- Установка драйвера CH340 для китайского ардуина UNO
- Драйвера чипа CH340 для разных операционных систем:
- Инструкция по установке драйвера CH340 на Windows
- Инструкция по установке драйвера CH340 на Linux
- Неправильно работает USB-SERIAL CH340/CH341
- Установка драйверов
- Ch340 linux driver debian
- How to Install CH340 Drivers
- Introduction
- Required Materials
- SparkFun RedBoard Qwiic
- SparkFun RedBoard Artemis Nano
- SparkFun Serial Basic Breakout — CH340C and USB-C
- SparkFun Serial Basic Breakout — CH340G
- SparkFun RedBoard Artemis ATP
- SparkFun RedBoard Artemis
- SparkFun Servo pHAT for Raspberry Pi
- Accessories
- Jumper Wires Premium 6″ M/M Pack of 10
- USB 3.1 Cable A to C — 3 Foot
- SparkFun Traveler microB Cable — 1m
- Suggested Reading
- Serial Communication
- Connector Basics
- What is an Arduino?
- Logic Levels
- Serial Terminal Basics
- Meet the CH340
- Drivers (If You Need Them)
- Updating Drivers
- Windows 7/10
- Driver Verification for Windows
- Device Manager
- Arduino IDE
- Serial Loop Back Test
- Mac OSX
- Driver Verification for Macs
- Command Line
- Arduino IDE
- Serial Loop Back Test
- Linux
- Raspbian for Raspberry Pi
- Other Linux Distributions
- Driver Verification for Linux
- Command Line
- Arduino IDE
- Serial Loop Back Test
- Troubleshooting
- COM Port is Not Showing Up as CH340 Windows
- COM Port Not Available Windows, Mac, and Linux
- USB Cable Windows, Mac, and Linux
- Issues Uploading at Fast Baud Rates
- Resources and Going Further
Установка драйвера CH340 для китайского ардуина UNO
Подробная инструкция по установке драйвер CH340 для для китайского клона Arduino UNO/Nano на Windows XP, Windows 7, Windows 10, Linux, Mac OS.
Китайская ардуина отличается от оригинальной тем, что в ней для программирования основного микроконтроллера используется чип CH340 вместо МК Atmega16. Этот недорогой чип позволяет снизить итоговую стоимость платы ардуины (например, ардуина UNO на CH340 будет стоить около $3 вместо $5). Китайская Arduino UNO с чипом CH340 выглядит так:
Соответственно для зашивки программы в такую ардуино на компьютере должен быть установлен драйвер для чипа CH340. В остальном работа с такими платами ничем не отличается от оригинальных.
Драйвера чипа CH340 для разных операционных систем:
Эти драйвера подходят не только для китайских ардуино UNO, но и для любой другой ардуине на базе CH340 — NANO, MEGA и т.п.
Инструкция по установке драйвера CH340 на Windows
Этот метод проверялся на Windows XP и Windows 7, но должен также работать на Windows 10 и т.п.
Если драйвер для CH340 не был предварительно установлен на Windows, то сразу после подключения вашей платы Arduino UNO с чипом CH340 к компьютеру/ноутбуку через USB-кабель в списке устройств (Device manager) будет обнаружено новое USB-устройство USB2.0-Serial (как показано на рисунке). Восклицательный знак указывает на то, что драйвер для устройства не установлен.
Поэтому скачиваем драйвер CH340 для Windows отсюда , если вы это еще не сделали, и распаковываем архив куда-нибудь.
В распакованном архиве находим файл CH341SER.EXE и запускаем его. Появится такое окошко:
Здесь, естественно, нажимаем INSTALL , чтобы установить драйвер на компьютер (или UNINSTALL, если наоборот нужно удалить драйвер с компьютера).
После установки драйвера в списке устройств, а точнее в разделе порты COM & LPT вы увидет устройство USB-SERIAL CH340 (COM19) — это и есть ваша плата ардуина, подключенная через USB-порт, но работать она будет в режиме виртуального (последовательного) COM-порта.
То есть теперь вы можете использовать разные программы для работы с COM-портами, чтобы обмениваться сообщениями с вашей ардуиной. Это удобно, так как программировать USB-порт гораздо сложнее. Номер COM-порта в нашем случае определился как 19, но, вообще говоря, он может быть любым (из сводобных). Так что если номер COM-порта будет другим, то ничего страшного — всё должно работать.
Если устройство не было ображено, то возможно надо перезагрузить винду.
Инструкция по установке драйвера CH340 на Linux
На свежих линуксах ничего устанавливать не надо, всё работает из коробки. Тем не менее драйвер также имеется и его можно скачать здесь .
Источник
Неправильно работает USB-SERIAL CH340/CH341
Задача: обеспечить работу переходника USB-SERIAL на чипе CH340/CH341.
Система: Переходник определяется автоматически:
Соединяю два компьютера нуль-модемным кабелем.
На тестируемом компьютере запускаю: На втором: Вывод на первом: Теперь наоборот:
Видно, что цепляется какой-то мусор.
Понижение скорости передачи приводит к полному отсутствию передачи данных в обоих направлениях.
Под WinXP/Win7 этот переходник работает нормально.
Можно ли заставить работать этот переходник, или лучше какой-нибудь на другом чипе? И если так, то на каком лучше?

Запусти minicom на обоих портах (он предсказуемо настраивает порты) и посмотри на результат.
vel, спасибо. Направление верное.
minicom правильно передает данные при условии отключения Hardware Flow Control, т.к. нуль-модемнный кабель использован самый простой.
Но конечная задача все равно не решена. Мне требуется запустить программу Modpoll Modbus Master Simulator. Так вот, она через /dev/ttyS0 отлично работает, а через /dev/ttyUSB0 — завершается по тайм-ауту. А потом уже и остальная передача данных через echo и cat ломается. Полагаю, причина в инициализации портов.
На клиентской машине настройки портов как после инициализации через minicom, так и после работы modpoll, остаются прежними, а на серверной после запуска diagslave меняются следующие параметры портов: После этого серверная машина отказывается принимать данные с порта через cat /dev/ttyS0, сразу же завершая выполнение. При этом связка diagslave-modpoll нормально работает при использовании /dev/ttyS0, но не работает через /dev/ttyUSB0.
Возможно, смена параметров порта на серверной машине как-то влияет на работоспособность адаптера USB-SERIAL, других вариантов я пока не вижу.

а использовать более адекватные ftdi? ну или на худой конец pl2303?
а по более по теме — не вижу какие параметры порта ты задаешь.
stty позволяет настраивать порты
stty -F /dev/ttyUSB0 .
а использовать более адекватные ftdi? ну или на худой конец pl2303?
Переходник на pl2303 уже заказал, в воскресенье привезут. ftdi — не нашел, где купить. У нас есть только NIX под заказ, в остальных местах выбор еще хуже.
а по более по теме — не вижу какие параметры порта ты задаешь.
А вот это уже не в бровь, а в глаз. Четность включилась по умолчанию, стоило ее убрать, и связь через адаптер заработала.
Вывод: этот адаптер (или драйверы) не работает с включенной проверкой четности.
Было бы интересно узнать, возможно ли это исправить. Но меня не огорчит, если это невозможно.
В целом проблема решена, всем спасибо.
stty позволяет настраивать порты
О смене параметров портов я и узнал через
stty -F /dev/ttyS0 -a
Адаптер на чипе pl2303 заработал сразу же — как с проверкой четности, так и без нее.
Источник
Установка драйверов
В набор входит “китайская” Ардуино-совместимая плата, у которой для подключения по USB используется контроллер CH340/CH341. Чтобы он распознавался компьютером, нужно установить драйвер.
Скачать драйвер можно по ссылке:
Распаковываем архив и запускаем файл
- SETUP.EXE (для 32-х разрядной системы)
- DRVSETUP64/SETUP64.EXE (для 64-х разрядной системы).
В появившемся окошке нажимаем INSTALL. Готово!

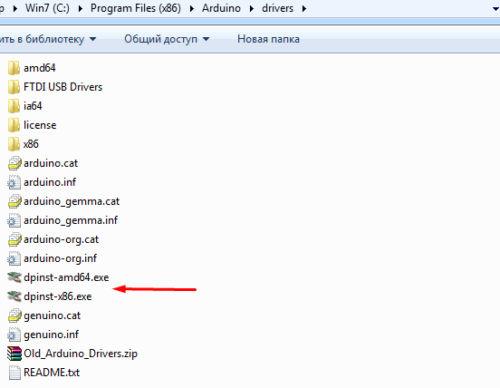
Если во время установки Arduino IDE вы по какой-то причине пропустили установку драйверов, то их можно установить вручную из папки с программой, расположенной по пути
- C/Program Files/Arduino/drivers (для 32-х разрядной системы)
- C/Program Files (x86)/Arduino/drivers (для 64-х разрядной системы).
- dpinst-x86.exe (для 32-х разрядной системы)
- dpinst-amd64.exe (для 64-х разрядной системы)
Драйвер CH341 для Mac можно скачать по ссылке с моего сайта , либо со страницы источника . Если у вас будут какие-то проблемы с OSX Sierra и выше, читайте вот эту статью .
В Linux уже встроен необходимый драйвер, но Arduino IDE может отказаться с ним работать: Linux определяет ардуинку как устройство ttyUSB*, обычно это ttyUSB0 (это можно узнать командой dmesg в терминале), то есть в системе появляется интерфейс /dev/ttyUSB0. Чтобы с ним работать, нужны права доступа. Читать и писать на устройство /dev/ttyUSB0 имеет пользователь root и пользователи группы dialout. Работы с правами суперпользователя лучше избегать, поэтому следует занести своего пользователя в группу dialout. Это можно сделать следующей командой (обратите внимание, команда whoami в обратных кавычках)
sudo usermod -a -G dialout `whoami`
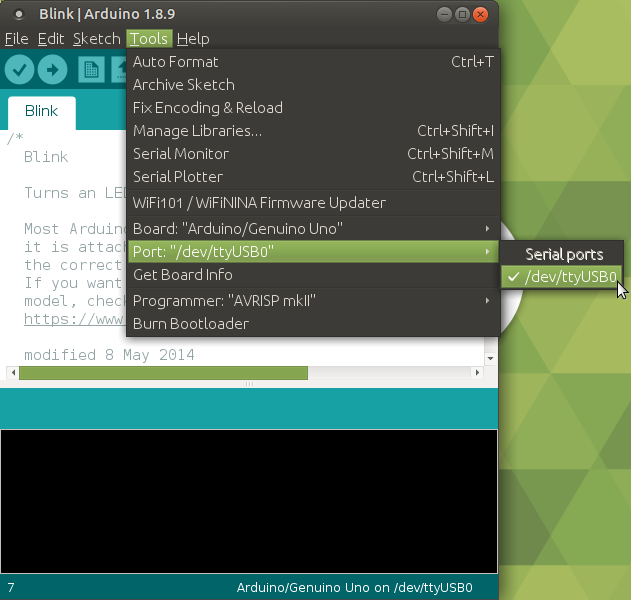
После этого нужно перелогиниться. Дальше запускаем Arduino IDE и в меню «Инструменты/Порт» ставим галочку напротив /dev/ttyUSB0.
Вся информация по работе с IDE на данной ОСи есть вот в этой статье
Источник
Ch340 linux driver debian
CH340 serial chip Drivers for Linux, Mac, and Windows all in one place
A One-Stop driver repo for the popular serial chip used on cheap Chinese Arduino clones.
The CH340G chip is a very popular USB to Serial chip used in Arduino clones because of its low cost. The OEM of this chip is Jiangsu Qinheng Co., Ltd. in the Nanjing Software Valley of China according to SparkFun who builds products that incorporate it.

Unfortunately, their website, being entirely in Chinese, makes many people nervous. For this reason, there have been many people who have tried to be helpful by hosting a copy of the drivers on a more inviting site. However, that is a dangerous thing to be comfortable with. As a Maker Space that regularly teaches microprocessor hacking to beginners, Decatur Makers has decided to host yet another copy of these drivers. You may or may not trust us as a source, but we didn’t feel safe sending our students elsewhere. We have done (and continue to do) everything in our power to verify and maintain the content of this repo.
The driver for this chip has been in the Linux Kernel for a long time. (Introduced in commit 6ce76104 that was released in Linux Kernel v2.6.24 Jan 24 2008) If your Kernel does not support this chip, you are probably very out of date and have severe vulnerabilities to worry about.
Even though Linux users should never need this, we’re going to put the information here.
Источник
How to Install CH340 Drivers
Introduction
In this tutorial, we’ll show you how to install CH340 drivers on multiple operating systems if you need. The driver should automatically install on most operating systems. However, there is a wide range of operating systems out there. You may need to install drivers the first time you connect the chip to your computer’s USB port or when there are operating system updates.
Required Materials
Depending on your application, the CH340 may be populated on a breakout or development board. Here are a few boards that use this particular USB-to-serial converter.

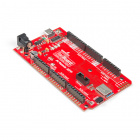
SparkFun RedBoard Qwiic
The SparkFun RedBoard Qwiic is an Arduino-compatible development board with a built in Qwiic connector, eliminating the need …
SparkFun RedBoard Artemis Nano
The RedBoard Artemis Nano is a miniature extremely versatile implementation of the Artemis module.
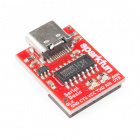
SparkFun Serial Basic Breakout — CH340C and USB-C
This SparkFun Serial Basic Breakout is an easy-to-use USB-to-Serial adapter based on the CH340G and takes advantage of the ha…
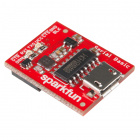
SparkFun Serial Basic Breakout — CH340G
The SparkFun Serial Basic Breakout is an easy-to-use USB-to-Serial adapter based on the CH340G IC from WCH.
SparkFun RedBoard Artemis ATP
The RedBoard Artemis ATP has 48 GPIO and this board breaks out all of them in an Arduino Mega format.

SparkFun RedBoard Artemis
The RedBoard Artemis takes the incredibly powerful Artemis module from SparkFun and wraps it up in an easy to use and familia…

SparkFun Servo pHAT for Raspberry Pi
The SparkFun Servo pHAT for Raspberry Pi allows your Raspberry Pi to control up to 16 servo motors in a straightforward manne…
Accessories
You’ll also need the correct USB cable to connect the board to your computer. You may need a jumper wires and a breadboard for prototyping.

Jumper Wires Premium 6″ M/M Pack of 10
This is a SparkFun exclusive! These are 155mm long, 26 AWG jumpers with male connectors on both ends. Use these to jumper fro…

USB 3.1 Cable A to C — 3 Foot
USB C is fantastic. But until we have converted all our hubs, chargers, and ports over to USB C this is the cable you’re goin…
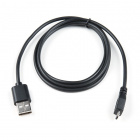
SparkFun Traveler microB Cable — 1m
Are you a traveler? Do you remove every ounce of extra weight from your gear? The SparkFun 1 meter Traveler microB cable is d…
Suggested Reading
Before you begin this tutorial, you should have the Arduino IDE installed on your computer. Check out our Installing Arduino tutorial for a step by step guide.
Serial Communication
Connector Basics
What is an Arduino?
Logic Levels
Serial Terminal Basics
Alright, let’s get to work! You can visit the next section to learn more about the CH340 and why you need the drivers, or you can skip straight to the operating system of your choice!
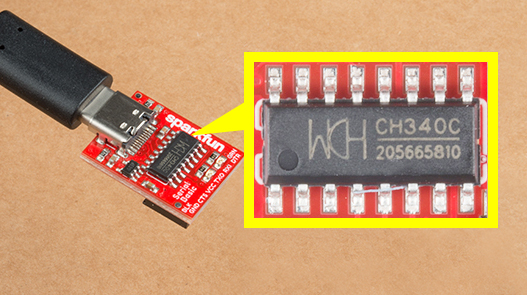
Meet the CH340
There are a few variants of the CH340. The CH340G requires an external crystal oscillator to function while the CH340C includes a built-in crystal oscillator. However, both function in the same fashion — they convert USB data for a serial UART and vice versa!
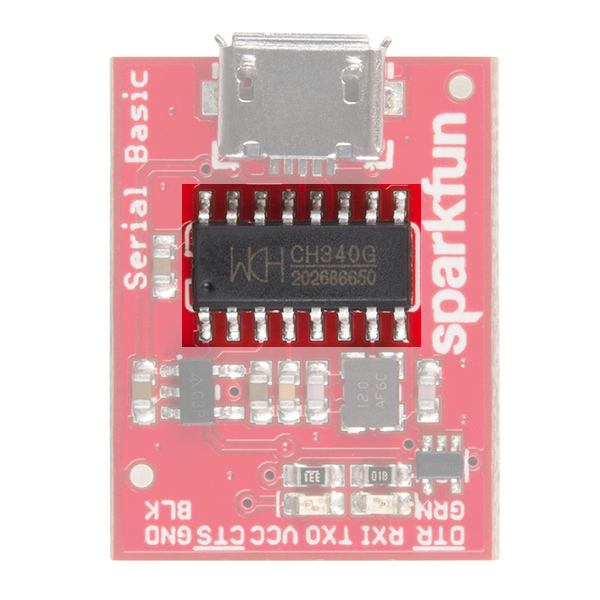 | 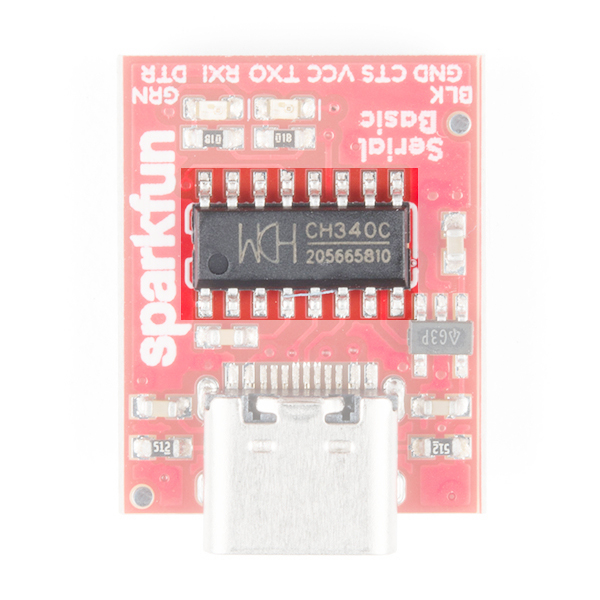 |
| CH340G | CH340C |
The CH340 is also populated on development boards such as the RedBoard Qwiic to upload code using the Arduino IDE.

Drivers (If You Need Them)
The CH340 has been tested on:
- Windows 7/10
- Mac OSX
- v10.10.5 (Yosemite)
- v10.11.6 (El Capitan)
- v10.13.0 (High Sierra)
- v10.14.5 (Mojave)
- Linux
- Raspbian Stretch (11-13-2018 release) for the Raspberry Pi
- Raspbian Buster (2019-07-10 release) for the Raspberry Pi
- Ubuntu v18.04.2, 64-bit
These operating systems have the CDC drivers pre-installed, which means you shouldn’t need to install any extra software. However, there are a wide range of operating systems out there, so if you run into driver problems, you can get the archived drivers linked below:
The CH340 is made by WCH. You can find the latest version of their drivers in their English translated website.
Note: At the time of writing, you were only able to find the latest version of their drivers from their website in Mandarin. If you use a Chrome web browser, you had the option to have the web page translated. However, you now have the option of browsing the WCH website in either language. For those interested in heading to the Mandirin side, you can click on the button below.
Updating Drivers
If you have the older CH340 drivers installed, you may need to update them. Below are the instructions for doing so on each of the tested operating systems.
Windows 7/10
Download and run the executable.
Click the «Uninstall» button first. Then click on the «Install» button.
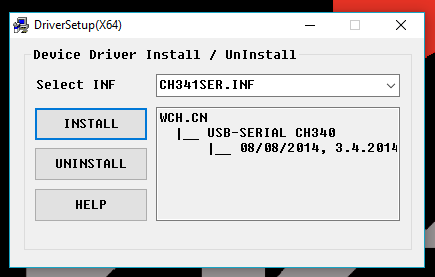
Windows CH340 Driver Installation
Driver Verification for Windows
To verify that your driver is working, you should see a difference in the following pictures after plugging the CH340 to a USB port.
Device Manager
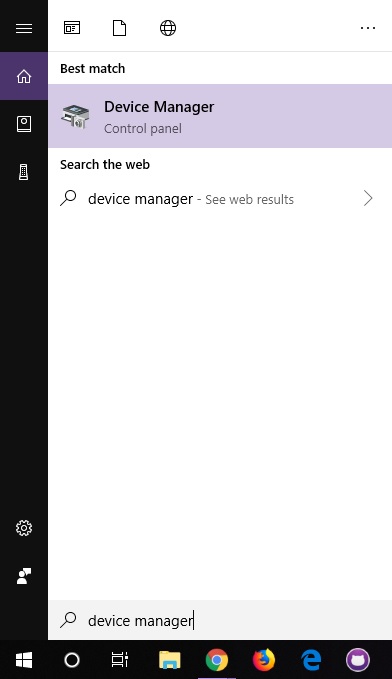
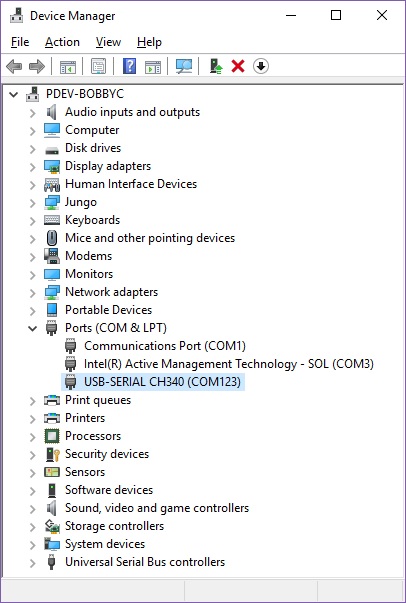
To check that the CH340 enumerates to a COM port, you can open the device manager. You can click the Start or ⊞ (Windows) button and type «device manager to quickly search for the application.
After opening the device manager, you will need to open the Ports (COM & LPT) tree. The CH340 should show up as USB-SERIAL CH340 (COM##). Depending on your computer, the COM port may show up as a different number.
Arduino IDE
Alternatively, if you have the Arduino IDE installed, you should also see a change in the number of available COM Ports (you may need to restart the Arduino IDE for the board to populate). Without the CH340 connected to your computer, click on Tools > Port. Take note of the Serial Ports available.
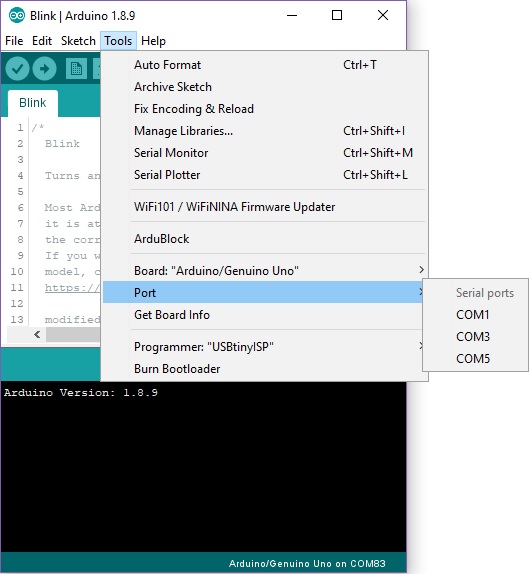
Connect the CH340 to your computer’s USB port. Click on somewhere else on the screen for the menu to refresh itself. Then head back to the menu by clicking on Tools > Port. A new COM port should pop up. By process of elimination, the CH340 should have enumerated to the new COM port! Feel free to click on the COM port to select if you are uploading code to a microcontroller. Depending on your computer, the COM port may show a different number.

Serial Loop Back Test
You can also verify if the USB-to-serial converter is working by doing a serial loop back test or echo test. If you are using the breakout board, you can add a jumper between the Tx and Rx to try and echo a character in a terminal program. For more information, try checking out the Hardware Test for the serial basic hookup guide.
Mac OSX
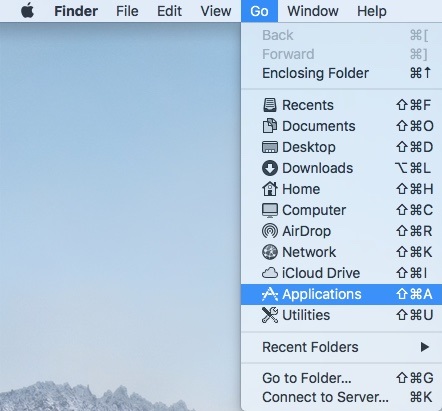
Open the Terminal program by selecting Go > Applications.
Select and open the Terminal program under Applications > Utilities > Terminal.
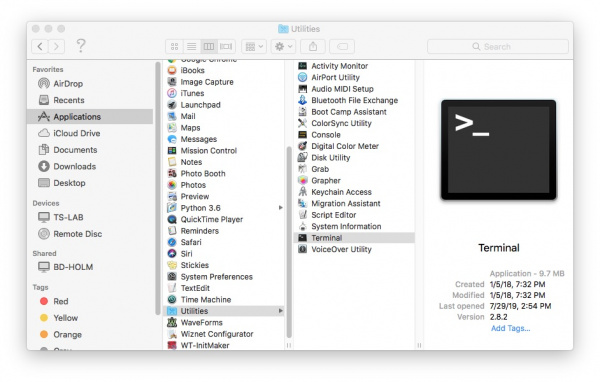
Note: You can also search with Spotlight by pressing ⌘ (Command) + space bar (Space Bar). Then type «Terminal» and double-click the search result.
If you are still unsure of how to access the Terminal, watch this video or read this Apple support article.
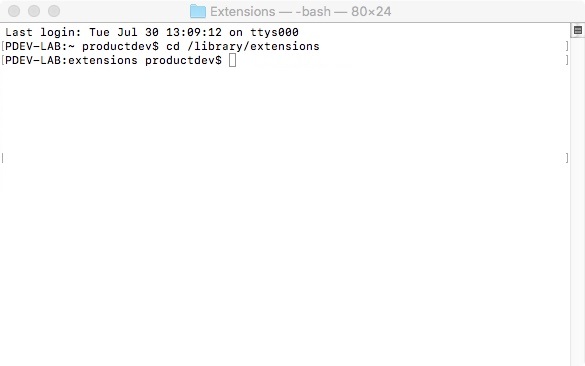
You’ll need to move to the directory where the *.kext files are stored.
For Mac OSX v10.9+, you will need to use this command:
For Mac OSX v10.8 and below, you will need to use this command:
In this case, we will be using Mac OSX v10.13, so we will need to use the first command.
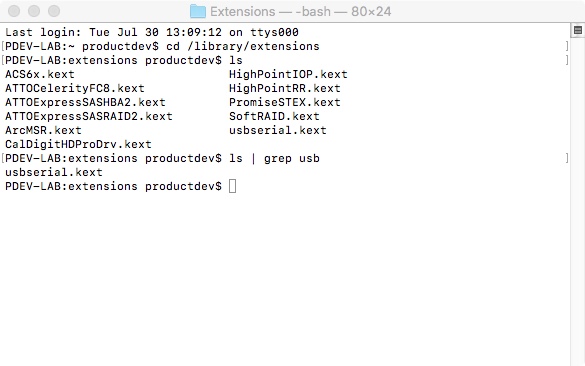
To check to see if the CH340 driver is in the correct path, use the following command to list the contents of the folder.
To look for CH340 driver files (i.e. usb.kext or usbserial.kext) in the path, you could use the following command.
You should see something similar to the output below after using the commands.
If you have found the file in the path, you will need to run each of the following commands in the CLI/Terminal to remove old CH340 drivers. In this case, there was only the usbserial.kext file but it does not hurt to run both commands. Make sure to have administrative privileges to ensure that the drivers are removed.
Check if the old drivers were removed in the paths by using the ls command with your respective OS version. You will notice that the *.kext file is removed from the respective paths. In this case, the usbserial.kext was removed from Mac OSX High Sierra.
Download and extract the folder.
Then, open the «*.pkg» file from the unzipped folder and follow the instructions. You’ll need to restart your computer for the changes to take effect.
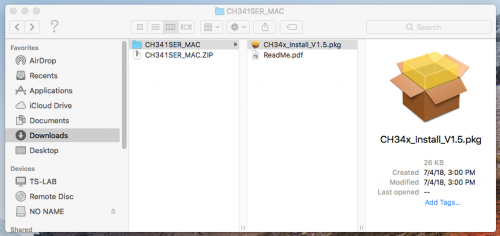
Mac OSX CH340 Driver Installation File
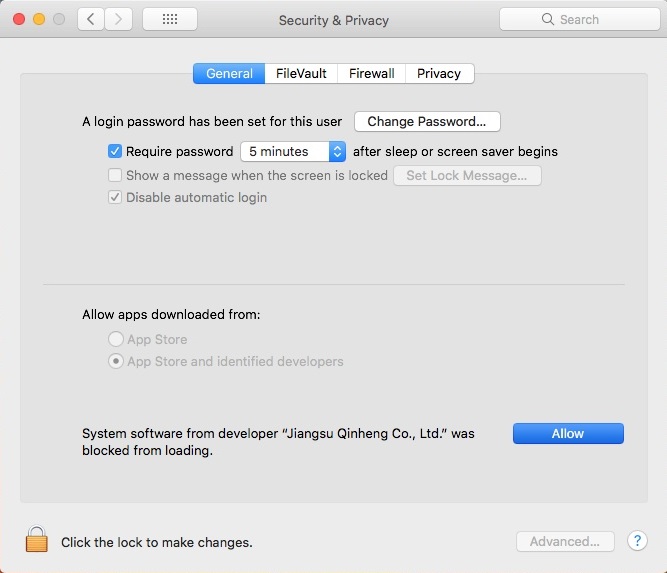
Heads up! Depending on your settings, you may need to adjust your Security & Privacy settings to allow the CH340 drivers to function. A window may pop up indicating that the drivers have been block as shown in the image below.
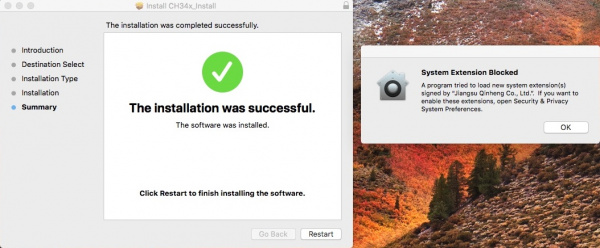
If you receive a window that indicates that the system extension is blocked, you’ll need to open a search with Spotlight by pressing ⌘ (Command) + space bar (Space Bar). Type Security & Privacy and click on the «Allow» button to enable the CH340 drivers.
Driver Verification for Macs
To verify that your driver is working, you should see a difference in the following pictures after plugging the CH340 to a USB port.
Command Line
Open the Terminal by heading to Applications > Utilities > Terminal if the program is not open yet.
Note: Press ⌘ (Command) + space bar (Space Bar) to launch Spotlight and type «Terminal,» then double-click the search result as explained above.
If you are still unsure of how to access the Terminal, watch this video or read this Apple support article.
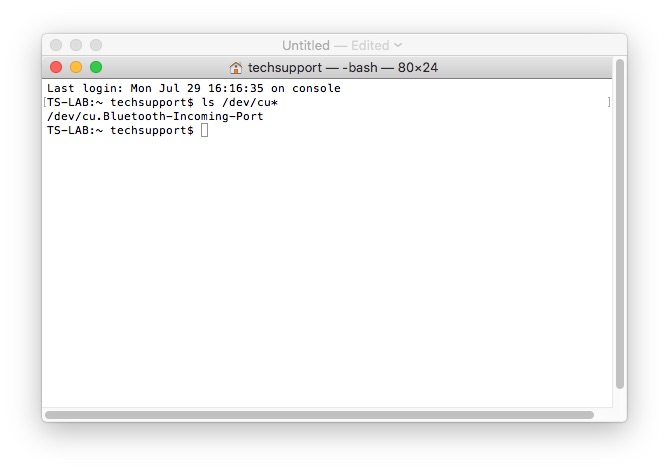
Then run the following command:
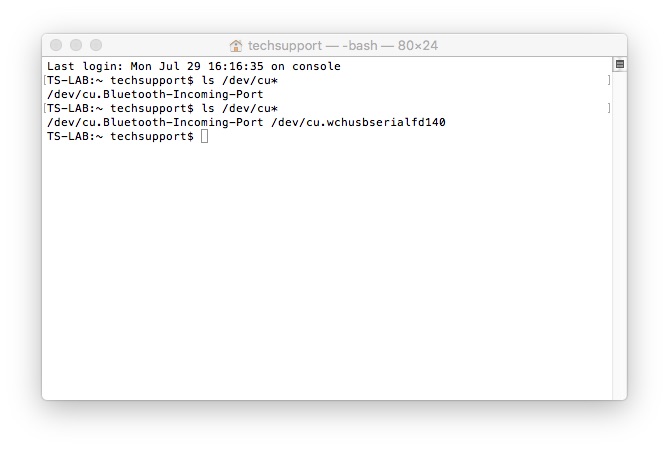
A list of devices connected to your Mac’s COM ports will be displayed as a result. Assuming that the CH340 is not connected to your computer, you should see something similar to the image below.
Connect the CH340 to one of your Mac’s COM ports. Check for the following changes (your board may show up under a different device name). The CH340 should show up as /dev/cu.wchusbserial*****. Depending on your computer, the COM port may show up as a different number.
Arduino IDE
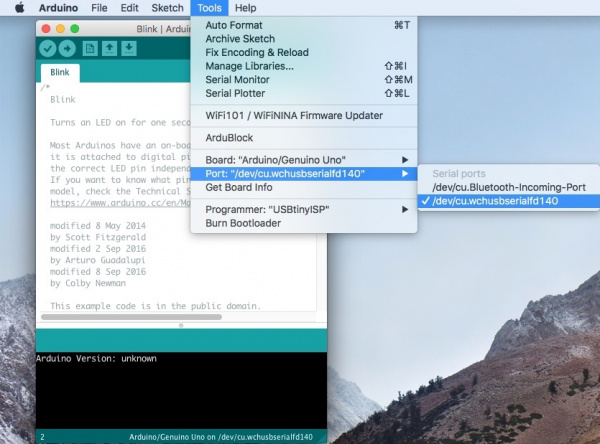
Alternatively, if you have the Arduino IDE installed, you should also see a change in the number of available COM Ports (you may need to restart the Arduino IDE for the board to populate). Without the CH340 connected to your computer, click on Tools > Port. Take note of the Serial Ports available.
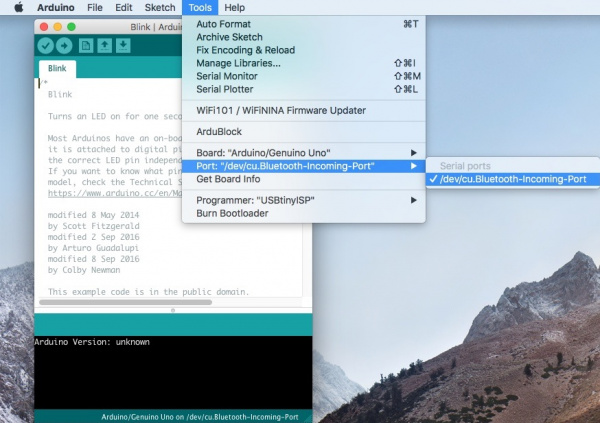
Connect the CH340 to your computer’s USB port. Click on somewhere else on the screen for the menu to refresh itself. Then head back to the menu by clicking on Tools > Port. A new COM port should pop up. By process of elimination, the CH340 should have enumerated to the new COM port! Feel free to click on the COM port to select if you are uploading code to a microcontroller. Depending on your computer, the COM port may show a different number.
Serial Loop Back Test
You can also verify if the USB-to-serial converter is working by doing a serial loop back test or echo test. If you are using the breakout board, you can add a jumper between the Tx and Rx to try and echo a character in a terminal program. For more information, try checking out the Hardware Test for the serial basic hookup guide.
Linux
Raspbian for Raspberry Pi
Run the following commands in the CLI/Terminal when using Raspbian on a Raspberry Pi. After updating, the latest CH340 should be installed!
Other Linux Distributions
There are some reported cases of serial communication failure when using the factory drivers in Linux. If you encounter this problem, you can try installing patched drivers as explained in this forum post. Here are the steps (to run in the command line):
- Plug and unplug your CH340 device from the USB port
- Type dmesg to see what has happened
- The expected output (shows «ch341») should have the following in the recent log:
- Download the patched drivers repository and unzip the files
Depending on your root permissions, you may need to configure the serial port with the following two commands. Make sure to adjust the $username with respect to the user ID that is currently logged in.
Driver Verification for Linux
Command Line
Plug the CH340 back to your computer’s USB port. Then run the following command in the CLI/Terminal on any Linux distribution. Check for the following changes (your board may show up under a different device name).
The serial port that CH340 is connected to should pop up as a result.
Arduino IDE
Alternatively, if you have the Arduino IDE installed, you should also see a change in the number of available COM Ports (you may need to restart the Arduino IDE for the board to populate). Without the CH340 connected to your computer, click on Tools > Port. Depending on the Linux flavor that you have, the Ports may not open to display any serial ports. Take note of the Serial Ports available if it opens up.

Connect the CH340 to your computer’s USB port. Click on somewhere else on the screen for the menu to refresh itself. Then head back to the menu by clicking on Tools > Port. A new COM port should pop up. By process of elimination, the CH340 should have enumerated to the new COM port! Feel free to click on the COM port to select if you are uploading code to a microcontroller. Depending on your computer, the COM port may show a different number.
Serial Loop Back Test
You can also verify if the USB-to-serial converter is working by doing a serial loop back test or echo test. If you are using the breakout board, you can add a jumper between the Tx and Rx to try and echo a character in a terminal program. For more information, try checking out the Hardware Test for the serial basic hookup guide.
Troubleshooting
COM Port is Not Showing Up as CH340 Windows
We have had a few reports on Windows 10 where the driver will automatically install and the board will show up under a new COM port as USB-Serial CH340, but with a different device name. However, the board cannot be accessed on the Arduino IDE. Others have had issues where the installation process hangs.
Based on the customer experiences, this might be specific to the manufacturer and are usually isolated cases. Users seem to be able to eventually get the board recognized by a combination of giving the computer time to finish the install (close to 20 min), plugging the board back in multiple times, reinstalling the drivers, and/or resetting the computer multiple times (repeat both steps).
COM Port Not Available Windows, Mac, and Linux
If you installed the drivers for the CH340 on your computer but have issues connecting via serial terminal or uploading code using the Arduino IDE, there may be an issue with your user settings preventing you from using the CH340. You may receive an avrdude: ser_open(): can’t open device error similar to the output shown below.
In this case, the error appeared on a Linux when trying to upload code due to the drivers not being installed and the root permissions.
Make sure to check your configuration settings and ensure that the serial port for the CH340 is enabled for your OS. You may also need to reinstall the drivers for your operating system.
USB Cable Windows, Mac, and Linux
Certain USB cables are for power only and may not have the data lines available. Try checking your USB cable and ensure that the data lines are intact.
Issues Uploading at Fast Baud Rates
If you are uploading to certain boards like the Apollo3 on the Artemis development boards with fast baud rates, there are some platforms (Linux flavors) where the standard CH340 USB to serial drivers don’t operate well at speeds higher than 115200. So if you run into upload problems, consider reducing the upload speed. For more information about upload issues, see this forum post and consider upgrading with these drivers for Mac OSX or these for Linux.
Resources and Going Further
Now that you’ve successfully got your CH340 up and running, it’s time to incorporate it into your own project!
- WCH: CH340 Drivers — Latest drivers can be downloaded from the manufacturer.
- Windows (EXE) — Driver executable
- Windows (ZIP) — Driver v3.4 (2016-09-27)
- Mac (ZIP) — Driver v1.5 (2018-07-04)
- Linux (ZIP) — Driver v1.5 (2018-03-18)
USB-to-serial converters like the CH340 are great for uploading code to a microcontroller or viewing data from a GPS on a serial terminal. Check out these tutorials to dive even deeper into the world of microcontrollers or send serial data to your computer with a GPS!
Источник
- WCH: CH340 Drivers — Latest drivers can be downloaded from the manufacturer.