- Linux Chown Command Tutorial
- chown Command Syntax
- List User and Group Owner Of The Files and Folders
- Using Root Account
- Change Owner User Of The File and Folder
- Change Owner Group Name Of The File and Folder
- Change User and Owner Group Name
- Change Files and Folders Ownership Recursively
- chown Command Verbose Mode
- 12 Linux Chown Command Examples to Change Owner and Group
- 1. Change the owner of a file
- 2. Change the group of a file
- 3. Change both owner and the group
- 4. Using chown command on symbolic link file
- 5. Using chown command to forcefully change the owner/group of symbolic file.
- 6. Change owner only if a file is owned by a particular user
- 7. Change group only if a file already belongs to a certain group
- 8. Copy the owner/group settings from one file to another
- 9. Change the owner/group of the files by traveling the directories recursively
- 10. Using chown command on a symbolic link directory
- 11. Using chown to forcefully change the owner/group of a symbolic link directory recursively
- 12. List all the changes made by the chown command
- Chown Command: Change Owner of File in Linux
- Linux Chown Command Syntax
- How to Check Ownership of a File in Linux
- How to Change the Owner of a File
- Change the Owner of a File With UID
- Change Ownership of Multiple Linux Files
- How to Change the Group of a File
- Change the Group of a File Using GID
- Change Owner and the Group
- Change Group to a Users Login Group
- Transfer Ownership and Group Settings from One File to Another
- Check Owner and Group Before Making Changes
- Check Owner Only
- Check Group Only
- How to Recursively Change File Ownership
- Chown Command and Symbolic Links
- Display Chown Command Process Details
- Suppress Chown Command Errors
Linux Chown Command Tutorial
chown command is used to change file and folders user, group, and other ownership. chown is a very useful tool but sometimes becomes very dangerous because it can harm the current owner’s policy.chown mainly changes read, write, and execute the owner according to the given user or group.
chown Command Syntax
Syntax of chown is like below.
List User and Group Owner Of The Files and Folders
Before starting to change file and folders owner in Linux we should list current owners of the file. We will use ls -l command which will list all files owner users and a group of the current working path.
In this example we can see that all files have owner user ismail and owner group ismail .
Using Root Account
While changing permissions and ownership in Linux the most straightforward way is using root account. Root account provides highest privileges so we will have the power to change things.
Change Owner User Of The File and Folder
The simplex usage form of chown is changing the owner user of the given file. We will simply specify the owner’s username of the file and file name to do this. In this example, we will change the owner user of a file named acknow.txt to ismail .
Change Owner Group Name Of The File and Folder
As we know the files and folders in Linux have owner users and owner groups. We can also change the owner group with chmod command. We will put the new group name after : . In this example, we will change the owner group to ismail .
Change User and Owner Group Name
In previous steps, we have changed the user and group ownership of files in separate steps. We can do this user and group ownership change in a single step with : . In this example, we will change user ownership to ahmet and group ownership ismail .
Change Files and Folders Ownership Recursively
Changing the ownership of files one by one is not a practical easy solution if we have 1000 files. Or we may need to change all ownership of folders and subfolders with their file contents. We can use -R for recursive operations.
chown Command Verbose Mode
While changing files and folders we may need to print verbose output about changes. We can use -v option in order to change this.
Источник
12 Linux Chown Command Examples to Change Owner and Group
The concept of owner and groups for files is fundamental to Linux. Every file is associated with an owner and a group. You can use chown and chgrp commands to change the owner or the group of a particular file or directory.
In this article, we will discuss the ‘chown’ command as it covers most part of the ‘chgrp’ command also.
Even if you already know this command, probably one of the examples mentioned below might be new to you.
1. Change the owner of a file
So we see that the owner of the file was changed from ‘himanshu’ to ‘root’.
2. Change the group of a file
Through the chown command, the group (that a file belongs to) can also be changed.
If you observe closely, the group of the file changed from ‘family’ to ‘friends’. So we see that by just adding a ‘:’ followed by the new group name, the group of the file can be changed.
3. Change both owner and the group
So we see that using the syntax ‘ : ’, the owner as well as group can be changed in one go.
4. Using chown command on symbolic link file
Here is a symbolic link :
So we see that the symbolic link ‘tmpfile_symlink’ links to the file ‘tmpfile’.
Lets see what happens if chown command is issued on a symbolic link:
When the chown command was issued on symbolic link to change the owner as well as the group then its the referent of the symbolic link ie ‘tmpfile’ whose owner and group got changed. This is the default behavior of the chown command. Also, there exists a flag ‘–dereference’ for the same.
5. Using chown command to forcefully change the owner/group of symbolic file.
Using flag ‘-h’, you can forcefully change the owner or group of a symbolic link as shown below.
6. Change owner only if a file is owned by a particular user
Using chown “–from” flag, you can change the owner of a file, only if that file is already owned by a particular owner.
- In the example above, we verified that the original owner/group of the file ‘tmpfile’ was root/friends.
- Next we used the ‘–from’ flag to change the owner to ‘himanshu’ but only if the existing owner is ‘guest’.
- Now, as the existing owner was not ‘guest’. So, the command failed to change the owner of the file.
- Next we tried to change the owner if the existing owner is ‘root’ (which was true) and this time command was successful and the owner was changed to ‘himanshu’.
On a related note, if you want to change the permission of a file, you should use chmod command.
If you are a beginner, you should start by reading the basics of file permissions.
7. Change group only if a file already belongs to a certain group
Here also the flag ‘–from’ is used but in the following way:
Since the file ‘tmpfile’ actually belonged to group ‘friends’ so the condition was correct and the command was successful.
So we see that by using the flag ‘–from=: ’ we can change the group under a particular condition.
NOTE: By following the template ‘–from= : ’, condition on both the owner and group can be applied.
8. Copy the owner/group settings from one file to another
This is possible by using the ‘–reference’ flag.
In the above example, we first checked the owner/group of the reference-file ‘file’ and then checked the owner/group of the target-file ‘tmpfile’. Both were different. Then we used the chown command with the ‘–reference’ option to apply the owner/group settings from the reference file to the target file. The command was successful and the owner/group settings of ‘tmpfile’ were made similar to the ‘file’.
9. Change the owner/group of the files by traveling the directories recursively
This is made possible by the ‘-R’ option.
So we see that after checking the owner/group of all the files in the directory ‘linux’ and its two sub-directories ‘ubuntu’ and ‘redhat’. We issued the chown command with the ‘-R’ option to change both the owner and group. The command was successful and owner/group of all the files was changed successfully.
10. Using chown command on a symbolic link directory
Lets see what happens if we issue the ‘chown’ command to recursively change the owner/group of files in a directory that is a symbolic link to some other directory.
Here is a symbolic link directory ‘linux_symlnk’ that links to the directory ‘linux’ (already used in example ‘9’ above) :
Now, lets change the owner (from himanshu to root) of this symbolic link directory recursively :
In the ouput above we see that the owner of the files and directories was not changed. This is because by default the ‘chown’ command cannot traverse a symbolic link. This is the default behavior but there is also a flag ‘-P’ for this.
11. Using chown to forcefully change the owner/group of a symbolic link directory recursively
This can be achieved by using the flag -H
So we see that by using the -H flag, the owner/group of all the files/folder were changed.
12. List all the changes made by the chown command
Use the verbose option -v, which will display whether the ownership of the file was changed or retained as shown below.
Источник
Chown Command: Change Owner of File in Linux
Home » SysAdmin » Chown Command: Change Owner of File in Linux
The chown command changes user ownership of a file, directory, or link in Linux. Every file is associated with an owning user or group. It is critical to configure file and folder permissions properly.
In this tutorial, learn how to use the Linux chown command with examples provided.

- Linux or UNIX-like system
- Access to a terminal/command line
- A user with sudo privileges to change the ownership. Remember to run the commands with sudo to execute them properly.
Linux Chown Command Syntax
The basic chown command syntax consists of a few segments. The help file shows the following format:
- [OPTIONS] – the command can be used with or without additional options.
- [USER] – the username or the numeric user ID of the new owner of a file.
- [:] – use the colon when changing a group of a file.
- [GROUP] – changing the group ownership of a file is optional.
- FILE – the target file.
Superuser permissions are necessary to execute the chown command.
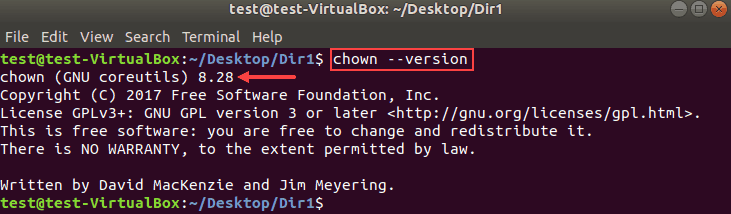
In this guide, we tested the command examples with the chown version 8.28 in Ubuntu 18.04.2 LTS.
To check the chown version on your machine, enter:
The output will look similar to this:
How to Check Ownership of a File in Linux
First, you need to know the original file owner or group before making ownership changes using the chown command.
To check the group or ownership of Linux files and directories in the current location, run the following command:
An example output of the ls command looks like this:

How to Change the Owner of a File
Changing the owner of a file with chown requires you to specify the new owner and the file. The format of the command is:
The following command changes the ownership of a file sample from root to the user test:
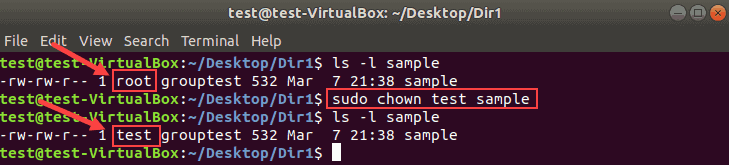
Use the same format to change the ownership for both files and directories.
Change the Owner of a File With UID
Instead of a username, you can specify a user ID to change the ownership of a file.
Make sure there is no user with the same name as the numeric UID. If there is, the chown command gives priority to the username, not the UID.
Note: To check a user’s ID, run id -u USERNAME from the terminal.
Change Ownership of Multiple Linux Files
List the target file names after the new user to change the ownership for multiple files. Use single spaces between the file names.
In the following example, root will be the new owner of files sample2 and sample3.
Combine file names and directory names to change their ownership with one command. For example:
Do not forget that the commands are case sensitive.
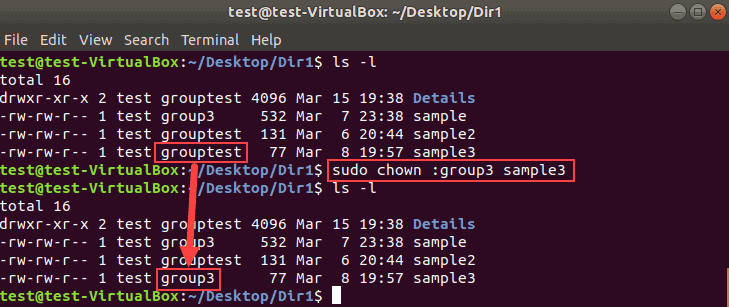
How to Change the Group of a File
With chown, you can change a group for a file or directory without changing the owning user. The result is the same as using the chgrp command.
Run the chown command using the colon and a group name:
The following example changes the group of the file sample3 from grouptest to group3.
List multiple names of files or directories to make bulk changes.
Change the Group of a File Using GID
Similar to UID, use a group ID (GID) instead of a group name to change the group of a file.
Change Owner and the Group
To assign a new owner of a file and change its group at the same time, run the chown command in this format:
Therefore, to set linuxuser as the new owner and group2 as the new group of the file sample2:
Remember that there are no spaces before or after the colon.
Change Group to a Users Login Group
The chown command assigns the owner’s login group to the file when no group is specified.
To do so, define a new user followed by a colon, space, and the target file:
The following example changes the group ownership to the login group of linuxuser:
Transfer Ownership and Group Settings from One File to Another
Rather than changing the ownership to a specific user, you can use the owner and a group of a reference file.
Add the —reference option to the chown command to copy the settings from one file to another:
Remember to type in the names of the files correctly to avoid the error message:
![]()
Check Owner and Group Before Making Changes
The chown command —from option lets you verify the current owner and group and then apply changes.
The chown syntax for checking both the user and group looks like this:
The example below shows we first verified the ownership and the group of the file sample3:
Then chown changed the owner to linuxuser and the group to group3.
Check Owner Only
The option —from can be used to validate only the current user of a file.
Check Group Only
Similar to the previous section, you can validate only the group of a file using the option —from .
Here is an example where we verified the current group before changing it:
Remember to use the colon for both group names to avoid error messages.
How to Recursively Change File Ownership
The chown command allows changing the ownership of all files and subdirectories within a specified directory. Add the -R option to the command to do so:
In the following example, we will recursively change the owner and the group for all files and directories in Dir1.
Chown Command and Symbolic Links
To change the owner of a symbolic link, use the -h option. Otherwise, the ownership of the linked file will be changed.
The following image shows how symbolic links behave when -h is omitted.
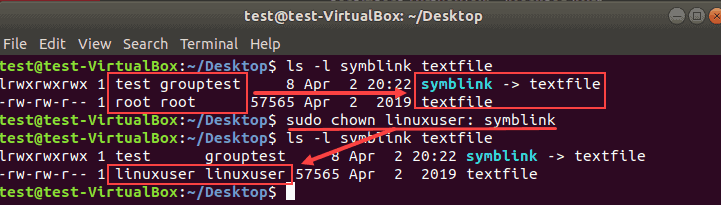
The owner and group of the symbolic link remain intact. Instead, the owner and the group of the file textfile changed.
To push the changes to the link, run the chown command with the -h flag:
In the following example, we changed the owner and group of a symbolic link.

Display Chown Command Process Details
By default, the terminal does not display the chown process information. To see what happens under the hood, use one of the two command line flags:
- The option –v produces the process details even when the ownership stays the same.
- The option –c displays the output information only when an owner or group of the target file changes.
For example, if we specify the current owner as a new owner of the file:
The terminal produces the following output:

Switch from -v to -c and there will be no messages in this case. This happens because there are no owner or group changes.
The information is particularly useful with the recursive chown command:

In this example, the output lists all objects affected after running the command.
Suppress Chown Command Errors
To avoid seeing potential error messages when running the chown command, use the -f option:
The example below shows the error message for a non-existent file or directory:

Adding the -f flag suppresses most error messages. However, if you specify an invalid username, the error message appears:

Now you know how to use chown command in Linux to change a file’s user and/or group ownership.
Take extra caution when changing the group or ownership of a file or directories.
Источник


