- How to change default sound devices in Windows 10 (playback and recording)
- What do you want to achieve?
- How to select the default playback device in Windows 10, using the Sound flyout
- How to select the default playback device in Windows 10, using the Settings app
- How to select the default playback device in Windows 10, using the Sound settings from the Control Panel
- How to select the default recording device in Windows 10, using the Settings app
- How to select the default recording device in Windows 10, using the Sound settings from the Control Panel
- How to set a different communications device in Windows 10
- Troubleshooting: Why can’t I see my preferred audio device listed?
- Did you manage to change your default sound devices in Windows 10?
- Change Default Sound Input Device in Windows 10
- Change Default Sound Input Device using Sound Dialog
- About Sergey Tkachenko
- 1 thought on “ Change Default Sound Input Device in Windows 10 ”
- How do I change the audio output device for a running application in Windows 7?
- 5 Answers 5
- 8 Tools to Quickly Change or Switch the Default Audio Sound Output in Windows
How to change default sound devices in Windows 10 (playback and recording)
One of the many creative options built into Windows is the ability to record and play multimedia files of all kinds. Windows 10 makes it simple to select a default device for audio recording and playback. However, what if you would prefer that another device be used from your devices with similar capabilities? For example, you may have a webcam and a microphone on your computer, and you want the microphone to be the default recording device. Or, you may have both headphones and speakers available, and you want the headphones to be the default audio playback device. Let’s take a look at how to change the default audio devices in Windows 10:
What do you want to achieve?
Before we make any changes, it is important to know what we’re dealing with. For example, some Windows PCs have a large monitor with built-in speakers (which usually are of poor quality) and also external speakers which are connected to the PC. You may want to use the external speakers instead of the built-in ones for playing audio.
We record audio using microphones, for example, and play them through speakers. We can also record sounds from devices inside the computer, like the optical drive, and play them back through headphones. Many people have more than one audio device attached (like the microphone included in a webcam plus a standalone microphone plus a microphone built into a headset), and it is important to pick a default so that the sound is recorded and played back with the highest fidelity.
You do not want your voice to sound like you’re in an empty hallway because your default is the webcam microphone three feet away from you instead of the microphone in your headset or on your desk.
Therefore, before moving forward with this tutorial, you must be clear on what you want to achieve: which audio devices do you want to use for each task?
How to select the default playback device in Windows 10, using the Sound flyout
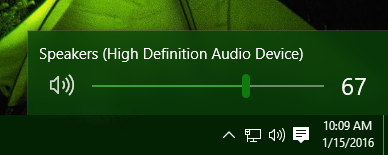
The simplest way to change your playback device in Windows 10 is to select it from the Sound flyout. Click or tap on the sound volume icon from the system tray, and then click/tap on the current playback device.
The Sound flyout then shows you all the playback audio devices that are available for you to use. All you have to do is to select the one you prefer from the list.
How to select the default playback device in Windows 10, using the Settings app
Similarly, you can also choose what audio device you prefer to use for playback, from the Settings app. However, this method involves a few more steps. Start by opening the Settings app: a fast way is to click or tap on its button from the Start Menu.
In the Settings app, navigate to System, and then to Sound. On the right side of the window, click or tap on the currently selected playback device under “Choose your output device.”
The Settings app should show you a list of all the audio playback devices available on your system. Select the one you prefer.
NOTE: There are also slightly faster ways to get to the Sound section from the Settings app. For instance, you can use the search, or you can right-click or press and hold on the sound volume icon from the system tray, and then click or tap on “Open Sound settings.”
How to select the default playback device in Windows 10, using the Sound settings from the Control Panel
You can also use the classic Sound window to change the default playback device on your Windows 10 system. However, getting to it is a bit more cumbersome than it used to be in the past. Open the Control Panel, navigate to Hardware and Sound, and click or tap on Sound.
This action opens the Sound window, where you set your default audio devices.
In the Playback tab, you are shown all the playback devices that are available on your Windows computer. Each system is different, and what you see reflects that. You can also see which devices are actually available. Some devices might not be plugged in, so they are greyed out. A green checkmark indicates the current default device.
To choose another audio device as your default playback device, click or tap on it, and then the Set Default button.
The selected device is now your default playback device in Windows. All playback audio is now routed through that device.
How to select the default recording device in Windows 10, using the Settings app
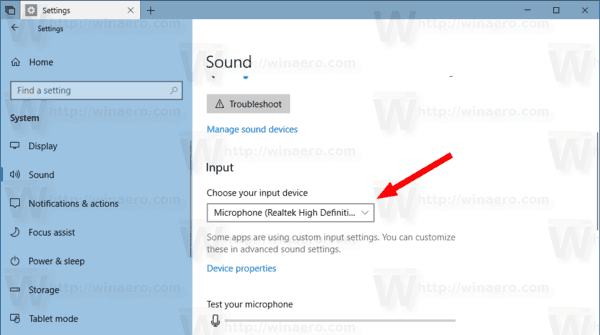
In the Settings app, navigate to System, and then to Sound. On the right side of the window, click or tap on the currently selected recording device under “Choose your input device.”
The Settings app should show you a list of all the input devices available on your system. Just select the one you prefer from the list.
The choice is immediately applied, as soon as you select the recording device you prefer.
How to select the default recording device in Windows 10, using the Sound settings from the Control Panel
Alternatively, you can also go to the Sound window: “Control Panel -> Hardware and Sound -> Sound.”
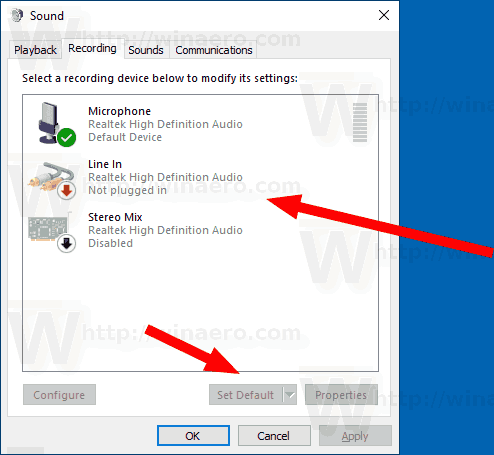
In the Sound window, click or tap the Recording tab. Here you see the devices you have available to record sound. Again, your current default device is indicated by a green checkmark. Choose your preferred device and click or tap Set Default.
TIP: You can see if the sound recording device is working by watching for movement in the bar beside each device when you talk as if you are trying to record sound.
How to set a different communications device in Windows 10
The Sound window also lets you set different default devices for communications. Note that this is the only place in Windows 10 where you can do this change, as it has not yet been added to the Settings app.
For example, you may want to use a headset or the speakers that are built into your monitor for Skype and your external speakers for everything else. To set this, first, select the device you want to use, and then click or tap on the down-arrow on the Set Default button. You can then assign a device to communications (Default Communication Device) or general playback (Default Device).
You can see that the default communication device has a different green icon from the default playback audio device.
When you are done setting your default playback communication devices, click or tap OK or repeat the same process for setting your default input devices for communications.
Troubleshooting: Why can’t I see my preferred audio device listed?
What if the audio device that you want to use for recording isn’t listed? We talked about this problem in Troubleshooting Common Speech Recognition Problems. Remember, speech recognition devices are also configured through the Sound window. By default, Windows does not show you devices that are disabled or disconnected or those without their correct drivers installed. If your device is not listed, right-click or press and hold anywhere in the blank space in the Sound window. You can then choose to see the devices that would otherwise be invisible, by clicking or tapping “Show disabled devices.”
The same goes for showing disabled audio playback devices in the Playback tab of the Sound window.
Did you manage to change your default sound devices in Windows 10?
As you can see, setting the default audio devices for playback and recording is a quick and easy process in Windows 10, and you can adjust the settings from multiple places. You can change them anytime you need to, to make the best of Windows 10’s recording and playback capabilities. Have you had a good or bad experience with recording or playback defaults? Let’s talk about it in the comments section below.
Change Default Sound Input Device in Windows 10
In Windows 10, the user can specify the default sound input device. Recent versions of the operating systems provide a number of ways to do it, including the Settings app, and the classic Sound applet of the Control Panel.
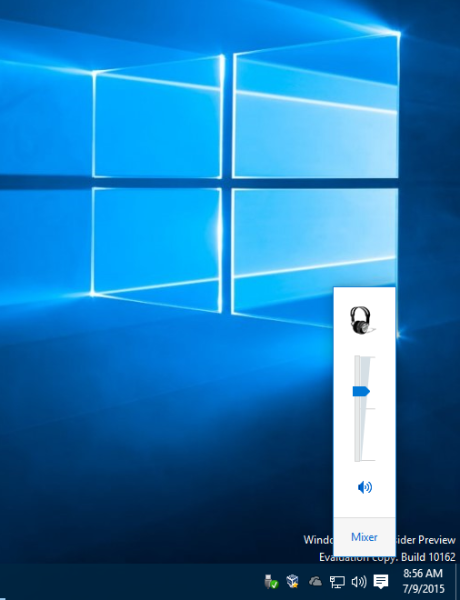
Windows 10 introduced a new style of items and their panes/flyouts which open from the notification area. All of the applets which open from the system tray are different now. This includes the Date/Time pane, the Action Center, the Network pane and even the volume control. Once you click the sound icon in the system tray, the new volume indicator will appear on the screen.
Note: In a number of situations, the Volume icon can be hidden in the taskbar. Even when you have all the drivers installed, the icon might remain inaccessible. If you are affected by this issue, see the following post:
Tip: It is still possible to restore the good old «classic» sound volume control.
Refer to the following article:
The default sound input device is the device that the operating system uses to record or hear sounds. If you have connected several audio devices to your PC or laptop, such as microphones, a web camera with a built-in microphone, a Bluetooth headset, it is possible to specify which device to use by default for audio input. Let’s see how it can be done.
To change Default Sound Input Device in Windows 10, do the following.
- Open the Settings app.

- Go to System -> Sound.
- On the right, go to the section Choose your input device and select the desired device in the drop-down list.

Windows 10 will switch the audio input device instantly.
Alternatively, you can use the classic Sound applet, as described below.
Change Default Sound Input Device using Sound Dialog
Tip: To save your time, you can open the classic Sound dialog using the following command:
Refer to the next article:
Then do the following.
- Open the classic Control Panel app.
- Navigate to Control Panel\Hardware and Sound\Sound.
- On the Recording tab of the sound dialog, select the desired input device from the list of available devices.
- Click on the Set default button.
Winaero greatly relies on your support. You can help the site keep bringing you interesting and useful content and software by using these options:
Share this post
About Sergey Tkachenko
Sergey Tkachenko is a software developer from Russia who started Winaero back in 2011. On this blog, Sergey is writing about everything connected to Microsoft, Windows and popular software. Follow him on Telegram, Twitter, and YouTube.
1 thought on “ Change Default Sound Input Device in Windows 10 ”
You describe how to (simply) go to sound input device select panel and choose the device you want, but in both ways microphone is the only option listed on my laptop. If I disable it then there is nothing. So what do you do if you want ‘Stereo Mix’ or ‘Line In’ and it is not there to select?
How do I change the audio output device for a running application in Windows 7?
This post is close to my question, but not quite the same. What I’m trying to find out is, if I’m running an application and want to change which device it’s using for audio output without quitting the application, is that possible?
Sometimes, my Bluetooth headset shows up as connected even when it’s not — I blame the device, and that’s not my biggest current concern. The problem is, sometimes I’ll start something that needs audio output — a video chat, game, etc — and it will start routing to this non-existent bluetooth device, rather than my speakers. I’d like to be able to fix this without quitting the video call, restarting the game, etc, but as far as I can tell changing the default audio device doesn’t change the output being used by already-running programs. Is there another way to «change horses midstream» that I’m missing?
5 Answers 5
In Windows, Audio Output is software defined. Each software that wants to output audio to a different output device needs to implement this feature itself. Depending on how well the programm is coded, you’ll have to restart the application for the changes to take effect.
You can play around a bit with setting the default output device in windows sound settings but that’s about. There may be tools to make switching the default output device more comfortable.
I don’t have an answer for Windows 7 (as I don’t have any systems running Win7 anymore) but I can answer for Windows 10.
- Right click the speaker icon in the taskbar and select Sound Settings
- Under «Advanced sound options» you can find «App volume and device preferences»
- Any app that is making sound will be listed here, and you can change its output device with a dropdown under «Output»
If you haven’t launched the app in question yet, you can left-click the speaker icon as you would to change the volume, then look just above the volume slider. The name of the current default output device is there, and if you click it you will be given a list of other output devices, where selecting one will change the default.
8 Tools to Quickly Change or Switch the Default Audio Sound Output in Windows
Although a lot of people use sound chips integrated on their motherboards for playing audio in Windows, many users still like to have a sound card not least because of the amount of external connections they can offer. These days you can also get sound output through your video card as well, and some headphones will even set themselves up as an audio device.
The trouble with Windows is it will only let you setup one of these audio devices as the default player at any one time. For instance, if you want to switch the output of the audio from your PC speakers to perhaps a TV or external media device, you have to go into the Sound options in Control Panel and change the default playback device from PC speakers to the other device by right clicking on it. And when you’re done, you have to remember to go back into the sound options again to revert the changes back or there will be no sound the next time you want to use the PC speakers!
This has long been a problem with Windows and switching audio devices is not something that can be done quickly using the standard options available. Thankfully there are some useful tools around that can make it a lot easier and faster than having to go through the Control Panel every time you want to select a different audio playback device. Here’s a selection for you to have a look at.

STADS is a program that allows you to easily switch between audio devices without going into the control panel by simply using a right click on the the tray icon. This will show the available playback devices and allows you to select one of as default, and if you click on “Show Recording Devices” it will let you select the default recording device. There is a drawback in that it’s compatible with XP only and won’t switch the devices in Vista or Windows 7 / 8.
2. Quick Sound Switch

Quick Sound Switch is a small System Tray tool which unfortunately suffers from the same issue as System Tray Audio Device Switcher (STADS), which is it only works on XP and won’t change the audio devices in Vista or 7. It is still useful for XP users though and includes its own integrated audio volume mixer and set main volume level in addition to a shortcut creator and a hotkey function to set an individual combination for a device. Default volumes and sound devices can configured for startup and shutdown.
3. Vista Audio Changer

Vista Audio Changer has a number of interesting features, one of which is a an application monitoring function which watches for a process name to be launched and then changes the default audio device on its startup and shutdown. Useful if you want to switch audio or video to another device when launching a media player etc. There is also a configurable on screen display to let you know what’s happening and individual hotkeys can be created for each device you want to switch to for quick access. Although it’s called Vista Audio Changer, it will work on Windows 7.
4. Audio Switcher for Windows 7

This little utility is a plain and simple default audio playback device switcher designed to work in Windows 7 and has been created by a member of Hardforum.com. Run the program and a small speaker icon will sit in your tray, left click on it and you will get a list of the currently available playback devices with the current default highlighted. Simply click on the device you want to make the new default. There are no options but it’s an ideal and portable tool to quickly switch between your PC speakers and your HD TV for example.
5. Win7AudioSwitcher

Win7AudioSwitcher is a neat and portable utility with separate 32-bit and 64-bit versions available. In addition to a tray icon you can right click on and change the default playback and recording devices, there is also a useful floating widget which displays volume level meters for each audio channel and hovering over each device and using the mouse scroll wheel can alter the device’s current volume. Right clicking a device in the widget will allow you to change the default playback and communication device. Verbose tray notifications will inform you of all changes and Auto Switch will change the audio device if the primary monitor changes.
6. SoundSwitch

SoundSwitch works with the intention of making it easy for you to switch between the audio playback devices by using a keyboard hotkey. On installing via the one-click installer, right click on the tray icon and select Settings. Then place a tick next to the devices you wish to be able to select and setup a hotkey if the default of Ctrl+Alt+F11 isn’t suitable. Then pressing the hotkey will cycle through the ticked devices or left clicking the tray icon will let you select them with the mouse. A tooltip will let you know what is currently being selected. SoundSwitch works on Windows 7 and 8.
7. SetSoundDevice

SetSoundDevice (SSD) is an easy to use and standalone tool that simply creates a shortcut icon of the audio device you want to select as the default. Run the tool and it will also open the Sound Control Panel applet because the program can also be executed from the command line by parsing the number of the sound device as an argument. To create a shortcut, all you need to do is select the device to create it for from the drop down list and then click the Change Default Sound Device button making sure the box is ticked which creates the shortcut in the same folder as the SSD utility. Obviously you need to make 2 shortcuts if you’re switching to one device and then want to switch back again afterwards.
8. NirCmd
NirCmd is a multi functional Windows command line tool that allows you to perform a large number of simple and useful tasks from standard Windows shortcut icons or within batch files etc. One of its features is being able to set the default sound device on Windows 2008, Vista and 7 although unlike the SSD tool, you have to create the shortcut yourself, the syntax is:
nircmd.exe setdefaultsounddevice [Device Name (eg; speakers)]

To find your device name, go to Control Panel -> Sound and each device will be given a display name (arrowed above), which is what you enter as the device name in the Nircmd argument. If you have more than 1 device with the same name, click on it -> Properties and give it a different name in the box at the top. It’s best to change the name of fixed devices if you can as those you unplug will reset themselves to the default when inserted again.
To create a Nircmd shortcut right click on the desktop -> New -> Shortcut and enter the command into the box (nircmd.exe setdefaultsounddevice [Device Name]), then click Next and give it a name such as “Switch to Speakers”. Double clicking Nircmd will copy it to the Windows directory for you, so if you don’t do that, will need to supply a path to the nircmd.exe in the shortcut.
These last 2 tools give you the added advantage of not needing to have a program running in the system tray or background if switching sound devices is not something you need to do that often.


