- How to change the download location in Windows 10, 8, 7
- Change default download location on PC
- How do I change the default save location in Windows 10?
- Run a System Scan to discover potential errors
- Change default Save location for Documents, Music, Pictures, Videos in Windows 10
- Change default location of User folders
- 1] Change default location of Documents folder using Properties
- 2] Change where new content is saved via Settings
- 3] Change default Save location for User Profile folders via Registry
- How to set a default Folder View for all folders in Windows 10
- What are Folder Templates
- Set a default Folder View for all folders
- Set Default Folder When Opening Explorer in Windows 10
- Set Default Folder to This PC
- Set Any Folder as Default for Explorer
- Pin Folders to Quick Access
How to change the download location in Windows 10, 8, 7


- Download Restoro PC Repair Tool that comes with Patented Technologies (patent available here).
- Click Start Scan to find Windows issues that could be causing PC problems.
- Click Repair All to fix issues affecting your computer’s security and performance
- Restoro has been downloaded by 0 readers this month.
Has it ever happened to you that when trying to download a file, folder or perhaps a program in Windows 8, Windows 7 or Windows 10, you didn’t had enough free disk space to do so ?Well, this is mainly because Windows 8, 7 and Windows 10, like any other Microsoft operating systems, have the default download location folder set in your C:/ drive where you also have your operating system. This is the reason why, most probably, you won’t have that much space available.
Tn the tutorial below, you’ll learn how easy it is to change the download location in Windows 8, 7 or Windows 10 in only five minutes of your time. Also, you can change the download location folder even when the message pops up saying that you don’t have enough free disk space on the partition. So, without wasting any more time, let’s begin the tutorial and set our new directory for our downloaded items.
Change default download location on PC
- After you power up the Windows 7, 8 or Windows 10 PC, you will have to left click on the desktop icon you will have in the start screen.
- Now after you get to your desktop feature right click on the “Windows Explorer” icon presented in the lower left side of the screen.
- Now from the menu that pops up you will need to left click on the “Desktop” icon.
Note: You can also access the “Desktop” by double clicking (left clicking) on My Computer or This PC (depending on your OS version) and after the window with “My Computer” is opened you can left click on the “Desktop” icon in the left side of the screen. - Now, after you selected the “Desktop”, some icons will be shown in the right side of the window and you will need to double click (left click) on the folder with the name of your account.

- In the folder you opened that had your account name, you will have to right click on “Downloads” folder presented there.
- After you right clicked the “Downloads” folder you will need to left click on “Properties”.
- Now that the “Properties” window is open, you will need to left click on the “Location” tab presented in the upper side of that window.
- Now that you have selected the “Location” tab you can see the path where the download items are going .
- Left click on the “Move…” button you have under the specified path.
- Now after you left clicked on “Move…” you will have to write there yourself the drive where you want your items to be downloaded and also in which folder.
Note: If the folder you have written does not exist after you left click on the “Apply” button situated in the lower right side of the screen you will be asked if you want to create that download folder and you will left click on “OK” to confirm. - Another “Move folder” window will appear which it will show you the old and the new location where you will have to left click on the “Yes” button situated in the lower right side of the screen.
- Now, you will have to left click on the “OK” button in the “Download Properties” window.
- Go to your new location where you selected to download your files and check if Windows 7, 8 or Windows 10 system has made a “Downloads” folder there.
Note: Reboot your Windows 7, 8 or Windows 10 device if it hasn’t created the “Downloads” folder to the new directory and check again after power up.
- RELATED: Can’t rename folders in Windows 10 [Fix]
How do I change the default save location in Windows 10?
If Windows 10 is your OS of choice, you can also change the download folder save location from the Settings page:
- Go to Settings > System > select Storage
- Now, click on the option ‘Change where new content is saved’
- Set your preferred download location for each item category.
Run a System Scan to discover potential errors


So, now you can go and download your files or programs in Windows 7, 8 or Windows 10 without having to worry about the download location. Share your thoughts on this article in the comments below and feel free to list your suggestions on what we can do to help you further in your Windows 7, 8 or Windows 10 computer.
Also, the location where a Windows 10 update is saved on your computer is tricky, but for that, you can check this fresh guide here on where’s the default download folder for the Windows 10 versions.
RELATED STORIES TO CHECK OUT:
Change default Save location for Documents, Music, Pictures, Videos in Windows 10
Windows 10 lets you easily change the default Save location for Documents, Music, Picture, and Video User Profile folders. You can now easily save your personal files like Documents, Music, Picture, and Videos to another drive or partition or even an external drive by default.
We have already seen how to move apps to another location and how to install Windows 10 Apps to another Partition. The procedure for changing the default save location for personal files in Windows 10 is similar.
Change default location of User folders
You can change the default location of user folders like the Documents, Music, Picture, and Videos folders via their respective Folder Properties, Settings app, or by editing the Registry. Let us take a look at the procedure involved. While we have taken the Documents folder as an example, the procedure is the same for other User Profile folders as well.
1] Change default location of Documents folder using Properties
The procedure is as follows:
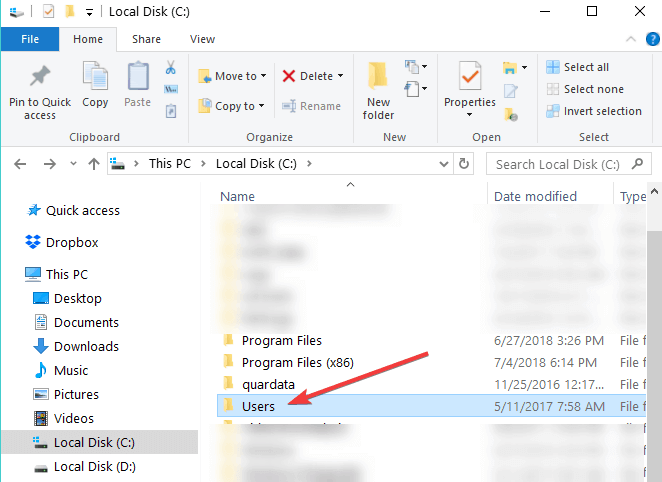
- Open File Explorer
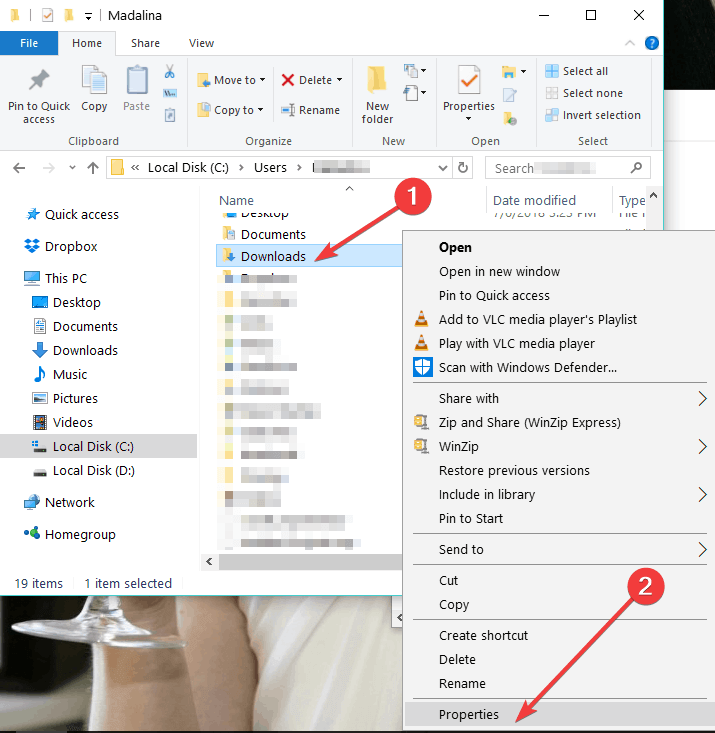
- Navigate to the Documents folder located in C:\Users\
- Right-click on the folder and select Properties.
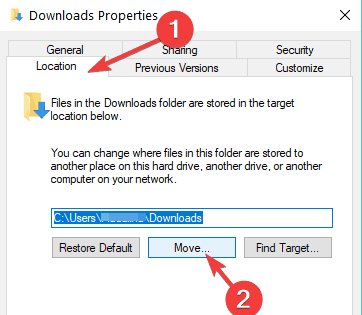
- Open Location tab and enter the desired new path.
- Click Move.
- It will open the Explorer dialog box.
- Navigate to and select the desired new location; or else manually enter the path.
- Click Apply/OK.
The folder and its contents will get moved.
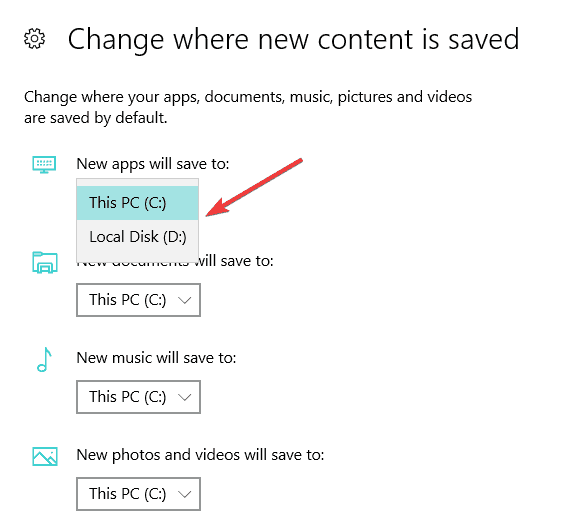
2] Change where new content is saved via Settings
Windows 10 makes things easier as you can do so via the Settings app.
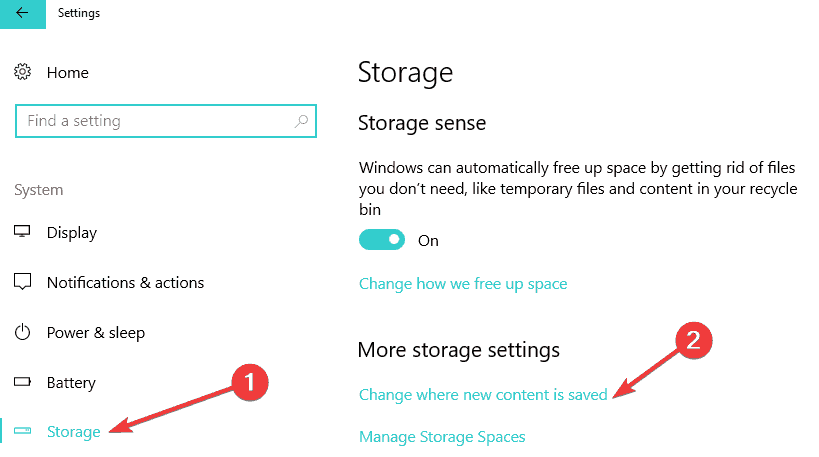
Open Start Menu > Settings > System settings.
Next, click on Storage in the left pane.
Scroll down a bit and find Change where new content is saved.
Click on it to open the following panel.
Here you will see New documents will save to setting – and similar settings for Music, Pictures & Videos.
Select the location from the drop-down menu.
Thus you can set different Save locations for different types of files.
3] Change default Save location for User Profile folders via Registry
Press Win+R keys to open the Run box. Now type regedit and hit Enter to open the Registry Editor. Next, navigate to the following path:
On the right-hand side, you will a key called Personal. If you want to change the path of the Documents folder, you need to work on Personal. If you want to change the path of the Video folder, you need to use the Video. Similarly, there are Pictures for Pictures folder, Music for Music folder.
So double-click on the concerned key, and enter the new value according to your folder.
The default paths are:
- Documents: %USERPROFILE%\Documents
- Music: %USERPROFILE%\Music
- Pictures: %USERPROFILE%\Pictures
- Video: %USERPROFILE%\Videos
Having done this, exit the Registry Editor, restart your computer, and check.
The folder should have moved to the new location.
If you are suffering from the low space issues after upgrading, you can use this technique to move Documents and other personal folders from the default system drive to another drive.
How to set a default Folder View for all folders in Windows 10
In Windows File Explorer, you might have noticed the different folder layout settings for different folders. Some of the folders have smaller icons while some puts on a large icons view layout. There are several folder layouts available in Windows 10/8/7 which you can choose from, for any folder. While Windows has set these defaults based on the nature of the files in the folder, if you wish, you can set a default Folder View for all folders. In this post, we will how to set & apply the same view settings of the current folder, as the default, for all other folders on your PC.
What are Folder Templates
Before rolling on to change the folder’s view settings, let’s take a look at how folder templates work. You might have noticed that folders that contain pictures have a different view layout than that which contains videos or documents. This is the folder optimization technique in play which chooses one of the five templates for any folder based on the content that is stored in it. These templates are:
- General Items – Applies to any folder that contains a mixed combination of files and other sub-folders.
- Documents – Applies to the folders that contain documents (Word files, text files, etc.)
- Pictures – Applies to the folders that contain image files (.jpg, .png files, etc.)
- Music – Applies to all such folders which contain music files (.mp3, .wav, etc.)
- Videos – Applies to any folder that contains just video items (.mp4, .avi, etc.)
Whenever you create a new folder and put some files in it, Windows does its best to decide the folder template based on the content. If you’re storing mixed type of files in any folder, Windows automatically assigns General Items as the folder template. If you want to view any folder’s template, right-click the folder icon and open its Properties window. In here, navigate to the Customize tab where you can see the correct template optimized for the folder in question.
Set a default Folder View for all folders
Now that we are clear on basics, let’s roll over to the task at hand. You can apply a folder’s view settings to only those folders which are optimized for the same folder template type. Once the view layout is generalized for a folder template type (say, Music), every time you change the layout of file icons (from tile icons to large icons), the same will be reflected in other folders as well that are optimized for Music template. Now, you can follow the below steps to apply the folder view settings across a folder template type:
1. Open File Explorer by using key combination Windows Key + E and navigate to the folder you want to use as a source for view layout settings.
2. Navigate to the View tab in ribbon bar on the top and change the settings per your wish. You can change the layout and choose the folder details to display, add extra panes, adjust column width, etc.
3. Once done with the changes, click Options to open Folder Options window.
4. Navigate to View tab in Folder Options window.
5. Click/Tap on Apply to Folders button.
6. Click/Tap Yes on the confirmation window that pops up.
7. Click/Tap OK on the Folder Options window to save the settings.
That is it. You have just generalized the view settings for a particular folder template type across the OS. Hope this works for you.
Set Default Folder When Opening Explorer in Windows 10
How to change from Quick Access to This PC
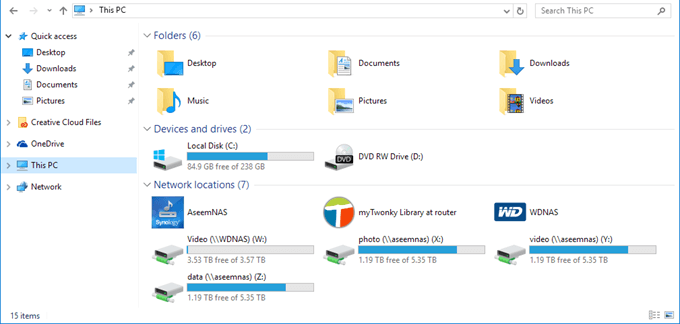
After upgrading to Windows 10 recently, I noticed that whenever I opened Explorer, it would always show me Quick Access. I like the new Quick Access feature, but I preferred to have Explorer open to This PC instead.
For me, being able to access the different drives on the computer and my network devices was far more important than accessing frequently used folders or recently opened files. It’s a useful feature, but I don’t mind having to click once to access it.
In this post, I’ll show you how to change the default folder from Quick Access to This PC when opening Explorer. In addition, I’ll also show you a trick whereby you can set any folder to be the default folder when opening Explorer in Windows 10.
Set Default Folder to This PC
To change the setting, open Explorer, click on File and then click on Change folder and search options.
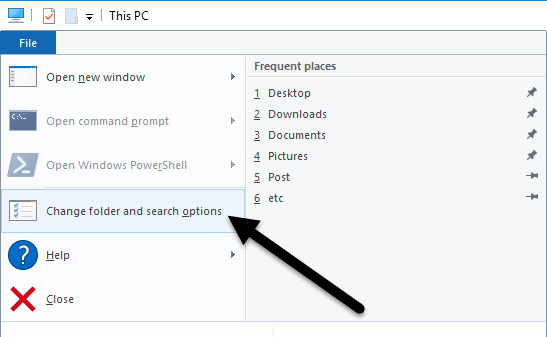
In the dialog that pops up, you should already be on the General tab. At the very top, you’ll see Open File Explorer to where you can select from This PC and Quick Access.
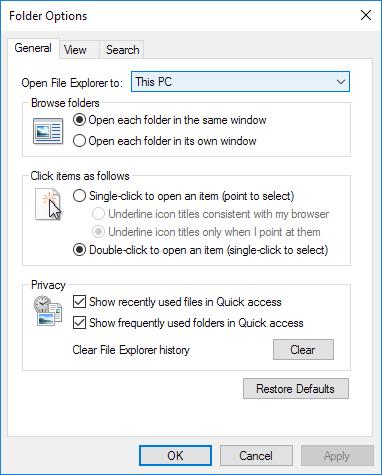
Just pick whichever folder you prefer and you’re good to go! Now when you open Explorer, you should see it open to This PC selected instead of Quick Access.
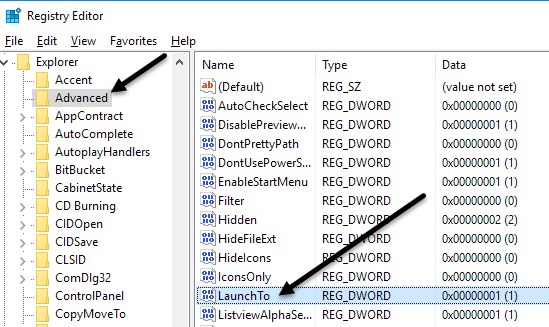
If you need to do this on many machines in a corporate environment, you’ll be happy to know that there is a registry entry that controls this setting also. Just navigate to the following key:
On the right hand side, look for a DWORD key named Launch To. 1 means This PC and 2 means Quick Access.
Finally, let’s talk about how we can configure Explorer to open up to any folder as the default folder.
Set Any Folder as Default for Explorer
Since there really isn’t any official way to do this, we have to kind of hack Windows to get it to do what we want. I’ve tested it out and the process seems to work just fine. To get started, find your folder and create a shortcut to the folder on your desktop.

For example, if I wanted to use the Pictures folder as my default folder, I would right-click on it, choose Send to and then click on Desktop (create shortcut). Next, we need to copy that shortcut into a special location in Windows. First, let’s open Explorer and go to that special location. Just copy and paste the following path into the address bar in another Explorer window:
Make sure to press Enter after you paste the path into Explorer. Depending on what else is pinned to your taskbar, you might see shortcuts to several programs here, but you should always see a File Explorer shortcut.
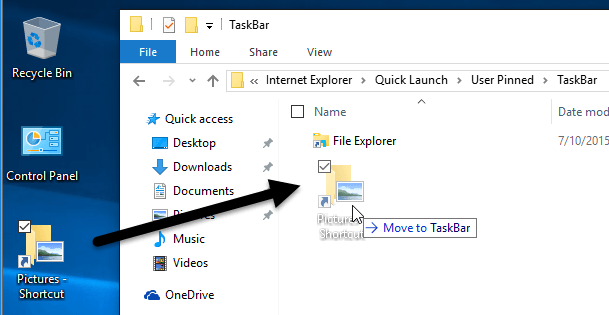
Now go ahead and drag the shortcut that we just created from your desktop into the special folder you have open in Explorer. Now we have to do one last thing. Go ahead and delete the File Explorer shortcut and rename the Pictures Shortcut to File Explorer. If you chose a different folder than Pictures, then change whatever the name of that shortcut is to File Explorer.
That’s about it! Now open File explorer from your taskbar and you should be viewing the contents of whichever folder you chose to be the default folder.
It’s worth noting that this little trick will only work when you click on the Explorer icon on your taskbar. If you open Explorer by double-clicking on This PC on the desktop or by clicking on Start and then File Explorer, you’ll either see This PC or Quick Access, depending on which option is chosen in the settings.
If you want to undo what we just did above, all you have to do is right-click on Explorer in the taskbar and choose Unpin from taskbar. After that, just drag the This PC icon from your desktop and drop it onto the taskbar again. This will create a new Explorer shortcut and it’ll work normally.
Pin Folders to Quick Access
If you don’t like any of the two options above, you do have one other choice in Windows 10. You could use the new pinned folders feature that is associated with Quick Access. When you open Explorer, you’ll see a pin icon next to several folders under Quick Access.
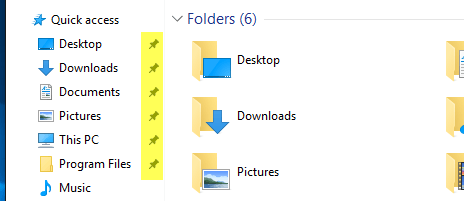
The Desktop, Downloads, Documents, Pictures, This PC and Music folders are pinned by default in Windows 10. If you want to remove any of them, just right-click and choose Unpin from Quick Access.
However, if you want one click access to any folder on your computer, navigate to that folder, then right-click on Quick Access and choose Pin current folder to Quick Access.
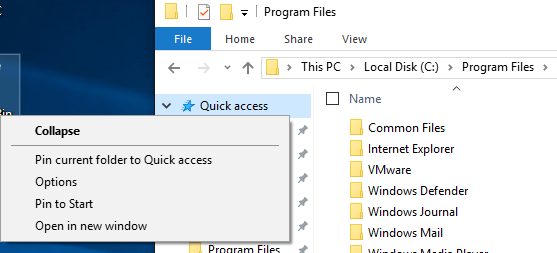
As you can see, this is how I pinned the Program Files folder to my Quick Access section. Using this method, you don’t have to resort to any hacks and you can also quickly access any folder on your system with two clicks.
Lastly, you can also get to that pinned folder quickly by simply right-clicking on the File Explorer icon in your taskbar and choosing your pinned folder, which will show up in the jumplist.

So in summary, if you want to change the default folder system-wide, you can only pick between This PC and Quick Access. If you use the second method involving the shortcut hack, then you have to use the shortcut from the taskbar.
Lastly, if you just need quick access to a folder, try using the pin to Quick Access option as that will also be system-wide and will remain in the left-hand side even as you browse through other folders. If you have any questions, post a comment. Enjoy!
Founder of Online Tech Tips and managing editor. He began blogging in 2007 and quit his job in 2010 to blog full-time. He has over 15 years of industry experience in IT and holds several technical certifications. Read Aseem’s Full Bio


