- How to change a computer DNS address
- What is a DNS?
- Alternate domain name services
- Configuring your operating system
- Windows 10
- Windows 8
- Windows 7
- Windows Vista
- Windows XP
- Windows 98
- macOS
- Linux
- Как изменить DNS сервер в Windows 10, 8.1 и Windows 7
- Изменение DNS сервера в Windows
- Еще один способ изменить DNS сервер в Windows 10
- Адреса популярных DNS-серверов
- Видео инструкция
How to change a computer DNS address
What is a DNS?

A DNS (Domain Name Service) acts like a phonebook for Internet addresses. It’s a networked computer system with a massive database of Internet domain names and their corresponding addresses, which is constantly kept up-to-date.
When you make a network request to a domain name, your computer needs to know where on the Internet that domain is located. It gets this information from the DNS. Your computer sends a request to the DNS containing the name of the domain, and the DNS responds with that domain’s numeric IP address. Your computer then proceeds to connect to that address.
The process is referred to as domain name resolution: a domain name resolves to its corresponding address.
Your ISP usually provides its own default DNS for its customers, and the settings for this server are automatically configured via DHCP. But you don’t have to use your ISP’s DNS. There are many publicly available Domain Name Services, and you may want to use one of them instead. In addition to providing an alternative solution to your ISP, services like Cloudflare also encrypt and keep your DNS requests private from your ISP.
Alternate domain name services
Here is a selection of public DNS servers, current as of December 2018. There are two addresses listed for each: primary and a secondary, which acts as a backup if the first address is unavailable.
| DNS Provider | Primary Address | Secondary Address |
|---|---|---|
| Cloudflare IPv4 | 1.1.1.1 | 1.0.0.1 |
| Cloudflare IPv6 | 2606:4700:4700::1111 | 2606:4700:4700::1001 |
| Google Public DNS | 8.8.8.8 | 8.8.4.4 |
| OpenDNS | 208.67.222.222 | 208.67.220.220 |
| Verisign | 64.6.64.6 | 64.6.65.6 |
| DNS.WATCH | 84.200.69.80 | 84.200.70.40 |
| OpenNIC | 50.116.23.211 | 192.99.240.129 |
| Dyn | 216.146.35.35 | 216.146.36.36 |
| DNS Advantage | 156.154.70.1 | 156.154.71.1 |
| SafeDNS | 195.46.39.39 | 195.46.39.40 |
| Comodo Secure DNS | 8.26.56.26 | 8.20.247.20 |
| Norton ConnectSafe | 199.85.126.10 | 199.85.127.10 |
| GreenTeamDNS | 81.218.119.11 | 209.88.198.133 |
| SmartViper | 208.76.50.50 | 208.76.51.51 |
| AlternateDNS | 198.101.242.72 | 23.253.163.53 |
| Yandex.DNS | 77.88.8.8 | 77.88.8.1 |
You may decide to use one of these, or change your DNS to an address provided by your school or your employer’s IT department. Make sure you know the address(es) of your new DNS before you proceed.
Configuring your operating system
The steps for changing your computer’s DNS settings will depend on what operating system you are running. Use the links below to navigate to the section which applies to you.
Before making any changes to your DNS configuration, we highly recommended writing down your current DNS address information so changs can be reverted if necessary.
If you cannot change your DNS addresses, you likely don’t have the proper permissions to do so. If you have problems, contact your system administrator or IT department for assistance.
The following are step-by-step instructions for changing the DNS settings on Windows, OS X, Linux, and BSD operating systems:
Windows 10
- Open the Control Panel.
- Click View network status and tasks
- Click Change adapter settings on the left portion of the window.
- Double-click the icon for the Internet connection you’re using.
- Click the Properties button.
- Click and highlight Internet Protocol Version 4 (TCP/IPv4) and click Properties.
- If not already selected, select the Use the following DNS server addresses option.
- Enter the new DNS addresses and click OK and close out of all other windows.
Windows 8
- Access the Windows desktop screen.
- Press Ctrl + I on the keyboard to open the Settings menu and select the Control Panel option.
- Click the Network and Sharing Center icon.
- Click the Change adapter settings option in the left navigation pane.
- Double-click the icon for the Internet connection you are using. It may be labeled Ethernet if using wired Internet, or Wi-Fi if you’re using a wireless connection. If you have multiple connections, make sure not to select the one with the red X. In the Properties or Status window that opens, click the Properties button.
- Select the Internet Protocol Version 4 (TCP/IPv4) option in the list of items on the Properties window and click the Properties button.
- If not already selected, select the Use the following DNS server addresses option.
- Enter the new DNS addresses and click OK and close out of all other windows.
Windows 7
- Open the Control Panel.
- Click View network status and tasks
- Click Change adapter settings on the left portion of the window.
- Double-click the icon for the Internet connection you’re using. Often this will be labeled Local Area Connection or the name of your ISP. If you have multiple connections, make sure not to click the one with the red X.
- Click the Properties button.
- Click and highlight Internet Protocol Version 4 (TCP/IPv4) and click Properties.
- If not already selected, select the Use the following DNS server addresses option.
- Enter the new DNS addresses and click OK and close out of all other windows.
Windows Vista
- Open the Control Panel.
- Click View network status and tasks
- Click View status for the network connection.
- Click Properties and Continue.
- Click and highlight Internet Protocol Version 4 (TCP/IPv4) and click Properties.
- If not already selected, select the Use the following DNS server addresses option.
- Enter the new DNS addresses and click OK and close out of all other windows.
Windows XP
- Open the Control Panel.
- In the Control Panel window, double-click the Network Connections icon.
- Double-click the icon for the Internet connection you’re using. Often this will be labeled Local Area Connection or the name of your ISP. If you have multiple connections, make sure not to click the one with the red X.
- Click the Properties button.
- Highlight Internet Protocol (TCP/IP) in the connection items list and click the Properties button.
- If not already selected, select the Use the following DNS server addresses option.
- Enter the new DNS addresses and click OK and close out of all other windows.
Windows 98
- Open the Control Panel.
- In the Control Panel window, double-click the Network icon.
- Highlight TCP/IP Ethernet adapter in the connection items list and click the Properties button.
- In the Properties window, click the DNS Configuration tab and select Enable DNS.
- If any DNS server is listed, highlight each and click the Remove button.
- Once no DNS is listed, type in the new addresses and click the Add button.
- Once the new addresses are added, click Ok and close out of all other windows.
macOS
- From the Apple menu in the upper left corner of your screen, select System Preferences.
- From the System Preferences menu, select Network.
- In the Network menu, make sure your correct network device is highlighted on the left pane of the window Wi-Fi, for example. Click Advanced.
- In the advanced settings, click the DNS button to bring up DNS settings.
- In the left pane, you can see your current DNS server addresses. Write these down in case you need to revert your changes later.
- Highlight one of your current DNS addresses, and click the minus («—«) button underneath the left pane to remove the highlighted address from the list. Do this for each of your current DNS addresses.
- Once the list is empty, click the plus («+«) button to add a new empty address (0.0.0.0). Highlight this address and type in a new one. Press Enter when you are done.
- Repeat step 7 for a secondary address, if you are adding one.
- Click OK to save the settings.
- Click Apply to apply your new network settings.
Linux
In Linux, the DNS server addresses are kept in the system file /etc/resolv.conf. (You need superuser privileges to edit this file.)
For instance, to edit this file with the nano text editor, use the command:
(We prefix the command with sudo to run nano with superuser permission.)
In your text editor, you can see the contents of /etc/resolv.conf. Each line that begins with the word nameserver contains a DNS address that is used by your system.
Once you have the file open, follow these steps:
- Make a note of the DNS addresses already listed. You may need this information later if you want to revert your changes.
- Delete any lines beginning with nameserver.
- For each DNS address you want to add, add a line which reads nameserveraddress, where address is the address of the DNS. For instance, in the image below, we are configuring our system to use the primary and secondary Google Public DNS.

- Save the file. In nano, this is Ctrl-O, Enter.
- Exit the text editor. In nano, this is Ctrl-X.
Как изменить DNS сервер в Windows 10, 8.1 и Windows 7
 При появлении проблем с открытием сайтов, таких как ERR_NAME_NOT_RESOLVED и многих других одно из первых рекомендуемых действий изменить DNS сервер в свойствах подключения Windows. Использование другого сервера может работать быстрее (и точнее) чем DNS сервер вашего провайдера, ускоряя тем самым загрузку страниц. Также некоторые серверы предоставляют функции фильтрации нежелательного трафика.
В этой инструкции подробно о том, как изменить DNS-сервер в Windows 10, 8.1 и Windows 7 — один универсальный метод для всех указанных систем и один дополнительный, только для Windows 10. Также в статье приведены популярные быстрые и безопасные DNS-серверы.
Изменение DNS сервера в Windows
Если вам требуется изменить DNS-сервер в Windows 10, 8.1 или Windows 7 используйте следующие шаги, которые подойдут для всех указанных версий ОС:
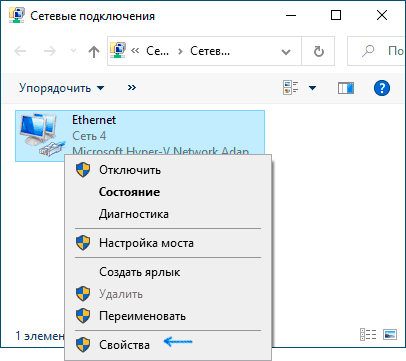
- Нажмите клавиши Win+R на клавиатуре, введите ncpa.cpl в окно «Выполнить» и нажмите Enter.
- В открывшемся окне нажмите правой кнопкой мыши по подключению, используемое для доступа в Интернет и выберите пункт «Свойства» в контекстном меню.

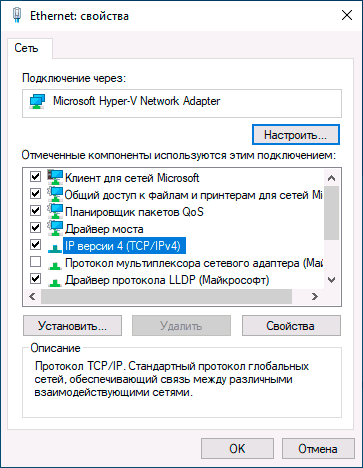
- В списке компонентов подключения выберите «IP версии 4» или «TCP/IPv4» и нажмите кнопку «Свойства».
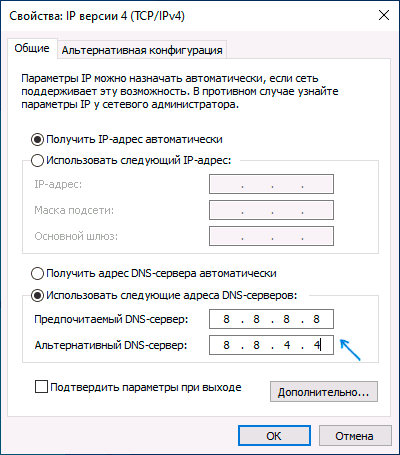
- Установите отметку «Использовать следующие адреса DNS-серверов» и укажите нужные адреса.
- Примените настройки кнопкой Ок.
- При необходимости (обычно таковая отсутствует) измените аналогичным образом DNS для IP версии 6.
После изменения параметров DNS не обязательно, но желательно сбросить кэш DNS.
На этом процесс будет завершен, а при открытии сайтов в Интернете у вас будет использоваться заданный вами адрес DNS-сервера.
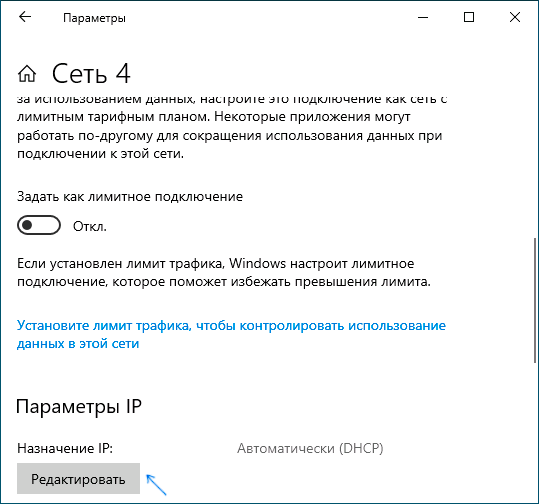
Еще один способ изменить DNS сервер в Windows 10
В Windows 10 присутствует дополнительный метод изменения DNS-сервера для Интернет-подключения:
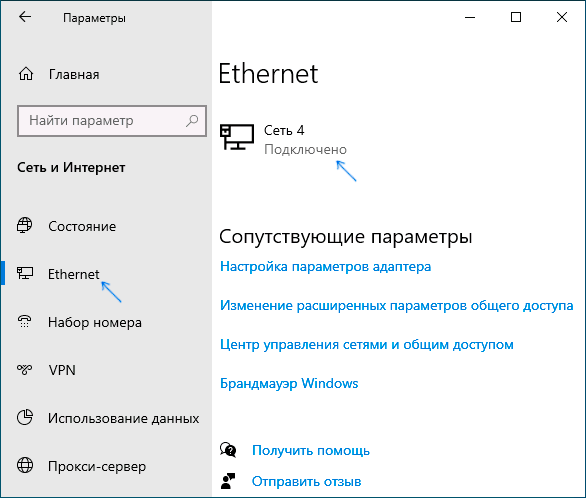
- Зайдите в Параметры — Сеть и Интернет, слева выберите тип подключения (Ethernet, Wi-Fi), для которого нужно выполнить изменение.
- Нажмите по имени активной сети.
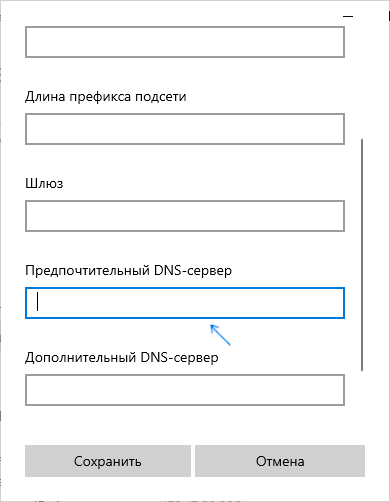
- Пролистайте следующую страницу вниз до раздела «Параметры IP» и нажмите кнопку «Редактировать».
- Вместо «Автоматически» установите «Вручную».
- Включите IPv4, пролистайте вниз и установите желаемые параметры предпочитаемого и дополнительного DNS сервера, сохраните настройки.
- При необходимости, задайте DNS для IPv6 (обычно не требуется).
Также, как и в предыдущем случае, желательно очистить кэш DNS после применения настроек.
Адреса популярных DNS-серверов
Многие известные Интернет-компании предоставляют доступ к своим DNS-серверам: вы можете ввести их в параметрах, и они будут использоваться вашим подключением. Среди популярных DNS-серверов:
- Google — 8.8.8.8 и 8.8.4.4 (для IP версии 4), 2001:4860:4860::8888 и 2001:4860:4860::8844 (IP версии 6).
- Яндекс — 77.88.8.8 и 77.88.8.1 (Яндекс также предоставляет дополнительные возможности для своих DNS, подробнее можно прочесть на странице dns.yandex.ru).
- Cloudflare — 1.1.1.1 и 1.0.0.1 (IPv4), 2606:4700:4700::1111 и 2606:4700:4700::1001 (IPv6).
Видео инструкция
Надеюсь, в вашем случае все сработало. Если вы решили сменить DNS-сервер из-за каких-либо ошибок при открытии сайтов, рекомендую попробовать ввести текст ошибки в поиск на этом сайте: возможно, у меня есть решение для вашей проблемы.
А вдруг и это будет интересно:
Почему бы не подписаться?
Рассылка новых, иногда интересных и полезных, материалов сайта remontka.pro. Никакой рекламы и бесплатная компьютерная помощь подписчикам от автора. Другие способы подписки (ВК, Одноклассники, Телеграм, Facebook, Twitter, Youtube, Яндекс.Дзен)
20.04.2020 в 20:53
Есть отличная прога Dns Jumper. И никаких плясок с бубном.
sordum.org/7952/dns-jumper-v2-2/
21.04.2020 в 13:53
Кеш DNS при очистке выдаёт ошибку. Очистка не происходит.
21.04.2020 в 14:58
А что за ошибка?
21.04.2020 в 15:37
Не удаётся очистить кэш сопоставителя DNS:Ошибка исполнения функции.
21.04.2020 в 15:47
От администратора? Странно, у меня нет решения, не сталкивался с такой ошибкой.
Но вообще, как правило, очистка не критична.
21.04.2020 в 23:15
А как из cmd быстро изменить, не зная названия подключения?
22.04.2020 в 14:15
Имя подключения и в cmd нужно будет, а вообще вот так:
Для просмотра списка подключений с именами и другими параметрами:
22.04.2020 в 12:03
Всё описанное в статье относится к непосредственному соединению с сетью провайдера. А вот как изменить DNS-адрес в мобильном модеме — он (модем) сам регистрируется в сети провайдера, сам получает DNS и моего согласия не спрашивает? Также отсутствуют (или я его не нашел) возможности изменения — строго: 10.52.129.36 и 10.52.129.56
30.04.2020 в 17:44
Здравствуйте уважаемый Dmitry.
Я сделал всё, как Вы сказали, а потом ещё попробовал прописать новый адрес DNS в настройках роутера. Роутер D-Link DIR-320.
Ничего не получается с адресом нового DNS, соединения с интернетом нет.
Я пробовал прописывать разные адреса самых популярных DNS серверов.
Если же вернусь к начальным настройкам − поставлю галочку напротив «Выбирать DNS сервер автоматически», то соединение с интернетом моментально устанавливается.
Похоже что провайдер (Билайн) блокирует.
Что делать, как Вы думаете?
01.05.2020 в 10:44
Здравствуйте.
А я вроде в статье не писал про изменение DNS в настройках роутера. Как раз потому что оно у многих наших провайдеров с PPTP/L2TP соединениями работать не будет. Причина — роутеру для установки Интернет-подключения нужно выполнить подключение к внутреннему серверу провайдера (тот, что у вас, вероятнее всего, tp.internet.beeline.ru или подобный), который в публичных DNS не прописан (то есть этого сервера в общем-то вне локальной сети Билайна нету), а в том, который «автоматически», провайдерском, он есть.
В принципе, если взять внутренний IP адрес этого сервера и его указать в настройках Интернет-подключения, а уже потом указать публичный DNS в настройках на роутере, должно заработать. Но работа может оказаться временной, если IP для L2TP сервера изменится.
01.05.2020 в 15:29
А если сменить провайдера? Вы не скажете у какого провайдера нет проблем с изменением DNS сервера?
01.05.2020 в 16:25
Боюсь, не подскажу, тут требуется эксперимент.
А вообще, по идее, если у вас прописан DNS в системе, то именно он будет использоваться, а не тот, что роутер получил от провайдера.
02.05.2020 в 10:52
Мне нужно изменить DNS сервер именно в настройках роутера.
Нужно для того, чтобы настроить т.н. «умную RGB лампочку» Yeelight, чтобы управлять цветом и яркостью со смартфона.
С DNS Билайн ничего не получается, нужно или Google DNS, или ещё что-то.
Интересно, Вы Dmitry, знаете о такой проблеме с этими лампочками?
02.05.2020 в 10:54
Пока нет, у меня такое освещение пока только в планах, как раз на это лето)
Но вообще наверняка есть форумы конкретно по этим лампам и другим от Xiaomi и там проблема скорее всего рассматривается и можно найти методы решения.


