- How to Change Legacy to UEFI in Windows 10/8/7?
- UEFI is the replacement for BIOS
- Is it necessary to reinstall Windows 10/8/7 for UEFI mode?
- How to Change Legacy to UEFI?
- How to Boot into UEFI Directly from Windows 10
- Check If Your System Supports UEFI or Legacy BIOS
- Boot into UEFI from Settings App
- Boot into UEFI from Command Prompt
- Boot to UEFI Mode or legacy BIOS mode
- To boot to UEFI or BIOS:
- UEFI and BIOS modes in WinPE
- Detect if WinPE is booted into BIOS or UEFI Mode
- Make sure you boot into the right mode every time
- Use preformatted hard drives, and use a method that doesn’t automatically format the drive.
- Remove the UEFI or BIOS boot files
- Boot only when in UEFI mode
- Boot only when in BIOS mode
- Этапы последовательности задач для управления преобразованием BIOS в UEFI Task sequence steps to manage BIOS to UEFI conversion
- Функция инвентаризации оборудования собирает сведения о UEFI Hardware inventory collects UEFI information
- Создание пользовательской последовательности задач для подготовки жесткого диска Create a custom task sequence to prepare the hard drive
- Подготовка раздела FAT32 для преобразования в UEFI Prepare the FAT32 partition for the conversion to UEFI
- Переход от BIOS к UEFI при обновлении на месте Convert from BIOS to UEFI during in-place upgrade
- Requirements (Требования) Requirements
- Последовательность задач преобразования из BIOS в UEFI при обновлении на месте Process to convert from BIOS to UEFI during an in-place upgrade task sequence
How to Change Legacy to UEFI in Windows 10/8/7?
Learn to change Legacy to UEFI boot mode to get better performance if you are using a new system such as Windows 10, 8, and 7 (doesn’t support Windows Vista).

By AOMEI  / Last Updated November 30, 2020
UEFI is the replacement for BIOS
All new hardware nowadays uses the unified extensible firmware interface (UEFI) instead of the traditional BIOS. UEFI is now well on its way to replacing BIOS which by now is an outdated standard, well over 40 years old! At present, most UEFI enabled systems have a Legacy boot mode in order to be compatible with older systems.
If you are using Windows 7 64-bit, Windows 8/8.1, or Windows 10, you can change Legacy to UEFI mode to get better performance and disk support. In Legacy mode, Windows can only boot from master boot record (MBR) disk that has 2TB size limit while UEFI mode works with GUID partition table that allows you to use disks of enormous size.
Is it necessary to reinstall Windows 10/8/7 for UEFI mode?
Normally, you need to reinstall Windows for changing to UEFI mode because you need to wipe the hard drive and then convert to GPT disk.
1. After you convert Legacy BIOS to UEFI boot mode, you can boot your computer from a Windows installation disk.
2. At Windows Setup screen, press Shift + F10 to open a command prompt.
3. Type “diskpart” and use command “convert gpt” to convert the disk from MBR to GPT as the screenshot below.
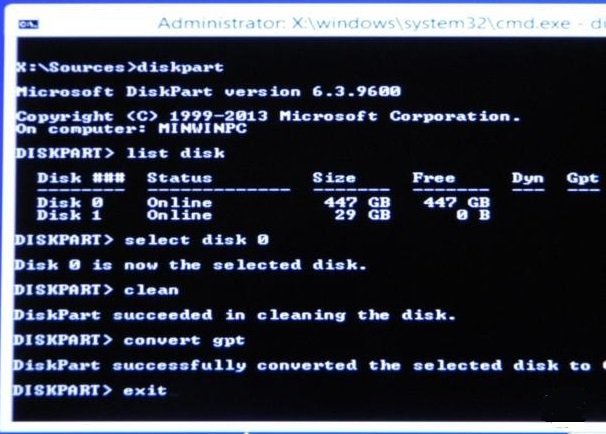
4. Now, you can go back and install Windows. If you try to install Windows without these steps, you will get the error “Windows cannot be installed to this disk” after you change BIOS to UEFI mode.
Seems complicated right? There’s actually an easier way that involves far less messing around in Command Prompt. You can use specialist third party software AOMEI Partition Assistant Professional Edition to convert from MBR to GPT without deleting partitions or losing data in Windows 10/8/7 and Windows XP/Vista (convert MBR and GPT withou data loss in Server operating systems, the Server edition can satifsy you). This way, you don’t need to spend time installing Windows and all of your programs or typing out a string of command prompt commands.
Note: To avoid data loss caused by improper operation or some accidents like power outage, you can back up vital data beforehand.
To convert to GPT disk with AOMEI Partition Assistant Professional:
2. Right click on the system disk and select Convert to GPT Disk.
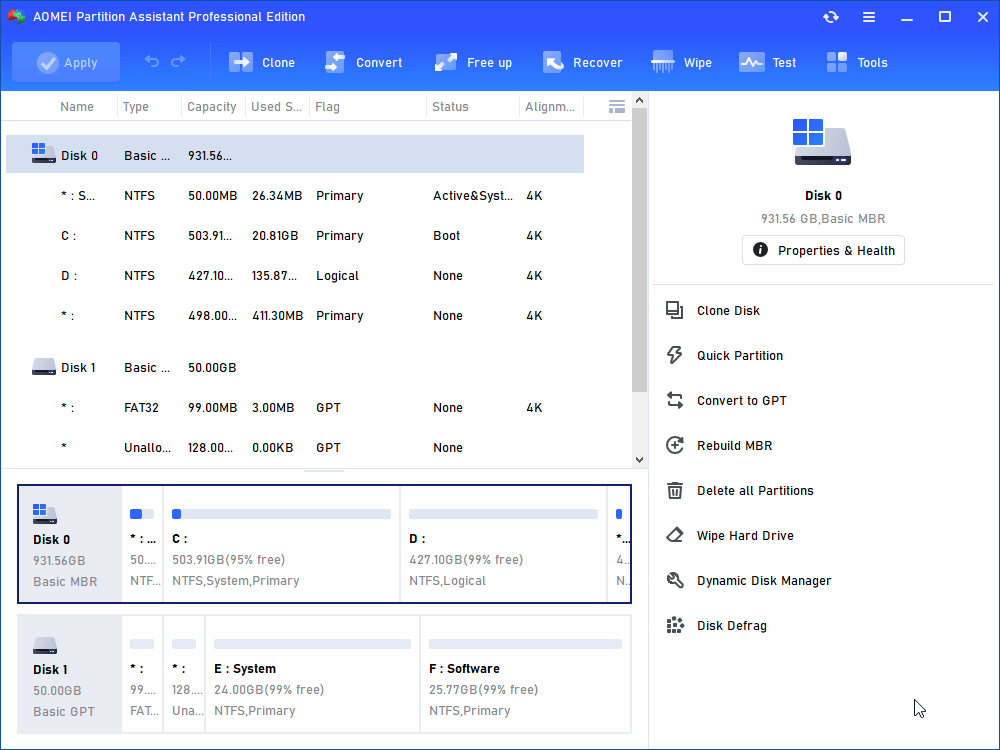
3. Click “Apply” to apply the change.
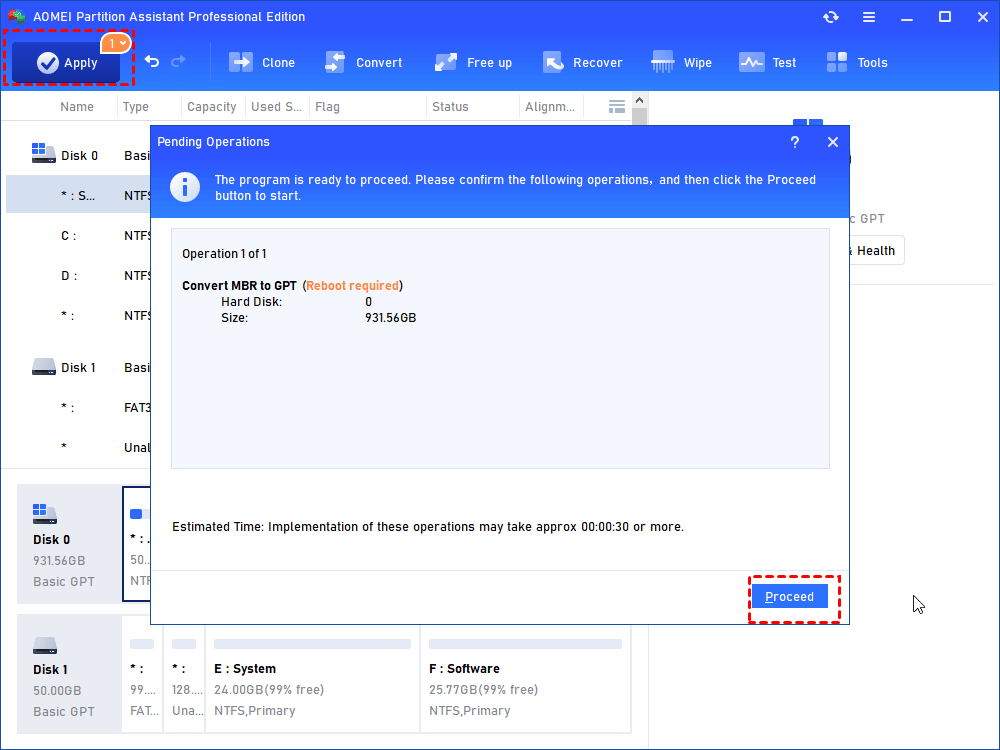
During the process, your computer will reboot into AOMEI Pre-OS mode. When it completes, you can go into the BIOS and switch from Legacy to UEFI mode. You can use the same method to convert GPT to MBR without losing data.
How to Change Legacy to UEFI?
The steps to turn on UEFI mode vary from computer to computer. You can refer to the following to help you configure yours.
1. Typically, you continuously press a specific key when the computer starts up to enter the EFI Setup menu. Normally, it is Del for desktops and F2 for laptops. If you don’t know which key to press, just press Esc. It will give you the full menu, and then you can select BIOS Setup.
2. Normally, you can find the Legacy/UEFI boot mode configuration under the Boot tab. Under the Boot tab you should disable Legacy and enable UEFI.
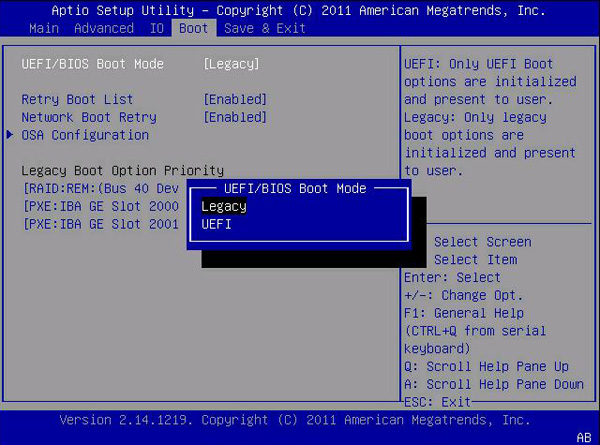
3. Now, press F10 to save the settings and then exit.
In conclusion, it is recommended that you change Legacy to UEFI boot mode if your operating system (OS) is compatible. As you can see, the entire process doesn’t take much time or effort since as you don’t need to reinstall Windows 10, 8, and 7.
How to Boot into UEFI Directly from Windows 10

If you want to change the boot priority, enable or disable secure boot or change any other low-level settings, then you need to boot into UEFI mode. Depending on the motherboard manufacturer, you have to press specific keys or a combination of keys on your keyboard to access UEFI mode. Though the splash screen displays the keys you need to press, it can be pretty confusing for beginners. If you are ever in this situation, you can boot into UEFI mode directly from Windows. This eliminates the need to press relevant keys as fast as possible at boot time.
Booting into UEFI from Windows is not hard. However, you can only do this if your motherboard supports or has a UEFI chip on it. If your motherboard doesn’t support UEFI, you cannot boot into UEFI from Windows. That being said, most modern motherboards come equipped with a UEFI chip and supports both UEFI and legacy BIOS.
If you don’t know or are unsure whether your motherboard supports UEFI or not, you can easily verify that directly from Windows.
Check If Your System Supports UEFI or Legacy BIOS
There are several ways to check if you are using UEFI or BIOS.
Windows displays all the system information in a single app called System Information. By accessing the System Information application you can find whether you are using BIOS or UEFI.
1. Press Win + R , type msinfo32 and press Enter. This action will open the System Information app.
2. Select “System Summary” on the left panel. On the right panel you can see whether you are using BIOS or UEFI next to “BIOS Mode.” If you see UEFI, then your system is using UEFI bios. If you see “Legacy,” then your system is using Legacy BIOS.

Alternatively, you can also find it using the Disk Management tool.
1. Open the Start menu and search for “Check and format hard disk partitions” and open it. Don’t worry, we are not going to partition or format your hard drive.
2. If you see a partition named “Healthy (EFI System Partition),” then your system supports UEFI. If you don’t have this partition, then your system is using Legacy BIOS.

Once you’ve confirmed your motherboard’s support for UEFI, proceed to the next steps of booting into UEFI directly from Windows 10.
Boot into UEFI from Settings App
To boot into UEFI from the Settings panel, we are going to use the Advanced Start-up options.
1. Search for “Settings” in the Start menu and open it. Go to “Update and Security -> Recovery,” and click on the “Restart Now” button under the Advanced Start-up section.
2. In the Advanced start-up screen go to “Troubleshoot -> Advanced options,” and click on the “UEFI Firmware Settings” option.

3. On the next screen click on the Restart button, and you will be taken to the UEFI screen.
Boot into UEFI from Command Prompt
You can also boot into UEFI from Windows by executing a single command.
1. Search for Command Prompt in the Start Menu, right-click on it and select the option “Run as administrator.”
2. In the command prompt, execute the below command:

3. Windows will show a warning message saying that the system will restart in less than a minute.
Close the warning message and save all your work. The system will automatically restart and boot into UEFI mode.
Comment below sharing your thoughts and experiences about using the above methods to boot into UEFI directly from Windows 10.
Vamsi is a tech and WordPress geek who enjoys writing how-to guides and messing with his computer and software in general. When not writing for MTE, he writes for he shares tips, tricks, and lifehacks on his own blog Stugon.
Boot to UEFI Mode or legacy BIOS mode
Choose UEFI or legacy BIOS modes when booting into Windows PE (WinPE) or Windows Setup. After Windows is installed, if you need to switch firmware modes, you may be able to use the MBR2GPT tool.
In general, install Windows using the newer UEFI mode, as it includes more security features than the legacy BIOS mode. If you’re booting from a network that only supports BIOS, you’ll need to boot to legacy BIOS mode.
After Windows is installed, the device boots automatically using the same mode it was installed with.
To boot to UEFI or BIOS:
Open the firmware menus. You can use any of these methods:
Boot the PC, and press the manufacturer’s key to open the menus. Common keys used: Esc, Delete, F1, F2, F10, F11, or F12. On tablets, common buttons are Volume up or Volume down (find more common keys and buttons). During startup, there’s often a screen that mentions the key. If there’s not one, or if the screen goes by too fast to see it, check your manufacturer’s site.
Or, if Windows is already installed, from either the Sign on screen or the Start menu, select Power ( ) > hold Shift while selecting Restart. Select Troubleshoot > Advanced options > UEFI Firmware settings.
From the firmware menus, boot to drive or network while in UEFI or BIOS mode:
On the boot device menu, select the command that identifies both the firmware mode and the device. For example, select UEFI: USB Drive or BIOS: Network/LAN.
You might see separate commands for the same device. For example, you might see UEFI USB Drive and BIOS USB Drive. Each command uses the same device and media, but boots the PC in a different firmware mode.
Some devices only support one mode (either UEFI or BIOS). Other devices will only allow you to boot to BIOS mode by manually disabling the UEFI security features. To disable the security features, go to Security > Secure Boot and disable the feature.
Some older PCs (Windows 7-era or earlier) support UEFI, but require you to browse to the boot file. From the firmware menus, look for the option: «Boot from file», then browse to \EFI\BOOT\BOOTX64.EFI on Windows PE or Windows Setup media.
UEFI and BIOS modes in WinPE
Detect if WinPE is booted into BIOS or UEFI Mode
Query the registry to determine which mode the device is in. You can do this from the command line:
| Return code | Firmware mode |
|---|---|
| 0x1 | BIOS |
| 0x2 | UEFI |
Use it in a script:
Note that between delims= and » %%A is a tab, followed by a space.
Make sure you boot into the right mode every time
Here are a couple of ways you can make sure you’re booted into the right firmware mode every time you start your PC.
Use preformatted hard drives, and use a method that doesn’t automatically format the drive.
If you want to ensure that your drive boots into a certain mode, use drives that you’ve preformatted with the GPT file format for UEFI mode, or the MBR file format for BIOS mode. When the installation starts, if the PC is booted to the wrong mode, Windows installation will fail. To fix this, restart the PC in the correct firmware mode.
Remove the UEFI or BIOS boot files
If you want a PC to only boot into a certain mode, you can remove the files that Windows PE or Windows Setup use to boot in UEFI or BIOS mode. Remove the following files, depending on the mode you want to boot to.
Boot only when in UEFI mode
Remove the bootmgr file from the root of the Windows PE or Windows Setup media. This prevents the device from starting in BIOS mode.
Boot only when in BIOS mode
Remove the efi folder from the root of the Windows PE or Windows Setup media. This prevents the device from starting in UEFI mode.
Этапы последовательности задач для управления преобразованием BIOS в UEFI Task sequence steps to manage BIOS to UEFI conversion
Windows 10 предоставляет множество новых функций безопасности, для которых используются устройства с поддержкой UEFI. Windows 10 provides many new security features that require UEFI-enabled devices. Возможно, у вас есть современные устройства под управлением Windows, которые уже поддерживают UEFI, но используют BIOS прежних версий. You might have newer Windows devices that support UEFI, but are using legacy BIOS. Раньше, чтобы реализовать на устройстве поддержку UEFI, приходилось лично подходить к каждому устройству, изменять разбивку жесткого диска и перенастраивать встроенное ПО. Previously, converting a device to UEFI required you to go to each device, repartition the hard disk, and reconfigure the firmware.
С Configuration Manager можно автоматизировать следующие действия. With Configuration Manager you can automate the following actions:
- Подготовка жесткого диска для преобразования из BIOS в UEFI Prepare a hard drive for BIOS to UEFI conversion
- Преобразование из BIOS в UEFI в рамках процесса обновления на месте Convert from BIOS to UEFI as part of the in-place upgrade process
- Получение сведений о UEFI в составе инвентаризации оборудования Collect UEFI information as part of hardware inventory
Функция инвентаризации оборудования собирает сведения о UEFI Hardware inventory collects UEFI information
Доступны класс (SMS_Firmware) и свойство (UEFI) инвентаризации оборудования, помогающие определить, запускается ли компьютер в режиме UEFI. The hardware inventory class (SMS_Firmware) and property (UEFI) are available to help you determine whether a computer starts in UEFI mode. Когда компьютер запускается в режиме UEFI, свойство UEFI принимает значение TRUE. When a computer is started in UEFI mode, the UEFI property is set to TRUE. Инвентаризация оборудования включает этот класс по умолчанию. Hardware inventory enables this class by default. Дополнительные сведения об инвентаризации оборудования см. в разделе Настройка инвентаризации оборудования. For more information about hardware inventory, see How to configure hardware inventory.
Создание пользовательской последовательности задач для подготовки жесткого диска Create a custom task sequence to prepare the hard drive
Последовательность задач развертывания ОС можно настроить с помощью переменной TSUEFIDrive. You can customize an OS deployment task sequence with the TSUEFIDrive variable. Шаг Перезагрузить компьютер подготавливает раздел FAT32 на жестком диске для перехода на UEFI. The Restart Computer step prepares a FAT32 partition on the hard drive for transition to UEFI. Далее приводится пример создания шагов последовательности задач для выполнения этого действия. The following procedure provides an example of how you can create task sequence steps to do this action.
Подготовка раздела FAT32 для преобразования в UEFI Prepare the FAT32 partition for the conversion to UEFI
В существующую последовательность задач для установки ОС добавьте новую группу с шагами для преобразования BIOS в UEFI. In an existing task sequence to install an OS, add a new group with steps to do the BIOS to UEFI conversion.
Создайте новую группу последовательности задач после шагов для сбора файлов и параметров и перед шагами по установке ОС. Create a new task sequence group after the steps to capture files and settings, and before the steps to install the OS. Например, после группы Сбор файлов и параметров создайте группу с именем BIOS-to-UEFI. For example, create a group after the Capture Files and Settings group named BIOS-to-UEFI.
На вкладке Параметры новой группы добавьте новую переменную последовательности задач как условие. On the Options tab of the new group, add a new task sequence variable as a condition. Задайте _SMSTSBootUEFI не равно true. Set _SMSTSBootUEFI not equal true. При таком условии последовательность задач выполняет эти действия только на устройствах BIOS. With this condition, the task sequence only runs these steps on BIOS devices.

В новой группе добавьте шаг последовательности задач Перезагрузить компьютер. Under the new group, add the Restart Computer task sequence step. В разделе Укажите программы, которые необходимо запустить после перезагрузки выберите Выбран загрузочный образ, назначенный этой последовательности задач. In Specify what to run after restart, select The boot image assigned to this task sequence is selected. Это действие перезагрузит компьютер в среде предустановки Windows. This action restarts the computer in Windows PE.
На вкладке Параметры добавьте переменную последовательности задач как условие. On the Options tab, add a task sequence variable as a condition. Задайте _SMSTSInWinPE равно false. Set _SMSTSInWinPE equals false. С этим условием последовательность задач не выполняет этот шаг, если компьютер уже находится в среде предустановки Windows. With this condition, the task sequence doesn’t run this step if the computer is already in Windows PE.

Добавьте шаг для запуска средства OEM, которое преобразует встроенное ПО с BIOS в UEFI. Add a step to start an OEM tool to convert the firmware from BIOS to UEFI. Обычно это шаг Выполнить из командной строки с командой для запуска средства OEM. This step is typically Run Command Line, with the command to run the OEM tool.
Добавьте шаг этапа последовательности задач Отформатировать диск и создать разделы. Add the Format and Partition Disk task sequence step. На этом шаге настройте следующие параметры. In this step, configure the following options:
Создайте раздел FAT32 для преобразования в UEFI перед установкой операционной системы. Create the FAT32 partition to convert to UEFI before the OS is installed. Для параметра Тип диска выберите GPT. For Disk type, choose GPT.

Перейдите к свойствам раздела FAT32. Go to the properties for the FAT32 partition. В поле Переменная введите TSUEFIDrive . In the Variable field, enter TSUEFIDrive . Обнаружив эту переменную, последовательность задач готовит раздел для перехода на UEFI перед перезагрузкой компьютера. When the task sequence detects this variable, it prepares the partition for the UEFI transition before it restarts the computer.

Создайте раздел NTFS, который последовательность задач использует для сохранения своего состояния и хранения файлов журнала. Create an NTFS partition that the task sequence uses to save its state and to store log files.
Добавьте еще один шаг последовательности задач Перезагрузить компьютер. Add another Restart Computer task sequence step. В разделе Укажите программы, которые необходимо запустить после перезагрузки выберите Выбран загрузочный образ, назначенный этой последовательности задач, чтобы запускать компьютер в среде Windows PE. In Specify what to run after restart, select The boot image assigned to this task sequence is selected to start the computer in Windows PE.
По умолчанию размер раздела EFI составляет 500 МБ. By default, the EFI partition size is 500 MB. В некоторых средах загрузочный образ слишком велик для хранения в этом разделе. In some environments, the boot image is too large to store on this partition. Чтобы обойти эту проблему, увеличьте размер раздела EFI. To work around this issue, increase the size of the EFI partition. Например, задайте для него 1 ГБ. For example, set it to 1 GB.
Переход от BIOS к UEFI при обновлении на месте Convert from BIOS to UEFI during in-place upgrade
Windows 10 содержит простое средство преобразования MBR2GPT. Windows 10 includes a simple conversion tool, MBR2GPT. Оно автоматизирует процесс повторного разбиения жесткого диска для оборудования с поддержкой UEFI. It automates the process to repartition the hard disk for UEFI-enabled hardware. Средство преобразования можно интегрировать в процесс обновления на месте до Windows 10. You can integrate the conversion tool into the in-place upgrade process to Windows 10. Объедините это средство с последовательностью задач обновления и средством OEM, которое преобразует встроенное ПО из BIOS в UEFI. Combine this tool with your upgrade task sequence and the OEM tool that converts the firmware from BIOS to UEFI.
Requirements (Требования) Requirements
- Поддерживаемая версия Windows 10 A supported version of Windows 10
- компьютеры с поддержкой UEFI; Computers that support UEFI
- OEM-средство для преобразования встроенного ПО компьютера из BIOS в UEFI. OEM tool that converts the computer’s firmware from BIOS to UEFI
Последовательность задач преобразования из BIOS в UEFI при обновлении на месте Process to convert from BIOS to UEFI during an in-place upgrade task sequence
Откройте последовательность задач для редактирования. Edit the task sequence. В группе Постобработка внесите следующие изменения. In the Post-Processing group, make the following changes:
- Добавьте шаг Выполнить из командной строки. Add the Run Command Line step. Укажите командную строку для инструмента MBR2GPT. Specify the command line for the MBR2GPT tool. При запуске в полной операционной системе настройте его для преобразования диска из MBR в GPT без изменения или удаления данных. When run in the full OS, configure it to covert the disk from MBR to GPT without modifying or deleting data. В командной строке введите следующую команду: MBR2GPT.exe /convert /disk:0 /AllowFullOS In Command line, enter the following command: MBR2GPT.exe /convert /disk:0 /AllowFullOS
Вы также можете запустить средство MBR2GPT.EXE из Windows PE, а не в полной версии ОС. You can also choose to run the MBR2GPT.EXE tool when in Windows PE instead of in the full OS. Добавьте шаг для перезагрузки компьютера в среде предустановки Windows перед выполнением средства MBR2GPT.EXE. Add a step to restart the computer to Windows PE before the step to run the MBR2GPT.EXE tool. Затем удалите параметр /AllowFullOS из командной строки. Then remove the /AllowFullOS option from the command line.
Дополнительные сведения об этом средстве и доступных параметрах см. в описании MBR2GPT. EXE. For more information about the tool and available options, see MBR2GPT.EXE.
Добавьте шаг для запуска средства OEM, которое преобразует встроенное ПО с BIOS в UEFI. Add a step to run the OEM tool that converts the firmware from BIOS to UEFI. Обычно это шаг Выполнить из командной строки с командой для запуска средства OEM. This step is typically Run Command Line, with a command line to run the OEM tool.
Добавьте шаг Перезагрузить компьютер и выберите Операционная система по умолчанию, установленная в данный момент. Add the Restart Computer step, and select The currently installed default operating system.
Выполнить развертывание последовательности задач. Deploy the task sequence.


