- How to change the download location in Windows 10, 8, 7
- Change default download location on PC
- How do I change the default save location in Windows 10?
- Run a System Scan to discover potential errors
- How to Change File Type in Windows 10
- Showing file extensions and changing the file format
- How to Change the Target Folder in Windows 10 File Explorer
- how to change folder and file permissions in windows 10
- Replies (6)
How to change the download location in Windows 10, 8, 7


- Download Restoro PC Repair Tool that comes with Patented Technologies (patent available here).
- Click Start Scan to find Windows issues that could be causing PC problems.
- Click Repair All to fix issues affecting your computer’s security and performance
- Restoro has been downloaded by 0 readers this month.
Has it ever happened to you that when trying to download a file, folder or perhaps a program in Windows 8, Windows 7 or Windows 10, you didn’t had enough free disk space to do so ?Well, this is mainly because Windows 8, 7 and Windows 10, like any other Microsoft operating systems, have the default download location folder set in your C:/ drive where you also have your operating system. This is the reason why, most probably, you won’t have that much space available.
Tn the tutorial below, you’ll learn how easy it is to change the download location in Windows 8, 7 or Windows 10 in only five minutes of your time. Also, you can change the download location folder even when the message pops up saying that you don’t have enough free disk space on the partition. So, without wasting any more time, let’s begin the tutorial and set our new directory for our downloaded items.
Change default download location on PC
- After you power up the Windows 7, 8 or Windows 10 PC, you will have to left click on the desktop icon you will have in the start screen.
- Now after you get to your desktop feature right click on the “Windows Explorer” icon presented in the lower left side of the screen.
- Now from the menu that pops up you will need to left click on the “Desktop” icon.
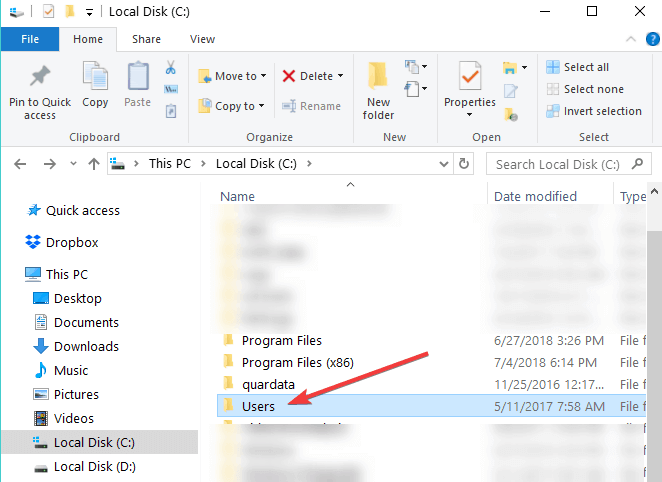
Note: You can also access the “Desktop” by double clicking (left clicking) on My Computer or This PC (depending on your OS version) and after the window with “My Computer” is opened you can left click on the “Desktop” icon in the left side of the screen. - Now, after you selected the “Desktop”, some icons will be shown in the right side of the window and you will need to double click (left click) on the folder with the name of your account.

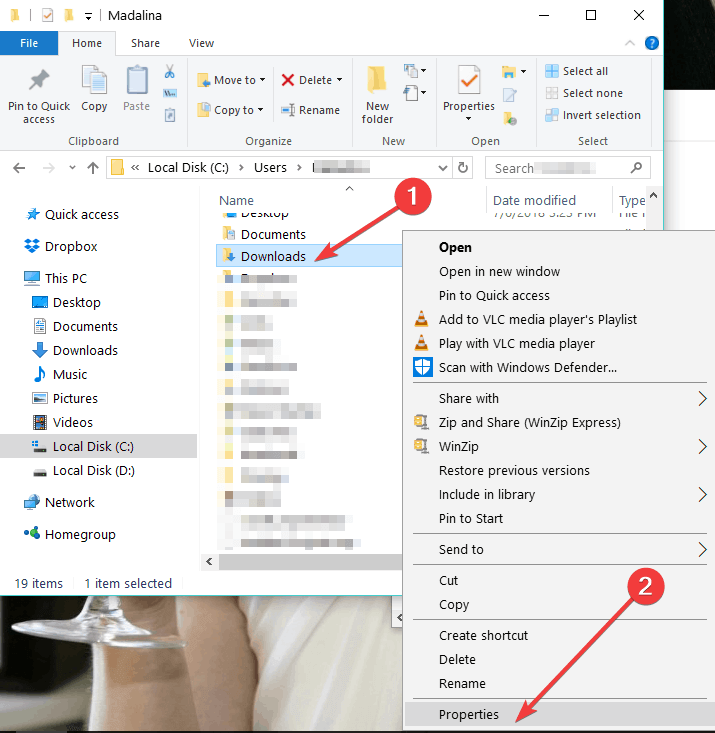
- In the folder you opened that had your account name, you will have to right click on “Downloads” folder presented there.
- After you right clicked the “Downloads” folder you will need to left click on “Properties”.
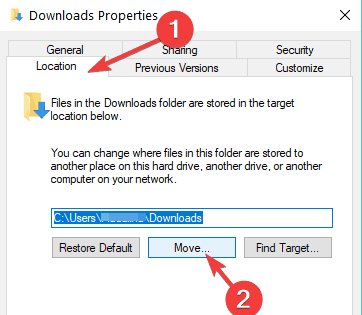
- Now that the “Properties” window is open, you will need to left click on the “Location” tab presented in the upper side of that window.
- Now that you have selected the “Location” tab you can see the path where the download items are going .
- Left click on the “Move…” button you have under the specified path.
- Now after you left clicked on “Move…” you will have to write there yourself the drive where you want your items to be downloaded and also in which folder.
Note: If the folder you have written does not exist after you left click on the “Apply” button situated in the lower right side of the screen you will be asked if you want to create that download folder and you will left click on “OK” to confirm. - Another “Move folder” window will appear which it will show you the old and the new location where you will have to left click on the “Yes” button situated in the lower right side of the screen.
- Now, you will have to left click on the “OK” button in the “Download Properties” window.
- Go to your new location where you selected to download your files and check if Windows 7, 8 or Windows 10 system has made a “Downloads” folder there.
Note: Reboot your Windows 7, 8 or Windows 10 device if it hasn’t created the “Downloads” folder to the new directory and check again after power up.
- RELATED: Can’t rename folders in Windows 10 [Fix]
How do I change the default save location in Windows 10?
If Windows 10 is your OS of choice, you can also change the download folder save location from the Settings page:
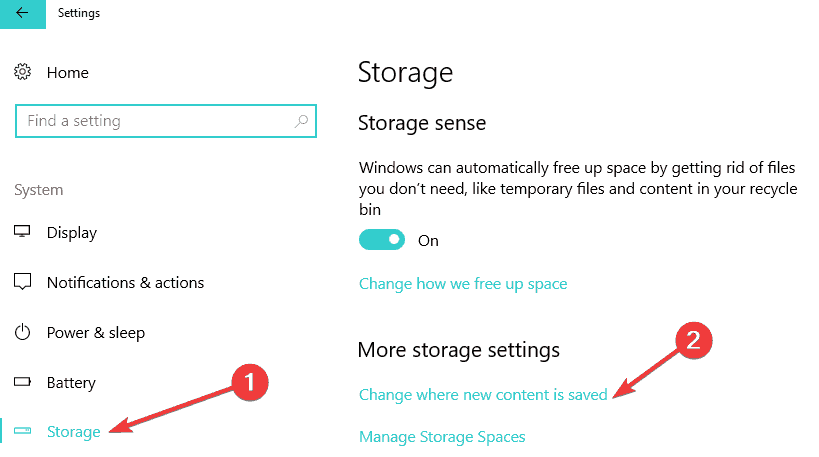
- Go to Settings > System > select Storage
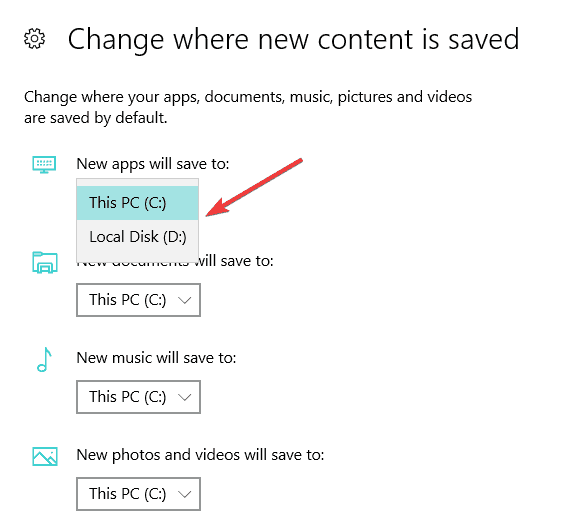
- Now, click on the option ‘Change where new content is saved’
- Set your preferred download location for each item category.
Run a System Scan to discover potential errors


So, now you can go and download your files or programs in Windows 7, 8 or Windows 10 without having to worry about the download location. Share your thoughts on this article in the comments below and feel free to list your suggestions on what we can do to help you further in your Windows 7, 8 or Windows 10 computer.
Also, the location where a Windows 10 update is saved on your computer is tricky, but for that, you can check this fresh guide here on where’s the default download folder for the Windows 10 versions.
RELATED STORIES TO CHECK OUT:
How to Change File Type in Windows 10
With our increasing use of computers in our daily life, it may get necessary even for a simple user to change the file type of a file from one format to another. Each file format has their own properties. For example a ‘.txt’ file will probably get opened by the text editor while an ‘html’ file will get launched in your default browser.
 File format analogy
Even though the contents inside the files might be the same, the file type matters a lot. The process of changing file type is quite simple and straightforward. However, there are some cases whereby changing the file type, the file becomes unusable. Hence it is recommended that you know exactly what you’re doing and also make an additional copy of the file.
Showing file extensions and changing the file format
By default, Windows doesn’t have the file format displayed alongside every file. For example, if a file is a text file, its name wouldn’t display ‘ap puals.txt’. Instead, it will only display ‘appuals’. First, we will enable the file extensions and then through basic rename, we will change the file extension. You can also choose to rename files in bulk if there are a lot of files that you need to change the type for.
- Press Windows + E, click View from the top-most ribbon. Now click Options and select the option Change folder and search options.
 Change folder and search options – Windows Explorer
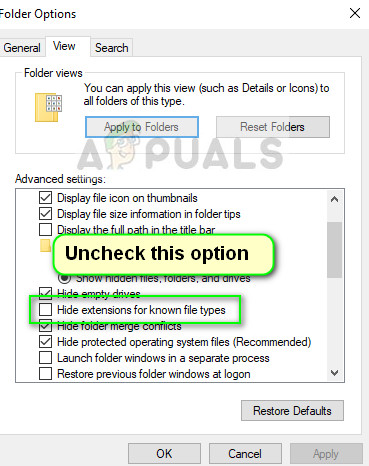
- Now uncheck the option Hide extensions for known file types. Now all the files will have their file extensions displayed alongside their names.
 Enabling File Extensions – Windows Explorer
- Now navigate to the file for which you want to change the file format. Right-click on it and select Rename.
- Now change the file’s extension to the extension of the type which you want to change into. In this example, we change a ‘text’ file to a ‘python’ file. The extensions for a text file are ‘txt’ and for python ‘py’.
 Process of changing a file type
Here is a list of common file extensions used in the world of computing. We have listed them according to their type.
How to Change the Target Folder in Windows 10 File Explorer
If you have to find or copy files in Windows 10, you’ll find yourself in File Explorer, browsing through folders. By default, File Explorer opens to show Quick Access, a list of your favorite and most recently used folders and files. But what if you want to change the target folder it opens to? Here’s how.
1. Right click the File Explorer icon in the taskbar and select Unpin from taskbar. If you don’t have this icon in your taskbar, you can skip this step.

2. Search for explorer.exe in the Cortana / Search box.
3. Right click the explorer.exe icon in results and select Open file location.
A window opens with the explorer.exe file selected. It is probably located in the C:\Windows directory.
4. Right click on the explorer.exe file in the window and select Create shortcut.
5. Click Yes when prompted to put the shortcut on the desktop.
A shortcut appears on the desktop.
6. Right click on the new explorer.exe shortcut and select Properties.
7. Enter the path to your desired folder in the Target field, right after the «C:\Windows\explorer.exe.» and click Ok.
8. Drag the explorer.exe icon onto the taskbar to pin it there.
From now on, clicking the File Explorer icon in your taskbar will take you to the folder you designated. However, if you open File Explorer some other way — by clicking Windows Key + E, for example — you’ll still end up at the Quick Access list.
how to change folder and file permissions in windows 10
Replies (6)
![]()
Thank you for contacting Microsoft Community.
- Are you trying to give permission to particular files and folders?
I suggest you to follow the below step and check if it helps.
- Once you choose the file that you want to give permission, right click on it.
- Click on properties and go to security tab, check whether any permission have been set.
- After you have viewed the permissions that are already set, you can now click on the Advanced Button that is right below the «Permissions for Authenticated Users»
- Once you have clicked Advanced, a box like this should appear, the «Permission Entries» box, which shows all the permissions that are set for the users. Now, after you have spotted the user whose permissions you wish to change, click «Change Permissions.
- Click on the user you would like to edit, and then click the option that says «Change Permissions» which is right below the box.
- Once that is clicked, you are going to get the same box pop up, but this time, you can actually edit the options. You do that by clicking the «Administrators» user again, and this time, you are going to click the «Edit» option.
Hope this information was helpful and do let us know if you need further assistance. We will be glad to assist.
56 people found this reply helpful
Was this reply helpful?
Sorry this didn’t help.
Great! Thanks for your feedback.
How satisfied are you with this reply?
Thanks for your feedback, it helps us improve the site.
How satisfied are you with this reply?
Thanks for your feedback.
All boxes are grey . How should I continue ?
80 people found this reply helpful
Was this reply helpful?
Sorry this didn’t help.
Great! Thanks for your feedback.
How satisfied are you with this reply?
Thanks for your feedback, it helps us improve the site.
How satisfied are you with this reply?
Thanks for your feedback.
Thank you for contacting Microsoft Community.
- Are you trying to give permission to particular files and folders?
I suggest you to follow the below step and check if it helps.
- Once you choose the file that you want to give permission, right click on it.
- Click on properties and go to security tab, check whether any permission have been set.
- After you have viewed the permissions that are already set, you can now click on the Advanced Button that is right below the «Permissions for Authenticated Users»
- Once you have clicked Advanced, a box like this should appear, the «Permission Entries» box, which shows all the permissions that are set for the users. Now, after you have spotted the user whose permissions you wish to change, click «Change Permissions.
- Click on the user you would like to edit, and then click the option that says «Change Permissions» which is right below the box.
- Once that is clicked, you are going to get the same box pop up, but this time, you can actually edit the options. You do that by clicking the «Administrators» user again, and this time, you are going to click the «Edit» option.
Hope this information was helpful and do let us know if you need further assistance. We will be glad to assist.
this is for a file. how for a folder and ALL subfolders and files
8 people found this reply helpful
Was this reply helpful?
Sorry this didn’t help.
Great! Thanks for your feedback.
How satisfied are you with this reply?
Thanks for your feedback, it helps us improve the site.


