- How To: Ubuntu / Debian Linux Regenerate OpenSSH Host Keys
- Why regenerate new ssh server keys?
- Steps to regenerate OpenSSH host keys on Linux
- Step 1 – Delete old ssh host keys
- Step 2 – Debian or Ubuntu Linux Regenerate OpenSSH Host Keys
- Step 3 – Update all ssh client(s) known_hosts files
- Conclusion
- Ubuntu Linux Change Hostname (computer name)
- Ubuntu change hostname command
- Display the current Ubuntu hostname
- How to change the Ubuntu server hostname without a system restart?
- Ubuntu Linux Change Hostname Using hostnamectl
- Conclusion
- Как исправить «ECDSA host key» Предупреждающая ошибка в Arch Linux
- 4 thoughts on “ Как исправить «ECDSA host key» Предупреждающая ошибка в Arch Linux ”
- How To : Generate SSH Host keys
- Why to generate Host keys:
- Generating Host Keys:
How To: Ubuntu / Debian Linux Regenerate OpenSSH Host Keys
H ow do I regenerate OpenSSH sshd server host keys stored in /etc/ssh/ssh_host_* files? Can I safely regenerate ssh host keys using remote ssh session as my existing ssh connections shouldn’t be interrupted on Debian or Ubuntu Linux? How do I regenerate new ssh server keys? How to regenerate new host keys on a Debian or Ubuntu Linux?
[donotprint]
| Tutorial details | |
|---|---|
| Difficulty level | Intermediate |
| Root privileges | Yes |
| Requirements | None |
| Est. reading time | 2m |
[/donotprint]To regenerate keys you need to delete old files and reconfigure openssh-server. It is also safe to run following commands over remote ssh based session. Your existing session shouldn’t be interrupted .

How to regenerate new ssh server keys
Why regenerate new ssh server keys?
Most Linux and Unix distribution create ssh keys for you during the installation of the OpenSSH server package. But it may be useful to be able re-generate new server keys from time to time. For example, when you duplicate VM (KVM or container) which contains an installed ssh package and you need to use different keys from cloned KVM VM guest/machine.
Steps to regenerate OpenSSH host keys on Linux
Let us see all steps
Step 1 – Delete old ssh host keys
Login as the root and type the following command to delete files on your SSHD server:
# /bin/rm -v /etc/ssh/ssh_host_*
Sample outputs:
- No ads and tracking
- In-depth guides for developers and sysadmins at Opensourceflare✨
- Join my Patreon to support independent content creators and start reading latest guides:
- How to set up Redis sentinel cluster on Ubuntu or Debian Linux
- How To Set Up SSH Keys With YubiKey as two-factor authentication (U2F/FIDO2)
- How to set up Mariadb Galera cluster on Ubuntu or Debian Linux
- A podman tutorial for beginners – part I (run Linux containers without Docker and in daemonless mode)
- How to protect Linux against rogue USB devices using USBGuard
Join Patreon ➔
Step 2 – Debian or Ubuntu Linux Regenerate OpenSSH Host Keys
Now create a new set of keys on your SSHD server, enter:
# dpkg-reconfigure openssh-server
Sample output:
You just regenerated new ssh server keys. You need to restart ssh server:
$ sudo systemctl restart ssh
OR
$ /etc/init.d/ssh restart
Step 3 – Update all ssh client(s) known_hosts files
Finally, you need to update
Either remove host fingerprint or update the file using vi text editor (command must be typed on client machine):
$ ssh-keygen -R remote-server-name-here
Now login using the ssh command:
$ ssh vivek@server1.cyberciti.biz
Conclusion
You just regenerated OpenSSH Host Keys on a Debian or Ubuntu Linux using the dpkg-reconfigure command. For more info see the man page or this wiki page here:
$ man dpkg-reconfigure
$ man sshd
🐧 Get the latest tutorials on Linux, Open Source & DevOps via
Источник
Ubuntu Linux Change Hostname (computer name)
I am a new Ubuntu Linux laptop user. I setup my computer name to ‘tom’ during installation but now I would like to change the computer name to ‘jerry’. Can you tell me how do I remove tom and set it to jerry on Ubuntu Linux? How do I change the Ubuntu computer name from ‘ubuntu’ to ‘AvlinStar’? Can you tell me more about Ubuntu Linux change hostname command?
You can use the hostname command or hostnamectl command to see or set the system’s host name. The host name or computer name is usually at system startup in /etc/hostname file. Open the terminal application and type the following commands to set or change hostname or computer name on Ubuntu Linux.
| Tutorial details | |
|---|---|
| Difficulty level | Easy |
| Root privileges | Yes |
| Requirements | Ubuntu Linux |
| Est. reading time | 2 minutes |
Ubuntu change hostname command
The procedure to change the computer name on Ubuntu Linux:
- Type the following command to edit /etc/hostname using nano or vi text editor:
sudo nano /etc/hostname
Delete the old name and setup new name. - Next Edit the /etc/hosts file:
sudo nano /etc/hosts
Replace any occurrence of the existing computer name with your new one. - Reboot the system to changes take effect:
sudo reboot
Gif 01: Ubuntu change the computer name demo
Display the current Ubuntu hostname
Simply type the following command:
$ hostname
Sample outputs:
Fig.01: Ubuntu Linux Show the hostname/computer name command
How to change the Ubuntu server hostname without a system restart?
Type the following commands:
$ sudo hostname new-server-name-here
Next edit the /etc/hostname file and update hostname:
$ sudo nano /etc/hostname
Finally, edit the /etc/hosts file and update the lines that reads your old-host-name:
$ sudo nano /etc/hosts
From:
127.0.1.1 old-host-name
To:
127.0.1.1 new-server-name-here
Save and close the file.
- No ads and tracking
- In-depth guides for developers and sysadmins at Opensourceflare✨
- Join my Patreon to support independent content creators and start reading latest guides:
- How to set up Redis sentinel cluster on Ubuntu or Debian Linux
- How To Set Up SSH Keys With YubiKey as two-factor authentication (U2F/FIDO2)
- How to set up Mariadb Galera cluster on Ubuntu or Debian Linux
- A podman tutorial for beginners – part I (run Linux containers without Docker and in daemonless mode)
- How to protect Linux against rogue USB devices using USBGuard
Join Patreon ➔
Ubuntu Linux Change Hostname Using hostnamectl
Systemd based Linux distro such as Ubuntu Linux 16.04 LTS and above can simply use the hostnamectl command to change hostname. To see current setting just type the following command:
$ hostnamectl
Sample outputs:
To change hostname from nixcraft to viveks-laptop, enter:
$ hostnamectl set-hostname viveks-laptop
$ hostnamectl
Conclusion
In this tutorial, you learned how to change hostname on Ubuntu Linux. For more information see this page here.
🐧 Get the latest tutorials on Linux, Open Source & DevOps via
| Category | List of Unix and Linux commands |
|---|---|
| Documentation | help • mandb • man • pinfo |
| Disk space analyzers | df • duf • ncdu • pydf |
| File Management | cat • cp • less • mkdir • more • tree |
| Firewall | Alpine Awall • CentOS 8 • OpenSUSE • RHEL 8 • Ubuntu 16.04 • Ubuntu 18.04 • Ubuntu 20.04 |
| Linux Desktop Apps | Skype • Spotify • VLC 3 |
| Modern utilities | bat • exa |
| Network Utilities | NetHogs • dig • host • ip • nmap |
| OpenVPN | CentOS 7 • CentOS 8 • Debian 10 • Debian 8/9 • Ubuntu 18.04 • Ubuntu 20.04 |
| Package Manager | apk • apt |
| Processes Management | bg • chroot • cron • disown • fg • glances • gtop • jobs • killall • kill • pidof • pstree • pwdx • time • vtop |
| Searching | ag • grep • whereis • which |
| Shell builtins | compgen • echo • printf |
| Text processing | cut • rev |
| User Information | groups • id • lastcomm • last • lid/libuser-lid • logname • members • users • whoami • who • w |
| WireGuard VPN | Alpine • CentOS 8 • Debian 10 • Firewall • Ubuntu 20.04 |
Comments on this entry are closed.
Last file should be /etc/hosts instead of /etc/hostname
On any system using SystemD to check current:
hostnamectl
or:
hostname
To change:
hostnamectl set-hostname viveks-desktop
Very useful. I didn’t konw about changing /etc/hosts.
How about hostnamectl command?
Dear Vivek,
The above is good and solves to Change/Modify hostname/hosts..
But the same is not holds for System Name
Ex: vivek@ubuntu is changed as vivek@vivek_desktop or anything else..
But It could not change “vivek” to newname
Hi it worked and Thank you very much for your help
I have a Doubt about AWS EC2
i created a new instance using existing instance and i want to change the hostname of new instance automatically but it showing its private ip address only for the new one
please help me
my code is
aws ec2 create-tags –resources `aws ec2 run-instances –image-id –count 1 –instance-type t2.micro –key-name –user-data file://my-userdata.sh –subnet-id –security-group-ids |jq -r “.Instances[0].InstanceId”` –tags “Key=Name,Value=servername”
It’ll hold the value to the system, i mean persist the value even after restart if you add it to /etc/sysconfig/network
HOSTNAME=
Источник
Как исправить «ECDSA host key» Предупреждающая ошибка в Arch Linux
Я использовал множество виртуальных машин, используюя Oracle VirtualBox для тестирования и обучения.
На днях я попытался подключиться к одному из моих удаленных серверов, который работает с Arch Linux через SSH.
Вот как я использую SSH для моего удаленного сервера Arch от моей локальной системы.
Здесь sk – это мое имя пользователя удаленного сервера Arch Linux, а 192.168.1.102 – это IP-адрес Arch Linux.
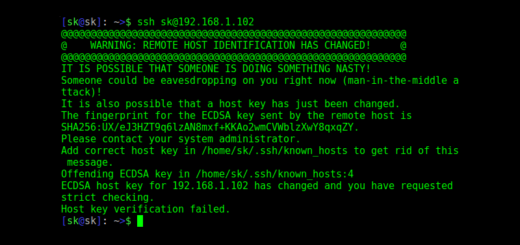
После выполнения вышеуказанной команды я получил следующее предупреждающее сообщение.

Я не могу использовать SSH на удаленном сервере VM.
Я попытался войти с альтернативным именем пользователя, но получил тот же результат, что и выше.
После небольшого поиска в Google я понял, что эта ошибка произойдет, если ваша система использует динамическую IP-адресацию.
Таким образом, указанное предупреждающее сообщение будет появляться каждый раз, когда изменяется IP-адрес удаленного сервера.
Чтобы навсегда исправить эту ошибку, вы должны использовать статический IP-адрес и добавить ключ хоста только один раз.
Дело в том, что у всех нас нет статических IP-адресов, не так ли? Покупка статического IP-адреса не требуется для всех нас, и это тоже дорого.
Таким образом, вы можете решить эту ошибку, как описано ниже. Чтобы обойти эту проблему, сначала нам нужно обновить кеш-ключ ECDSA-хоста вашей удаленной системы в файле known_hosts вашей локальной системы.
Как вы, возможно, знаете, ключи хоста будут храниться в файле /home/yourusername/.ssh/known_hosts.
Чтобы удалить кешированный ключ, используйте следующую команду:
В нашем случае IP-адрес удаленной системы – 192.168.1.102, поэтому давайте использовать следующую команду для удаления ключа хоста из файла «known_hosts».
Теперь попробуйте снова зайти через ssh в удаленную систему с командой:
Введите «yes» и нажмите «enter», чтобы обновить ключ хоста вашей удаленной системы в файле known_hosts вашей локальной системы.
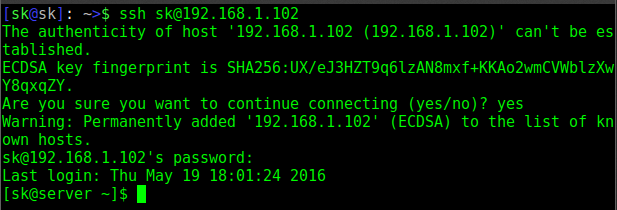
Теперь вы можете без проблем справиться с ssh в своей удаленной системе Arch Linux.
Этот метод будет работать не только на Arch Linux, но и на других дистрибутивах Linux.
4 thoughts on “ Как исправить «ECDSA host key» Предупреждающая ошибка в Arch Linux ”
Спасибо, понимал что трабла с ключами, но не мог понять что делать. Эта статья в две секунды всё исправила.
Источник
How To : Generate SSH Host keys
SSH is a service which most of system administrators use for remote administration of servers. When you install a fresh system, then at the start of the ssh service, it generates the host keys for your system which later on used for authentication. But if due to some reason you need to generate the host keys, then the process is explained below.
Why to generate Host keys:
- If you are getting this error when trying to start the ssh service:
**** Normally this happens when SSH keys don’t get generated on the startup.
There could be some other reasons also but if you are reading this article then i believe you already have some reason with you.
Generating Host Keys:
To re-generate your host keys use this command:
This will re-generate the dsa keys for your host. To re-generate the rsa keys, use the same command like this:
This will generate a key pair for your system.
Note: Administrators that have other users connecting to their sshd2 daemon should notify the users of the host-key change. If you do not, the users will receive a warning the next time they connect, because the host key the users have saved on their disk for your server does not match the host key now being provided by your sshd2 daemon. The users may not know how to respond to this error.
Источник


