- Ethical hacking and penetration testing
- InfoSec, IT, Kali Linux, BlackArch
- Kali Linux post-installation tips and settings
- 1. How to install VirtualBox Guest OS Add-ons for Kali Linux
- 2. How to use Windows drives in Kali Linux. How to solve the problem with the error ‘The disk contains an unclean file system (0, 0). Metadata kept in Windows cache, refused to mount’
- 3. Regular system updates
- 4. Regular system cleaning
- 5. How to install the analogue of Total Commander
- 6. How to run commands without a password
- 7. How to enable root user in Kali Linux
- 8. How to disable screen lock in Kali Linux
- 9. How to enable login without password at system boot
- 10. How to switch to a light or dark theme?
- 11. How to change the Kali Linux language?
- 12. How to change the keyboard layout?
- 13. How to enable the language bar in the top menu of Kali Linux
- 14. Install pip
- 15. How to disable window grouping in Kali Linux
- Linux. Настройка клавиатуры
- Почему я захотел изменить свою клавиатуру?
- Настройка переключения раскладки
- Ациклическое переключение раскладок
- Замечание
- Изменение клавиш
- Двоеточие и точка с запятой
- ESC и CapsLock
- Alt и Win
- Модификаторы
- Назначение модификатора как второе значение клавиши
- Дальнейшие изменения
- Замечание
- Интересный вариант BackSpace напоследок
Ethical hacking and penetration testing
InfoSec, IT, Kali Linux, BlackArch
Kali Linux post-installation tips and settings
Here you can find tips on how to make the system more convenient for work by configuring the installed Kali Linux to your habits.
You do not need to do everything that is written here – select only those recommendations that will make your work in Kali Linux more comfortable. Moreover, from a security point of view, all recommendations related to passwords (for example, setting up logging in without a password, executing commands without a password, turning off the screen lock) are very harmful. But personally, this annoys me more than the potential protection gives (when an outsider physically accesses the computer, password protection does not give anything, see the article “How to reset a forgotten login password in Linux”).
1. How to install VirtualBox Guest OS Add-ons for Kali Linux
No longer required. VirtualBox guest OS add-ons are now installed automatically during the installation of the system itself.
2. How to use Windows drives in Kali Linux. How to solve the problem with the error ‘The disk contains an unclean file system (0, 0). Metadata kept in Windows cache, refused to mount’
This is needed if you have problems accessing Windows drives from Kali Linux. This can happen when you installed Kali Linux as a second system or on a USB flash drive.
We look at the disks and look for the problematic one that interests us:
The found disk (I have it for example /dev/sdb1) we fix by the ntfsfix command:
3. Regular system updates
Updates fix bugs in the system and bring new features. To perform a full update, run the command:
4. Regular system cleaning
From time to time it is recommended to execute commands to remove packages that were installed automatically (since they were dependencies of other programs), but are no longer needed.
To do this, use the command:
Its use is safe and should not cause problems.
Each program update, package files are downloaded to the package cache. After the update, downloaded files (you can call them installation files) are not deleted, and gradually the package cache grows to large sizes. This was done intentionally with the idea that if after the next update you find that the new package has problems and the old version is no longer available in the online repository, then you can roll back to the old version by installing it from a file saved in the package cache.
For rolling distributions, the cache grows very quickly, and if you are not qualified enough to roll back to the old version using the installation package which is stored in the cache, then for you these hundreds of megabytes or even several gigabytes are a waste of space on your hard drive. Therefore, from time to time you can execute commands
clean – delete downloaded archive files
clean cleans the local repository from received package files. It removes everything except the lock file from /var/cache/apt/archives/ and /var/cache/apt/archives/partial/.
autoclean – delete old downloaded archive files
Like clean, autoclean cleans downloaded package files from the local repository. The only difference is that it only removes package files that can no longer be downloaded and are largely useless.
This allows you to maintain the cache for a long period without growing too much. APT::Clean-Installed configuration option will not allow the installation files of those packages that are currently installed to be deleted.
The following command is not directly related to cleaning, but helps maintain system health.
The -f, —fix-broken option tries to normalize a system with broken dependencies. This option, when used with install/remove, may skip any packages to allow APT to find a likely solution. If packages are listed, this should completely fix the problem. This option is sometimes necessary when starting APT for the first time; APT alone does not allow packages with broken dependencies to exist on the system. It is possible that the structure of the system dependencies can be so broken that manual intervention will be required (which usually means using dpkg —remove to eliminate some of the intruder packages). Using this option with -m may cause an error in some situations. Item in the configuration file: APT::Get::Fix-Broken.
5. How to install the analogue of Total Commander
Total Commander is a two-panel, cross-platform file manager, a complete analogue of Double Commander. To install it, do:
6. How to run commands without a password
Until recently, in Kali Linux, the root user was the main user, you did not need to use sudo and enter a password when executing commands that require elevated privileges. If you do not want to enter a password each time you use sudo, then run the following command:
7. How to enable root user in Kali Linux
The root user in Kali Linux is still there. If you want to use it instead of a regular user to log in, then just set the password for it with the following command:
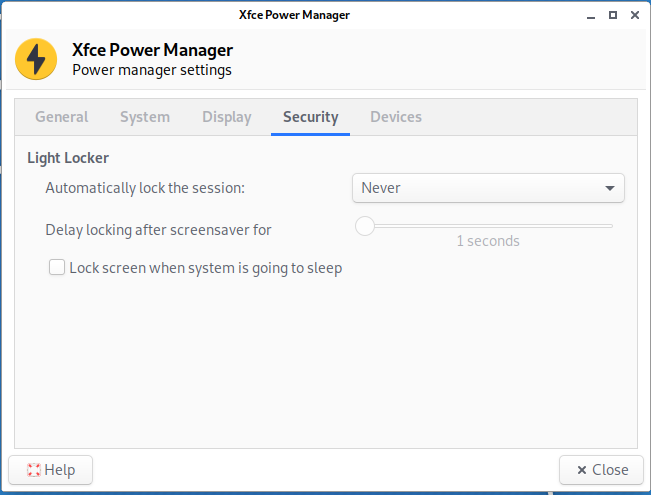
8. How to disable screen lock in Kali Linux
Click on the battery icon next to the clock and select “Power Manager Settings” from the menu:

In the Xfce Power Manager, go to the “Security” tab and select “Never” for “Automatically lock the session”. Also uncheck “Lock screen when system is going to sleep”.
9. How to enable login without password at system boot
Here is considered how to enable automatic login when the desktop is XFCE and the display manager is LightDM.
Open the /etc/lightdm/lightdm.conf file:
and edit (don’t forget to uncomment) or just add the lines:
In the previous lines, replace USERNAME with your username. If you accidentally forgot it, then look with the command:
You also need to create an autologin group and add your user to it:
10. How to switch to a light or dark theme?
Kali Linux provides two default themes: dark and light. To switch to a light theme, go to “Settings” → “Appearance” and on the “Style” tab, select “Kali-Light”. And on the “Icons” tab, select “Flat-Remix-Blue-Light”.
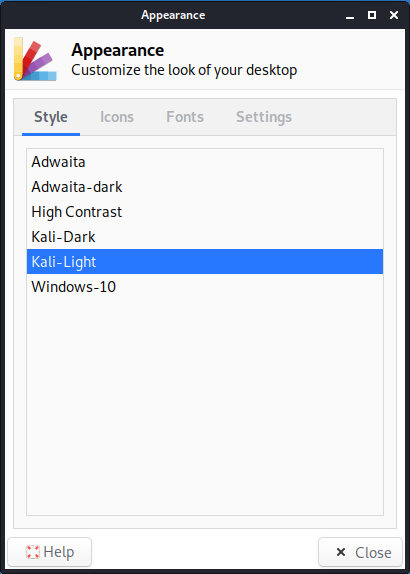
Then go to “Settings” → “Window Manager” and on the “Style” tab, select “Kali-Light”.
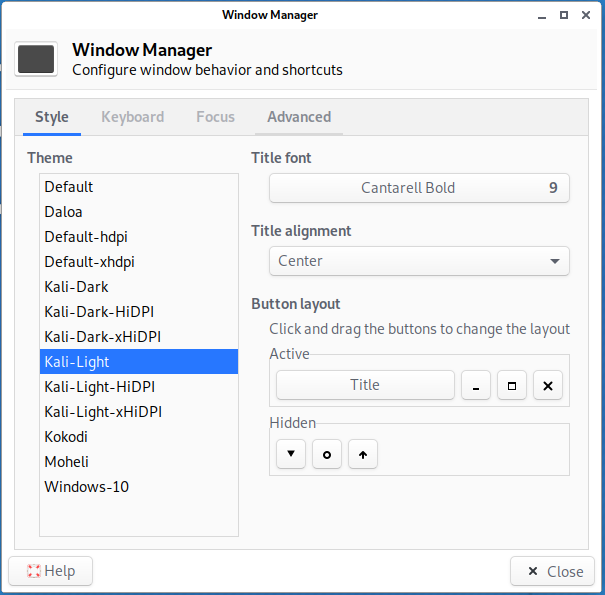
To switch from Light to a Dark theme, simply select Dark themes in the same settings.
11. How to change the Kali Linux language?
In the LightDM login screen, select your preferred language on the right side of the top panel.

12. How to change the keyboard layout?
Go to Settings → Keyboard → Layout:
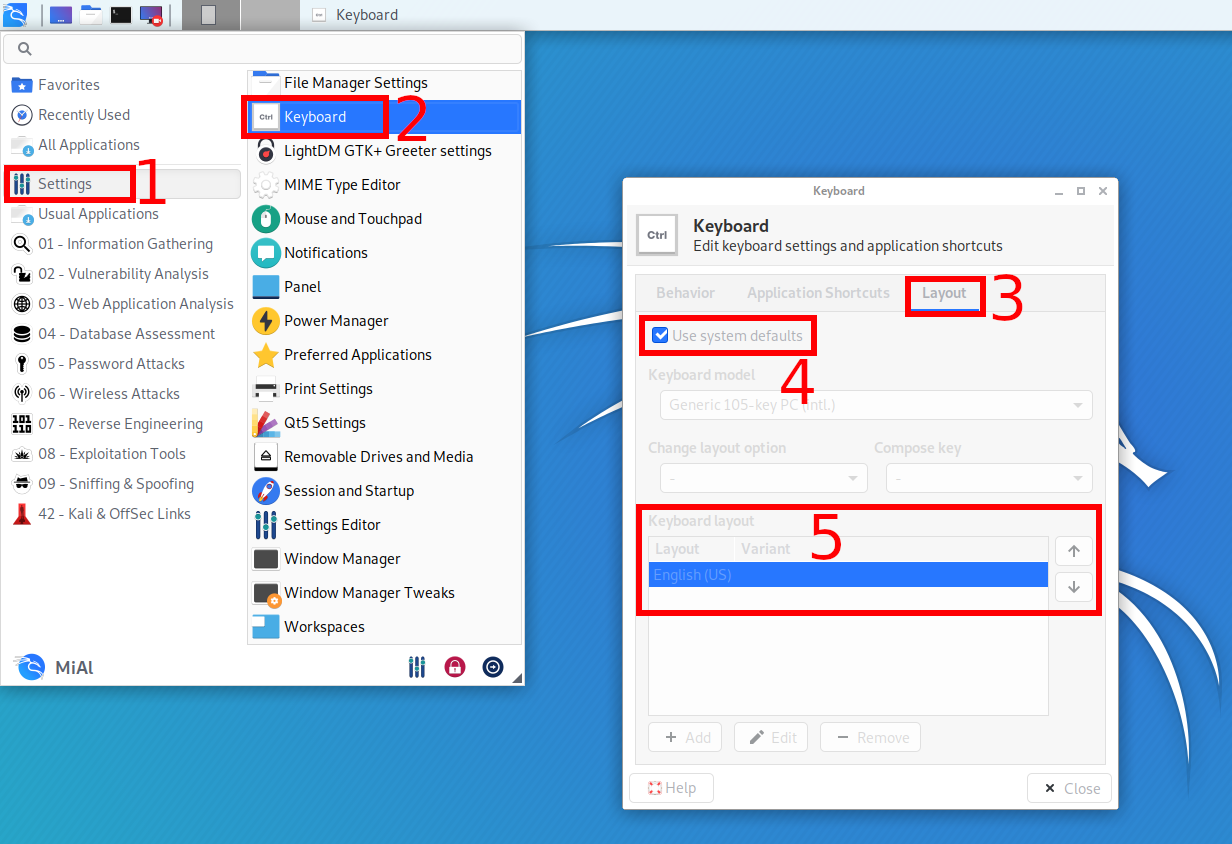
To configure, uncheck “Use system defaults”, as a result, you can add new keyboard layouts, select the default keyboard layout, change the key combination to change the keyboard.
To change and set other keyboard shortcuts, see the adjacent Application Shortcuts tab.
13. How to enable the language bar in the top menu of Kali Linux
Kali Linux does not have a keyboard layout indicator, that is, the language that is currently selected for input is not shown.
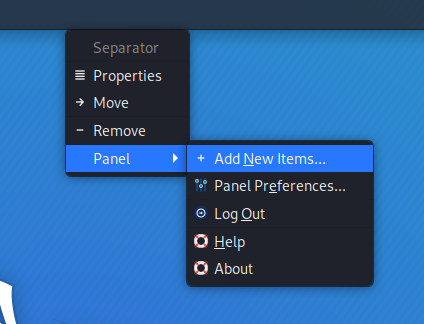
To display the language panel in the form of a button with a flag, when you click on it the keyboard layout will be switched, do the following:
1) Click on the top panel with the right mouse button and in the context menu that opens select Panel → “Add New Items…”:
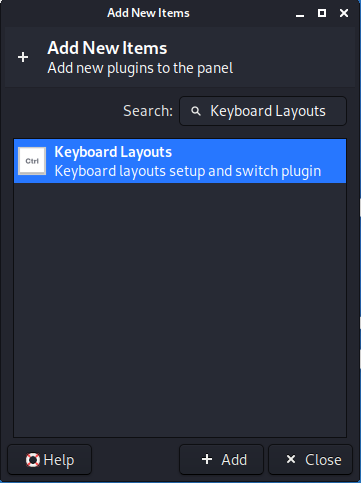
2) Find the “Keyboard Layouts” and click the “Add” button:
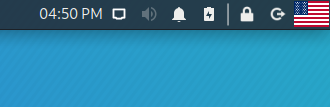
After that, the language bar appears in the form of a flag:
14. Install pip
pip is a package manager for the Python programming language. The pip command is heavily used to install tools or to install tool dependencies. You will almost certainly need pip.
To install, run the commands:
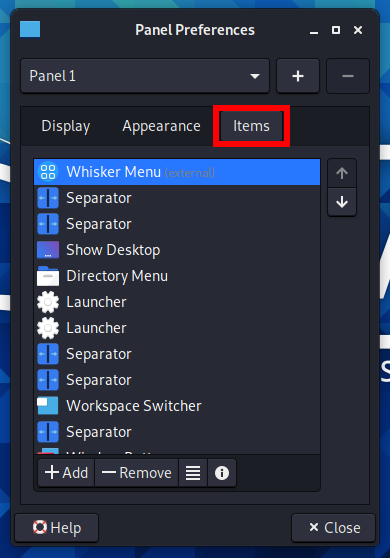
15. How to disable window grouping in Kali Linux
Window grouping is a combination of icons of open applications of the same type into one. Grouping saves space on your control panel.

But not everyone likes the grouping of windows, because in this form, more actions are needed to switch to the desired window. You can also get confused in the windows and waste time switching between them.
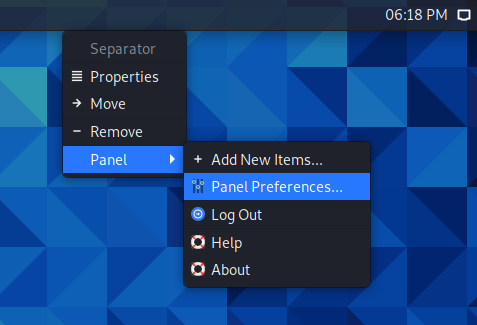
Start by right-clicking on the taskbar.
In the context menu that opens, select “Panel” → “Panel Preferences”:
Switch to the “Items” tab:
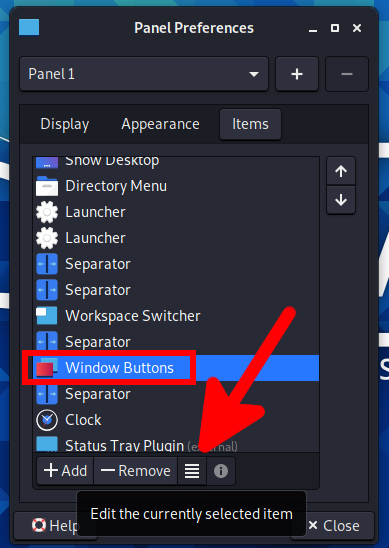
Find “Window Buttons” and click the “Edit the currently selected item” button.
In the “Windows grouping” drop-down list, select “Never”:
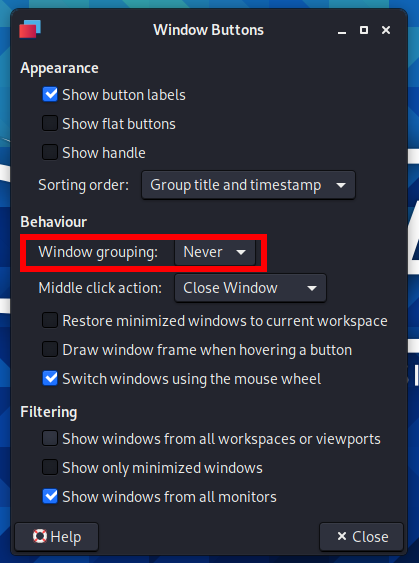
After that, the windows will no longer be assembled into one icon.
Источник
Linux. Настройка клавиатуры
Для чего вообще специально настраивать клавиатуру?
Можно пользоваться и стандартными настройками, но иногда внесенные изменения дают возможность набирать быстрее (это, конечно, не слепая печать, но все же), совершать меньше ошибок, меньше переключать раскладку.
Почему я захотел изменить свою клавиатуру?
Во-первых, когда я начал использовать vim как основной редактор, я понял, что не хочу каждый раз тянуться к ESC . Кроме того, я писал в основном на питоне, поэтому ; нажимал сильно реже, чем : , а в vim разница стала более явной.
Во-вторых, через некоторое время я стал пользоваться вимовскими комбинациями для навигации в браузере, дальше — тайловый оконный менеджер i3 , где они тоже использовались, и хотелось перейти на них везде (вместо обычных стрелок, например, в файловом менеджере).
В-третьих, когда начал писать конспекты на TeX в vim , я понял, что могу реально упростить и ускорить этот процесс; если английская и русская раскладки будут больше похожи друг на друга, то я смогу вводить одинаковые символы (например, точку, запятую, кавычки, доллар) одинаково. Плюс приходится часто менять язык, поэтому надо это делать быстро, надежно и удобно.
Настройка переключения раскладки
Что же, начнем. Сначала разберемся, как можно настроить смену раскладки клавиатуры.
Первый способ. Можно воспользоваться какой-нибудь программой, например, gnome-tweaks :
здесь мы можем выбрать один из вариантов, предлагаемых нам разработчиками. 
Главное — мы не можем создать свой вариант. Давайте научимся делать и это.
Второй способ.
Посмотрим, как то же самое можно сделать руками, и чего еще можно добиться.
Давайте поставим переключение на правый Alt (он же AltGr ):
Но где можно узнать, какие еще есть варианты, и как создать свои? Все файлы лежат /usr/share/X11/xkb/symbols/ . И наши переключения находятся в /usr/share/X11/xkb/symbols/group . Вот так выглядит выбранный вариант:
Там же можно найти множество других вариантов, в том числе ациклические, которые позволяют быть уверенным, какой язык будет после переключения, вместо того, чтобы каждый раз проверять раскладку или смотреть на индикатор.
Ациклическое переключение раскладок
Изменим циклическое переключение по AltGr на ациклическое: AltGr переключает на латинскую раскладку, Shift+AltGr — на русскую.
Перед тем как что-то менять, посмотрим на текущие настройки:
Должны получить что-такое ( pc105 может отличаться в зависимости от количества клавиш на вашей клавиатуре):
Теперь запишем это в конфигурационный файл
В файле /usr/share/X11/xkb/symbols/group можно найти аналогичный вариант с CapsLock , откуда можно понять, что на us будет переключать ISO_First_Group , а на ru — ISO_Second_Group .
Вот такая строчка
говорит, что клавиша при обычном нажатии вызывает ISO_First_Group , а вместе с Shift — ISO_Last_Group .
Изменим в только что созданном файле xkb_symbols :
Проверим, что у нас получилось. Загружаем конфиг:
Теперь язык должен переключаться по заданным комбинациям.
Замечание
Это очень удобно, когда набираешь текст, используя сразу две раскладки (например, TeX ), потому что, переключение происходит часто и гораздо проще каждый раз когда начинаешь писать русский текст нажимать нужные клавиши, чем проверять, какой язык стоит сейчас, и переключать, если нужно. Просто меньше тратишь умственных сил, меньше совершаешь ошибок.
Еще один плюс ациклического переключения — можно больше не использовать никаких индикаторов.
Изменение клавиш
Двоеточие и точка с запятой
Поменяем местами двоеточие и точку с запятой. Как задать значение мы уже знаем, осталось понять как называются символы. Это можно посмотреть в тех же файлах /usr/share/X11/xkb/symbols/ . Выберем файл us и найдем нужную клавишу:
Осталось записать в наш конфигурационный файл в обратном порядке.
ESC и CapsLock
Поменяем ESC и CapsLock . В той же директории в файле capslock можно найти:
partical — специальные куски, которые мы можем включать в другие раскладки.
Теперь либо пишем include «swapescape» , либо просто копируем код.
Alt и Win
Еще аналогично можно поменять, например, левый Alt и Win , что особенно удобно в i3wm , если поставить главный модификатор на Win , то он будет ближе к остальной клавиатуре, и плюс мы не ограничим себя в использовании Alt в комбинациях различный программ (браузер, файловый менеджер. ).
Модификаторы
Для чего вообще они нужны? Можно задать комбинации, которые будут позволять нам быстрее и удобнее набирать какие-то символы или вызывать какое-то действие, помещая поверх других, то есть эти комбинации не будут пересекаться с уже созданными или с комбинациями заданными системой.
Существует два дополнительных уровня: level3 , level5 . И еще комбинации с Shift .
Сделаем так, чтобы клавиша CapsLock в комбинации с h, j, k, l давала эффект стрелки. Тогда не нужно будет каждый раз тянуться ним.
Назначим модификатор (мы уже решили поставить туда ESC , но можно сделать и то и другое: об этом далее):
Если мы хотим назначить для разных раскладок разное значение, то сначала нужно их определить:
Теперь нужно настроить клавиши h, j, k, l. Сначала узнаем их имя — тоже можно посмотреть файл раскладки, это несложно. Их зовут ,… . Какие команды вызывают стрелки можно узнать совершенно аналогично. Дальше пропишем поведение в комбинации с модификатором:
При нормальном нажатии будет обычная буква, при нажатии с шифтом — заглавная, с модификатором третьего уровня — стрелки.
Назначение модификатора как второе значение клавиши
Кроме стрелок можно назначить на третий слой символы или другие операции.
Давайте сделаем, чтобы кроме функции модификатора клавиша CapsLock выполняла и предназначенную ей миссию ранее — была ESC .
Для этого нам понадобится xcape , которая позволяет назначить на на клавишу значение, которое она будет иметь, если нажать ее не в комбинации. Еще есть полезная функция: можно настроить время, после истечения которого ее эффект отменяется.
Как я уже обещал, мы сделаем так, чтобы при однократном нажатии клавиши CapsLock вызывался ESC , а в комбинациях выступала в роли модификатора третьего уровня.
Для этого нужно выполнить
Я использую интервал 500 миллисекунд. Для нашей цели:
Дальнейшие изменения
Когда я пишу в TeX , я использую достаточно много одинаковых символов, но в разных раскладках. Поэтому появилась идея сделать их максимально похожими. В раскладках по умолчанию сильно отличаются положения точки, запятой, кавычек, квадратных и фигурных скобок, вопросительных знаков, различных слэшей.
Здесь было две идеи:
Поставим редко используемые русские буквы на крайних правых клавишах на третий слой других букв.
Схема была такая:
| Клавиша | Третий слой |
|---|---|
| у | ю |
| в | б |
| ь | ъ |
| з | ж |
| щ | х |
Для достижения такого эффекта добавляем в конфиг (здесь для у/ю, для остальных аналогично, названия букв русского алфавита можно посмотреть, где и все остальное):
А на освобожденные клавиши просто назначаем такие же символы, как во второй раскладке.
Этот вариант оказался для меня неудобным и скорее снизил скорость, так как приходилось вспоминать и искать нужные буквы (хоть я выбирал специально созвучные), кроме этого я понял, что не так уж и редко они используются. А заглавные вообще тяжело набирать было.
Этот вариант я использую и сейчас: давайте оставим русские буквы на своих местах, а на третий слой на них назначим те символы, которые стоят на них на английской раскладке.
Тогда мы сможем нажимать одинаковые клавиши, но с модификатором (причем, если мы не назначим что-то другое поверх символов а английской раскладке, то ничего не случиться, если мы будем нажимать модификатор и в ней тоже).
Получаем такую схему:
Еще можем поставить в русской раскладке слэш и вопросительный знак туда, где они стоят в английской.
Плюс к этому добавляется возможность сделать одинаковыми и символы на цифрах, так как и кавычки, и двоеточие, и точка с запятой будет на других клавишах.
И главное, что это реально упростило процесс набора текста.
Замечание
Аналогично можно добавлять пятый слой, хотя пока лично я не испытываю никакой нужды — вполне хватает третьего.
Интересный вариант BackSpace напоследок
А может хватит тянуться далеко-далеко в дальний угол клавиатуры?
Поставим-ка BackSpace на $mod3+Space ( $mod3 наш модификатор третьего уровня)!
Все настройки в принципе применимы для любых Linux дистрибутивов, использующих X.
Полные конфиги можно найти на GitHub.
Этот пост стал для меня отправной точкой к пониманию того, как можно и нужно настроить клавиатуру.
Источник


