- How to Change Permissions and Owners via Command Line
- Why You Need to Change Permissions and Owners in Linux
- How to Change File and Folder Permissions
- How to Use chmod Command
- Changing the Owners of Files and Folders
- Using Options with chmod and chown Commands
- Conclusion
- How to Manage File and Folder Permissions in Linux
- Command line: File permissions
- Command line: File ownership
- GUI: File permissions
- GUI: Change ownership
How to Change Permissions and Owners via Command Line
In this tutorial, you will learn how to change permissions and owners in Linux using chmod and chown commands. By doing so, you’ll have better management in team-based projects.
Why You Need to Change Permissions and Owners in Linux
Linux is a multi-user operating system, so more than one person can work on the same computer at the same time. What’s great, the system can be accessed locally or remotely. That’s why developers often use this OS for group projects.
In such a large environment, we need to set file permissions and ownership, so only specific users can access our data. This way, we can protect sensitive information and prevent unwanted changes from happening.
Fortunately, thanks to chmod and chown commands, it is easy to change permissions and owners in Linux. But before we begin to learn how to use them, make sure you have access to the command line. You can launch it by pressing Ctrl + Alt + T.
How to Change File and Folder Permissions
We will be using the chmod command to change file and folder permissions in Linux. But first, you need to be aware that there are three types of users who can interact with a file:
- Owner — the user who creates and owns a file or folder.
- Group — all users who are members of the same group.
- Others — all other users on the system who are neither the owner nor members of a group.
To see permissions and owners of a specific file, you can run this command:
The result will look like this:
Let’s break the output down to see what each field means:
- “-rwxrw-rw-“ — this part of the line represents the file permissions. To understand it better, we have to divide it into four groups: (–), (rwx), (rw-), and (rw-).
- The first group indicates the file type. Our example shows a hyphen, which represents a regular file. If we are inspecting a directory, the hyphen will be replaced by d.
- The three characters after the file type represent the owner’s file permissions. In this example, we can see that the owner can read (r), write (w), and execute (x) the file.
- The next three characters are the group’s file permissions. We can conclude that the group can read (r) and write (w), but cannot execute the file. This is because the last character is a hyphen instead of the letter x.
- The last group is others’ file permissions. Based on our example, this type of user cannot execute the file, but they are allowed to read and write.
- 1 – the number of hard links. A hard link is an additional name for an existing file.
- user user – the owner and group owner of the file.
- 0 – the size of the file in bytes.
- Jan 19 12:59 – the last modification date.
- myfile.txt – the name of the file/folder.
How to Use chmod Command
Let’s say we want to change Linux file permissions from -rwxrw-rw- to -rwx-r–r–. Simply enter this line:
By executing this command, the owner can read, write, and execute the file (rwx). However, group and others are only allowed to read (r–).
At this point, you might wonder why we are using a three-digit number (744) after the chmod command.
The number determines the file permissions. Read, write, and execute are represented by a numerical value:
- r (read) – 4
- w (write) – 2
- x (execute) – 1
So if you want to give all permissions (rwx) to a user, we need to add read (4), write (2), and execute (1). Therefore, rwx is equal to 7.
Meanwhile, since group and others are only allowed to read the file, we give them 4.
Remember, the owner’s permissions always come first, then followed by group and others. That’s why we enter 744.
If you don’t want to give any permission to a user, enter 0 into the corresponding spot.
Here is a list of the most common file permissions:
Common permissions for directories:
Changing the Owners of Files and Folders
To change the owner of a file and folder, we will be using the chown command. This is the basic syntax:
Let’s say we have a file named “myfile.txt.” If we want to set the owner of the file to “hostinger,” we can use this command:
However, if we want to change the group owner of the file to “clients,” we’ll enter this line instead:
Notice that we use a colon (:) before “clients” to indicate that it is a group owner.
Now, to change both the owner and group owner at the same time, the syntax would be like this:
The main rule is that the owner should come before the group owner, and they have to be separated by a colon.
Using Options with chmod and chown Commands
Option is an additional command to change the output of a command.
One of the most popular options that you can combine with chmod and chown is -R (Recursive). This Linux option allows you to change permissions or owners of all files and subdirectories inside a specific directory.
If you want to use an option, you have to place it right after the chmod/chown command.
Take a look at this example:
After you enter the above command, the owner can read, write, and execute all files and subdirectories inside the /etc/myfiles directory. The command also gives read and execute permissions to group and others.
Be extra careful with this option. Improper use of the command may cause critical failure, and it requires a great deal of work to reverse the changes.
Aside from -R, the following options are often used with chmod and chown commands:
- -f or force. The command line will ignore any errors and apply the chmod and chown commands.
- -v (verbose) option gives you diagnostics of all files that are processed by the command.
- -c (changes) is similar to the -v option. However, it will only provide information when changes were successfully made.
Conclusion
In this tutorial, you have learned how to use chmod and chown commands to change permissions and owners in Linux. We also provided the basic syntax and several useful options that you can combine with either of these commands.
To learn more about Linux command line, you can read our article on basic bash commands.
If you have any questions, feel free to comment below!
Domantas leads the content and SEO teams forward with fresh ideas and out of the box approaches. Armed with extensive SEO and marketing knowledge, he aims to spread the word of Hostinger to every corner of the world. During his free time, Domantas likes to hone his web development skills and travel to exotic places.
Источник
How to Manage File and Folder Permissions in Linux
For many users of Linux, getting used to file permissions and ownership can be a bit of a challenge. It is commonly assumed, to get into this level of usage, the command line is a must. Although there is always far more power and flexibility to be had, running seemingly complicated command isn’t alwaysa necessity. With the help of some of the most user-friendly desktop interfaces available, you can get away with little to no command line usage. Even with file permission and ownership.
That’s right, much to the surprise of many a new user, managing files and folders can be done from within the file managers. But before we get to the GUI, it’s always best to have a solid understanding of what it’s doing. So, we’ll start with the command line first.
Command line: File permissions
The commands for modifying file permissions and ownership are:
chmod – change permissions
chown – change ownership.
Neither command is difficult to use. It is important, however, that you understand the only user that can actually modify the permissions or ownership of a file is either the current owner or the root user. So, if you are user Bethany, you cannot make changes to files and folders owned by Jacob without the help of root (or sudo). For example:
A new folder was created on a data partition called /DATA/SHARE. Both users Bethany and Jacob need read and write access to this folder. There are a number of ways this can be done (one of which would be to join the users to a special group – we’ll go over managing groups in another post). If Bethany and Jacob are the only users on the system (and you know your network is safe – very important), you can change the permissions of the folder to give them access. One way to do this would be to issue the command:
The breakdown of the above command looks like:
sudo – this is used to gain admin rights for the command on any system that makes use of sudo (otherwise you’d have to ‘su’ to root and run the above command without ‘sudo’)
chmod – the command to modify permissions
-R – this modifies the permission of the parent folder and the child objects within
ugo+rw – this gives User, Group, and Other read and write access.
As you can probably surmise, this command opens wide the SHARE folder such that anyone on the system can have access to that folder. As I mentioned earlier, a more secure method would be to use groups. But we’re just using this for the purpose of demonstration.
The breakdown of permissions looks like this:
The ‘other’ entry is the dangerous one, as it effectively gives everyone permission for the folder/file. The permissions you can give to a file or folder are:
Using the -R switch is important. If you have a number of sub-folders and files within the SHARE directory, and you want the permissions to apply from the parent object (the containing folder) to the child objects (the sub-folders and files), you must use the -R (recursive) switch so the same permissions are applied all the way to the deepest folder, contained within the parent.
Command line: File ownership
Changing the ownership of a file or folder is equally as simple. Say Jacob moved a folder for Bethany into the SHARE directory – but Jacob still has ownership. This can be changed with a simple command:
Let’s break this down.
sudo – admin rights must be used since we are dealing with a folder that belongs to another user
chown – the command for changing ownership
-R – the recursive switch to make sure all child objects get the same ownership changes
bethany – the new owner of the folder
/DATA/SHARE – the directory to be modified
Should Bethany send the folder back to Jacob, the ownership would need to again be changed (again, this will be simplified with the use of groups).
GUI: File permissions
I’m going to demonstrate changing file permissions using the Nautilus file manager on an Ubuntu 13.10 system.
Let’s say you need to allow everyone to gain read/write permissions to the folder TEST. To do this, within the Nautilus file manager, follow these steps:
- Open Nautilus
- Navigate to the target file or folder
- Right click the file or folder
- Select Properties
- Click on the Permissions tab
- Click on the Access files in the Others section
- Select “Create and delete files”
- Click Change Permissions for Enclosed Files
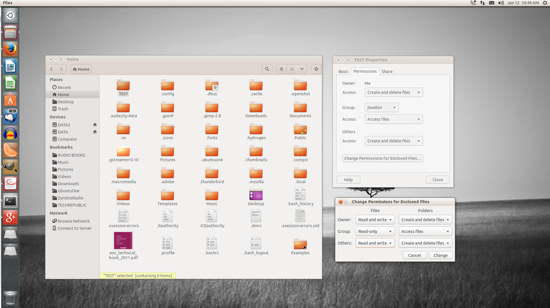
- In the resulting window, Select Read and Write under Files and Create and delete files under Folders (Figure A)
- Click Change
- Click Close.
The trick comes when you need to change the permissions of a folder which does not belong to you. It can be done, but Nautilus must be started with admin access. To do this, follow these steps:
Open up a terminal window
Issue the command sudo -i
Issue the command nautilus
The sudo -i command gives you persistent access to sudo, until you enter the exit command to remove that access. Once Nautilus is open, you can change the permissions of the folder or file as described above – even if you are not the owner of the folder or file.
NOTE: If you’re using a distribution that doesn’t use sudo, alter the above instructions to:
Open up a terminal window
Issue the command su
Type your root password and hit Enter
Issue the command nautilus.
After you’ve completed the task, close the Nautilus window and then the terminal window.
GUI: Change ownership
Changing the ownership of a file or folder will most often require the use of admin rights. So for this, you’ll need to start Nautilus in the method described above.
For changing ownership of a folder or file through Nautilus, do the following:
In the Nautilus window (opened with admin rights), locate the folder or file in question
Right click the folder (or file)
Click on the Permissions tab
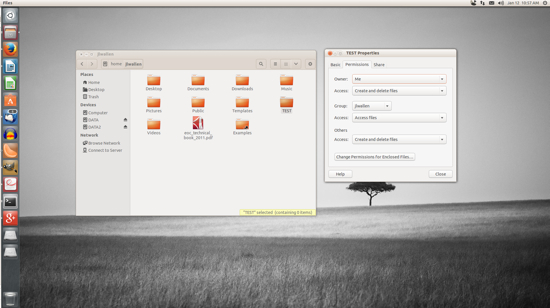
Select the new owner from the Owner drop-down (below)
That’s all there is to it. At this point you shouldn’t have any problems changing permissions or ownership for a file or folder with either the command line or the GUI. The use of groups will empower you to alter permission and ownership with more power and security – we’ll cover that soon. Until then, enjoy modifying your files and folders!
Источник


