- How can I change programs that start automatically when I turn on my computer?
- How to change startup programs in Windows 10, to make your computer start faster
- Check out the products mentioned in this article:
- Windows 10 (From $139.99 at Best Buy)
- How to change startup programs in Windows 10
- How to disable startup programs in Windows 10
- How to set a program to launch at startup in Windows 10
- How to remove Startup Programs in Windows 10 [Full Guide]
- Windows 10 Guide to remove Startup Programs
- 1. Use the File Explorer
- 2. Use the registry
- 3. Use the Group Policy Editor
- 4. Use the Task Scheduler
- How to Change Program Files Location in Windows 10, 8, 7
- Change program files directory on Windows 10, 8, 7
How can I change programs that start automatically when I turn on my computer?
I have several programs that slow down my start up. I don’t use the programs and would like them to not start automatically.
First, note that you should be concerned with *all* programs that start automatically, not just with those that go into the system tray. Not all auto-starting programs manifest themselves by an icon in the tray.
On each program you don’t want to start automatically, check its Options to see if it has the choice not to start (make sure you actually choose the option not to run it, not just a «don’t show icon» option). Many can easily and best be stopped that way. If that doesn’t work, run MSCONFIG from the Start | Run line, and on the Startup tab, uncheck the programs you don’t want to start automatically.
However, if I were you, I wouldn’t do this just for the purpose of running the minimum number of programs. Despite what many people tell you, you should be concerned, not with how *many* of these programs you run, but *which*. Some of them can hurt performance severely, but others have no effect on performance.
Don’t just stop programs from running willy-nilly. What you should do is determine what each program is, what its value is to you, and what the cost in performance is of its running all the time. You can try internet searches and ask about specifics here.
Once you have that information, you can make an intelligent informed decision about what you want to keep and what you want to get rid of.
How to change startup programs in Windows 10, to make your computer start faster

- You can change startup programs in Windows 10 — the applications that start when you turn on your computer — by adjusting your settings.
- You can also disable startup programs in Windows 10, as having too many can slow down your computer, and even cause Windows to crash upon startup.
- Visit Business Insider’s homepage for more stories.
Having programs open on startup can save you a lot of hassle if you use them frequently. When they open by default, after all, you won’t have to spend time searching for them on your computer. Popular programs like Skype, Spotify, and f.lux will usually be set to startup by default.
However, having too many startup programs can make turning on your Windows 10 computer an incredibly slow process. This is especially true for older computers with less processing power.
It’s possible to turn this function off for individual programs, as well as enable it for other programs. This means that you can set it so only the programs that you need will start up right away.
Check out the products mentioned in this article:
Windows 10 (From $139.99 at Best Buy)
How to change startup programs in Windows 10
1. Click the Windows logo at the bottom left of your screen, or press the Windows key on your keyboard. Then search and select «Startup Apps.»
2. Windows will sort the applications that open on startup by their impact on memory or CPU usage. If you’re experiencing slow startups, start by disabling the programs at the top and work down.
3. If you don’t recognize a program on this list, then it might be a good idea to search its name in your internet browser to see if it’s important. Either you’ll find out what it’s there for, or realize that it’s unwanted software that you should consider uninstalling.
For information on how to uninstall programs in Windows 10, see our article here.
How to disable startup programs in Windows 10
You can also disable startup programs via the Task Manager.
1. Open the Task Manager by right-clicking the Windows icon, or by pressing Ctrl-Alt-Delete.
2. Click «More Details» at the bottom of the Manager, and then select the Start-up tab at the top.
3. You can disable options in this list by right clicking them.
You can sort programs in this list by how many resources they take up when they start.
How to set a program to launch at startup in Windows 10
1. Click the Windows logo at the bottom left of your screen, or press the Windows key on your keyboard, and then type the name of the application you want to run at startup.
2. Right-click the application and select «More.»
3. Select «Open file location.» If you don’t see that option in the More menu, then you can’t set it up to open at startup.
4. In the folder that opens, right-click the program’s icon and select «Copy.»
5. Either click the Windows logo in the bottom left again and search for the Run application, or hit the Windows key + R on your keyboard.
6. In the Run window, type «shell:startup» and then press Enter.
Paste the shortcut into the new folder that appears by right-clicking on an empty space and selecting «Paste.»
How to remove Startup Programs in Windows 10 [Full Guide]

- If booting your OS seems to last forever, you might want to take action.
- Start by managing your startup apps so that you only keep those you need. Here’s how to quickly remove programs from the Startup.
- Check out more handy fixes on our Windows 10 Guides.
- Don’t be shy to explore the Tutorials Hub as well for more tech tricks and tips.

- Download Restoro PC Repair Tool that comes with Patented Technologies (patent available here).
- Click Start Scan to find Windows issues that could be causing PC problems.
- Click Repair All to fix issues affecting your computer’s security and performance
- Restoro has been downloaded by 0 readers this month.
Does it take a long time to start up your operating system? Maybe the boot process is lengthy because there are many applications that load at startup.
There are different tools to manage startup apps. It can be done via the Startup Manager, Task Manager, Explorer, or Registry editor. Below, you can find a few methods that will guide you through the process of adding or removing the startup apps.
You can, also, learn how to enable or disable different apps.
Windows 10 Guide to remove Startup Programs
- Right-click the empty space on the Taskbar.
- A new window will pop up. Drag your mouse pointer on the Task Manager feature and left-click on it.
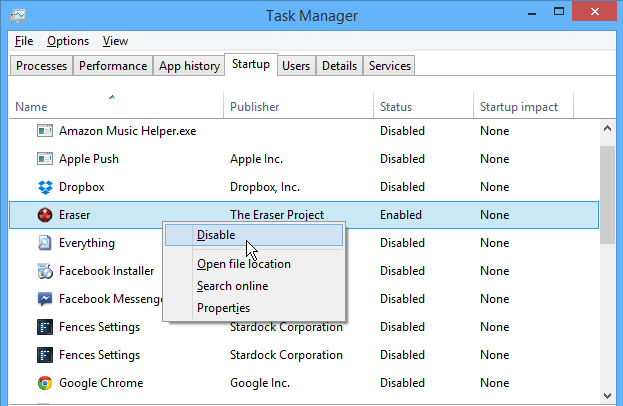
- The Task Manager window will open. Left-click on the Startup tab.
Note: You can navigate directly on the Startup tab by pressing the key combination: Win + R and enter the following command: taskmgr /0 /startup. - In the Startup tab, you can observe a list of applications that are starting with Windows;
- Disable startup application: Prevent any application in the list, from starting with your operating system. Right-click on it and select from the menu, the Disable feature.
- Enable startup application: Right-click on the application( from the startup list) and select from the menu the Enable feature. In this case, the application will start with the OS.
1. Use the File Explorer
- Press the Win + R key combination.
- Enter the following command: shell:Startup, and press the Enter key.
Note: If you want to add or remove startup apps for all users, you need to enter the following command: shell: Common Startup. - A Startup window will open. Find the application executable file that needs to load when Windows boots.
- Create a shortcut of this app. Copy it and paste it in the Startup window. This is the way for adding a startup application in Windows 10.
- To remove the application, delete the shortcut from the Startup folder.
2. Use the registry
- Press the Win + R key combination.
- Enter the following command: regedit without quotes and press the Enter key.
- Navigate to the following path or register key:
- In the name column, you can find the application that starts automatically, when Windows boots.
- Remove the application from the Startup:
- Right-click on the application name and choose Delete feature.
- Adding the application in the Startup:
- Right-click in the Registry Editor window and select New -> String value feature.
- Add value name (the name of the application).
- Add value data: enter the full path to the executable (*.exe) of the application that you wish to run at the startup.
3. Use the Group Policy Editor
If you want to add applications to startup, you can do so using Group Policy Editor. We have to mention that this tool isn’t available in Home versions of Windows, but if you’re using Pro or Enterprise version, this tool should be available for you.
To add an application to startup using Group Policy Editor, do the following:
- Press Windows Key + R and enter gpedit.msc. Press Enter or click OK.
- When Group Policy Editor opens, in the left pane navigate to User Configuration > Windows Settings > Scripts (Logon/Logoff). Now in the right pane double click on Logon.
- Logon Properties window will appear. Click on the Add button.
- When Add a script window opens, click on the Browse button.
- Select the application you want to start. After doing that, click on OK.
- Now click on Apply and OK to save changes. After saving the changes, restart your PC and check if the application starts automatically with Windows.
This is a simple method, but in order to use it, you need to have Pro or Enterprise version of Windows. If you’re a Home user, you’ll have to look for a different solution.
4. Use the Task Scheduler
Windows comes with a useful tool called Task Scheduler. Using this tool you can set certain applications to start at a specific time, but you can also use it to add applications to startup.
How to Change Program Files Location in Windows 10, 8, 7


- Download Restoro PC Repair Tool that comes with Patented Technologies (patent available here).
- Click Start Scan to find Windows issues that could be causing PC problems.
- Click Repair All to fix issues affecting your computer’s security and performance
- Restoro has been downloaded by 0 readers this month.
Normally if you have Windows 8, Windows 10 or any other version of Windows operating systems, you will definitely have your program files location in your “C:/” driver where the operating system itself is usually installed. This is mainly because the system needs to ensure a good correlation between the programs that you are installing and the Windows 8 or Windows 10 operating system. 
Of course you can change this location anytime and we will see how to do so by reading the tutorial posted a few rows below. But first of all, we will need to know the consequences that may happen if we change the program files location. Mainly the program files folder is put there for a good reason, if you move it and all your programs will be moved to another location you may experience some system errors after a while.
Change program files directory on Windows 10, 8, 7
- While on your Desktop in Windows 8, Windows 10 or Windows 7, you will need to press and hold the buttons “Windows” and “R”.
- Holding the buttons above will open the “Run” window where we will need to type “Regedit”.
- After typing “Regedit” you will need to press the “Enter” button on the keyboard.
- Now you should have the “Registry Editor” window in front of you.
- On the left side of the window left click on the “HKEY_LOCAL_MACHINE” folder.
- In the “HKEY_LOCAL_MACHINE” folder left click on the “ SOFTWARE” folder.
- In the “SOFTWARE” folder left click on the “Microsoft” folder.
- In the “Microsoft” folder left click on the “Windows” folder.
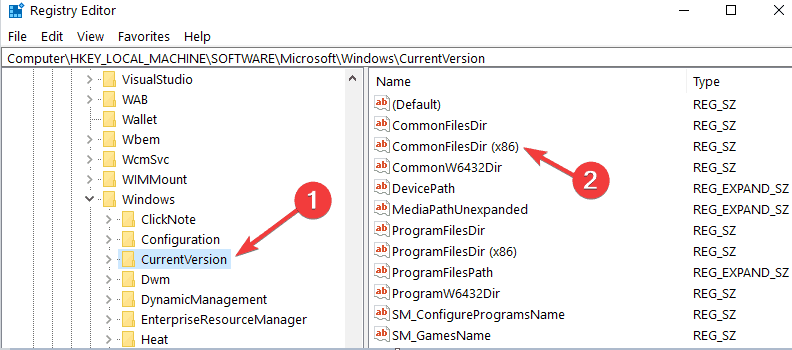
- And now in the “Windows” folder left click on the “CurrentVersion” folder.
- Now that you are in the “CurrentVersion” folder you will have to look in the right side of the window for a “ProgramFilesDir” item. Note: if you have a 64 bit system it will be a “ProgramFilesDir (x86)” item.

- Double click (left click) on it and from there you will be able to change the path of the “Program files” folder by entering a new path in the “Value data” section of the window.
- After you are done selecting a path you will need to left click on “OK” and then close the “Registry Editor” window.
- If the changes did not work after you closed the window try a reboot of the Windows 8 or Windows 10 system and try it afterwards.
Now, you know how to change the path of the program files folder and you can see that it didn’t took up much of your time. Always keep in mind that if you change the path of the program files folder, this may cause malfunctions in the system. Microsoft made it clear that it does not support changing the location of the program files:
Microsoft does not support changing the location of the Program Files folder by modifying the ProgramFilesDir registry value. If you change the location of the Program Files folder, you may experience problems with some Microsoft programs or with some software updates.
RELATED STORIES TO CHECK OUT:


