- How to Set A Custom Screen Resolution in Ubuntu Desktop
- Share this:
- 47 responses to How to Set A Custom Screen Resolution in Ubuntu Desktop
- Thread: Change Screen Resolution From Within The Terminal
- Change Screen Resolution From Within The Terminal
- Re: Change Screen Resolution From Within The Terminal
- Re: Change Screen Resolution From Within The Terminal
- How to Change Screen Resolution through the Ubuntu Terminal
- Changing Screen Resolution through the Command Line
- Karim Buzdar
How to Set A Custom Screen Resolution in Ubuntu Desktop
Your preferred screen resolution is not available in the Display settings? Well, here I’m going to show you how to add a custom screen resolution in Ubuntu 17.04 (Work on all current Ubuntu releases).
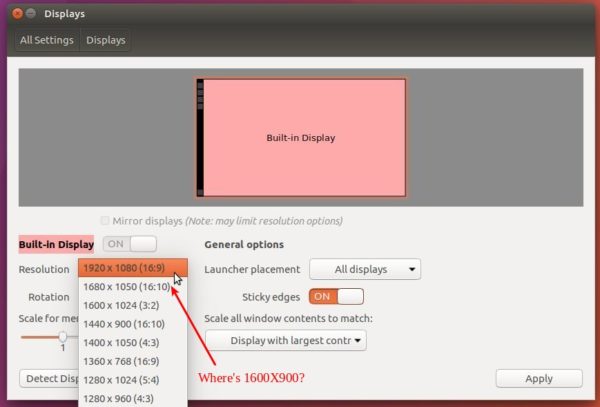
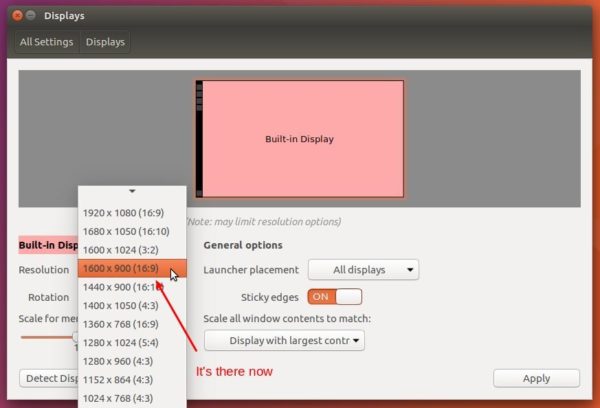
On my Ubuntu 17.04 Desktop, the default 1920X1080 (16:9) resolution is kinda high for me. Though there are options to scale for menu, title bars, and text, I prefer 1600X900 (16:9) which is available in Ubuntu 16.04 LTS by default.
To get my screen resolution, I did the following steps:
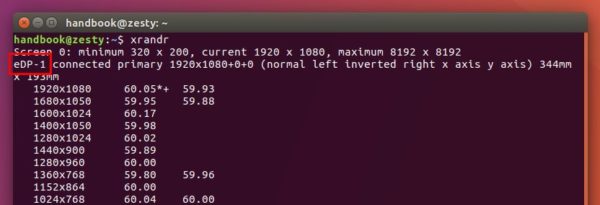
1. Open terminal via Ctrl+Alt+T or by searching for “Terminal” from dash. When it opens, run command:
It outputs current screen resolution as well as all available solutions. ALL I need here is the display device name, in my case, it’s eDP-1.
2. Run command to calculate VESA CVT mode lines by given resolution:
Replace 1600 900 (1600X900 in my case) in the command to your desired screen resolution.

3. Copy the Modeline (words with red underline, see previous picture), and run command to add new mode:
NOTE the command section after —newmode are COPIED from previous step output.

4. Now add the new created mode for your display device:
Replace eDP-1 (see step1) and «1600x900_60.00» (Step 2 or 3) in the command.

Finally Apply the new resolution in the Display settings:
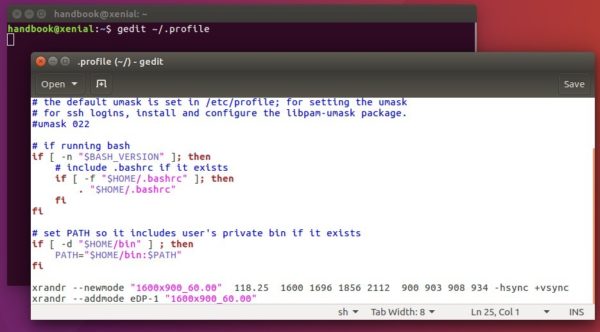
IMPORTANT: To make Ubuntu remember the new created screen resolution at next start, you have to edit the .profile via command:
add the last 2 commands to the end, commands in step 3 and 4, and save the file.
Share this:

I’m a freelance blogger who started using Ubuntu in 2007 and wishes to share my experiences and some useful tips with Ubuntu beginners and lovers. Please notify me if you find any typo/grammar/language mistakes. English is not my native language. Contact me via [email protected]
47 responses to How to Set A Custom Screen Resolution in Ubuntu Desktop
A very cool tip! I now can use a notebook with physical 1280 x 800 resolution with 1638 x 1024 🙂 Thank you!
I’m getting the following error message. Any chance on helping me make it right?
$ sudo xrandr –addmode eDP1 “1600x900_60.00”
X Error of failed request: BadMatch (invalid parameter attributes)
Major opcode of failed request: 140 (RANDR)
Minor opcode of failed request: 18 (RRAddOutputMode)
Serial number of failed request: 45
Current serial number in output stream: 46
I got that error but if you continue on with the steps it still works fine.
I am getting the same error. I don’t know what to do next.
Same Here. Does Not Work.
$ xrandr
And then replace eDP1 with either VGA-1 or DVI-1, whatever reads connected next to it
your display may be eDP-1 not eDP1.
Find the exact text from xrandr (step 1).
After changing your screen resolution, it’s xy alignment may overlap or gap your other screens.
Move them around, based on left,top origin 0,0
xrandr —output eDP-1 —pos 1600×0
Not working for me
Can we do this for 2560X1080 for display on LG Ultrawide monitor
The steps work fine, but it doesn’t display correctly- I get fuzzy lines as if alignment is off.
perfect for me using 1680×1050 because this option was not available in display choices; TKS
Nice to see this technique laid out neatly – you don’t need to place the “cvt” command in your profile file though.
That is only used to give you the format for placing in the –newmode xrandr command.
It won’t do any harm there, but it won’t actually do anything 🙂
I get an error when doing this command:
sudo xrandr –newmode “1920x1080_60.00” 173.00 1920 2048 2248 2576 1080 1083 1088 1120 -hsync +vsync
X Error of failed request: BadName (named color or font does not exist)
Major opcode of failed request: 140 (RANDR)
Minor opcode of failed request: 16 (RRCreateMode)
Serial number of failed request: 41
Current serial number in output stream: 41
Not sure what’s the problem. But as @Andrew said, it still work if you continue on the steps.
Thanks a lot Ji .
/.profile file enough add 2 last commands. (cvt is only show mode, not configuration)
Thank you – not only is your English perfect, your guidance on screen resolution is also clear and precise. I’ve been trying to sort this problem out for weeks. Excellent…
Fantastic tutorial, it worked “out of the box”. Thanks a lot! 🙂
Does not work at all. Xrander not found. Whye the HELL do you have to do these things in some little DOS box in Linux? Can’t they catch up with other operating systems where you do not have to use this little MS DOS box, and set things in a GUI?
And it should be forgiving of your spelling and or typing. I typed Xrander and it gave an error! Unbelievable. It should work spelled either way.
Then, the thing does not say anything about edp-1 so that does not work. I don’t know what else would. I got this…..
xrandr
Screen 0: minimum 320 x 200, current 1024 x 768, maximum 16384 x 16384
HDMI-0 disconnected (normal left inverted right x axis y axis)
DVI-0 disconnected (normal left inverted right x axis y axis)
VGA-0 connected 1024×768+0+0 (normal left inverted right x axis y axis) 0mm x 0mm
1024×768 60.00*
800×600 60.32 56.25
848×480 60.00
640×480 59.94
[email protected] :
$ 1600 x 1200 / 75 Hz
1600: command not found
[email protected] :
$ cvt 1600 900
# 1600×900 59.95 Hz (CVT 1.44M9) hsync: 55.99 kHz; pclk: 118.25 MHz
Modeline “1600x900_60.00” 118.25 1600 1696 1856 2112 900 903 908 934 -hsync +vsync…..
THEN you notice, “command not found 1600! WHAT THE HELL. Why would you have to put in ANOTHER command? OK so then the cvt thing. ….
xrander –newmode “1600x900_60.00” 118.25 1600 1696 1856 2112 900 903 908 934 -hsync +vsync
No command ‘xrander’ found, did you mean:
Command ‘xrandr’ from package ‘x11-xserver-utils’ (main)
xrander: command not found
[email protected] :
$ sudo xrandr –newmode “1600x900_60.00” 118.25 1600 1696 1856 2112 900 903 908 934 -hsync +vsync
and AGAIN command not found. I HATE MS DOS. …
thern to top it all off I finally get this. ….
xrandr –newmode “1600x900_60.00” 118.25 1600 1696 1856 2112 900 903 908 934 -hsync +vsync
X Error of failed request: BadName (named color or font does not exist)
Major opcode of failed request: 140 (RANDR)
Minor opcode of failed request: 16 (RRCreateMode)
Serial number of failed request: 33
Current serial number in output stream: 33
[email protected] :
$ sudo xrandr –addmode eDP-1 “1600x900_60.00”
xrandr: cannot find output “eDP-1″….
AND it simply does not work. Can’t someone write a damn display thingy that you can click on the numbers you want, picking displays from a list (mine is a Dell UltraScan P1110 – CRT monitor – 21″… which last I checked Window XP had listed, and I used.) Nothing showing up, you cannot select anything from the dropdown. AND I REFUSE to get a new monitor, this one is much better than those flat screen crap ones they now sell with the stupid widescreen, which I never saw the need for! Also it’s native resolution is 1800X1440, which I can’t seem to find in the dropdown. It only wants to let me set some widescreen thing , 1024X768 OR the old fashioned 800X600 which Windows 95 used. I think Linux is about 20 years behind the times on this one.
Источник
Thread: Change Screen Resolution From Within The Terminal
Thread Tools
Display
Change Screen Resolution From Within The Terminal
Posted this on Linux Mint forums also
Recently I have changed my screen resolution, and well it didn’t turn out to well. My computer boots up fine and everything and once logged into X it does not shut down but it shows a screen where everything is distorted and overlapped. That means I can not see how to change the resolution back to what it originally was. Is there a way to do this while Grub is loading, and or/ is there a way to change the resolution via terminal? If you need to know what my resolution was before it was
Also if you need to know the distro it is
Linux Mint 4.0 Daryna
Thank you all for your help in advance.
Since Linux Mint is based off of Ubuntu, (Gusty I thin( I think that maybe , notice I say maybe someone will be able to help.
What I am looking for specifically is to just Set it back to 800×600 resolution while in the ALT-F2 terminal. I do not want an Easy Way Out. I am willing to do what it takes and try the command line but I just am wondering if this is possible because I don’t want to have to reinstall my system just to get the resolution back. If that is what I have to do then so be it but for now, please take the time to read and try to help me, you don’t have to help, but I’ll be infinitely greatful if you would.
![]()
Re: Change Screen Resolution From Within The Terminal
To change the resolution (monitor display) from the command line ( using a terminal window ) do this: ( when x is running — don’t exit Xwindows just use a terminal window. This is done from the command line. )
[ xrandr ]
this command will bring up information like this:
SZ: Pixels Physical Refresh
0 1024 x 768 ( 271mm x 201mm ) 75 70 60
1 800 x 600 ( 271mm x 201mm ) 85 75 72 60 56
2 640 x 480 ( 271mm x 201mm ) 85 75 72 60
*3 832 x 624 ( 271mm x 201mm ) *74
4 720 x 400 ( 271mm x 201mm ) 85
5 640 x 400 ( 271mm x 201mm ) 85
6 640 x 350 ( 271mm x 201mm ) 85
Current rotation — normal
Current reflection — none
Rotations possible — normal
Reflections possible — none
This will show the resolutions possible on your monitor. The star indicates what is currently being used. To change resolution use a command like this:
[ xrandr -s 1024×760 ]
This will immediately change the resolution; in this case to 1024×760.
To check for xrandr on your system type
[ xdpyinfo ]
(If you see RANDR listed under number of extensions then it should work.)
Also typing [ xrandr -s ] will give u info on the usage of this command.
Good Luck!
Let me know if this was helpful.
Last edited by cmb11; August 8th, 2008 at 10:33 PM .
Re: Change Screen Resolution From Within The Terminal
Full credit to this link:
To change the resolution (monitor display) from the command line ( using a terminal window ) do this: ( when x is running — don’t exit Xwindows just use a terminal window. This is done from the command line. )
[ xrandr ]
this command will bring up information like this:
SZ: Pixels Physical Refresh
0 1024 x 768 ( 271mm x 201mm ) 75 70 60
1 800 x 600 ( 271mm x 201mm ) 85 75 72 60 56
2 640 x 480 ( 271mm x 201mm ) 85 75 72 60
*3 832 x 624 ( 271mm x 201mm ) *74
4 720 x 400 ( 271mm x 201mm ) 85
5 640 x 400 ( 271mm x 201mm ) 85
6 640 x 350 ( 271mm x 201mm ) 85
Current rotation — normal
Current reflection — none
Rotations possible — normal
Reflections possible — none
This will show the resolutions possible on your monitor. The star indicates what is currently being used. To change resolution use a command like this:
[ xrandr -s 1024×760 ]
This will immediately change the resolution; in this case to 1024×760. ( it takes about .5 seconds on my system which uses a «Super View 1280» monitor which is actually an Hitachi cm500 as far as specifications go — I am using RedHat with kernel 2.4.20-6 and Xfree86 version 4.3.0)
To check for xrandr on your system type
[ xdpyinfo ]
(If you see RANDR listed under number of extensions then it should work.) Also typing
[ xrandr -s ]
will give this information:
usage: xrandr [options]
where options are:
-display or -d
-help
-o
or —orientation
-q or —query
-s / x or —size / x
-r or —rate
-v or —version
-x (reflect in x)
-y (reflect in y)
—screen
—verbose
This assumes your (crt) monitor is set up with vertical and horizontal specifications that it can handle. Be aware that you can inadvertently destroy your monitor with the wrong settings.
I’ve tried xrandr but the terminal simply displays the message
«Can not open display»
Same thing when I tried # xrandr -s 800×600
—
Would me using the Entrance log in manager and the Enlightenment window manager have any thing to do with this that could effect xrandr? (I’m not using gdm)
Thank you for your help though, I do appreciate it, even if it doesn’t work for me. I might be able to help someone else in the future.
Источник
How to Change Screen Resolution through the Ubuntu Terminal
The resolution of your display monitor/screen means the clarity of the content (text and images) that you can view on your screen. When your screen is set to a higher resolution, say 1366×768, the contents appearing on your screen will be sharper to look at. You might also notice that in high resolution the items on your screen look smaller; this happens so that more items can fit on the display. On the other hand, low resolution means a less clearer display where items appear larger and thus fewer. If you have a larger monitor, it supports a higher display resolution. Your video card also plays a big role in the capability of your system to support a large screen resolution.
This article will help you in configuring the resolution of your screen on a Ubuntu system. We are specifically using the command line in order to change the resolution. There is always a way to do almost all of our stuff right inside the Terminal. So, why should changing screen resolution be any different! Using the Terminal makes certain tasks more efficient, and even faster. The command-line tools do not use too many resources and thus form great alternatives to the widely used graphical applications, especially if you are stuck up with older hardware.
We have run the commands and procedures mentioned in this article on a Ubuntu 18.04 LTS system.
Changing Screen Resolution through the Command Line
Please follow these steps in order to adjust the screen resolution on a Ubuntu system:
Open the Terminal application either by using the Ctrl+Alt+T shortcut or by accessing it through the application launcher search as follows:

The Xrandr tool (an app component in Xorg) is a command-line interface to RandR extension and can be used to set outputs for a screen dynamically, without any specific setting in xorg.conf. This utility is installed, by default, on a Ubuntu 18.04 system.
We will be using the following flag of xrandr tool to configure the screen size:
| -s, –size size-index or –size widthxheight This sets the screen size, either matching by size or using the index into the list of available sizes. |
These are one of the two commands you can use:


Through this simple tool, that comes already installed on Ubuntu, you can adjust the resolution of your screen right from your command line. Adjusting the screen resolution through the UI is also every. All you need to do is use the Devices>Displays tab view on the Settings utility to manually set the resolution according to your requirements.
Karim Buzdar
About the Author: Karim Buzdar holds a degree in telecommunication engineering and holds several sysadmin certifications. As an IT engineer and technical author, he writes for various web sites. You can reach Karim on LinkedIn
Источник


