- How Do I Change My Username in Linux?
- Prerequisite
- Modify Current Username
- Add a New User and then Modify the Username
- Determine the User Account Currently in Linux
- Conclusion
- About the author
- Aqsa Yasin
- Linux Change or Rename User Name and UID
- Linux Change or Rename User Command Syntax
- List all users in Linux system
- How to Change or Rename Username and UID in Linux
- View current user and group membership for user named tom
- Rename and change username from tom to jerry on Linux
- A note about running process
- Rename and change primary groupname from tom to jerry
- How to change user home directory from /home/tom/ to /home/jerry
- How to change user tom UID from 5001 to 10000
- Getting help about usermod command
- Conclusion
- How To Properly Change Username In Linux
- The right way to change username in Linux
- You May Also Like
- How To Navigate Directories Faster In Linux
- Fix “WARNING: REMOTE HOST IDENTIFICATION HAS CHANGED” Error.
- How To Easily Build Linux Packages Using Fpm.
- Solanum – A Pomodoro Timer For GNOME Desktops
- How To Identify Operating System Using TTL Value.
- Create Bootable USB Drives And SD Cards Using.
- 2 comments
How Do I Change My Username in Linux?
- Modify current username
- Add user and then modify its username
- Determine the user account
Prerequisite
You need to have Linux running on the virtual machine configured on your system. When you install Ubuntu, it requires information like username and password. After providing this information, you will be able to access all the applications and have the privilege to use them.
Modify Current Username
Step 1- User Description: To change the current username in Linux, we use the command to know about the current user and directory. “Whoami” is used to display the username, and “pwd” is used to display commands used to outright the execution. The third command, “gnome-session-quit” is used for logging out from the current account in the system.
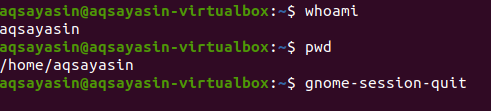
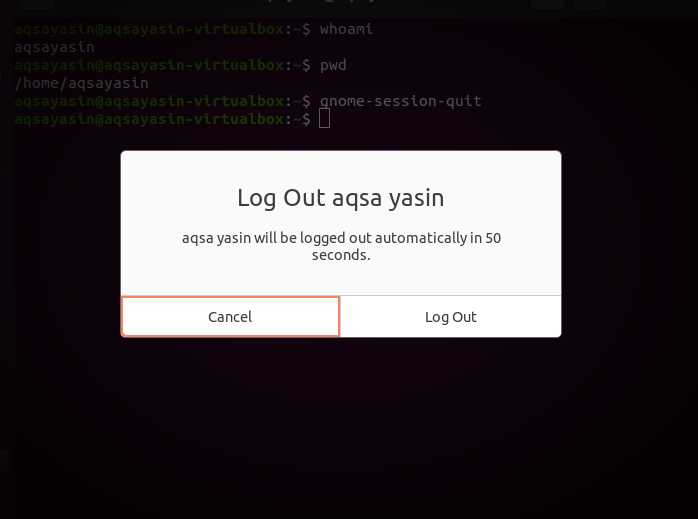
After the above command, the system will prompt a message to log out or it will automatically quit from the system.
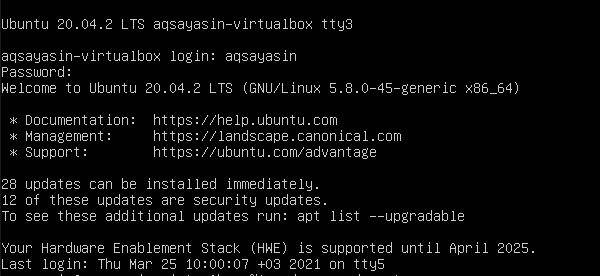
Step 2-Enter in the command shell: When the login page is displayed, type keys Ctrl+alt+f1 then a command prompt will appear. The system will demand a username and password for the login.
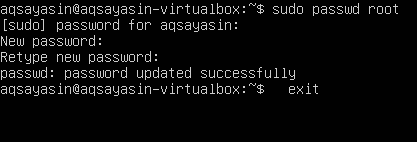
Step 3-Set password for root: Modify the password for the root user. After providing login details, we will implement the appended command to set a password for the root user.
After this command, we will type the current password of the user. Then, you can input the new password you want. After retyping, you will see that password is updated successfully.
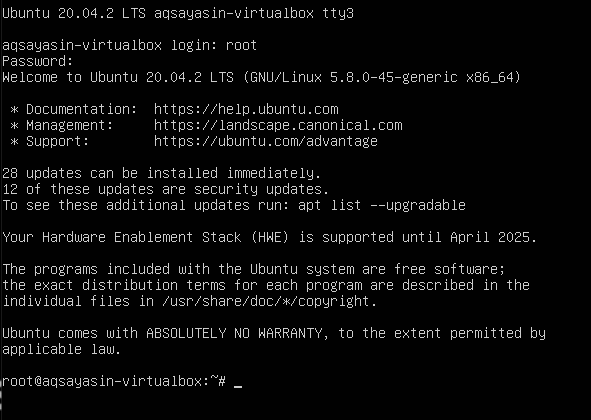
Step 4:Login as root: Now, the user will log in to the system as root. After applying the password, you will see that name is changed from aqsayasin to root. The root is a temporary name.
Step 5-Change username from Aqsa Yasin to aqsay: We will change the root name with our desired one. Once the name is initialized, the home directory name will be altered. Following the change, the user name on the login screen is changed.
#usermod –l aqsay aqsayasin
# usermod –d /home/aqsay –m aqsay
#chfn –f aqsay aqsay

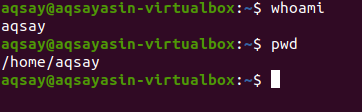
After login to “aqsay”, go to the terminal and write the three commands we used to execute earlier in this guide to check the description of a user after alteration. By using these commands, you can see that the username is changed successfully.
Add a New User and then Modify the Username
In accordance with modifying the username, one must have a user in Linux. If there is no existence of any user, we will see how the user is created and modified in the command line of Ubuntu. This creation and modification require the following steps:
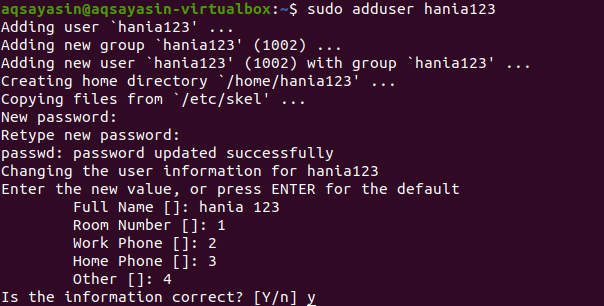
Step 1-Add user: You will add a user by the following command. “hania123” is the name we want to give to a new user.
After providing the username, you will be asked to enter a new password. After retyping the password, a message prompting a successful update will appear. Password confirmation will allow you for further verifications and knowledge of the description of the user, .i.e. Full name etc. The user doesn’t need to enter all details, and you can skip it by pressing the “enter” key. The system will confirm the given information by pressing “y” to continue.
Step 2-Identification: After completing the description process, we will log out from the system to ensure the user’s presence on the homepage of Ubuntu.

Step 3-Modification: Moving forward, we will modify the root name of the directory with the help of the below-cited command.
After modifying the user, you will now want to see all users created in Ubuntu. For this purpose, we will use the “ls” command

Now, you will see the names of the users. Then you will log out from the system. After logging in, you will notice that the root name that has been changed from “Aqsa Yasin” to“zahra123”

Determine the User Account Currently in Linux
To know the currently logged-in user, we will come to know it by using a couple of commands.
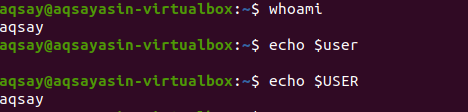
The “Who” command will let you know about the identity of the user i.e., name of the current user is “aqsay”.

The same answer is obtained by applying “whoami” as a comparative to “who”. Moreover, the same answer is obtained by echoing the “$user”.
One letter word “w” is more effective in giving output in a detailed form. It provides the information of the last 5,10 and 15 minutes, mostly including boot time, etc.

TTY shows the terminal type you are using,:0 means the mouse and keyboard connected with. FROM represent the name of the host. IDLE shows the idle time of the user in the system. [email protected] depicts the time, the user was logged in. JCPU and PCPU represent the joint and process CPU timings. Whereas WHAT shows the current process of the user.
To obtain more details about the user, as we have to know who the user is. The below command is the better way to start.

This command gives us user id (uid), groups of them (gid), and shows the group in which the user has become the member.
If you want to obtain the output of only groups, specific less cluttered view of groups can be obtained.

Conclusion
In the article mentioned above, we have described changing usernames using some set of commands in the terminal and on a simple command-line shell.
About the author

Aqsa Yasin
I am a self-motivated information technology professional with a passion for writing. I am a technical writer and love to write for all Linux flavors and Windows.
Источник
Linux Change or Rename User Name and UID
Linux Change or Rename User Command Syntax
| Tutorial details | |
|---|---|
| Difficulty level | Easy |
| Root privileges | Yes |
| Requirements | Linux terminal |
| Est. reading time | 5 mintues |
The syntax is as follows to rename by user name:
usermod -l login-name old-name
- We use the usermod command in Linux to rename user account. The name of the user will be changed from the old-name to login_name. Nothing else is changed. In particular, the user’s home directory name should probably be changed to reflect the new login name.
The syntax is as follows to rename by a UID (user ID):
usermod -u UID username
Where,
- The numerical value of the user’s ID (UID) . This value must be unique unless the -o option is used. The value must be non-negative. Values between 0 and 99 are typically reserved for system accounts. Any files which the user owns and which are located in the directory tree rooted at the user’s home directory will have the file user ID changed automatically. Files outside of the user’s home directory must be altered
manually.
List all users in Linux system
Type the following cat command:
cat /etc/passwd
One can use the grep command to filter out only user names:
grep -w ‘^username’ /etc/passwd
grep -w ‘^jerry’ /etc/passwd
Another option is to use the cut command:
cut -d: -f1 /etc/passwd
Sample outputs:
How to Change or Rename Username and UID in Linux
Let us see how to rename user login. First, make sure user name is not logged into the server and any other process is not running under the same user name. I also recommend that you backup any data or server files before changing user names.
View current user and group membership for user named tom
First get user identity using the id command:
id tom
Next use the grep command to grab login info about user named tom from the /etc/passwd file
grep ‘^tom:’ /etc/passwd
See group info about user named tom using the groups command:
grep ‘tom’ /etc/group
groups tom
Find home directory permissions for user named tom, run the following ls command:
ls -ld /home/tom/
Finally, see all Linux process owned by user and group named tom using the ps command:
ps aux | grep tom
ps -u tom
Fig.01: Getting info about user named ‘tom’ on a Linux based system
Rename and change username from tom to jerry on Linux
Type the usermod command as follows:
# id tom
# usermod -l jerry tom
## Verify ###
# id tom
# id jerry
# ls -ld /home/tom
A note about running process
You may see an error as follows if tom is logged in and running jobs:
You need to kill all Linux process owned by user named tom and forcefully logged them out of the system:
Rename and change primary groupname from tom to jerry
Type the usermod command as follows:
# id tom
# groupmod -n jerry tom
## Verify it ###
# id tom
# ls -ld /home/tom
Sample outputs:
Fig.02: Sample session renaming user on a Linux based server
How to change user home directory from /home/tom/ to /home/jerry
The syntax is as follows:
# usermod -d /home/jerry -m jerry
# id jerry
# ls -ld /home/jerry
Sample outputs:
- No ads and tracking
- In-depth guides for developers and sysadmins at Opensourceflare✨
- Join my Patreon to support independent content creators and start reading latest guides:
- How to set up Redis sentinel cluster on Ubuntu or Debian Linux
- How To Set Up SSH Keys With YubiKey as two-factor authentication (U2F/FIDO2)
- How to set up Mariadb Galera cluster on Ubuntu or Debian Linux
- A podman tutorial for beginners – part I (run Linux containers without Docker and in daemonless mode)
- How to protect Linux against rogue USB devices using USBGuard
Join Patreon ➔
How to change user tom UID from 5001 to 10000
Type the usermod command as follows:
# id tom
# usermod -u 10000 tom
# id tom
Getting help about usermod command
You can pass the —help option to the usermod command. For instance, type the following command at the shell prompt in Linux:
usermod —help
| Options | Description |
|---|---|
| -c OR —comment | COMMENT new value of the GECOS field |
| -d OR —home | HOME_DIR new home directory for the user account |
| -e OR —expiredate | EXPIRE_DATE set account expiration date to EXPIRE_DATE |
| -f OR —inactive | INACTIVE set password inactive after expiration to INACTIVE |
| -g OR —gid | GROUP force use GROUP as new primary group |
| -G OR —groups | GROUPS new list of supplementary GROUPS |
| -a OR —append | append the user to the supplemental GROUPS mentioned by the -G option without removing the user from other groups |
| -h OR —help | display this help message and exit |
| -l OR —login | NEW_LOGIN new value of the login name |
| -L OR —lock | lock the user account |
| -m OR —move-home | move contents of the home directory to the new location (use only with -d) |
| -o OR —non-unique | allow using duplicate (non-unique) UID |
| -p OR —password | PASSWORD use encrypted password for the new password |
| -R OR —root | CHROOT_DIR directory to chroot into |
| -P OR —prefix | PREFIX_DIR prefix directory where are located the /etc/* files |
| -s OR —shell | SHELL new login shell for the user account |
| -u OR —uid | UID new UID for the user account |
| -U OR —unlock | unlock the user account |
| -v OR —add-subuids | FIRST-LAST add range of subordinate uids |
| -V OR —del-subuids | FIRST-LAST remove range of subordinate uids |
| -w OR —add-subgids | FIRST-LAST add range of subordinate gids |
| -W OR —del-subgids | FIRST-LAST remove range of subordinate gids |
| -Z OR —selinux-user | SEUSER new SELinux user mapping for the user account |
Conclusion
In this tutorial, you learned how to change or rename username and UID in Linux using the usermod command. Read man pages of usermod(8) and groupmod(8) commands for more information see this page.
🐧 Get the latest tutorials on Linux, Open Source & DevOps via
Источник
How To Properly Change Username In Linux
This brief guide explains how to properly change username in Linux operating system. Not just the username, this guide also describes how to change the hostname, user group, home directory and the ownership and group of that directory to the new user, along with all files.
A few days ago, I downloaded the Fedora 33 vagrant box and deployed it using libvirt/kvm provider. As you might already know, all vagrant boxes comes with a default user called «vagrant» . And the default hostname for the vagrant box is localhost . I changed the username and hostname in the Fedora VM for better accessibility in the network. If you’re ever looking for a proper way to change the username in Linux without messing the existing configuration files, here is how.
A note of caution:
I would not recommend this in production environment. It is always best to just create a new user rather than renaming the existing one. Because renaming username will cause so many problems if the old user’s home directory is referenced by some other configuration files. You may end up changing the config files used by so many services. Also do not do it if your $HOME directory is encrypted!. So I recommend you to create a new user and move the old user’s data to new one. If it is a freshly installed system or just testing system, you can then go ahead and change the user name as described below.
The right way to change username in Linux
Changing hostname in Fedora and other Linux distributions is easy!
Login as a different sudo user or root user. Because you can’t change the username of the currently logged in user. I logged in as root user.
Change the current hostname using the hostnamectl command like below:
The above command changes the old hostname to «fedora33». Log out and log back in to apply the changes. You will now see that the hostname is updated in the shell prompt. You can also check it using hostname command:
Here comes the main part. Now I am going to change the user name from «vagrant» to «ostechnix». To do so, I created a new group called «ostechnix» using command:
For the purpose of this guide, I used the same name for user and group. You can use different name if you want.
And then changed the username using the usermod command like below:
Let us break down the above command and see what each option does.
- usermod : The command to modify a user account in Unix-like systems.
- -d /home/ostechnix : Create a new $HOME directory for the user.
- -m : Move the content of the old user’s $HOME directory to the new location.
- -g ostechnix : Add the new user to a group called «ostechnix» .
- -l ostechnix vagrant : Change the name of the user from «vagrant» to «ostechnix» . i.e. «vagrant» is the old user name and «ostechnix» is the new user.
The above command changes the user name, the user group, the $HOME directory and ownership and group of that directory to the new user, along with all the user’s files and directories.
If you’re on Debian-based systems like Ubuntu, you can grant sudo permissions to the user using this command:
Now exit it from the root user and log in as new user.
Verify if the hostname, username, and $HOME directories are changed:
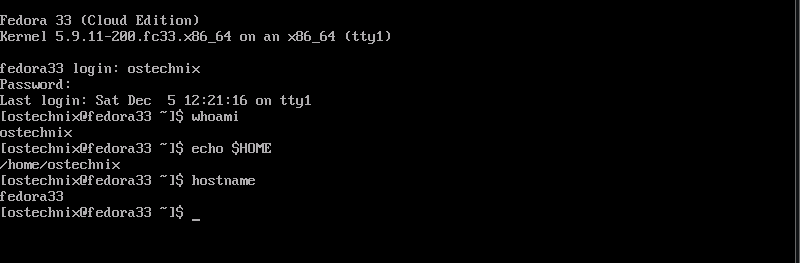
Check username and hostname in Fedora
Great! Everything is changed as I wished.
For more details about usermod command, refer its man page:
I am Senthil Kumar, more commonly known as SK to my friends, from India. I love to read, write and explore topics on Linux, Unix and all other technology related stuff.
How To Speed Up DNF Package Manager In Fedora
Transfer Files Between Any Devices Using Piping Server
You May Also Like
How To Navigate Directories Faster In Linux
Fix “WARNING: REMOTE HOST IDENTIFICATION HAS CHANGED” Error.
How To Easily Build Linux Packages Using Fpm.
Solanum – A Pomodoro Timer For GNOME Desktops
How To Identify Operating System Using TTL Value.
Create Bootable USB Drives And SD Cards Using.
2 comments
I have Scientific Linux 7.9 and I’d like to move to Centos Stream 8, but SL 7.9 can’t find centos-release-stream. Is (or will there be) a fix for that? I have a RAID-10 system that Fedora didn’t want to install on, but SL 7.9 didn’t complain (that’s how I got here). I now (finally) have Python 3.9.5, TensorFlow 2.5 & Keras installed and don’t want to lose all of that downloading & configuring. See below for specifics trying to pull/install centos-release-stream… Any suggestions?
[email protected]:/etc/systemd/system$ dnf install centos-release-stream
Repository ‘fermilab-debuginfo’ is missing name in configuration, using id.
Repository ‘fermilab-source’ is missing name in configuration, using id.
Repository ‘fermilab-testing’ is missing name in configuration, using id.
Repository ‘fermilab’ is missing name in configuration, using id.
Repository ‘repos’ is missing name in configuration, using id.
Repository ‘repos-source’ is missing name in configuration, using id.
Repository ‘sl-extras’ is missing name in configuration, using id.
Repository ‘sl-extras-debuginfo’ is missing name in configuration, using id.
Repository ‘sl-extras-source’ is missing name in configuration, using id.
Scientific Linux $slreleasever – x86_64 0.0 B/s | 0 B 00:00
Scientific Linux $slreleasever – x86_64 – bugfix updates 0.0 B/s | 0 B 00:00
Scientific Linux $slreleasever – x86_64 – security updat 0.0 B/s | 0 B 00:00
Failed to synchronize cache for repo ‘sl’, ignoring this repo.
Failed to synchronize cache for repo ‘sl-fastbugs’, ignoring this repo.
Failed to synchronize cache for repo ‘sl-security’, ignoring this repo.
Last metadata expiration check: 0:54:04 ago on Thu 03 Jun 2021 06:28:56 AM PDT.
No match for argument: centos-release-stream
I guess you’re asking how to migrate to CentOS stream from Scientific Linux. The centos-release-stream package will only convert the CentOS systems to CentOS Stream. It won’t migrate Scientific Linux to CentOS Stream. You need to find a way (which I don’t know yet) to migrate your Scientific Linux to CentOS 8 and then convert the CentOS 8 to CentOS stream.
Источник


