- fdisk — простой способ управления разделами дисков в Linux
- Как ядро Linux работает с жесткими дисками?
- Что такое fdisk?
- Как установить fdisk в Linux
- Как вывести список доступных дисков с помощью команды fdisk
- Как вывести список определенных разделов диска с помощью команды fdisk
- Как вывести список доступных действий для команды fdisk?
- Как вывести список типов разделов с помощью команды fdisk
- Как создать раздел на диске с помощью команды fdisk
- Как создать расширенный раздел диска с помощью команды fdisk
- Как просмотреть нераспределенное дисковое пространство с помощью команды fdisk
- Как создать логический раздел с помощью команды fdisk
- Как удалить раздел с помощью команды fdisk
- Как отформатировать раздел или создать файловую систему на разделе
- Как смонтировать раздел в Linux
- Linux Change Disk Label Name on EXT2 / EXT3 / EXT4 File Systems
- Syntax
- Label limitations
- View the label of partition
- Modify partition labels / Change disk name
- Mount file system by label at Linux server boot time
- How to Change Linux Partition Label Names on EXT4 / EXT3 / EXT2 and Swap
- Linux Filesystem and Partitions – Types and Terminologies
- Some Terminologies Relating to Linux Partitioning:
- Primary Partition:
- Extended Partition:
- Logical Partition:
- Linux LVM Partition:
- Volume:
- Linux Utilities/Commands for Changing or Modifying Partition Names/Labels
- 1. e2label or tune2fs
- 2. ntfslabel
- 3. reiserfstune
- 4. mkswap
- 5. exfatlabel
- 6. Changing Label of a partition in GUI – DISKS
- Special Linux Utilities to Mount Partition with Label Names
- 1. gdisk
- 2. mount
- Conclusion
- If You Appreciate What We Do Here On TecMint, You Should Consider:
fdisk — простой способ управления разделами дисков в Linux
Оригинал: fdisk – Easy way to manage disk partitions in Linux
Автор: Magesh Maruthamuthu
Дата публикации: 28 января 2019 года
Перевод: А. Кривошей
Дата перевода: ноябрь 2019 г.
Жесткие диски можно разделить на один или несколько логических дисков, называемых разделами. Это разделение описано в таблице разделов (MBR или GPT) в секторе 0 диска.
Linux нужен как минимум один раздел, а именно для его корневой файловой системы, и мы не можем установить Linux на диск без разделов.
После создания раздел должен быть отформатирован в соответствующей файловой системе, прежде чем в него можно будет записывать файлы. Нам понадобится какая-нибудь утилита для выполнения этого действия в Linux.
Для этого в Linux доступно множество утилит. Мы писали о Parted Command в прошлом, и сегодня мы будем обсуждать fdisk. Команда fdisk является одним из лучших инструментов для управления разделами диска в Linux. Она поддерживает диски максимум 2 ТБ, и все предпочитают использовать fdisk.
Эта утилита используется большим количеством администраторов Linux, потому что мы практически не используем более 2 ТБ сегодня из-за LVM и SAN. Она используется в большей части инфраструктуры Linux по всему миру. Тем не менее, если вы хотите создать большие разделы, например, более 2 ТБ, вам нужно использовать команду Parted или команду cfdisk.
Создание разделов диска и файловых систем — одна из рутинных задач администратора Linux. Если вы работаете в большой компании, вам придется выполнять эту задачу несколько раз в день.
Как ядро Linux работает с жесткими дисками?
Как человек, мы можем легко понять разные вещи, но компьютер нуждается в правильном преобразовании имен, чтобы понять все и вся.
В Linux устройства расположены в разделе /dev, и ядро понимает жесткий диск в следующем формате.
/dev/hdX[a-z]: IDE-диск с именем hdX в Linux
/dev/sdX[a-z]: SCSI-диск с именем sdX в Linux
/dev/xdX[a-z]: XT-диск с именем xdX в Linux
/dev/vdX[a-z]: виртуальный жесткий диск с именем vdX в Linux
/dev/fdN: гибкий диск с именем fdN в Linux
/dev/scdN or /dev/srN: CD-ROM с именем /dev/scdN или /dev/srN в Linux
Что такое fdisk?
fdisk обозначает «fixed disk» или «format disk». Это утилита командной строки, которая позволяет пользователям выполнять различные действия с дисками. Она позволяет нам просматривать, создавать, изменять размеры, удалять, перемещать и копировать разделы.
Она понимает таблицы разделов MBR, Sun, SGI и BSD, не понимает таблицу разделов GUID (GPT) и не предназначена для больших разделов.
fdisk позволяет нам создать максимум четыре основных раздела на диск. Один из них может быть расширенным разделом, и он может содержать несколько логических разделов.
1-4 зарезервировано для четырех основных разделов, а логические разделы начинаются с 5.
Как установить fdisk в Linux
Вам не нужно устанавливать fdisk в системе Linux, потому что он установлен по умолчанию как часть утилит core.
Как вывести список доступных дисков с помощью команды fdisk
Сначала мы должны узнать, какие диски были добавлены в систему, прежде чем выполнять какие-либо действия. Для просмотра списка всех доступных дисков в вашей системе выполните приведенную ниже команду. Она выведет возможные сведения о дисках, такие как имя диска, количество разделов на нем, размер диска, тип метки диска, идентификатор диска, идентификатор раздела и тип раздела.
Как вывести список определенных разделов диска с помощью команды fdisk
Если вы хотите увидеть определенный диск и его разделы, используйте следующий формат команды:
Как вывести список доступных действий для команды fdisk?
Если вы нажмете m в команде fdisk, вы увидите доступные действия.
Как вывести список типов разделов с помощью команды fdisk
Если вы нажмете l в команде fdisk, она покажет вам доступные типы разделов.
Как создать раздел на диске с помощью команды fdisk
Если вы хотите создать новый раздел, выполните следующие действия. В моем случае я собираюсь создать 4 раздела (3 основных и 1 расширенный) на диске /dev/sdc.
Поскольку он принимает значение из таблицы разделов, нажмите Enter для первого сектора. Введите размер, который вы хотите установить для раздела (мы можем добавить размер раздела, используя КБ, МБ, ГБ и ТБ) для последнего сектора.
Например, если вы хотите добавить раздел размером 1 ГБ, последним значением сектора должно быть + 1G. Как только вы создали 3 раздела, fdisk автоматически изменит тип раздела на расширенный по умолчанию. Если вы все еще хотите создать четвертый первичный раздел, тогда нажмите p вместо значения по умолчанию e.
Как создать расширенный раздел диска с помощью команды fdisk
Обратите внимание, что вы должны использовать все оставшееся пространство при создании расширенного раздела, потому что вы затем можете создать в нем несколько логических разделов.
Как просмотреть нераспределенное дисковое пространство с помощью команды fdisk
Как описано в предыдущем разделе, мы полностью создали 4 раздела (3 основных и 1 расширенный). Дисковое пространство расширенного раздела будет отображаться как неразмеченное, пока вы не создадите в нем логические разделы.
Используйте приведенную ниже команду для просмотра неразмеченного пространства для диска. В соответствии с приведенным ниже выводом у нас есть 7ГБ неразмеченного диска.
Как создать логический раздел с помощью команды fdisk
Выполните ту же процедуру, описанную выше, чтобы создать логический раздел после создания расширенного раздела. Здесь я создал логический раздел размером 1 ГБ с именем /dev/sdc5, вы можете убедиться в этом, проверив значение таблицы разделов.
Как удалить раздел с помощью команды fdisk
Если раздел больше не используется в системе, мы можем удалить его, используя следующие шаги.
Убедитесь, что вы будете вводить правильный номер раздела, чтобы удалить его. В данном случае я собираюсь удалить раздел /dev/sdc2.
Как отформатировать раздел или создать файловую систему на разделе
Файловая система контролирует, как хранятся и извлекаются данные через таблицы inode.
Без файловой системы система не может найти, где хранится информация на разделе. Файловая система может быть создана тремя способами. Здесь я собираюсь создать файловую систему в разделе /dev/sdc1.
Когда вы создаете файловую систему на этом разделе, это даст вам следующие важные вещи.
UUID файловой системы: UUID означает универсальный уникальный идентификатор, UUID используются для идентификации блочных устройств в Linux. Это 128-битные числа, представленные 32 шестнадцатеричными цифрами.
Superblock: в суперблоке хранятся метаданные файловой системы. Если суперблок файловой системы поврежден, файловая система не может быть смонтирована и, следовательно, файлы не доступны.
Inode: это структура данных в файловой системе Unix-подобной операционной системы, в которой хранится вся информация о файле, кроме его имени и его фактических данных.
Journal: журналируемая файловая система — это файловая система, которая поддерживает специальный файл, называемый журналом, который используется для исправления любых несоответствий, возникающих в результате неправильного выключения компьютера.
Как смонтировать раздел в Linux
После того, как вы создали раздел и файловую систему, нам нужно смонтировать раздел для использования.
Для этого нам нужно создать точку монтирования для монтирования раздела. Используйте команду mkdir для создания точки монтирования.
Для временного монтирования используйте приведенную ниже команду. Эта точка монтирования не сохранится после перезагрузки вашей системы.
Для постоянного монтирования добавьте информацию о разделе в файл fstab. Это можно сделать двумя способами: добавить имя устройства или значение UUID.
Постоянное монтирование с использованием имени устройства:
Постоянное монтирование с использованием значения UUID. Чтобы получить UUID раздела, используйте команду blkid.
То же самое было проверено с помощью команды df.
Источник
Linux Change Disk Label Name on EXT2 / EXT3 / EXT4 File Systems
H ow can I modify partition labels on a Linux operating systems? How to change disk name on the ext4 file system on a Ubuntu Linux using command line?
You need to use the e2label command to set a text label to your disk drive partitions and then refer to them in the /etc/fstab file. The e2label command must be run as root user. Normal users can not modify partition label for security reasons. [donotprint]
| Tutorial details | |
|---|---|
| Difficulty level | Easy |
| Root privileges | Yes |
| Requirements | e2label command |
| Est. reading time | 1m |
[/donotprint]
Syntax
Use the following syntax to display or change the filesystem label on the ext2, ext3, or ext4 filesystem located on device.
- No ads and tracking
- In-depth guides for developers and sysadmins at Opensourceflare✨
- Join my Patreon to support independent content creators and start reading latest guides:
- How to set up Redis sentinel cluster on Ubuntu or Debian Linux
- How To Set Up SSH Keys With YubiKey as two-factor authentication (U2F/FIDO2)
- How to set up Mariadb Galera cluster on Ubuntu or Debian Linux
- A podman tutorial for beginners – part I (run Linux containers without Docker and in daemonless mode)
- How to protect Linux against rogue USB devices using USBGuard
Join Patreon ➔
Label limitations
Ext2 filesystem labels can be at most 16 characters long; if new-label-name-here is longer than 16 characters, e2label will truncate it and print a warning message on screen.
View the label of partition
To see the label of partition called /dev/sda5, type:
Fig.01: View the label of partition
Modify partition labels / Change disk name
To add or change the label of partition /dev/sda1 to “Webserver”, enter:
$ sudo e2label /dev/sda1 Webserver
OR
# e2label /dev/sda1 Webserver
To verify new changes, type:
Mount file system by label at Linux server boot time
The /dev/sda1 partition can be mounted by label at server boot time at /wwwdata location. Edit the /etc/fstab file, enter:
$ sudo vi /etc/fstab
Set or update it as follows:
Save and close the file. You can also use the mount command as follows:
Источник
How to Change Linux Partition Label Names on EXT4 / EXT3 / EXT2 and Swap
A Partition is a space carved out from a physical disk which can be used to either install an Operating System or just act as a storage space for Users files and other data. Each partition is created directly on Hard Disk or External Disk attached to the system with starting and ending block address identifying the amount of space it takes on the drive.
![]() Change Linux Partition Disk Label Names
Change Linux Partition Disk Label Names
Although you can create n number of partitions you desire but a Linux system identifies maximum of 16 partitions which can be associated to any of SCSI, SATA, PATA or virtual hard disk. For identifying above partitions, A Linux system has its own general convention. That convention is in the form ‘ /dev/sdxn ‘ or ‘ /dev/vdxn ‘ where ‘ x ‘ is alphabet and ‘ n ‘ a number.
Here, ‘/dev’ is the directory in ‘/’ file system which holds files associated to each of the devices attached to a Linux system. After that ‘s’ identifies a SATA, SCSI or PATA drive and ‘v’ is for virtual disks on KVM based Machines. The next alphabet i.e. ‘d’ is acronym for device and finally the next alphabet identifies the drive attached.
If your system has 4 hard disks, you may find listing for: /dev/sda , /dev/sdb , /dev/sdc , /dev/sdd in the output of fdisk command when ‘l’ option is invoked.
After the alphabet comes the number. A typical hard disk identifies 4 primary partitions of which there can be an extended partition too, which again holds multiple logical partitions. In that case, the first primary partition, which generally is the boot partition, holds the default label: ‘/dev/sda1’ which signifies its position as first primary partition on first hard disk, likewise ‘/dev/sdb1’ will be first primary partition on second hard disk.
The next primary partition will have sda2, then sda3 and so on, with logical partition starting from sda5. This is a just of how a Linux Partitioning is laid down, although currently one more type of partition exists, which is Linux LVM partition on which Logical Volume is created out of Physical Volume and Volume Groups on the fly without directly affecting the underlying hardware.
Linux Filesystem and Partitions – Types and Terminologies
A bare Linux system configures 2 partitions during normal installation i.e. root ( ‘/’ ) (Where the filesystem is laid down) and swap (a temporary storage space which is assumed to be twice of RAM by default which is although not necessary).
Bootloader is generally installed in root partition or the first primary partition. Partition lays down the base for filesystems which are then created on the partition, but before that it requires the partition to be formatted for the type of filesystem to be supported on that partition.
Some of the filesystems supported by Linux Systems include:
- ext2
- ext3
- ext4
- ReiserFS
- xfs
- FAT
- HPFS/NTFS/exFAT
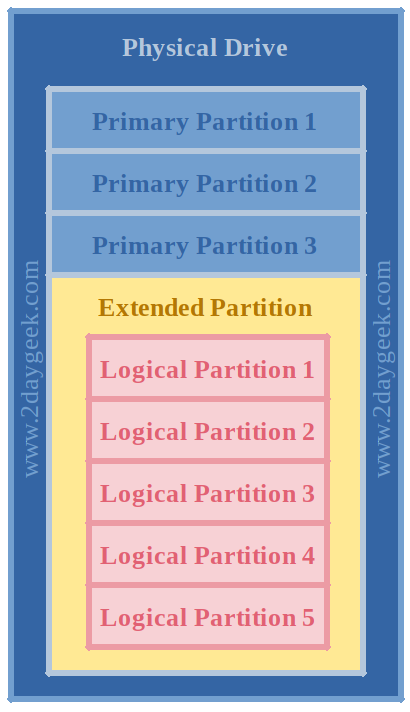
Some Terminologies Relating to Linux Partitioning:
Primary Partition:
Directly holds area on hard disk specified in terms of first and last sector address and holding a label indicating the hard disk where it is and its number. It can hold the boot files for OS or the data as configured by user.
Extended Partition:
Partition which holds other partitions. Extended partition is created to hold multiple logical partitions. Unlike primary partition, it can’t hold the boot files of installed OS, as it holds and manages the logical partitions.
Logical Partition:
After first 4 primary partitions, come the logical partitions which are laid down on extended partition. These are generally used to hold the filesystem as laid down by user. Swap space is also configured as a logical partition.
Linux LVM Partition:
LVM partition is used for laying down filesystems created on Logical Volumes. LVM is acronym for Logical Volume Management, a feature of Linux to create on the fly Logical Volumes on partitions. It takes a partition, which then holds a Physical Volume and multiple Physical volumes are combined to create a volume group on which Logical Volume is laid down. Logical Volume is then formatted to hold the filesystem.
Volume:
A formatted segment of space, which can hold filesystem. Volume is created on the partition for mounting filesystem on it and allowing it to hold user data.
Since all the operations on partitions require modification of size of filesystem hosted by it, any modification, deletion or creation of partition require filesystems to be carefully unmounted and backed up to avoid risking loss of data.
Some Linux Utilities/Commands that come in handy for filesystem related operations include:
- fdisk – for creating, modifying, deleting partition, including creating and printing partition table and so on.
- parted – performs same operations as fdisk and even many more also considered.
- df – displays all the filesystems mounted on Linux Filesystem and their mount points.
- mount – for mounting filesystems, directories, changing mount point for a directory/device and all sorts of such operations.
- mkfs – creating and formatting a filesystem. Usually command is used in concatenation with the type of formatting desired. Like: mkfs.ext4 for formatting filesystem with type ext4.
- umount – for unmounting filesystem from a partition.
- GParted/QParted – GUI Parted for Gnome and KDE systems.
- Disks – Software Utility pre-installed on Linux systems for managing partitions through GUI.
Linux Utilities/Commands for Changing or Modifying Partition Names/Labels
Commands for changing or modifying Partition Name/ Label are dependent on type of filesystem on that partition with exception of some general commands.
Below you can find listing of all such commands.
1. e2label or tune2fs
The commands e2label or tune2fs used for changing label of ext2, ext3 and ext4 type partitions.
Here, ROOT and ROOT_PART are the labels to be added to /dev/sda1 which is ext4 formatted partition.
2. ntfslabel
The ntfslabel command used for changing label of NTFS partitions.
3. reiserfstune
The reiserfstune command used for labeling reiserFS formatted partitions.
Note: It is advisable to first unmount the filesystem before this command.
Where, /dev/sdb1 is the partition formatted with reiserFS filesystem.
4. mkswap
The mkswap command used for changing label of SWAP partition.
After unmounting the filesystem, following command needs to be executed to change the label of swap partition.
Where, /dev/sda5 is the SWAP formatted partition.
5. exfatlabel
The exfatlabel command used for changing the label of exFAT formatted partition.
6. Changing Label of a partition in GUI – DISKS
Disks is a pre-installed utility found in most Linux systems which presents GUI for doing all the partitions related tasks which are done by fdisk and parted and even more than that. Disks can be used to change label of a partition by following procedure:
![]() Show Linux Partition Table
Show Linux Partition Table
GUI of Disks shows, all the external drives and details of selected external drive including partitions, their labels, their size and type of formatting. First step is to select the partition whose label is to be changed, which is Partition 1 here, next step is to select gear icon and edit filesystem.
![]() Change Linux Partition Label
Change Linux Partition Label
After this you will be prompted to change the label of selected partition.
![]() Set Linux Partition Label Name
Set Linux Partition Label Name
And finally, the label of the partition will be changed.
![]() Linux Partition Name Modified
Linux Partition Name Modified
Special Linux Utilities to Mount Partition with Label Names
1. Using Label for loading partition at boot time – /etc/fstab file
/etc/fstab is the file which is consulted at the boot time to mount the partitions that exist on the system. Partitions are by default identified by using UUID as per the entry in this /etc/fstab file.
But, there is another way to load the partition, instead of that long UUID, you can just pass the label of that partition in the file instead of UUID and from then on, your system would mount the partitions on the system using LABEL instead of UUID.
For loading any partition using Label rather than UUID just open the /etc/fstab file for editing:
File looks like below:
![]() Linux Fstab Mounted Partitions
Linux Fstab Mounted Partitions
Here, partition is recognized using UUID as seen above. Now if you want the partition to be recognized using label just edit the corresponding entry in the file replacing UUID= by LABEL= . Then, save and close the file. On next boot, the partition will be loaded using label instead of UUID.
2. Changing entries of partitions in partition table:
Some commands can be used to play with entries of partitions in partition table and shuffle the entries in the partition table.
These commands include:
1. gdisk
Utility which can be used to perform many useful operations on partitions, but highlighted here is one of its operation to change the partition names.
Procedure to follow:
This opens the gdisk and you will be prompted to enter the disk to be selected. Just enter the disk you want to select. ‘/dev/sda’ for operating on first hard disk.
Next, you will get following prompt would appear asking you to enter any command. Enter ‘c’ here. You will be prompted to select the partition number whose name you want to edit. Enter the partition name and then you will be prompted to enter the new name. Enter the new name and hit ENTER.
Next, use the following option to verify that the change you did, is done.
Now Close and exit gdisk, saving your changes.
2. mount
Mount can also be used to change the name of partition. Following procedure can be used here:
Unmount the partition.
Change the name of directory after it is un-mounted.
Edit /etc/fstab and change the mount point of partition from /partition to /new_name_partition and then remount the partition.
Conclusion
Above are the techniques presented for Changing/Modifying the Name/Label of Linux Partitions. If you have other interesting techniques which can achieve the same thing do share with us in your precious comments.
If You Appreciate What We Do Here On TecMint, You Should Consider:
TecMint is the fastest growing and most trusted community site for any kind of Linux Articles, Guides and Books on the web. Millions of people visit TecMint! to search or browse the thousands of published articles available FREELY to all.
If you like what you are reading, please consider buying us a coffee ( or 2 ) as a token of appreciation.

We are thankful for your never ending support.
Источник


