- How to change a Windows 10 user account type and why you might want to
- How to change user account type using Settings
- How to change user account type using User Accounts
- How to change user account type using Control Panel
- How to change user account type using PowerShell
- How to change user account type using Command Prompt
- More Windows 10 resources
- Halo: MCC’s live service elements make it better, not worse
- Microsoft’s Surface Duo is not ‘failing up’
- Here’s what you can do if Windows 10 update KB5001330 is causing issues
- These are the best PC sticks when you’re on the move
- How to change user account type back to administrator on Windows 10?
- 6 ways to change an account to Administrator and back in Windows 10
- First things first: About Standard and Administrator accounts in Windows 10
- 1. Change an account type to Administrator or Standard from Settings in Windows 10
- 2. Change an account to Administrator or Standard from the Control Panel
- 3. Change to Administrator or Standard user using Computer Management
- 4. Change to Administrator or Standard with netplwiz in Windows 10
- 5. Change to Administrator or Standard with the Command Prompt
- 6. Change to Administrator or Standard with PowerShell in Windows 10
- How many accounts did you change to Administrator in Windows 10?
How to change a Windows 10 user account type and why you might want to
 Source: Windows Central
On Windows 10, you have two main account types for users, including Administrator and Standard User, each one offering a different set of privileges to use a device and apps. The Administrator type provides complete system control, which means that users can change settings globally, install apps, execute elevated tasks, and perform pretty much anything.
In comparison, the Standard User account type is more restrictive. Users with the standard account can work with apps, but they can’t install new applications. They can change settings, but only those that won’t affect other accounts, which means that global system configurations aren’t allowed. If an app or a command requires elevation, they’ll need administrative credentials to complete the task.
Usually, it’s recommended to use an account with standard privileges as it offers a more secure environment. However, depending on the situation, it may be necessary to change the account type from Standard User to Administrator (or in reverse), and Windows 10 includes multiple ways to complete the process using Settings, Control Panel, User Accounts, PowerShell, and Command Prompt.
In this Windows 10 guide, we’ll walk you through virtually every method that you can use to change the account type on your device.
Quick tip: If you’re looking to make your primary account standard, it’s best to create a new administrator account first, and then use the new account to change your old account to standard and make administrative changes.
How to change user account type using Settings
To change the account type with Settings, use these steps:
- Open Settings.
- Click on Accounts.
- Click on Family & other users.
- Under the «Your family» or «Other users» section, select the user account.
Click the Change account type button.
 Source: Windows Central
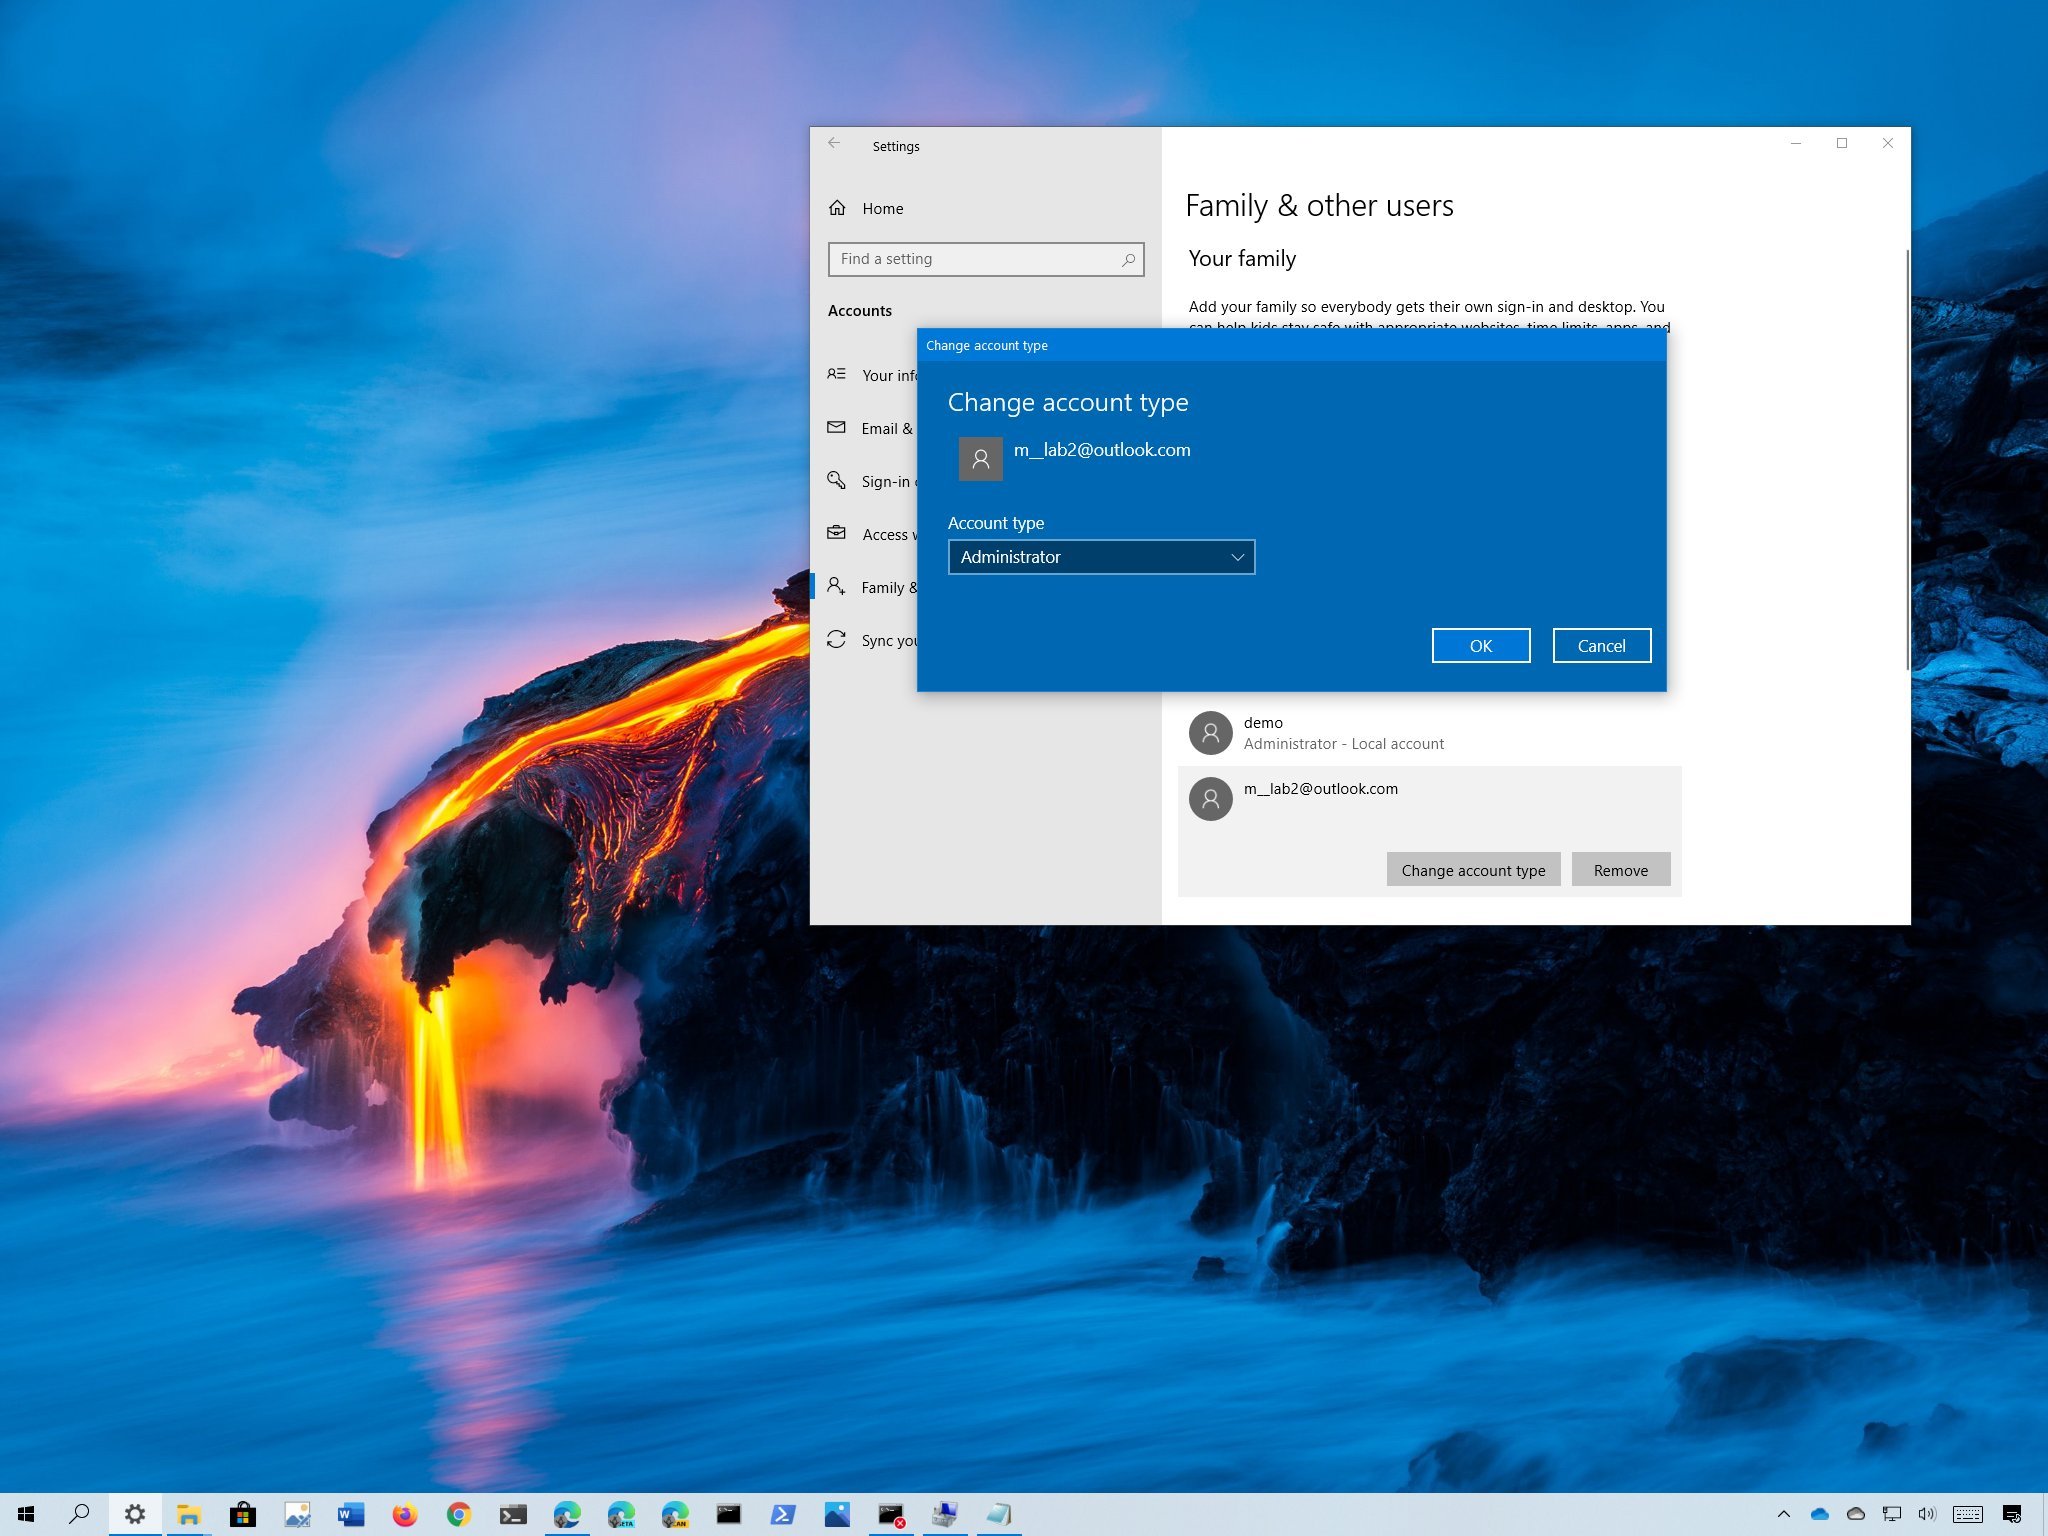
Select the Administrator or Standard User account type.
 Source: Windows Central
Once you complete the steps, restart your computer to start using the account with the new privilege level.
How to change user account type using User Accounts
To set an account to Standard user or Administrator type using User Accounts (netplwiz), use these steps:
- Open Start.
- Search for netplwiz and click the top result to open the «User Accounts» experience.
- Select the account that you wish to change.
Click the Properties button.
 Source: Windows Central
Select the Standard user or Administrator account type depending on your requirements.
Source: Windows Central
Quick tip: You can also select the Other membership option, which allows you to choose different user groups, such as Power Users, Backup Operators, Remote Desktop Users, etc.
Once you complete the steps, restart the device to apply the changes and start using the new account type on Windows 10.
How to change user account type using Control Panel
To change an account type using Control Panel, use these steps:
- Open Control Panel.
Under the «User Accounts» section, click the Change account type option.
Source: Windows Central
Select the account that you want to change.
Source: Windows Central
Click the Change the account type option.
Source: Windows Central
Select either Standard or Administrator as required.
Source: Windows Central
After you complete the steps, the next time the user signs in to the account, it’ll be limited to the permissions allowed by the user group that you specified.
How to change user account type using PowerShell
To change a Windows 10 account type with PowerShell, use these steps:
- Open Start.
- Search for PowerShell, right-click the top result, and select the Run as administrator option.
Type the following command to change the account type to «Standard User» and press Enter:
Remove-LocalGroupMember -Group «Administrators» -Member «ACCOUNT-NAME»
Source: Windows Central
In the command, make sure to change the ACCOUNT-NAME for the actual name of the account that you want to change. If you’re trying to change an account using a Microsoft account, then the account name would be the first five letters of the email address.
Type the following command to change the account type to «Administrator» and press Enter:
Add-LocalGroupMember -Group «Administrators» -Member «ACCOUNT-NAME»
 Source: Windows Central
In the command, make sure to change the ACCOUNT-NAME for the actual name of the account that you want to change.
Quick note: Users with administrator accounts are part of both, the «Administrators» and «Users» groups. As a result, to make a user standard, you only need to remove the user from the «Administrators» group.
After you complete the steps, the account type will switch to the Administrator or Standard group depending on your configuration.
How to change user account type using Command Prompt
To switch account types with Command Prompt, use these steps:
- Open Start.
- Search for Command Prompt, right-click the top result, and select the Run as administrator option.
Type the following command to change the account type to Standard User and press Enter:
net localgroup Administrators «ACCOUNT-NAME» /delete
Source: Windows Central
In the command, make sure to change the ACCOUNT-NAME for the actual name of the account that you want to change. If you’re trying to change an account using a Microsoft account, then the account name would be the first five letters of the email address.
Type the following command to change the account type to Administrator and press Enter:
net localgroup Administrators «ACCOUNT-NAME» /add
Source: Windows Central
In the command, make sure to change the ACCOUNT-NAME for the actual name of the account that you want to change.
Type the following command view the account type and press Enter:
net user ACCOUNT-NAME
Source: Windows Central
Once you complete the steps, the next time the user signs in to the device, the account will load with the privileges allowed by the group that you specified in the command.
More Windows 10 resources
For more helpful articles, coverage, and answers to common questions about Windows 10, visit the following resources:
![]()
Halo: MCC’s live service elements make it better, not worse
Halo: The Master Chief Collection is more popular than ever, but some fans don’t agree with the live service approach 343 Industries has taken with it. Here’s why those elements are, at the end of the day, great for the game and for Halo overall.
![]()
Microsoft’s Surface Duo is not ‘failing up’
Microsoft announced this week that it was expanding Surface Duo availability to nine new commercial markets. While Surface Duo is undoubtedly a work in progress, this is not a sign of a disaster. It’s also doesn’t mean that Surface Duo is selling a ton either. Instead, the reason for the expansion is a lot more straightforward.
![]()
Here’s what you can do if Windows 10 update KB5001330 is causing issues
In this guide, we’ll show you the steps to get rid of the update KB5001330 to fix profile, gaming, and BSoD problems with the Windows 10 October 2020 Update and May 2020 Update.
![]()
These are the best PC sticks when you’re on the move
Instant computer — just add a screen. That’s the general idea behind the ultra-portable PC, but it can be hard to know which one you want. Relax, we have you covered!
How to change user account type back to administrator on Windows 10?
At First,I want to disable the passwords on the lock screen.I use the ‘windows key+R’ method but accidentally change my account type to user.
I want to change my account back to administrator(using the same method)but there is a protection asking me to type the administrator’s password.
I only have one user(which I am using now).
i can’t add more user to change it to administrator.
I’m using windows 10.
[Moved from Community Participation Center]
Original title: I only have one user(which I am using now)but accidentally change my account type to user.
![]()
As you are facing issues with changing the user account type back to administrator, we will help you with this issue.
I would like to inform that you can try to enable the built-in administrator account, log-in with the admin account, change the user account type of previous account back to administrator and check if it helps.
Step 1: Follow the steps to Enable Built-in administrator.
- Press Windows + X key together on your desktop screen.
- Click on Command Prompt (admin) to open Command Prompt.
- Type the following command and hit Enter:
- net user administrator /active:Yes (Check for the spaces)
- Now log off from the current user and try to login to the administrator account that is enabled.
Note: Please follow the same steps and type net user administrator /active:no to disable admin account after the troubleshooting is done.
Step 2: Change the account type.
- Press Windows + R keys from the Keyboard.
- Type netplwiz and click on Ok.
- Click on the Users tab.
- Under Users of this computer: select the account you want to change.
- Click on Properties button.
- Under Group Membership tab and select Administrator as user account type.
- Click on Apply and Ok.
Hope it helps. Let us know if you are facing issues changing the user account type, we will help you further.
6 ways to change an account to Administrator and back in Windows 10
If you want to promote a trustworthy user or limit the permissions of a naughty one on your Windows 10 PC, there are several ways to change an account type from Standard to Administrator and the other way around. While a Standard account lets you access the device and make changes that don’t affect other users, you need Administrator privileges to have complete control over the operating system, its apps, and settings in Windows 10. This tutorial illustrates how to change the type of user account in Windows 10, from Standard to Administrator and vice versa, in six different ways:
First things first: About Standard and Administrator accounts in Windows 10
There are two types of user accounts in Windows 10: Standard and Administrator. When you create a new account in Windows 10, it defaults to having Standard permissions. This is a limited type of account that can use existing applications, perform basic tasks, and modify system settings as long as they don’t affect other users in Windows 10.
An Administrator has complete control and autonomy over the Windows 10 computer or device. An account with Admin rights can do anything from installing software and hardware to accessing protected system files, changing security settings, and executing elevated tasks. You also need to be an Admin to manage other user accounts on your Windows 10 PC, which includes changing their type to Administrator or Standard, as illustrated in this tutorial. If you want to demote an Administrator to Standard user, you need to be authenticated on a different Administrator account than the one you are changing.
1. Change an account type to Administrator or Standard from Settings in Windows 10
In Windows 10, Administrator permission can be granted or withdrawn easily from the Settings app. Open Settings and access Accounts.
Click or tap on Accounts settings
Access the “Family & other users” tab from the column on the left. On the right, the Other users section displays all the user accounts on your Windows 10 device other than your own. Click or tap the name of the user account you want to promote or demote, and then press the subsequent “Change account type” button.
Press on the account you want to edit to reveal the Change account type option
In the “Change account type” window, you can see the name of the selected user account and its type. Click or tap on the field showing the current Account type to open a dropdown menu.
Pressing the Account type field opens a dropdown menu
Select the first option to elevate a Standard account to Administrator. To remove admin privileges, select Standard User. Then, click or tap OK to save your changes.
Select the Administrator or Standard User account type and press OK
That was it. The account you changed should display its new type in the Other users section.
2. Change an account to Administrator or Standard from the Control Panel
You can also change a Standard user to Administrator and vice versa from the Control Panel in Windows 10. Open the Control Panel and, in the User Accounts section, find the “Change account type” link. Click or tap on it.
Access the Change account type link
Next, you are shown a list of all the user accounts on your Windows 10 computer or device. Administrator accounts display their type underneath. Click or tap on the user account you want to change to Administrator or Standard.
Choose the account whose type you want to change
The next page displays a list of options for the selected user. Press the “Change the account type” link on the left.
Click or tap Change the account type
You can now modify the user account’s type. Select the one you want to assign, either Standard or Administrator, and then click or tap on “Change Account Type.”
Change Account Type to Administrator or Standard
You are returned to the previous screen, where you can verify that your changes are applied by checking whether the Administrator title is displayed underneath the selected account.
3. Change to Administrator or Standard user using Computer Management
A third method to change an account type involves accessing the Computer Management tool. On the left side of the Computer Management window, under System Tools, expand “Local Users and Groups” and click or tap on Users. The middle pane now displays all the accounts currently available on your Windows 10 computer or device.
See a list of Users in Windows 10’s Computer Management
Next, double-click or double-tap on the user entry you want to edit. Alternatively, you can also right-click or press-and-hold on the account you want to promote or demote to open a contextual menu. Then, click or tap on Properties.
Press Properties from a user’s right-click menu
In the User Properties pop-up window, access the Member Of tab, where you can see all the user groups the account belongs to. If you want the user to have Admin rights, it needs to be part of the Administrators user group. As you can see below, our user is Standard, so we have to add it to the appropriate group to change it to Administrator. Click or tap on the Add button.
Press Add to change an account to Administrator
The Select Groups window opens. Type “Administrators” in the only available text field, press Check Names, and then OK.
Add a user to Administrators in Windows 10
The user is now part of the Administrators group, as seen below. To revert an account to Standard, it must only be a member of the Users group, and NOT the Administrators one. In the Member Of tab, select the Administrators user group and click or tap on Remove.
Whether you’re promoting or demoting an account, don’t forget to press OK or Apply when you’re done, to save your changes.
Return an account back to Standard
That was it. The account now has the privileges you assigned.
4. Change to Administrator or Standard with netplwiz in Windows 10
Another method to change an account’s type in Windows 10 is with the User Accounts utility or netplwiz. To begin, launch the Run window with the keyboard shortcut Win + R and insert “netplwiz” in the Open field. Then, press OK or Enter on your keyboard.
Type netplwiz and press OK
In the Users tab of the User Accounts window, you can see a list with “Users for this computer.” Select the account you want to demote or promote and press the Properties button.
Choose an account and open its Properties
Access the Group Membership tab and select the account type you want to set: Standard user or Administrator. Then, press OK or Apply.
Choose between Standard user and Administrator and Apply your changes
The user account type is now set according to your preferences.
5. Change to Administrator or Standard with the Command Prompt
You can also rely on the Command Prompt, as always, to change an account’s type from Standard to Administrator and the other way around. Start the Command Prompt by searching “cmd” in your taskbar’s search field and then pressing on the “Run as administrator” option.
Search for cmd and press Run as administrator
Confirm your choice in the UAC pop-up window, and the Command Prompt is launched.
To grant a user Admin rights, enter the following command in the elevated Command Prompt, replacing NAME with the name of the user you want to promote: net localgroup Administrators “NAME” /add – as seen below.
Use CMD to promote an account to Administrator
The Standard account is changed to an Administrator one.
To remove Admin rights from an account, the command to insert in CMD is a bit different: net localgroup Administrators “NAME” /delete
Use CMD to change account type from Administrator to Standard
TIP: If you are changing permissions for a Microsoft account using command-line interpreters, replace NAME with the first five letters of the email address associated with it.
6. Change to Administrator or Standard with PowerShell in Windows 10
Another useful tool you can use to change an account’s type in Windows 10 is PowerShell. Launch the elevated version of the app by typing “powershell” in the taskbar’s search field and then clicking or tapping the Run as Administrator option, as shown below.
Run elevated PowerShell
In the resulting UAC window, confirm allowing the program to make changes, and PowerShell opens. To change an account’s type to Administrator, the command you must enter is: Add-LocalGroupMember -Group “Administrators” -Member “NAME”
Replace NAME with the name of the promoted user, as we did in the following image.
Promote an account to Administrator with PowerShell
The command to return the account to Standard privileges is similar:
Remove-LocalGroupMember -Group “Administrators” -Member “NAME”
Return an Administrator back to Standard with PowerShell
That was it. Although PowerShell does not offer feedback, you can use the first methods to verify an account’s type.
How many accounts did you change to Administrator in Windows 10?
We believe a Standard account is enough when dealing with a child or a relative that isn’t technically inclined. Users should only be promoted to Administrator if you trust them and their ability to make decisions that don’t harm your system. Now that you know more about user accounts and how to change Administrator in Windows 10, we’re curious how many accounts you granted Admin rights to. Are there more Admins than Standard users on your Windows 10 computer or device? Let us know in the comments.


