- Stay protected with Windows Security
- Important security info
- Understand and customize Windows Security features
- Status icons indicate your level of safety:
- Run a malware scan manually
- Run a quick scan in Windows Security
- Run an advanced scan in Windows Security
- Schedule your own scan
- Schedule a scan
- Turn Microsoft Defender Antivirus real-time protection on or off
- Turn real-time protection off temporarily
- How to change your Automatic Updates settings by using Windows Security Center
- INTRODUCTION
- More Information
- Fix it for me
- Let me fix it myself
- Configure security policy settings
- To configure a setting using the Local Security Policy console
- To configure a security policy setting using the Local Group Policy Editor console
- To configure a setting for a domain controller
- Windows Security settings in Windows 10
- Windows Security settings in Windows 10
- 1] Virus and threat protection
- 2] Account Protection
- 3] Firewall and network protection
- 4] App and browser control
- 5] Device Security
- 6] Device performance and health
- 7] Family options
Stay protected with Windows Security
Windows 10 includes Windows Security, which provides the latest antivirus protection. Your device will be actively protected from the moment you start Windows 10. Windows Security continually scans for malware (malicious software), viruses, and security threats. In addition to this real-time protection, updates are downloaded automatically to help keep your device safe and protect it from threats.
Windows 10 in S mode
Some features will be a little different if you’re running Windows 10 in S mode. Because this mode is streamlined for tighter security, the Virus & threat protection area has fewer options. But don’t worry—the built-in security of this mode automatically prevents viruses and other threats from running on your device, and you’ll receive security updates automatically. For more info, see Windows 10 in S mode FAQ.
Important security info
Windows Security is built-in to Windows 10 and includes an antirvirus program called Microsoft Defender Antivirus. (In previous versions of Windows 10, Windows Security is called Windows Defender Security Center).
If you have another antivirus app installed and turned on, Microsoft Defender Antivirus will turn off automatically. If you uninstall the other app, Microsoft Defender Antivirus will turn back on automatically.
If you’re having problems receiving Windows Security updates, see Fix Windows Update errors and the Windows Update FAQ.
For info on how to uninstall an app, see Repair or remove an app in Windows 10.
To change your user account to an admin account, see Create a local user or administrator account in Windows 10.
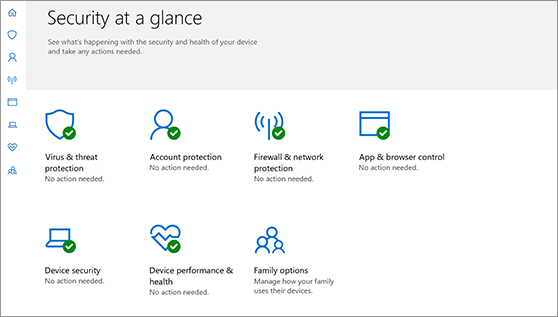
Understand and customize Windows Security features
Windows Security is your home to manage the tools that protect your device and your data:
Virus & threat protection. Monitor threats to your device, run scans, and get updates to help detect the latest threats. (Some of these options are unavailable if you’re running Windows 10 in S mode.)
Account protection. Access sign-in options and account settings, including Windows Hello and dynamic lock.
Firewall & network protection. Manage firewall settings and monitor what’s happening with your networks and internet connections.
App & browser control. Update settings for Microsoft Defender SmartScreen to help protect your device against potentially dangerous apps, files, sites, and downloads. You’ll have exploit protection and you can customize protection settings for your devices.
Device security. Review built-in security options to help protect your device from attacks by malicious software.
Device performance & health. View status info about your device’s performance health, and keep your device clean and up to date with the latest version of Windows 10.
Family options. Keep track of your kids’ online activity and the devices in your household.
You can customize how your device is protected with these Windows Security features. To access them, select Start > Settings > Update & Security > Windows Security . Then select the feature you want to explore.
Open Windows Security settings
Status icons indicate your level of safety:
Green means your device is sufficiently protected and there aren’t any recommended actions.
Yellow means there is a safety recommendation for you.
Red is a warning that something needs your immediate attention.
Run a malware scan manually
When you’re concerned about risks to a specific file or folder, you can right-click the file or folder in File Explorer, then select Scan with Microsoft Defender.
If you suspect there’s malware or a virus on your device, you should immediately run a quick scan. This is much faster than running a full scan on all your files and folders.
Run a quick scan in Windows Security
Select Start > Settings > Update & Security > Windows Security and then Virus & threat protection.
Open Windows Security settings
Under Current threats, select Quick scan (or in previous versions of Windows 10, under Threat history, select Scan now).
If the scan doesn’t find any issues, but you’re still concerned, you may want to check your device more thoroughly.
Run an advanced scan in Windows Security
Select Start > Settings > Update & Security > Windows Security and then Virus & threat protection.
Under Current threats, select Scan options (or in previous versions of Windows 10, under Threat history, select Run a new advanced scan).
Select one of the scan options:
Full scan (check files and programs currently running on your device)
Custom scan (scan specific files or folders)
Microsoft Defender Offline scan (run this scan if your device has been, or could potentially be, infected by a virus or malware). Learn more about Microsoft Defender Offline
Select Scan now.
Note: Because of streamlined security, this process isn’t available if you’re running Windows 10 in S mode.
Schedule your own scan
Even though Windows Security is regularly scanning your device to keep it safe, you can also set when and how often the scans occur.
Schedule a scan
Select the Start button, type schedule tasks in the Search box, and in the list of results, select Task Scheduler.
In the left pane, select the arrow (>) next to Task Scheduler Library to expand it, do the same with Microsoft > Windows, and then scroll down and select the Windows Defender folder.
In the top-center pane, select Windows Defender Scheduled Scan. (Point to the choices to see the full names.)
In the Actions pane on the right, scroll down and then select Properties.
In the window that opens, select the Triggers tab, and then select New.
Set your preferred time and frequency, and then select OK.
Review the schedule and select OK.
Note: Because of streamlined security, this process isn’t available if you’re running Windows 10 in S mode.
Turn Microsoft Defender Antivirus real-time protection on or off
Sometimes you may need to briefly stop running real-time protection. While real-time protection is off, files you open or download won’t be scanned for threats. However, real-time protection will soon turn on automatically again to protect your device.
Turn real-time protection off temporarily
Select Start > Settings > Update & Security > Windows Security and then Virus & threat protection > Manage settings. (In previous versions of Windows 10, select Virus & threat protection > Virus & threat protection settings.)
Open Windows Security settings
Switch the Real-time protection setting to Off and choose Yes to verify.
Note: Because of streamlined security, this process isn’t available if you’re running Windows 10 in S mode.
How to change your Automatic Updates settings by using Windows Security Center
INTRODUCTION
Windows Security Center is the centralized location in Windows XP Service Pack 2 where users can learn about security and can perform security-related tasks. Security Center monitors the status of three major security functions: the firewall, Automatic Updates, and virus detection. If Security Center detects a problem with any one of these, it displays an icon and balloon message in the notification area.
By default, Windows checks to make sure that Automatic Updates is set to download and install security and other important updates to your computer automatically. If Automatic Updates is turned off, or if Automatic Updates is not set to the highest setting, Security Center provides recommendations to turn on or to adjust Automatic Updates.
More Information
To have us turn on Automatic Updates for you, go to the «Fix it for me» section. If you would rather turn on Automatic Updates yourself, go to the «Let me fix it myself» section.
Fix it for me
To fix this problem automatically, click the Fix this problem link. Then click Run in the File Download dialog box, and follow the steps in this wizard.
Turn Automatic Updates on
Turn Automatic Updates off
Note This wizard may be in English only; however, the automatic fix also works for other language versions of Windows.
Note If you are not on the computer that has the problem, you can save the automatic fix to a flash drive or to a CD, and then you can run it on the computer that has the problem.
Let me fix it myself
To turn on Automatic Updates yourself, follow these steps:
Click Start, click Run, type wscui.cpl, and then click OK.
Click Automatic Updates.
The following options are available:
Automatic (recommended)
This option lets you select the day and the time that updates are automatically downloaded and installed. This can be every day, or it can be on a specific day and time.
Download updates for me, but let me choose when to install them
This option automatically downloads updates, but requires user interaction to install them.
Notify me but don’t automatically download or install them
This option notifies you that there are updates available. It requires user interaction to download them and install them.
Turn off Automatic Updates
This option disables Automatic Updates. It provides a link to the Windows Update Web site where you can manually select, download, and install updates.
Configure security policy settings
Applies to
Describes steps to configure a security policy setting on the local device, on a domain-joined device, and on a domain controller.
You must have Administrators rights on the local device, or you must have the appropriate permissions to update a Group Policy Object (GPO) on the domain controller to perform these procedures.
When a local setting is inaccessible, it indicates that a GPO currently controls that setting.
To configure a setting using the Local Security Policy console
To open Local Security Policy, on the Start screen, type secpol.msc, and then press ENTER.
Under Security Settings of the console tree, do one of the following:
- Click Account Policies to edit the Password Policy or Account Lockout Policy.
- Click Local Policies to edit an Audit Policy, a User Rights Assignment, or Security Options.
When you find the policy setting in the details pane, double-click the security policy that you want to modify.
Modify the security policy setting, and then click OK.
- Some security policy settings require that the device be restarted before the setting takes effect.
- Any change to the user rights assignment for an account becomes effective the next time the owner of the account logs on.
To configure a security policy setting using the Local Group Policy Editor console
You must have the appropriate permissions to install and use the Microsoft Management Console (MMC), and to update a Group Policy Object (GPO) on the domain controller to perform these procedures.
Open the Local Group Policy Editor (gpedit.msc).
In the console tree, click Computer Configuration, click Windows Settings, and then click Security Settings.
Do one of the following:
- Click Account Policies to edit the Password Policy or Account Lockout Policy.
- Click Local Policies to edit an Audit Policy, a User Rights Assignment, or Security Options.
In the details pane, double-click the security policy setting that you want to modify.
В If this security policy has not yet been defined, select the Define these policy settings check box.
Modify the security policy setting, and then click OK.
If you want to configure security settings for many devices on your network, you can use the Group Policy Management Console.
To configure a setting for a domain controller
The following procedure describes how to configure a security policy setting for only a domain controller (from the domain controller).
To open the domain controller security policy, in the console tree, locate GroupPolicyObject [ComputerName] Policy, click Computer Configuration, click Windows Settings, and then click Security Settings.
Do one of the following:
- Double-click Account Policies to edit the Password Policy, Account Lockout Policy, or Kerberos Policy.
- Click Local Policies to edit the Audit Policy, a User Rights Assignment, or Security Options.
In the details pane, double-click the security policy that you want to modify.
В If this security policy has not yet been defined, select the Define these policy settings check box.
Modify the security policy setting, and then click OK.
- Always test a newly created policy in a test organizational unit before you apply it to your network.
- When you change a security setting through a GPO and click OK, that setting will take effect the next time you refresh the settings.
Windows Security settings in Windows 10
Windows 10 comes with its in-house security app — Windows Security with a set of default settings, which makes sure the computer is safe. However, it is essential that as a consumer, you are aware of these settings, and change if there is something a miss. In this post, we will go through all the available Windows Security Settings in Windows 10 version 2004, and later.
Windows Security settings in Windows 10
The App can be launched in three main ways — by searching in the Start Menu, from the Settings app, or from the System Tray icon. All the notification appears on in the Action Center, and you must not miss them at all. Once you open the software, the dashboard offers quick access to all the features. Here is the list:
- Virus and threat protection
- Account Protection
- Firewall and network protection
- App and browser control
- Device Security
- Device performance and health
- Family options
Some of these settings, like Family Options, offer links to directly manage from Microsoft websites, while others provide granular control.
1] Virus and threat protection
Scan Options: Apart from Quick, Full, and Custom Scan, the most important is the Windows Defender Offline scan. This method is capable of removing malicious software, which is difficult to remove, especially connected to the internet or when in normal mode.
Protection Settings: It is the most important part of the software which offers Real-time protection, Cloud-delivered protection, Automatic sample submission, Tamper protection, Control folder access, Exclusions, and notification controls. Of all of these, make sure to turn on Tamper Protection so no other software can change Windows Security settings.
Ransomware Protection: Then comes Controlled Folder Access, which is a must for all Windows users. You can use this to protect files, folders, and memory areas from programs that seek access without permission. While it may be annoying as you will get prompted more than often, but it’s for your benefit. This feature, along with Ransomware data recovery connected to OneDrive, will make sure the files can be recovered in case of a ransomware attack.
2] Account Protection
It offers quick access to some of the crucial settings related to your account. So it’s merely a dashboard which includes Microsoft Account, Windows Hello, and Dynamic Lock.
3] Firewall and network protection
Here you can configure who and what can access your network by changing settings for Domain Network, Private Network, and Public Network. Click on any of them, and you can configure if Windows Defender Firewall should be on and if all incoming connections should be blocked.
Then you can set of the links which can directly open the following classic settings.
- Allow an app through Firewall
- Network and Internet troubleshooter
- Firewall notification settings
- Advanced settings
- Restore firewalls to default
4] App and browser control
This section manages app protection and online security. On a broader perspective, you have the following
- SmartScreen
- Apps and files
- Microsoft Edge
- Microsoft Store Apps
- Isolated Browsing
- Exploit Protection
While it is essential to keep the SmartScreen setting to Warn for all three, what is even more important is to setup Isolated Browsing and Exploit Protection.
Isolated browsing will make sure that Windows Defender Application Guard opens Microsoft Edge in an isolated browsing environment. It will make sure to protect the computer form malware. Exploit Protection is similar to UAC which makes sure no programs runs with admin privilege unless
5] Device Security
Its a hardware security feature, and if your devices support it, you will get to access them from here. If you see the message “Y our device meets the requirements for standard hardware security,” its because the computer shared either of TPM 2.0, Secure boot enabled, DEP, or UEFI MAT available in the system.
It offers access to:
- Core isolation: Offers added protection against malware and other attacks by isolating computer processes from your operating system and device.
- Memory integrity prevents malicious code from accessing high-security processes.
- Secure boot prevents malware from infecting your system during boot.
- The security processor provides additional encryption features.
6] Device performance and health
This section gives you a bird view of how your computer is performing. A healthy report is available which shares issues related to storage, apps, and software, and Windows Time Service.
7] Family options
The last section is the Family Options, but its more about educating the consumers about the feature, and what they can get out of it. We have talked about Parental control in detail, and if you gave kids in the house-sharing your computer, we recommend using it. You can set up screen time habits, keep track of what is browsing, and also allow your kids to buy apps and games.
Windows Security on Windows offers a complete package that allows you to control the security aspects of the computer. Right from browsing to computer hardware security to parental control.
If you are setting up the computer for the first time, make sure to configure it right away.


