- Change your account picture
- Change your account picture
- Delete an account picture
- How to Change User Account Picture in Windows 10
- Steps to Change User Account Picture using Settings app
- How to change user account picture in Windows 8.1, 8, 10 (login, logon, image)
- Solution to change user account picture in windows 8 and 8.1 and in new Windows 10!
- 1.) . Change user account picture in Windows 8 / 8.1! 2.) . Manage user account picture in Windows 10 Home and Pro!
- 1.) Change user account picture in Windows 8 / 8.1!
- 2.) Manage user account picture in Windows 10 Home and Pro!
- Password Recovery
- How to Change Default User Account Picture in Windows 10
- Change Default Account Picture
- Prevent Changing Account Picture Using Group Policy
- Prevent Changing Account Picture Using Registry
Change your account picture
If you want your account picture to have more of a personal touch and reflect you, you can change your picture in Windows 10.
Change your account picture
You can change the picture for either a local account or a Microsoft account. Here’s how.
Tip: If you use just a username and password to sign in to Windows 10, you’re using a local account. If you use an email address and password to sign in, you’re using a Microsoft account.
Change your local account picture in Windows 10
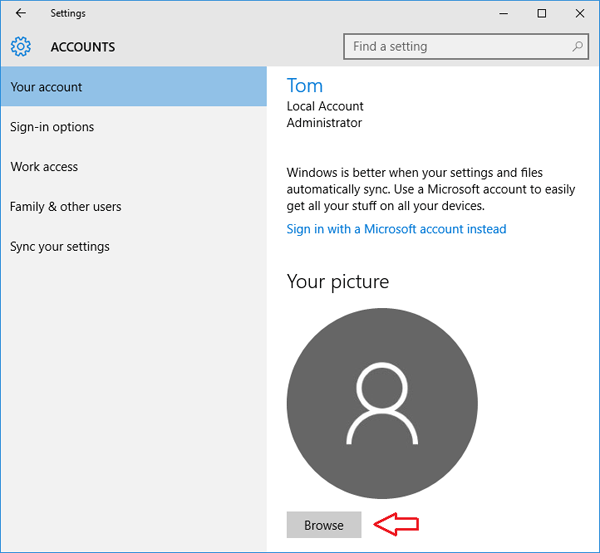
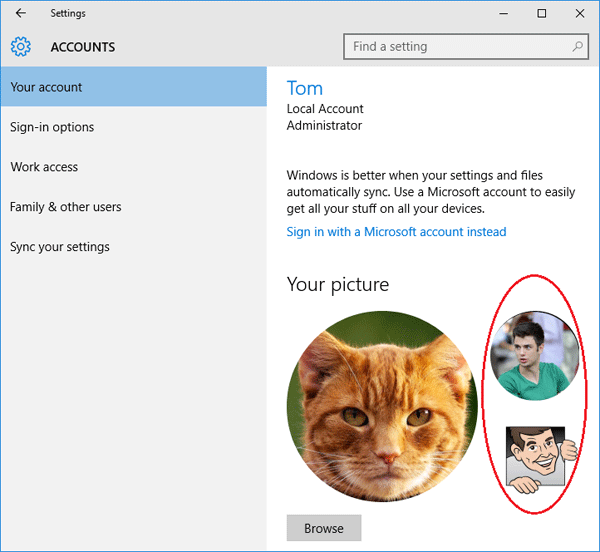
Select the Start button, then select Settings > Accounts > Your info.
Under Create your picture, select Browse for one. Or, if your device has a camera, select Camera and take a selfie.
Note: Windows remembers the last three pictures you’ve used. Select the picture on the Your info page to switch to that one.
Change your Microsoft account picture in Windows 10
Select Add picture or Change picture, then follow the instructions.
Note: Windows remembers the last three pictures you’ve used, so you can easily switch back to a recent favorite.
Delete an account picture
Windows is designed to let you switch between your three most recent pictures on the Your info page. If you really need to delete one of your account pictures:
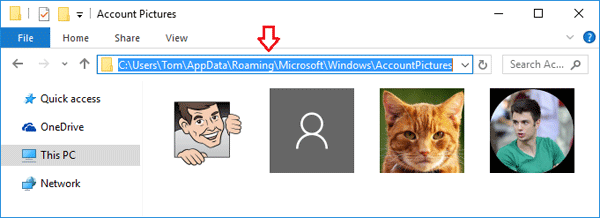
Open File explorer from the taskbar. If you don’t see File explorer on the taskbar, select Start , and type File explorer.
Go to C:\Users\ yourname\AppData\Roaming\Microsoft\Windows\AccountPictures.
Replace yourname with your account name.
If you’re unable to find the AppData folder in File Explorer , it might be hidden. Select the View setting and select the checkbox next to Hidden Items to show all items in a folder.
Delete the account picture you no longer want to use.
How to Change User Account Picture in Windows 10
Windows 10 lets you change the default user account image with a custom one. Here’re the steps to change user account picture in Windows 10.
When you create a new user account in Windows, it will automatically set an account picture. Generally, the default user account picture is a simple wireframe style user icon. If you are using your Microsoft account to log in, then Windows 10 will pull the user account picture from your Microsoft account and displays it the user account picture in the PC. The good thing is, you can quite easily change the default account picture to your own photo or any other image in Windows 10.
The account picture will be displayed in various places in Windows 10. Those places include in the start menu, on the lock screen, in the settings app, and in the control panel.
Unlike the older Windows versions where you are able to change the user account picture from Control Panel, Windows 10 requires you to use the Settings app. Thankfully, it is quite easy to use the Settings app to change the user account image.
Steps to Change User Account Picture using Settings app
- Press the keyboard shortcut “Win + I” to open the Settings app.
- Click on the “Accounts” option on the main page.
- Select the “Your Info” tab on the left panel. You can see the current user account picture on the right page.
- Click on the “Browse for one” under “Create your picture”. If you want to take a picture with your webcam, click on the “Camera” button.

- In the Browse window, go to the folder where you saved your photo, select it, and click on the “Open” button. If you chose the “Camera” option earlier, your web camera will launch where you can take a picture.

As soon as you click on the Open button, the image will be set your account picture.
Helpfully, Windows 10 will show your previous pictures right next to your current user account image. If you don’t like the current one, you can simply revert back to the old one with a single click.
The new account picture will appear everywhere in your Windows 10 machine, like in the start menu, lock screen, settings app, official MS apps, etc.
That is all. It is that simple to replace the default user account picture with your own image.
I hope that helps. If you are stuck or need some help, comment below and I will try to help as much as possible. If you like this article, check out how to get full user account details on Windows 10 and how to disable security questions in Windows 10.
How to change user account picture in Windows 8.1, 8, 10 (login, logon, image)
Solution to change user account picture in windows 8 and 8.1 and in new Windows 10!
1.) . Change user account picture in Windows 8 / 8.1!
2.) . Manage user account picture in Windows 10 Home and Pro!
1.) Change user account picture in Windows 8 / 8.1!
Start (open) the «Change PC Settings». Please press the key combination [Win-Logo]+[I] and then click/tap Change PC settings (. See Image-1 Arrow-1).
Or swipe in from the right edge of the screen, tap Settings, and then tap Change PC settings. When using the mouse, point to the upper-right corner of your screen, move the mouse cursor down, click Settings and then click Change PC settings.
And now: in PC Settings click Personalize (. See Image-2 Arrow-2), and Account Picture (. See Image-2 Arrow-2)
You can Browsing on your Computer for new User Account Image (. See Image-2 Arrow-3 and . See Image-3) or create a new User Picture via Webcam (. See Image-2 Arrow-4)! 
2.) Manage user account picture in Windows 10 Home and Pro!
1. Simply use the shortcut Windows Logo + I and type / enter the text in «account pic» ,
2. Type or / and click on the:«Your account Picture and profile settings»
3. Create a new account picture via camera
4. Browse on Computer to select a existed account Picture
Password Recovery
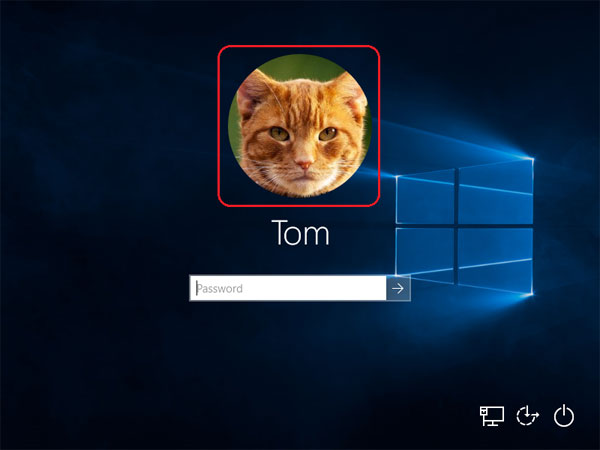
At Windows login screen you can see a list of user accounts with a small picture next to each one. Actually, the same account picture is also shown at the top of the Start menu (or Start screen), and you can click it to log off and switch user accounts.
In this article we’ll show you how to change the user account picture in Windows 10/8, restore the default user picture (avatar) or delete your old or current account picture.
Part 1: Change Account Picture for Windows 10/8 Account
Unlike previous versions of Windows, Windows 10 and Windows 8 don’t include an option to change the account picture from the User Accounts applet in Control Panel. Now, you have to change it from PC Settings. Here’s how:
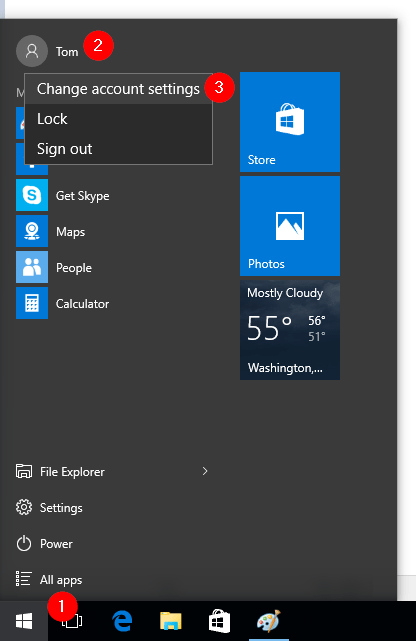
- Click the Start button or press the Windows logo key on your keyboard. This will open the Start Menu (or Start Screen).
- Right-click on the account picture at the top-left corner of the Start menu, and then select “Change account settings“. If a Start screen is shown, right-click on the account picture at the top-right corner of the Start screen and select the “Change account picture” option.
Windows presents the PC Settings screen shown below. From there you can see your current account picture. Click on Browse button and select your favorite picture to set as new account picture.
Part 2: Reset/Restore Account Picture to Default
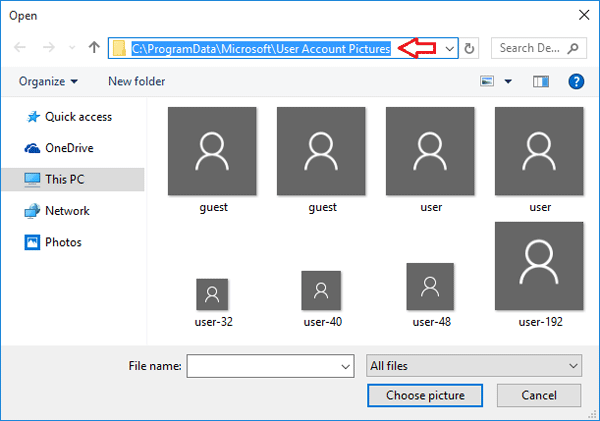
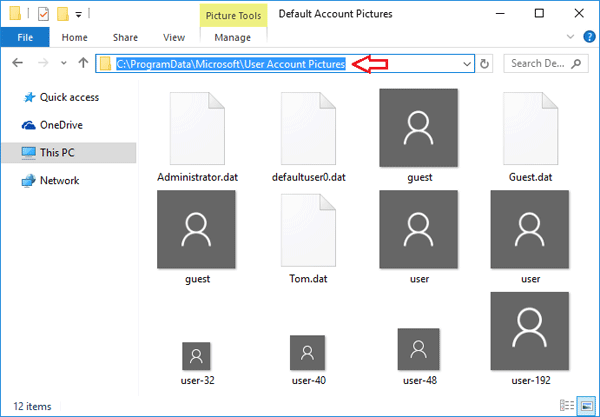
After changing the account picture, you might later find that there is no option to restore the profile picture to default. In Windows 10/8/7, the default account picture images are stored in the hidden system folder: C:\ProgramData\Microsoft\User Account Pictures. Here’s how to reset account picture to default in Windows 10/8:
- Click the Start button or press the Windows logo key on your keyboard. This will open the Start Menu (or Start Screen).
- Right-click on the account picture at the top-left corner of the Start menu, and then select “Change account settings“. If a Start screen is shown, right-click on the account picture at the top-right corner of the Start screen and select the “Change account picture” option.
- Click on Browse button under your current user avatar. When the Open dialog appears, type the following path in the address bar and hit Enter.
C:\ProgramData\Microsoft\User Account Pictures
Part 3: Delete Your Old Account Picture
If you changed your Windows user account picture several times, the previous account pictures will also be shown on the right side of your current account picture.
If you don’t plan to use them again, there is no reason to keep them there. But Windows 10/8 provide no way to remove old user pictures. Here is very simple way to delete the old user account pictures:
- Open the File Explorer.
- Type the following path at the address bar, replacing username with the name of your Windows account.
C:\Users\username\AppData\Roaming\Microsoft\Windows\AccountPictures
Part 4: Hide or Remove Current Account Picture
Is there a way to hide or remove the user picture at the login screen? How to disable the user account picture from the Start menu? Follow these steps and you can hide/remove current account picture completely in Windows 10/8:
- Open the File Explorer.
- Copy and paste the following path in the address bar of File Explorer. Press Enter and you can see all built-in default account pictures. Delete all images.
C:\ProgramData\Microsoft\User Account Pictures
Now you have to clean the cached account images. Copy and paste the following path in the address bar of File Explorer. Press Enter and you’ll see a folder with the name of your account’s SID.
C:\Users\Public\AccountPictures
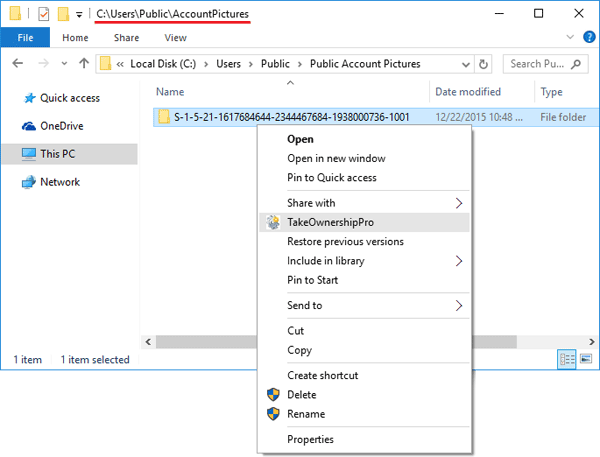
Just rename the folder or delete it. If you want to delete that folder, you need to firstly take ownership of the folder using the freeware TakeOwnershipPro.
Log off or restart your computer. You’ll see the account picture disappeared from Windows login screen.
How to Change Default User Account Picture in Windows 10
Every time you create a new user account in Windows, it will set a default user account picture. In Windows 10 the default picture is a very generic wireframe user icon on a dark grey background. Users can update the user account picture from the control panel or the Settings app.
If you don’t like the default user account icon, you can change it to the icon or picture of your choice. You can even standardize the default user account icon by preventing users from changing it.
Change Default Account Picture
Windows stores the default user account icon in the PNG format within a system folder in a variety of sizes. By replacing these default pictures with the icon of our choice, we can change the default account picture.
1. First, download the picture or icon of your choice that is at least 512px x 512px. Make sure that the width and height are the same. Now, create five copies of the icon and resize and rename them as follows:
- 448 x 448 – user.png
- 192 x 192 – user-192.png
- 48 x 48 – user-48.png
- 40 x 40 – user-40.png
- 32 x 32 – user-32.png
2. Once you are done, launch File Explorer and go to the “%ProgramData%\Microsoft\User Account Pictures” folder. Here you will see all the default user account icons.
3. Rename “user.png,” “user-192.png,” “user-48.png,” “user-40.png,” and “user-32.png” to “user.png.bkp,” “user-192.png.bkp,” “user-48.png.bkp,” “user-40.png.bkp,” and “user-32.png.bkp” respectively. You can ignore the “user.bmp” file.
Note: If you don’t want to go through the renaming process, you can simply delete or replace them. But if you do that, you might not be able to restore the default icons when needed. You can simply copy the icons from another system though.
4. After renaming, copy and paste the earlier resized and renamed icons into the “User Account Pictures” folder. This is how it looks once you are done.
5. Finally, restart your system.
From now on, whenever you create a new user account or when a user doesn’t set the user account picture, the modified custom icon will appear.
Prevent Changing Account Picture Using Group Policy
If you don’t want users to change their user account picture, you can block that option using the Group Policy editor.
1. Open the Start menu, search for “gpedit.msc,” right-click on it and select the option “Run as administrator.”
2. In the group policy editor go to “Computer Configuration -> Administrative Templates -> Control Panel -> User Accounts.” In the right panel double-click on the “Apply the default account picture to all users” policy to open it.
3. Select “Enabled” in the policy properties window, and click on the “OK” button to save the changes.
That is all. Once the system is restarted, users will no longer be able to change the default account picture.
If you want to revert back, select either the “Disabled” or “Not configured” option in the policy properties window.
Prevent Changing Account Picture Using Registry
If you don’t have access to the Group Policy Editor, you can do the same thing via Registry Editor.
1. Search for “regedit” in the Start menu, right-click on it and select the option “Run as administrator.”
2. In the Registry Editor go to the following location:
3. In the right panel right-click and select “New -> DWORD (32-bit) Value.” Name the new value as “UseDefaultTile.”
4. Double-click on the value, set the Value Data as “1” and click on the “OK” button.
If you want to revert back, either change the value data to “0” or delete the value.
Comment below sharing your thoughts and experiences regarding using the above method to change the default user account picture in Windows.
Vamsi is a tech and WordPress geek who enjoys writing how-to guides and messing with his computer and software in general. When not writing for MTE, he writes for he shares tips, tricks, and lifehacks on his own blog Stugon.


