Renaming files and file extensions
It’s easier to change filenames in Vista and Windows 7 than in previous versions of Windows. All you do is:
- Click the file to select it, then click once more. Windows automatically selects the filename so that anything you type will replace the existing name.
- Type the new filename and press Enter. You’re done.
It’s a small change from the previous method, where you had to manually select the filename before editing, but it saves a lot of time.
To change a whole batch of files at once:
- Select each of the files. You can select a group of contiguous files by click the first one and then Shift+clicking the last one; you can select any number of files by Ctrl+clicking each file; or to select all files in a folder, press Ctrl+A.
- Press F2. The filename of the last file you clicked will be selected.
- Type a new name and press Enter.
Each of the files will be renamed, with sequential numbering used to distinguish one file from another.
So, for example, if you select three .jpg image files and rename the first one Dad’s Birthday, you’ll end up with files named
Dad’s Birthday (1).jpg
Dad’s Birthday (2).jpg
Dad’s Birthday (3).jpg
TIP: If you make a mistake when renaming one or more files, simply press Ctrl+Z while you’re still in the file folder and before you take any other actions in that folder. Ctrl+Z undoes whatever you did last within a folder.
Unfortunately, this new file renaming method has one drawback: although the new method makes changing filenames easy, it makes it harder to change the file extension. The problem is exacerbated by Microsoft’s determination to hide those file extensions from view.
About filenames
Filenames in Windows consist of two parts, a filename and an extension, separated by a full stop (a period). The filename is a descriptive label; the extension indicates the type of file you’re dealing with – JPG for an image, MP3 for an audio file, DOC or DOCX for Word documents, PDF for an Adobe Reader file, and so on. You’re free to change filenames as you need, but you should exercise caution when changing file extensions because Windows uses the extension to figure out which program should be used to open a file.
First, display file extensions
Microsoft has been hiding file extensions from users in version after version of Windows. This supposedly makes things less confusing; in fact, it’s a piece of paternalistic boneheadedness. Being able to see file extensions is a good thing.
- Those extensions tell you the type of file you’re dealing with and which type of program you’ll need in order to view or edit the file.
- The extensions help you distinguish between similarly named files. For example, if you have an Excel spreadsheet named 4th Quarter Budget and a PowerPoint presentation also called 4th Quarter Budget, seeing the .xls extension on the spreadsheet and the .ppt extension on the presentation helps you see which is which at a glance. Yes, the little file icons help, too, but those icons aren’t always easily identifiable.
- The extensions also help you spot files which may be dangerous to open. A .vbs extension tells you you’re about to open a Visual Basic script which will run commands on your computer – one way that malware can strike. Similarly, seeing the .exe extensions lets you know you’re dealing with a program. If you receive an attachment in your email and see the .exe extension, you almost always want to avoid opening it, once again to avoid malware.
- The file extensions can also help you figure out why you can’t view or edit a file. Not everyone uses the same software nor the same operating system. If someone sends you a document they created using Pages on an Apple Mac, there’s a good chance you won’t be able to open that document on your Windows system; if you can’t see the file’s extension, there’s no way of knowing it’s a Pages document and thus it’s hard to figure out why you’re having problems. On the other hand, if you see the .pages file extension you’ll know immediately you’re dealing with some strange, other worldly animal. You can then ask your correspondent to save the file in Word or some other format and resend it.
- The file extensions help you recognise which version of a Microsoft Office document you’re dealing with. Office 2010 saves Word documents as .docx files, Excel documents as .xlsx files, an so on. In earlier versions of Office, those extensions were .doc and .xls. The new formats are incompatible with the old, so if someone sends you a .docx document and all you have is Word 2003, you won’t be able to open or edit the file. Being able to see the extension will help you troubleshoot why you’re running into this problem.
With all those reasons why displaying file extensions is a good thing, let’s look at why hiding them is a good thing:
- It makes for less clutter on the screen.
Really, that’s it. Microsoft may think it makes for less confusion, but the reverse is true.
It’s pretty clear by now that Microsoft is unlikely to see the light and display file extensions by default in any version of Windows. That doesn’t matter because you can take charge of the situation yourself and turn extension display on:
- Open any folder window.
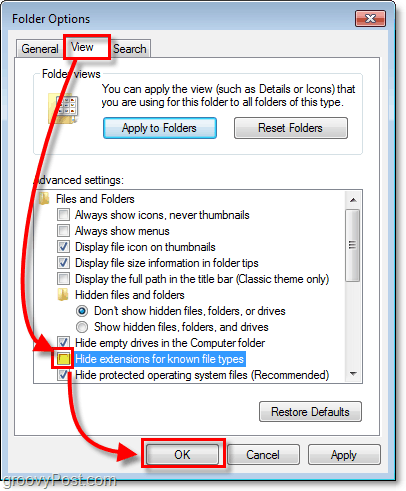
- Press Alt+T+O (that’s the letter O, not a zero) to open the Folder Options dialog box.
- Click the View tab.
- Remove the tick (checkmark) beside ‘Hide extensions for known file types’ and click OK.
Why change a file extension?
If Windows uses a file’s extension to determine how to open that file, why would you ever want to change an extension? Wouldn’t that simply confuse Windows and prevent it from opening the file?
In many cases, that’s true. Most of the time, you’ll want to leave extensions alone. But there are times when it’s useful to be able to change those extensions. If you use a text editor to create a web page, you may want to keep the .txt extension while editing the code but then change the extension to .html to be able to view the page in a web browser.
Occasionally, you may receive a file which has the wrong extension: a .jpg image which someone has accidentally named as a .bmp file, for example. If you try to load a .jpg file into your graphics program and you get an “invalid file format” or similar message, try changing the extension to .bmp or .png or .tif or another common graphics file extension, and see if your graphics editor recognises it.
You may also want to change the case of an extension. Many cameras save image files with a capitalised extension, such as .JPG. Windows is case-blind when it comes to filenames, so it doesn’t matter to the operating system whether a file is called MAGNOLIA.JPG or magnolia.jpg, but it may matter to humans; after all, using ALL CAPS is the digital equivalent of shouting at someone, and a folder littered with .JPG images does just that.
How to change a file extension
In Windows 7, to change a file extension, first, make sure file extensions are visible using the steps above, then:
- Click the file to select it, then click once more. Windows automatically selects the filename so that anything you type will replace the existing name.
- Click and drag over the extension, type the new extension and press Enter.
It sounds simple enough, but it turns out to be pretty clumsy, especially if you’re changing extensions on a bunch of files.
Things get even worse if you want to change capitalised extensions on a group of files: Windows 7 refuses to do it. For example, if you have three files named 1.JPG, 2.JPG and 3.JPG, if you select all the files and rename the first one platypus.jpg, you’ll end up with platypus (1).JPG, platypus (2).JPG and platypus (3).JPG. The extension pigheadedly maintains its uppercase lettering. If you want to change those extensions, you have to rename each file one by one.
 A better way to change filenames and extensions
 A better way to change filenames and extensions
If you need to do some serious file renaming – perhaps you have folders stuffed with horribly named photos – try a bulk file renaming utility. There’s one called Bulk Rename Utility that’s free to use. It looks pretty ferocious when you open it up, but don’t worry – although it has enormous power and flexibility, it makes very light work out of actions such as changing the case of a bunch of file extensions. If you want a less intimidating renamer, Better File Rename does the trick, but it’ll set you back $US19.95.
Here’s how you change the case of all files in a folder using Bulk Rename Utility:
- Open the folder containing the files.
- Right-click any file in the folder and choose Bulk Rename Here from the context menu. The utility will load all the files into its main window, with a folder tree displayed on the left allowing you to navigate to any other folder, and a mind-numbing array of options displayed below.
- Press Ctrl+A to select all the files in the folder.
- Down near the bottom right of the window you’ll see Extension. Select Lower from the Extension drop-down box. You’ll see the filenames updated in the New Name column. This is a preview to let you check whether the changes you’re making are correct.
- If you’re satisfied with the displayed changes, click the Rename button in the bottom right to rename the selected files.
A quick look at Bulk Rename’s other options gives you an idea of the power of the program. You can even save renaming schemes so that you can reapply them to other batches of files.
TIP: If you rename a bunch of files using Bulk Rename and the changes don’t immediately appear within explorer, press F5 to refresh the view of the window.
change file extension in batch
Simple question. IMDU command do
and convert the file.imd on file.raw
I have a lot of .imd so I need a batch. I have tried:
But it doesn’t work and creates a file called %%.raw
I need a batch which will remove the extension imd and replace it with raw. How can I do that?
nx.raw shows correct output for me. BTW, I think that the IMDU command does some extra contents conversion in addition to renaming, doesn’t it? – JosefZ May 15 ’16 at 0:12
2 Answers 2
Open a command prompt window, run for /? and read the output help carefully and completely.
There is explained %
xI – only file extension of %I – and %
nI – only file name of %I – and %
nxI – file name with extension of %I . Please note that it does not matter if the string assigned to case-sensitive loop variable I is really a file or a folder which really exists or does not exist at all. In fact it can be any string.
The file name referenced with %
nI is the string after last backslash up to last dot or end of string. It can be an empty string if the string assigned to loop variable ends with a backslash, i.e. is a folder path, or name of file starts with a dot and has no real file extension like hidden files on UNIX/MAC are often named.
The file extension referenced with %
xI is everything from last dot after last backlash to end of string assigned to loop variable. So %
xI references the file name of a file with a name like .htaccess and not %
nI which is in this special case an empty string. A file named .htaccess is on UNIX/MAC a file with real name being htaccess and . at beginning of file name makes this file hidden on UNIX/MAC file systems.
Please note that loop variables are case-sensitive while the modifiers like n , x , f , . are not case-sensitive. So %
NXI is identical to %
nxI . It is in general better readable to use a loop variable in upper case and the modifiers in lower case.
It can be confusing for readers and in some special cases also for cmd.exe what is meant on using as loop variable a character which is also a modifier, for example on running in a cmd window the command line:
I is not a modifier and so the wrong output by the command line above can be avoided using %I instead of %f as it can be seen on running in a Windows command prompt window:
Now it is clear that %
ff was interpreted as reference to full qualified file name of string assigned to loop variable f while %
I is interpreted as referencing the string assigned to loop variable I with double quotes removed.
So I recommend to avoid one of these characters ADFNPSTXZadfnpstxz as loop variable or be at least careful on using them.
For all that reasons it is better to use in batch file on which the percent sign must be doubled the following command line:
For such simple loops it is also possible and good practice to use an ASCII character not being a letter or digit having no special meaning for Windows command processor like:
It is easier to search in batch file for all occurrences of # than for all occurrences of a letter existing also many times in other strings. The character $ is also very good as loop variable because it has also no special meaning and does usually not exist in other strings in a batch file.
Don’t forget the double quotes around the file names as files could contain spaces or round brackets or ampersands in their file names which require double quotes around file names. Command FOR holds in this use case a file name always without surrounding double quotes in loop variable.
The usage of FOR to process files or folders matching a wildcard pattern which are renamed, moved or deleted by executed command line(s) on FOR iterations is problematic on FAT32 and exFAT drives because of list of directory entry changes while FOR accesses this list during loop iterations.
For example the command line below in a batch file with current directory being on a FAT32 or exFAT drive can result in a temporary file being renamed more than once.
In such cases it is better to use in the batch file command DIR to get a list of file names captured by FOR which processes now a list of file names not being modified by the command line(s) executed by FOR on each file name as shown below.
Configure Windows 7 to Display File Extensions [How-To]

 In all versions of Windows including the latest Windows 7, the file extensions are hidden by default. Perhaps it’s because Microsoft did some case study in the past and found that people don’t like being able to see file extensions. Who knows. All I know is, with hidden file extensions, it’s not easy to (A – Find a file at times and (B – Rename files (specifically their extension.) This is why the below Step-by-Step to configure Windows to display file extensions is one of the first things I do on new systems.
How To Display File Extensions In Windows 7
1. Right-Click the Start Orb, and then Click Open Windows Explorer.

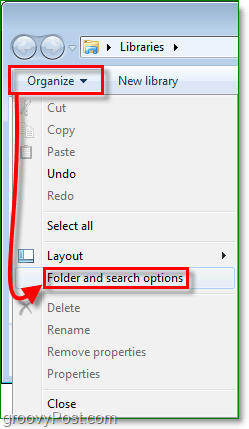
2. In Explorer, Click Organize. Then Click Folder and search options.
3. In the Folder Options window, Click the View tab. Next Click and Uncheck the Hide extensions for known file types check box. Click OK to finish.
All done!
Instantly your files will show their extensions at the end of their file name. Now you can even use the Right-Click > Rename feature to change file extensions manually as well (just make sure you know what you’re doing first.)


