- How to Change a File Extension in Windows
- My Computer
- How to Change File Type in Windows 10
- Showing file extensions and changing the file format
- How to change a File Extension in Windows
- How to Change File Associations in Windows
- Here’s how to change what program opens a file in Windows
- What to Know
- How to Change File Associations in Windows 10
- How to Change File Associations in Windows 8, 7, or Vista
- How to Change File Associations in Windows XP
- More About Changing File Associations
How to Change a File Extension in Windows
This page shows you how to change a file extension in Windows. For example, you might want to rename a file called MyDocument.rtf to MyDocument.txt .
These instructions are for Windows 7 but the same basic process applies to most versions of Windows (see screenshots from Windows XP).
NOTE: Changing a file extension should only be done if you are confident it’s the right thing to do. Test the file thoroughly after the change. If it doesn’t work you can easily change the extension back—just make sure you remember what it was!
My Computer
The first thing to do is open Windows Explorer (or My Computer) and view the file you wish to change. We’ll use the example of MyDocument.rtf . When we browse to the file it looks like this:

You’ll notice that the file does not appear to have an extension—it’s just called MyDocument . That’s because in this example Windows is set to hide extension names.
If you can already see file extensions on your computer, skip the next step.
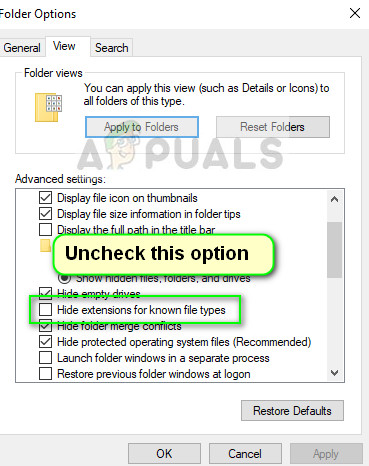
If you can’t see the file extension, go to organize > Folder and Search Options , then click the View tab. Uncheck the box titled «Hide extensions for known file types» like so:

Click OK . Now you should be able to see the file extension:

Right-click the file name and select Rename (or left-click and hold down the button for one second). Enter the new extension like so:

After entering the new extension, hit the Enter (return) key. Windows will give you a warning that the file may not work properly. This is quite safe—remember that you can restore the original extension if anything goes wrong.
It’s also possible that you might get another message telling you that the file is «read-only». In this case either say yes to turning off read-only, or right-click the file, select Properties and uncheck the Read-only box.
If you do not have permission to change the file extension, you may have to login as Administrator. Another option is to make a copy of the file, rename the copy and then delete the original.
How to Change File Type in Windows 10
With our increasing use of computers in our daily life, it may get necessary even for a simple user to change the file type of a file from one format to another. Each file format has their own properties. For example a ‘.txt’ file will probably get opened by the text editor while an ‘html’ file will get launched in your default browser.
 File format analogy
Even though the contents inside the files might be the same, the file type matters a lot. The process of changing file type is quite simple and straightforward. However, there are some cases whereby changing the file type, the file becomes unusable. Hence it is recommended that you know exactly what you’re doing and also make an additional copy of the file.
Showing file extensions and changing the file format
By default, Windows doesn’t have the file format displayed alongside every file. For example, if a file is a text file, its name wouldn’t display ‘ap puals.txt’. Instead, it will only display ‘appuals’. First, we will enable the file extensions and then through basic rename, we will change the file extension. You can also choose to rename files in bulk if there are a lot of files that you need to change the type for.
- Press Windows + E, click View from the top-most ribbon. Now click Options and select the option Change folder and search options.
 Change folder and search options – Windows Explorer
- Now uncheck the option Hide extensions for known file types. Now all the files will have their file extensions displayed alongside their names.
 Enabling File Extensions – Windows Explorer
- Now navigate to the file for which you want to change the file format. Right-click on it and select Rename.
- Now change the file’s extension to the extension of the type which you want to change into. In this example, we change a ‘text’ file to a ‘python’ file. The extensions for a text file are ‘txt’ and for python ‘py’.
 Process of changing a file type
Here is a list of common file extensions used in the world of computing. We have listed them according to their type.
How to change a File Extension in Windows

This article outlines how to change a file extension in Windows. For example, you might want to rename a TURF file called MCALL_0110_4865_6500_2074._ip to MCALL_0110_4865_6500_2074.zip
These instructions are for Windows 7 but the same basic process applies to most versions of Windows.
By default, Windows hides file extensions. In order to change them, you must first unhide file extension to make them visible so they can me changed. Then you can change it.
If you can already see file extensions on your computer, skip to Step 2
How to show file extensions in Windows 7
Step 1: If you can’t see the file extension, Open Windows Explorer and click on the Organize button towards the top left. Then choose Folder and Search Options, then click the View tab. Uncheck the box titled «Hide extensions for known file types» like so:
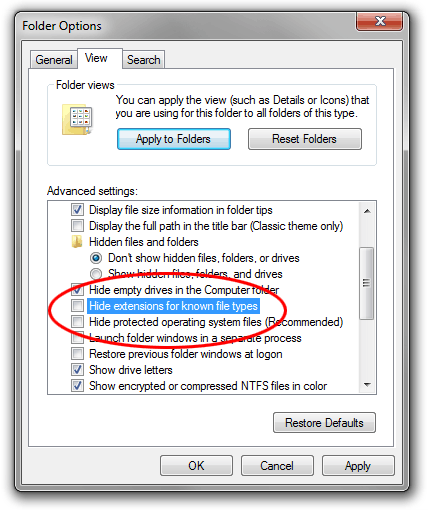
Click OK. Now you should be able to see the file extension.
How to show file extensions in Windows 8
Step 1: It’s simple to turn file extensions on and off in Windows 8. Simply open a File Explorer window (the new name for Windows Explorer) and click the View tab.

Now check the box next to File name extensions. If the box is check, extensions will be shown. If unchecked, they won’t. This is the opposite way the tickbox works in Windows 7 and Vista.
How to show file extensions in Windows 10
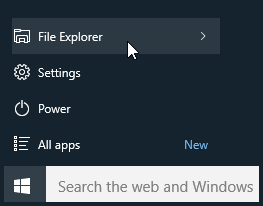
Step 1: Open the File Explorer by clicking on the Windows Start button and selecting the File Explorer icon as shown below.
Click the View tab in File Explorer and then click the Options button (or click the drop down menu and click Change folder and search options) as shown below.
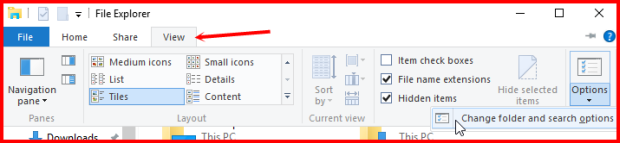
The Folder Options dialog box is displayed. Click the View tab at the top of Folder Options as shown below
To view file extensions, uncheck the Hide extensions for known file types option.

Click OK when done.
Step 2: Right-click the file name and select Rename (or left-click and hold down the button for one second). Enter the new extension like so:

After entering the new extension hit the Enter (return) key. Windows will give you a warning that the file may not work properly. This is quite safe—remember that you can restore the original extension if anything goes wrong.
It’s also possible that you might get another message telling you that the file is «read-only». In this case either say yes to turning off read-only or right-click the file, select Properties and uncheck the Read-only box.
If you do not have permission to change the file extension, you may have to log in as Administrator. Another option is to make a copy of the file, rename the copy and then delete the original.
How to Change File Associations in Windows
Here’s how to change what program opens a file in Windows
:max_bytes(150000):strip_icc()/tim-fisher-5820c8345f9b581c0b5a63cf.jpg)
:max_bytes(150000):strip_icc()/ryanperiansquare-de5f69cde760457facb17deac949263e-180a645bf10845498a859fbbcda36d46.jpg)
What to Know
- Under Win10 settings, click Apps > Default Apps > Choose default apps by file type, then choose the program you want to associate.
- The whole process takes less than five minutes.
- Setting a program’s default file association does not restrict other programs that support the file type from working.
This article explains the easy steps below to change a file type’s program association in Windows. Instructions apply to Windows 10, 8, 7, Vista, and XP.
How to Change File Associations in Windows 10
Windows can only open one program for a particular file extension automatically, so if you like to work with your PNG files in Photoshop Elements, for example, and not Paint, changing the default file association for PNG files is required.
Windows 10 uses Settings instead of Control Panel to make changes to file type associations.
Right-click the Start button (or hit the WIN+X hotkey) and choose Settings.
:max_bytes(150000):strip_icc()/001_how-to-change-file-associations-in-windows-2624477-5bf49f7dc9e77c0027195571.jpg)
Select Apps from the list.
:max_bytes(150000):strip_icc()/002_how-to-change-file-associations-in-windows-2624477-5bf49f9846e0fb0026918367.jpg)
Choose Default apps on the left.
:max_bytes(150000):strip_icc()/003_how-to-change-file-associations-in-windows-2624477-5bf49fac46e0fb002dc6d992.jpg)
Scroll down a little and select Choose default apps by file type.
:max_bytes(150000):strip_icc()/004_how-to-change-file-associations-in-windows-2624477-5bf49fc546e0fb00518197c7.jpg)
Locate the file extension for which you want to change the default program.
If you’re not sure what extension the file is using, open File Explorer to find the file and use the View > File name extensions option to show file extensions.
In the Choose default apps by file type window, select the program to the right of the file extension. If there isn’t one listed, select Choose a default instead.
In the Choose an app pop-up window, pick a new program to associate with that file extension. If there isn’t one listed that you want to use, try Look for an app in the Store.
:max_bytes(150000):strip_icc()/005_how-to-change-file-associations-in-windows-2624477-5bf4a062c9e77c002d166d15.jpg)
Windows 10 will now open the program you chose each time you open a file with that extension from File Explorer.
When you’re done, you can close any windows you opened to make these changes.
How to Change File Associations in Windows 8, 7, or Vista
Open Control Panel. In Windows 8, the Power User Menu (WIN+X) is the quickest way. Use the Start menu in Windows 7 or Windows Vista.
:max_bytes(150000):strip_icc()/001_how-to-change-file-associations-in-windows-2624477-5c8985acc9e77c00010c2307.jpg)
Select Programs.
:max_bytes(150000):strip_icc()/002_how-to-change-file-associations-in-windows-2624477-5c89867b46e0fb00017b3204.jpg)
You’ll only see this link if you’re on the Category or Control Panel Home view of Control Panel. Otherwise, choose Default Programs instead, followed by Associate a file type or protocol with a program link. Skip to Step 4.
Choose Default Programs.
:max_bytes(150000):strip_icc()/003_how-to-change-file-associations-in-windows-2624477-5c8986924cedfd000190b297.jpg)
Select Associate a file type or protocol with a program on the following page.
:max_bytes(150000):strip_icc()/004_how-to-change-file-associations-in-windows-2624477-5c8986af46e0fb0001a0bf7b.jpg)
Once the Set Associations tool loads, which should only take a second or two, scroll down the list until you see the file extension that you want to change the default program for.
If you’re not sure what extension the file in question has, right-click it (or tap-and-hold) the file, go to Properties, and look for the file extension in the «Type of file» line of the General tab.
Select the file extension to highlight it.
Choose the Change program button, located just above the scroll bar.
:max_bytes(150000):strip_icc()/005_how-to-change-file-associations-in-windows-2624477-5c8986d746e0fb00015f907f.jpg)
What you see next, and the next step to take, depend on what version of Windows you’re using. See What Version of Windows Do I Have? if you’re not sure which set of instructions to follow.
Windows 8: From the «How do you want to open this type of file [file extension]?» window you see now, look through the list and select the program you’d like to open when you double-click or double-tap these types of files. Try More options for the complete list.
:max_bytes(150000):strip_icc()/006_how-to-change-file-associations-in-windows-2624477-5c8986f646e0fb00017b3205.jpg)
Windows 7 & Vista: From the «Open with» window that popped up, look through the programs listed and choose the one you’d like to open for this extension. The Recommended Programs are probably the most applicable, but there may be Other Programs listed, too. Use Browse to manually locate a program.
:max_bytes(150000):strip_icc()/007_how-to-change-file-associations-in-windows-2624477-5c89871646e0fb00010f11cd.jpg)
Select OK if you see it, and Windows will refresh the list of file associations to show the new default program assigned to this file type. You can close the Set Associations window if you’re done making changes.
From this point forward, when you double-click or double-tap on any file with this particular file extension, the program you chose to associate with it in Step 8 will automatically launch and load the particular file.
How to Change File Associations in Windows XP
If you still have Windows XP, the instructions are different newer operating systems.
Go to Start > Control Panel to open Control Panel.
:max_bytes(150000):strip_icc()/008_how-to-change-file-associations-in-windows-2624477-5c898730c9e77c0001a67767.jpg)
Choose Appearance and Themes.
:max_bytes(150000):strip_icc()/009_how-to-change-file-associations-in-windows-2624477-5c898748c9e77c000142304a.jpg)
You’ll only see that link if you’re using the Category View of Control Panel. If you’re instead using the Classic View, choose Folder Options instead and then skip to Step 4.
Select Folder Options near the bottom of the window.
:max_bytes(150000):strip_icc()/010_how-to-change-file-associations-in-windows-2624477-5c89876546e0fb0001136785.jpg)
Open the File Types tab.
Under Registered file types, scroll down until you find the file extension that you want to change the default program association for.
Choose the extension to highlight it.
Select Change in the lower section.
:max_bytes(150000):strip_icc()/011_how-to-change-file-associations-in-windows-2624477-5c89878746e0fb0001336609.jpg)
From the Open With screen that you’re now looking at, choose the program you’d like to open the file type with by default.
:max_bytes(150000):strip_icc()/xp-open-file-with-5c8940c3c9e77c00010c22e1.png)
If you don’t see that screen, choose Select the program from a list, and then OK.
The most common programs that support this particular file type will be listed under the Recommended Programs or Programs list, but there may be other programs that support the file as well, in which case you can manually select one with the Browse button.
Select OK and then Close back on the Folder Options window. You can also close any Control Panel or Appearance and Themes windows that might still be open.
Going forward, any time you open a file with the extension you chose back on Step 6, the program you chose in Step 8 will be opened automatically and the file will be loaded within that program.
More About Changing File Associations
Changing a program’s file association doesn’t mean that another supporting program can’t open the file, it just means that it won’t be the program that opens when you double-tap or double-click on those types of files.
To use another program with the file, you’ll just need to start that other program manually first, and then browse your computer for the particular file to open it. For example, you can open Microsoft Word and use its File > Open menu to open a DOC file that is normally associated with OpenOffice Writer, but doing so doesn’t actually change the file association for DOC files as explained above.
Also, changing the file association doesn’t change the file type. To change the file type is to change the structure of the data so that it can be considered to exist in a different format. Changing the file’s type/format is usually done with a file conversion tool.


