- How to: Activate Windows 10 after Changing Hardware
- Phase 1: Create a bootable Windows 7 installation media
- Phase 2: Change your computer’s boot order & boot from the installation media
- Phase 3: Install Windows 7
- Phase 4: Install all available updates for your computer
- Phase 5: Upgrade to Windows 10
- Reactivating Windows 10 after a hardware change
- Prepare your Windows 10 device for a hardware change
- Reactivate Windows 10 after a hardware change
- If you don’t have a digital license or product key
- Need more help?
How to: Activate Windows 10 after Changing Hardware
Users of legitimate copies of Windows 7 and 8.1 were given a pretty awesome opportunity by Microsoft when the tech giant launched Windows 10, the latest and greatest in Windows Operating Systems – they could upgrade to the new version of Windows for FREE! However, when a Windows 7/8.1 user takes advantage of this offer and upgrades to Windows 10 for free, they are not given a standard Windows 10 retail license by Microsoft, meaning that they don’t get a Windows 10 product key. Instead, the free version of Windows 10 that they upgrade to becomes tied to their computer’s hardware.
When a Windows 7/8.1 user upgrades to Windows 10 for free, their computer’s hardware configuration gets registered on Microsoft’s Windows activation servers in the form of a unique ID. The free Windows 10 license that people who upgrade get isn’t tied to a product key or even their Microsoft accounts – it’s tied to their computer’s hardware.
That being the case, when someone who has upgraded to Windows 10 for free changes either their computer’s motherboard or processor, Microsoft’s activation servers see their computer as an entirely different one, one that doesn’t have a free Windows 10 license tied to it, so when they boot their computer up, their copy of Windows shows up as an un-activated copy of the OS. You see, Microsoft thinks of a computer’s motherboard as its heart and its processor as its brain, and when someone who has upgraded to Windows 10 for free replaces their computer’s heart or brain, Microsoft views it as a completely different computer. Thankfully, it is safe for people who upgrade to Windows 10 for free to change other hardware components of their computer such as its RAM, GPU, HDD or even CD/DVD drive without booting up to an un-activated copy of Windows 10.
It is impossible for people who upgrade to Windows 10 for free and then change their computer’s motherboard or processor to re-activate their copy of Windows 10 or activate a freshly installed copy of Windows 10 using a product key since they didn’t get one when they upgraded. Microsoft hasn’t really explained to the public how free Windows 10 licenses really work in order to keep as much critical information from pirates as they possibly can, but that has made getting around this problem extremely hard for legitimate users of free Windows 10 licenses.
According to Gabriel Aul, Vice President of Engineering for the Windows & Devices group at Microsoft, when someone using a free Windows 10 license boots up their computer after changing its motherboard or processor, they can have Windows re-activated for them by contacting Microsoft support. This also works for people who clean-install Windows 10 on a computer which they upgrade to Windows 10 from Windows 7/8.1 for free – they should simply skip both product key prompts during Windows 10 installation and wait until they get into the Operating System itself.
Once a user is inside their now un-activated copy of Windows 10, they should open the Start Menu, click on All Apps, click on Contact Support to launch the app, navigate to Services & apps > Windows > Setting up, where they can text-chat with a Microsoft representative or have one call them on the phone. The Microsoft representative will then activate the user’s free copy of Windows 10.
If the Microsoft representative fails to activate a user’s free copy of Windows 10, they advise the user to attempt the only solution for this problem in existence – downgrading to Windows 7 (Service Pack 1 or higher), starting from scratch and then upgrading all the way up to Windows 10 again. This is the only solution to this problem because when you downgrade to Windows 7 and then re-upgrade to Windows 10, your computer’s new hardware configuration is registered on Microsoft’s Windows activation servers and you are welcomed into a fully activated free copy of Windows 10.
While downgrading to Windows 7 and then re-upgrading to Windows 10 for free definitely isn’t the ideal solution to this problem and is certainly going to be a pain for the user, it is the best and only shot they’ve got. If you don’t quite know how to downgrade to Windows 7 from your free copy of Windows 10 and then re-upgrade to Windows 10, here’s how:
Phase 1: Create a bootable Windows 7 installation media
First and foremost, in order to downgrade from your free copy of Windows 10 to a legitimate copy of Windows 7 that you either bought or came with your computer, you are going to have to clean install Windows 7, and you’ll need a bootable Windows 7 installation media to do so. Creating a bootable Windows 7 installation media is a pretty simple process, and if you aren’t familiar with it, you should refer to this article that is a step-by-step guide for creating a bootable Windows 7 installation USB or DVD.
Pro Tip: Before moving onto the actual installation of Windows 7, you are definitely going to want to backup any and all important data stored on the same partition of your Hard Disk Drive that houses your free copy of Windows 10 as that partition is going to be nuked during the installation.
Phase 2: Change your computer’s boot order & boot from the installation media
By default, all computers are configured to analyze their Hard Disk Drives for boot information, and if they don’t find any, they move to other drives such as the CD/DVD drive or USB ports. In order to boot from the Windows 7 installation media that you have created, however, you are going to have to change this boot order so that your computer tries to boot from its CD/DVD drive (if you’ve created a Windows 7 installation CD/DVD) or USB ports (if you’ve created a Windows 7 installation USB) before its HDD. To do so, you need to:
Restart your computer.
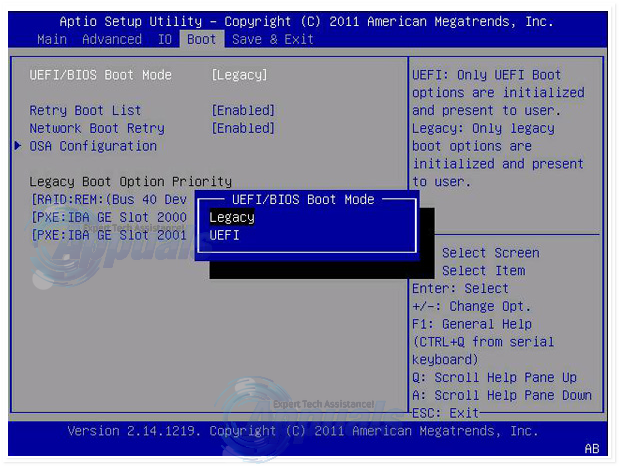
On the first screen that shows up when your computer tries to boot up, you will find instructions to press a specific key – which, in most cases, is Delete, F1 or F2 – to enter your computer’s BIOS/setup. Press the key specified and you will be taken to your computer’s BIOS.
In the BIOS, locate your computer’s boot order/configuration in the various tabs. In most cases, the boot order is located under the BIOS’s Boot
Change the boot order so that your computer boots from its CD/DVD drive or USB ports before its HDD.
Insert your bootable Windows 7 installation media into your computer.
Exit your computer’s BIOS, but be sure to save the changes that you have made to it.
Exiting your computer’s BIOS will result in it rebooting. When it tries to boot up, if you configured its boot order correctly, it will detect the installation media and ask you to press any key to boot from the installation CD/DVD/USB.
Press any key to boot from your Windows 7 installation media.
Phase 3: Install Windows 7
Once you force your computer to boot from your Windows 7 installation media, it will start loading all the files required for a clean install of Windows 7 from the installation media. The Windows 7 installation will begin after these files have been loaded. After the files have been loaded, you will see the Windows 7 splash screen, after which the Install Windows window will appear. At this point, you need to:
Select your preferred Language to install, Time and currency format, and Keyboard or input method, and then click on Next.
Click on the Install now button on the next screen.
The Windows 7 setup process will begin, so just let it do its thing for a while.
You will be met with the Windows 7 software license on the next screen. Read the agreement thoroughly, check the “I accept the license terms” checkbox and click on Next.
On the next screen, click on Custom (advanced).
On the “Where do you want to install Windows?” screen, select the partition of your HDD that is currently housing your free copy of Windows 10 by clicking on it, click on Drive options (advanced), click on Delete and confirm the action. This will turn the wipe the entire partition, which is why it shows up as unallocated space in the window.
Click on the unallocated space that you have just created to select it as the destination for your fresh installation of Windows 7 and click on Next. There is no need for you to turn this unallocated space into a proper hard disk partition – the setup will do so itself.
On the next screen – the Installing Windows… screen – you don’t need to do anything but wait for the setup to install Windows 7 on your computer. This entire process can take anywhere between 5 and 30 minutes depending on how good your computer’s hardware is.
Your computer will restart and perform some additional but automated installation steps, then restart again and then ready your computer for first-time use, so just sit back and relax until it’s done.
When the setup has been completed and Windows 7 has successfully been clean installed on your computer, you will see the Set up Windows At this screen, type a user name for yourself and a name for your computer in their respective fields and then click on Next.
On the next screen, setup a password for your user account on this fresh new installation of Windows 7 and then click on Next.
On the next screen, the setup will ask you to type in your Windows 7 product key. Yeah, that’s right – you’re going to need your Windows 7 product key in order to complete this phase of the process, so be sure to dig it up from wherever before you even start clean installing Windows 7. A Windows 7 product key is a 25-character alphanumeric string that is only associated with your copy of Windows 7. Once you have typed in your Windows 7 product key and enabled the Automatically activate Windows when I’m online option, click on Next to proceed.
On the next screen, simply choose your preferred setting for the installation of Windows 7 updates.
On the next screen, configure and review the Time Zone, Date and Time for your installation of Windows 7, and then click on Next.
Phase 4: Install all available updates for your computer
Once you have booted into your new installation of Windows 7, you are going to have to install all of the available updates for your computer – and you’d better be ready for a BOATLOAD of them – before re-upgrading to Windows 10. In order to do so, you need to:
Open the Start Menu.
Search for “windows update”.
Click on the search result titled Windows Update under Programs.
Click on Check for updates.
Be patient while your computer searches the internet for all available updates for your computer.
Once your computer is done searching and has generated a list of all available updates, install every single update listed so that you can move onto actually re-upgrading to your free copy of Windows 10.
Phase 5: Upgrade to Windows 10
You will be ready to re-upgrade to Windows 10 as soon as you install all available Windows 7 updates for your computer. To upgrade to a free copy of Windows 10 from your legitimate copy of Windows 7, you need to:
Click here to download the Windows 10 upgrade tool, dubbed the Media Creation Tool by Microsoft.
Once the Media Creation Tool has been downloaded, navigate to its destination folder and double-click on exe to launch the program.
Once you launch the Windows 10 upgrade tool, you will be met with the Windows 10 Setup On the first screen, select Upgrade this PC now and click on Next.
The setup will now start downloading all the files required for you to upgrade from Windows 7 to Windows 10, so just sit back and let it. The amount of time it takes the setup to download the files depends entirely on how fast your internet connection is.
On the next screen, read the License terms and click on Accept to proceed.
You will be taken to the Ready to install screen with a summary of what’s going to happen with the upgrade (the edition of Windows 10 that your computer will be upgraded to and what will happen to your personal files and apps). You can edit what you want to keep through the upgrade by clicking on Change what to keep, choosing your preferred option and clicking on Next. Once you are satisfied with what’s going to happen with the upgrade, click on Install to begin the Windows 10 upgrade. During the Windows 10 installation, your computer will reboot a couple of times, and the upgrade is fully automated so no further user intervention will be required. Once the upgrade has been completed, your computer will boot into Windows 10’s Login screen, and from here you can login to your now-fully activated free copy of Windows 10 and start setting it up.
Reactivating Windows 10 after a hardware change
Activation helps verify that your copy of Windows is genuine and hasn’t been used on more devices than the Microsoft Software License Terms allow.
When installing Windows 10, the digital license associates itself with your device’s hardware. If you make significant hardware changes on your device, such as replacing your motherboard, Windows will no longer find a license that matches your device, and you’ll need to reactivate Windows to get it up and running.
To activate Windows, you’ll need either a digital license or a product key. To find out which you need, see «What activation method do I use, product key or digital license?» in Activate Windows 10. Then, use the following info to help you successfully prepare for a hardware change and reactivate Windows 10.
Prepare your Windows 10 device for a hardware change
First, follow these steps to find out if Windows 10 is already activated.
Select the Start button, then select Settings > Update & Security > Activation .
If you’re not activated, complete the activation process with the steps you see on the Activation page. If you experience an error while activating, see Get help with Windows activation errors.
Once you’ve confirmed that Windows 10 is activated, follow these steps:
In Windows 10 (version 1607 or later), it is essential that you link your Microsoft account with the Windows 10 digital license on your device. Linking your Microsoft account with your digital license allows you to reactivate Windows using the Activation troubleshooter whenever you make a significant hardware change.
First, you’ll need to find out if your Microsoft account (What is a Microsoft account?) is linked to your Windows 10 digital license. To find out, select the Start button, then select Settings > Update & Security and then select Activation . The activation status message will tell you if your account is linked.
Windows is activated with a digital license
This means that your Microsoft account is not linked to your digital license.
Follow instructions for Add an account.
Windows is activated with a digital license linked to your Microsoft account
This means that your Microsoft account is already linked to your digital license.
No further action is required. You are ready to use the activation troubleshooter.
If your Microsoft account is not linked to your digital license, follow these steps to Add an account:
Sign in as an administrator to add your Microsoft account. To confirm that you’re using an administrator account, select the Start button, then select Settings > Accounts > Your info . Under your name, you’ll see Administrator. If you’re not an administrator, see Create a local user or administrator account.
Go to Your info in Settings
Confirm that the administrator account is also your Microsoft account by checking to see if an email address is displayed above Administrator. If an email address is displayed, this is a Microsoft account. If not, you’re logged in using a local account. If you don’t yet have a Microsoft account, see How to create a new Microsoft account.
Once you confirm that you’re an administrator and using your Microsoft account, go back to the Activation page, select Add an account, enter your Microsoft account and password, then select Sign in.
After your Microsoft account has been added, the message on the Activation page will change to: Windows is activated with a digital license linked to your Microsoft account.
Make sure that the edition, Windows 10 Home or Windows 10 Pro, is the same before and after your hardware change. Your digital license and product key will reactivate only if the edition remains the same.
You can see your edition on the same Activation page where you checked your activation status. To see which edition you have, select the Start button, then select Settings > Update & Security > Activation .
If you used a product key to get to Windows 10, then you’ll need that key again after the hardware change. To find out how to locate your key, see Find your Windows product key.
For more info about product keys and digital licenses, see Activate Windows 10.
Reactivate Windows 10 after a hardware change
When you’re ready to reactivate, make sure that your device is connected to the internet and then follow the steps for either a digital license or product key.
You’ll need to first add your Microsoft account and link your account to the digital license on your device. After linking your Microsoft account, run the Activation troubleshooter to reactivate Windows 10.
This troubleshooter will only be available if your copy of Windows 10 (version 1607 or later) isn’t activated.
To use the Activation troubleshooter:
Select the Start button, then select Settings > Update & Security > Activation > Troubleshoot . The troubleshooter will show Windows can’t be activated on your device.
Select I changed hardware on this device recently, then select Next.
Enter your connected Microsoft account and password, then select Sign in. The troubleshooter will only work with the connected Microsoft account.
From the list of devices that are linked to your Microsoft account, select the check box next to This is the device I’m using right now.
If you don’t see the device you’re using in the list of results, make sure that you signed in using the same Microsoft account you associated with the Windows 10 digital license on your device.
If you continue to experience errors while activating, see Get help with Windows activation errors and locate the error you’re getting.
If you didn’t link your Microsoft account to the digital license before the hardware change AND you used a product key to upgrade to Windows 10, then continue to next section.
If Windows 10 wasn’t pre-installed on your device when purchased and you used a product key to upgrade to Windows 10, then you’ll need that same product key after the hardware change.
Select the Start button, then select Settings > Update & Security > Activation > Change Product Key, then enter the product key.
If you installed a retail copy of Windows 10 on your device using a Windows 10 product key and then made hardware changes, follow this same process using your Windows 10 product key.
If you continue to experience errors while activating, see Get help with Windows activation errors and locate the error you’re getting.
If you don’t have a digital license or product key
If you don’t have a product key or digital license, you can purchase a Windows 10 digital license after installation finishes. Follow these steps to make a purchase:
Select the Start button, then select Settings > Update & Security > Activation . Then select Go to Store to go to the Microsoft Store app where you can purchase a Windows 10 digital license.
Need more help?
If you need additional help reactivating Windows on your device, contact customer support.


