- How to change your keyboard layout
- Summary
- More Information
- Windows 7 or Windows Vista
- Windows XP
- How to make sure that the selected layout matches the keyboard
- Windows 7 or Windows Vista
- Windows XP
- References
- How to change Windows 10 Keyboard Layout
- Change Windows 10 Keyboard Layout
- Change the complete keyboard or switch between keyboards
- Change keyboard placement in Windows 10
- Change your keyboard layout
- Change the keyboard layout or other method you use to type
- Install or change a display language
- Change your keyboard layout
- How to change keyboard layout on Windows 10
- How to add keyboard layout on Windows 10
- How to change keyboard layout on Windows 10
- Enable Input Indicator
- How to remove keyboard layout on Windows 10
- More Windows 10 resources
- The Dell XPS 15 is our choice for best 15-inch laptop
- Halo: MCC’s live service elements make it better, not worse
- Microsoft’s Surface Duo is not ‘failing up’
- These are the best PC sticks when you’re on the move
How to change your keyboard layout
Summary
This article describes how to change keyboard layouts for the Microsoft keyboards listed in the «Applies To» section.
You can configure your keyboard to use a different language or keyboard layout, such as Canadian Multilingual, Spanish, or United States-Dvorak. A large selection of keyboard layouts is installed with the Microsoft Windows operating system.
Generally, you should configure your keyboard layout in Windows to match the actual keyboard that you use. If you can choose a different layout, be aware that the keys on your keyboard may display different characters than those that appear on screen.
More Information
To configure your keyboard to use a different language or keyboard layout, use the appropriate method for your version of Windows.
Note These methods use the Canadian French keyboard layout as an example.
Windows 7 or Windows Vista
Click Start  , type intl.cpl in the Start Search box, and then press ENTER.
On the Keyboards and Language tab, click Change keyboards.
Expand the language that you want. For example, expand French (Canada).
Expand Keyboard list, click to select the Canadian French check box, and then click OK.
In the options, click View Layout to compare the layout with the actual keyboard.
In the Default input language list, click French (Canada) – Canadian French, and then click OK two times.
In the Regional and Language Options dialog box, click OK.
Note The Language bar appears on the taskbar. When you rest the mouse pointer over this bar, a tooltip appears that describes the active keyboard layout.
Click the Language bar, and then click FR French (Canada).
Windows XP
Click Start , type intl.cpl in the Run box, and then press ENTER.
On the Languages tab, click Details.
Under Installed services, click Add.
In the Input language list, select the language that you want. For example, select French (Canada) .
In the Keyboard layout/IME list, click Canadian French, and then click OK .
In the Select one of the installed input languages to use when you start your computer list, click French (Canada) – Canadian French, and then click OK.
In the Regional and Language Options dialog box, click OK.
Note The Language bar appears on the taskbar. When you rest the mouse pointer over this bar, a tooltip appears that describes the active keyboard layout.
Click the Language bar, and then click French (Canada).
How to make sure that the selected layout matches the keyboard
Windows 7 or Windows Vista
Click Start, type osk in the Start Search box, and then press ENTER.
Match the keyboard on the screen with the physical keyboard to make sure that the layout matches.
To check the uppercase characters, click the shift key on the keyboard or on the screen, and match the characters printed on the keyboard.
Windows XP
Click Start, type osk in the Run box, and then press ENTER.
Match the keyboard on the screen with the physical keyboard to make sure that the layout matches.
To check the uppercase characters, click the shift key on the keyboard or on the screen, and match the characters printed on the keyboard.
References
For more information about the Language bar, click the following article number to view the article in the Microsoft Knowledge Base:
306993 HOW TO: Use the Language Bar in Windows XP
For more information about how to use the United States-International keyboard layout, click the following article number to view the article in the Microsoft Knowledge Base:
306560 How to use the United States-International keyboard layout in Windows 7, in Windows Vista, and in Windows XP
How to change Windows 10 Keyboard Layout
Windows 10 offers multiple keyboards, and it’s easy to add them, its important to note that you can also change Windows 10 Keyboard layout. Even though very basic, it is essential, especially when you are using a touch screen to type. In this guide, we will share how you can change the Windows 10 keyboard layout and also add new keyboard.
Change Windows 10 Keyboard Layout
While a keyboard is available by default when you install Windows based on the language, you can add a new one. You can always switch between the default or multiple keywords easily.
- Go to Settings > Time and Language > Add a language.
- Once installed, hover over it and click on Options.
- Now click on Add a Keyboard and exit.
Now that you have a keyboard installed let’s see how you can change the Windows 10 keyboard layout.
There are two ways to understand the layout part. One where you change the entire keyboard and second where you want its position to change in such a way that it’s easily accessible.
Change the complete keyboard or switch between keyboards
Press WIN key + Spacebar to open the keyboard switcher.
Press the spacebar again, and it will switch between the installed keyboard.
Change keyboard placement in Windows 10
Look for a keyboard icon on the taskbar. Tap to launch it.
On the top left of the keyboard, look for a keyboard icon with configuration.
Tap to open it, and here you can choose between different layout including:
- Standard
- Floating
- Split
- Full keyboard.
Since most of the tablets and laptops screen is going to be bigger, its best to choose Split. You also have the option to use the microphone and clipboard.
If you need to use a pen, you can use the last one to use either your fingers or a digital pen. Useful when you need to sign in documents.
Change your keyboard layout
Swipe in from the right edge of the screen, tap Settings, and then tap Change PC settings. (If you’re using a mouse, point to the lower-right corner of the screen, move the mouse pointer up, click Settings, and then click Change PC settings.)
Tap or click Time and language, and then tap or click Region and language, and then tap or click Add a language.
Browse for the language you want, and then tap or click it to add it to your language list.
Swipe in from the right edge of the screen, tap Settings, and then tap Change PC settings. (If you’re using a mouse, point to the lower-right corner of the screen, move the mouse pointer up, click Settings, and then click Change PC settings.)
Tap or click Time and language, and then tap or click Region and language.
If the language says Language pack available, tap or click Options.
Note: If you don’t see Language pack available, you might be able to download the language pack at the Download Center.
Tap or click Download. The download process might take a while, depending on your PC and the size of the language pack.
Swipe in from the right edge of the screen, tap Settings, and then tap Change PC settings. (If you’re using a mouse, point to the lower-right corner of the screen, move the mouse pointer up, click Settings, and then click Change PC settings.)
Tap or click Time and language, and then tap or click Region and language.
Tap or click the language that you want to see Windows in, and then tap or click Set as primary. The Will be display language after next sign-in message will appear under the language.
Tap or click Set as primary to move the language to the top of the list. If the language can become your Windows display language, you’ll see Will be display language after next sign-in appear under the language.
Sign out of Windows, and then sign back in.
Warning: When you change your primary language, your keyboard layout might also change. When signing back in to Windows, make sure you’re using the right keyboard layout for entering your password. Otherwise, you might not be able to sign in. You can change your keyboard layout on the sign-in screen by tapping or clicking the language abbreviation button in the lower-right corner.
Change the keyboard layout or other method you use to type
Whenever you add a language, a keyboard layout or input method is added so you can enter text in the language. If you want to use a different keyboard layout or input method, you can add a new one or switch between the ones you have.
Swipe in from the right edge of the screen, tap Settings, and then tap Change PC settings. (If you’re using a mouse, point to the lower-right corner of the screen, move the mouse pointer up, click Settings, and then click Change PC settings.)
Tap or click Time and language, and then tap or click Region and language.
Tap or click the language you want to add a keyboard to, and then tap or click Options.
Tap or click Add a keyboard, browse the input method list for the one you want to use, and then tap or click it.
You can enter text with different keyboard layouts or input methods by switching between them. There are a few different ways to switch between keyboard layouts or input methods:
On a hardware keyboard, press and hold the Windows logo key , and then press the Spacebar to cycle through your input methods.
If you have a touchscreen, you can switch your touch keyboard layout by tapping or clicking the keyboard icon, and then tapping or clicking the keyboard layout you want to switch to.
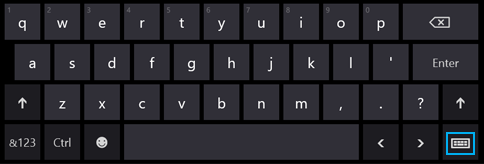
Language abbreviation button in the touch keyboard
On the desktop taskbar, tap or click the language abbreviation in the notification area at the far right of the taskbar, and then tap or click the keyboard layout or input method you want to switch to.
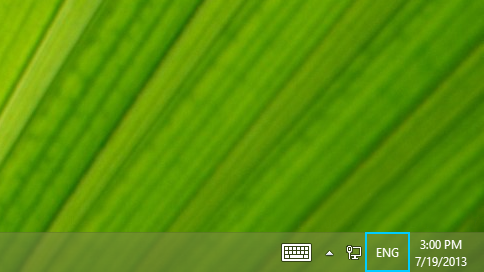
Language abbreviation button in the desktop taskbar
Your default keyboard layout or input method is the one that’s automatically used with the language you see Windows in (for example, the QWERTY keyboard for American English). If you want to keep your Windows language the same but use a different keyboard automatically, follow these steps:
Open Control Panel by swiping in from the right edge of the screen, tapping Search (or if you’re using a mouse, pointing to the upper-right corner of the screen, moving the mouse pointer down, and then clicking Search), entering Control Panel in the search box, and then tapping or clicking Control Panel.
Enter Add a language in the search box, and then tap or click Add a language.
Tap or click Advanced settings.
Under Override for default input method, choose the keyboard layout or input method you’d like to be your new default, and then tap or click Save.
Note: If you don’t see the keyboard layout or input method you want, then you haven’t added it to your input method list. For instructions, see the Add a keyboard layout or input method for a language section.
Install or change a display language
You can change the language Windows uses to display text in wizards, dialog boxes, menus, and other items in the user interface. Some display languages are installed by default, while others require you to install additional language files.
To install a Language Interface Pack (LIP), double-click the file to open the setup program. To install a language pack, follow these steps:
Open Region and Language by clicking the Start button , clicking Control Panel, clicking Clock, Language, and Region, and then clicking Region and Language.
Click the Keyboards and Languages tab.
Under Display language, click Install/uninstall languages, and then follow the steps.  If you’re prompted for an administrator password or confirmation, type the password or provide confirmation.
Note: The Display language section will be visible only if you have already installed a Language Interface Pack or if your edition of Windows supports a language pack. Language packs are available only in Windows 7 Ultimate and Windows 7 Enterprise.
When you change the display language, the text in menus and dialog boxes for some programs might not be in the language that you want. This happens because the program might not support Unicode.
Open Region and Language by clicking the Start button , clicking Control Panel, clicking Clock, Language, and Region, and then clicking Region and Language.
Click the Keyboards and Languages tab.
Under Display language, choose a language from the list, and then click OK.
Note: If you don’t see the list of display languages, you need to install additional language files.
Change your keyboard layout
On the Language bar, click the Input language button, and then select an input language.
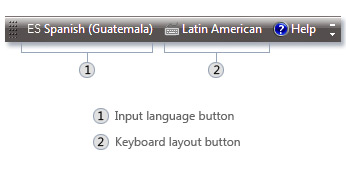
Click the Keyboard layout button, and then select a keyboard layout.
Note: If you don’t see the Language bar, right-click the taskbar, point to Toolbars, and then click Language bar.
On the Welcome screen, click the Keyboard layout button  , and then select a keyboard layout.
Note: If you don’t see the Keyboard layout button, you might not have more than one input language, or your regional and language settings might not be applied to reserved accounts.
How to change keyboard layout on Windows 10
 Source: Windows Central
Although Windows 10 allows you to configure multiple keyboard layouts when setting up a new installation, you can always add or remove layouts if you did not select the correct option or you now require to type in another language.
Usually, it is rare having to modify the input settings, but it’s not uncommon. For example, sometimes you may need to switch to the Spanish layout to write words that include special characters like «Ñ,» or prefer a different layout, such as the United States-Dvorak.
Whatever the reason it might be, Windows 10 includes easy to manage settings to add, remove, and change layouts for hardware and touch keyboards.
In this Windows 10 guide, we will walk you through the steps to add, change, and remove keyboard layouts in your current setup.
How to add keyboard layout on Windows 10
To add a new keyboard layout on Windows 10, use these steps:
- Open Settings.
- Click on Time & Language.
- Click on Language.
- Under the «Preferred languages» section, select the default language.
Click the Options button.
 Source: Windows Central
Select the new keyboard layout you want to use.
Source: Windows Central
Once you complete the steps, the new keyboard layout will be added to the device, and you can switch between them using the instructions below.
How to change keyboard layout on Windows 10
While the process to change layouts is straightforward, the switch will reconfigure some of the keyboard keys, which means that the keys may print a different character depending on your configuration.
To switch between Windows 10 keyboard layouts, use these steps:
- Click the Input Indicator icon in the bottom-right corner of the taskbar.
Select the alternate layout.
 Source: Windows Central
After you complete the steps, you can start typing with the new keyboard layout.
Enable Input Indicator
If the Input Indicator is not available in the taskbar, you can enable it using the Settings app.
To enable the Input Indicator in the taskbar, use these steps:
- Open Settings.
- Click on Personalization.
- Click on Taskbar.
Under the «Notification area» section, click the Turn system icons on or off option.
Source: Windows Central
Turn on the Input Indicator toggle switch.
Source: Windows Central
Once you complete the steps, the icon will appear in the taskbar’s notification area, allowing you to see the available layouts and switch between them.
Alternatively, you can also use the Windows key + Spacebar keyboard shortcut to cycle between the available keyboard layouts quickly.
How to remove keyboard layout on Windows 10
To remove a keyboard layout on Windows 10, use these steps:
- Open Settings.
- Click on Time & Language.
- Click on Language.
- Under the «Preferred languages» section, select the default language.
Click the Options button.
Source: Windows Central
Click the Remove button.
Source: Windows Central
Once you complete the steps, the layout for the keyboard you selected will be removed from the computer.
More Windows 10 resources
For more helpful articles, coverage, and answers to common questions about Windows 10, visit the following resources:
![]()
The Dell XPS 15 is our choice for best 15-inch laptop
For a lot of people, a 15-inch laptop is a perfect size that offers enough screen for multitasking, and in a lot of cases, some extra performance from powerful hardware. We’ve rounded up the best of the best at this size.
![]()
Halo: MCC’s live service elements make it better, not worse
Halo: The Master Chief Collection is more popular than ever, but some fans don’t agree with the live service approach 343 Industries has taken with it. Here’s why those elements are, at the end of the day, great for the game and for Halo overall.
![]()
Microsoft’s Surface Duo is not ‘failing up’
Microsoft announced this week that it was expanding Surface Duo availability to nine new commercial markets. While Surface Duo is undoubtedly a work in progress, this is not a sign of a disaster. It’s also doesn’t mean that Surface Duo is selling a ton either. Instead, the reason for the expansion is a lot more straightforward.
![]()
These are the best PC sticks when you’re on the move
Instant computer — just add a screen. That’s the general idea behind the ultra-portable PC, but it can be hard to know which one you want. Relax, we have you covered!


