- How to Change Windows 10 Boot Screen in an Easy Way [Partition Manager]
- Summary :
- Quick Navigation :
- Requirements for Changing Windows 10 Boot Screen
- How to Change Windows 10 Boot Screen
- ABOUT THE AUTHOR
- Changing the Friendly Name of a Boot Entry
- Using BCDEdit
- Using Bootcfg
- Editing the Boot.ini File
- Unbranded Boot
- Requirements
- Terminology
- Turn on Unbranded Boot settings
- Turn on Unbranded Boot by using Control Panel
- Configure Unbranded Boot settings at runtime using BCDEdit
- Configure Unbranded Boot using Unattend
- Unbranded Boot settings
- Customize the boot screen using Windows Configuration Designer and Deployment Image Servicing and Management (DISM)
- Replace the startup logo
How to Change Windows 10 Boot Screen in an Easy Way [Partition Manager]
By Linda | Follow | Last Updated March 02, 2021
Summary :
Are you bored with the default Windows 10 boot logo? Do you want to change Windows 10 boot screen for further UI customization? In this post, MiniTool Partition Wizard shows you how to do that step by step.
Quick Navigation :
Requirements for Changing Windows 10 Boot Screen
When you boot up a Windows 10 PC, it will show the default Windows 10 boot screen like the following picture:

Do you know you can change Windows 10 boot screen as your will. You don’t need to watch the same screen again and again.
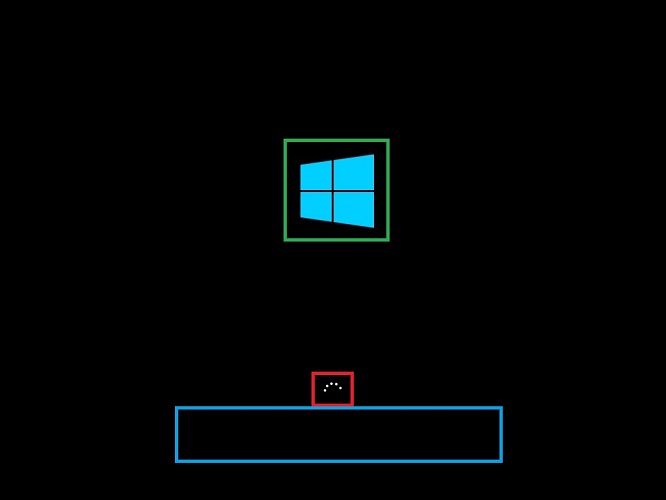
The Windows 10 boot screen is composed of three parts: the Boot Logo (the Windows logo), the Boot Status Indicator (the circle), and the Boot Status Message. The boot status message occurs only when your PC run into problems. And its location is right under the circle.
You can suppress these Windows elements via the Windows Unbranded Boot feature (this feature requires Windows 10 Enterprise, Windows 10 Professional, or Windows 10 Education). After suppressing these elements, you will get a totally black boot screen.
Many people may don’t like this method. They just want to replace the startup logo with a custom logo. In this case, you should use another tool to modify the Boot Graphics Resource Table (BGRT).
Please note that you can modify the BGRT only on devices that use UEFI as the firmware interface. If your PC uses the BIOS firmware, you can’t modify the BGRT.
What are UEFI and BIOS? This article will tell you their differences via UEFI vs BIOS and show you how to convert MBR to GPT to support UEFI mode.
How to Change Windows 10 Boot Screen
To change Windows 10 boot logo, you can refer to the following steps:
- Back up important data in advance lest anything goes wrong and your data is lost.
- Boot into UEFI firmware to disable the Secure Boot
- Make an image no bigger than 300px x 300px. This image will be set as the boot logo later. Please note that this image should not be GIF or transparent. If you want to add a transparent logo, you should change the background color of your transparent image to black in advance.
- Download a third-party free and open-source tool called HackBGRT from GitHub platform, since Windows doesn’t offer options to change Windows boot logo.
- Extract the folder and then run the «exe» program as an administrator. This will launch the application’s command-line tool.
- Press the «i» key on your keyboard and this will open the the program’s config file in the Notepad.
- Close the Notepad by clicking on the “X” icon on the top-right corner. Then, the HackBGRT will open the Paint application with its own default boot logo.
- Click on the “Paste” drop-down button and select the “Paste from” option.
- Select the «File >Save» option to save the file.
Through the above steps, you have replaced the Windows 10 boot logo and then you can close the software.
If you want to change Windows 10 boot screen back to the original one later, you can refer to the following steps:
- Open the HackBGRT folder, right-click on the “exe” file and select the “Run as administrator” option.
- Press «R» key to completely remove HackBGRT and restore the original boot logo, or press «D» key to just disable this software and restore the original boot logo.
- Reboot the system and you will see the original Windows boot logo.
ABOUT THE AUTHOR

Position: Columnist
Author Linda has been working as an editor at MiniTool for 1 year. As a fresh man in IT field, she is curious about computer knowledge and learns it crazily. Maybe due to this point, her articles are simple and easy to understand. Even people who do not understand computer can gain something.
By the way, her special focuses are data recovery, partition management, disk clone, and OS migration.
Changing the Friendly Name of a Boot Entry
In Windows, the items that appear in the Windows Boot Manager are the descriptions of each boot entry.
Typically, after you copy a boot entry, you change the friendly name of the newly created entry to distinguish it from the original.
You can also change the friendly name to make it easier to recognize customized boot entries. A string that precisely describes the entry can save significant time and effort.
For example, the following friendly name strings add little value.
However, more precise strings, such as the ones that follow, make the boot choice much easier.
NoteВ В When a boot entry is configured for debugging (/debug /debugport) or for Emergency Management Services (EMS) (/redirect) on an x86- or an x64-based system, the boot loader appends a bracketed phrase ([debugger enabled] or [ems enabled]) to the friendly name that appears in the boot menu. However, the boot loader omits the bracketed phrase from the boot menu when the friendly name and the bracketed phrase together exceed 70 characters. To restore the bracketed phrase, shorten the friendly name.
To change the friendly name of a boot entry in a Boot.ini file, you can use Bootcfg or edit the Boot.ini file in Notepad. On systems that store boot options in EFI NVRAM, use Bootcfg.
To change the friendly name of a boot entry for Windows, use BCDEdit.
Administrative privileges are required to update the boot configuration. Changing some boot entry options could render your computer inoperable.
Using BCDEdit
To change the description of a boot entry as it appears on the boot menu, you can use the /set IDdescription option. The command uses the following syntax. The ID is the GUID that is associated with the boot entry (or one of the well-known identifiers, for example,
If you are using Windows PowerShell, you must use quotes around the boot entry identifier, for example: «<49916baf-0e08-11db-9af4-000bdbd316a0>« or «
To change the description of the boot entry that corresponds to the operating system that is currently running, use the following example:
You can also change the description when you copy an existing boot entry using the /d option.
Using Bootcfg
With Bootcfg, you can change the friendly name of a boot entry only while copying the entry. Use the Bootcfg /copy switch to copy the entry and change its friendly name.
The following Bootcfg command copies the first boot entry to create a new entry. The /ID switch specifies the line number of the entry being copied. The /d (description) switch specifies the friendly name of the newly-created entry.
For complete instructions for using Bootcfg, see Help and Support Services. For examples, see Using Boot Parameters.
Editing the Boot.ini File
In the Boot.ini file, the friendly name of a boot entry appears in the boot entry in quotation marks.
For example, the following sample from a Boot.ini file has duplicate boot entries for Microsoft Windows 10 Professional.
To change the friendly name of a boot entry, type over the quoted string in the boot entry. In the following example, because the first entry will be customized for debugging, the name is changed to Windows 10 Debug.
Unbranded Boot
You can suppress Windows elements that appear when Windows starts or resumes and can suppress the crash screen when Windows encounters an error that it cannot recover from. This feature is known as Unbranded Boot.
The first user to sign in to the device must be an administrator. This ensures that the RunOnce registry settings correctly apply the settings. Also, when using auto sign-in, you must not configure auto sign-in on your device at design time. Instead, auto sign-in should be configured manually after first signing in as an administrator.
Requirements
WindowsВ 10 Enterprise, Windows 10 Professional, or WindowsВ 10 Education.
Terminology
Turn on, Enable: To make the setting available to the device and optionally apply the settings to the device. Generally «turn on» is used in the user interface or control panel, whereas «enable» is used for command line.
Configure: To customize the setting or sub-settings.
Embedded Boot Experience: this feature is called «Embedded Boot Experience» in Windows 10, build 1511.
Custom Boot Experience: this feature is called «Custom Boot Experience» in Windows 10, build 1607 and later.
Turn on Unbranded Boot settings
Unbranded Boot is an optional component and is not enabled by default in Windows 10. It must be enabled prior to configuring. For end-users, Unbranded Boot is available through Control Panel > Programs > Programs and Features > Turn Windows features on or off.
If Windows has already been installed you cannot apply a provisioning package to configure Unbranded Boot; instead you must use BDCEdit to configure Unbranded boot if Windows is installed.
BCDEdit is the primary tool for editing the startup configuration and is on your development computer in the %WINDIR%\System32 folder. You have administrator rights for it. BCDEdit is included in a typical Windows Preinstallation Environment (Windows PE) 4.0. You can download it from the BCDEdit Commands for Boot Environment in the Microsoft Download Center if needed.
Turn on Unbranded Boot by using Control Panel
- In the Search the web and Windows field, type Programs and Features and either press Enter or tap or click Programs and Features to open it.
- In the Programs and Features window, click Turn Windows features on or off.
- In the Windows Features window, expand the Device Lockdown node, and check or clear the checkbox for Unbranded Boot.
- Click OK. The Windows Features window indicates Windows is searching for required files and displays a progress bar. Once found, the window indicates Windows is applying the changes. When completed, the window indicates the requested changes are completed.
- Click Close to close the Windows Features window.
Configure Unbranded Boot settings at runtime using BCDEdit
Open a command prompt as an administrator.
To disable the F8 key during startup to prevent access to the Advanced startup options menu, type the following:
To disable the F10 key during startup to prevent access to the Advanced startup options menu, type the following:
To suppress all Windows UI elements (logo, status indicator, and status message) during startup, type the following:
To suppress error display during boot, type the following:
Configure Unbranded Boot using Unattend
You can also configure the Unattend settings in the Microsoft-Windows-Embedded-BootExp component to add Unbranded Boot features to your image during the design or imaging phase. You can manually create an Unattend answer file or use Windows System Image Manager (Windows SIM) to add the appropriate settings to your answer file. For more information about the Unbranded Boot settings and XML examples, see the settings in Microsoft-Windows-Embedded-BootExp.
Unbranded Boot settings
The following table shows Unbranded Boot settings and their values.
| Setting | Description |
|---|---|
| DisableBootMenu | Contains an integer that disables the F8 and F10 keys during startup to prevent access to the Advanced startup options menu. Set to 1 to disable the menu; otherwise; set to 0 (zero). The default value is 0. |
| DisplayDisabled | Contains an integer that configures the device to display a blank screen when Windows encounters an error that it cannot recover from. Set to 1 to display a blank screen on error; otherwise; set to 0 (zero). The default value is 0. |
| HideAllBootUI | Contains an integer that suppresses all Windows UI elements (logo, status indicator, and status message) during startup. Set to 1 to suppress all Windows UI elements during startup; otherwise; set to 0 (zero). The default value is 0. |
| HideBootLogo | Contains an integer that suppresses the default Windows logo that displays during the OS loading phase. Set to 1 to suppress the default Windows logo; otherwise; set to 0 (zero). The default value is 0. |
| HideBootStatusIndicator | Contains an integer that suppresses the status indicator that displays during the OS loading phase. Set to 1 to suppress the status indicator; otherwise; set to 0 (zero). The default value is 0. |
| HideBootStatusMessage | Contains an integer that suppresses the startup status text that displays during the OS loading phase. Set to 1 to suppress the startup status text; otherwise; set to 0 (zero). The default value is 0. Customize the boot screen using Windows Configuration Designer and Deployment Image Servicing and Management (DISM)If Windows has not been installed and you are using Windows Configuration Designer to create installation media with settings for Unbranded Boot included in the image, or you are applying a provisioning package during setup, you must enable Unbranded Boot on the installation media with DISM in order for a provisioning package to successfully apply. First you have to create the image or package. Create a provisioning package or create a new Windows image in Windows Configuration Designer by following the instructions in Create a provisioning package. In the Available customizations page, select Runtime settings > SMISettings and then set the value for the boot screen settings. The following values are just examples.
See SMISettings in the Windows Configuration Designer reference for more information about the available SMISettings. Once you have finished configuring the settings and building the package or image, you use DISM to apply the settings. Open a command prompt with administrator privileges. Copy install.wim to a temporary folder on hard drive (in the following steps, it assumes it’s called c:\wim). Create a new directory. Mount the image. Enable the feature. Commit the change. In the following image, the BootLogo is identified by the green outline, the BootStatusIndicator is identified by the red outline, and the BootStatusMessage is identified by the blue outline.
Replace the startup logoThe only supported way to replace the startup logo with a custom logo is to modify the Boot Graphics Resource Table (BGRT) on a device that uses UEFI as the firmware interface. If your device uses the BGRT to include a custom logo, it is always displayed and you cannot suppress the custom logo. |