- HackBGRT — меняем логотип загрузочного экрана
- How to Change Windows 7 Boot Screen Animation
- Selected boot screens for Windows 7:
- You may also like:
- changing windows 10 boot logo
- Replies (5)
- Unbranded Boot
- Requirements
- Terminology
- Turn on Unbranded Boot settings
- Turn on Unbranded Boot by using Control Panel
- Configure Unbranded Boot settings at runtime using BCDEdit
- Configure Unbranded Boot using Unattend
- Unbranded Boot settings
- Customize the boot screen using Windows Configuration Designer and Deployment Image Servicing and Management (DISM)
- Replace the startup logo
HackBGRT — меняем логотип загрузочного экрана

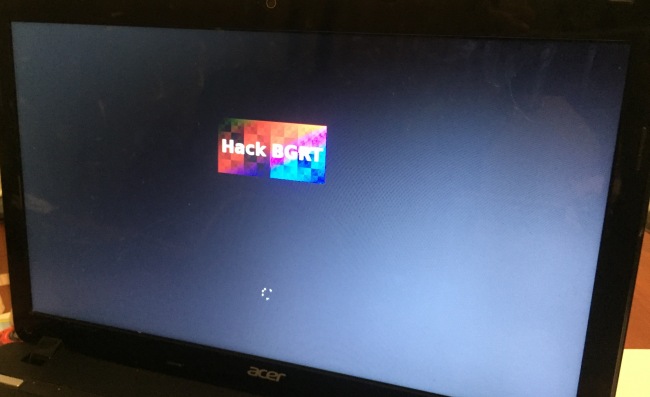
HackBGRT служит для замены загрузочного логотипа на UEFI-системах с Windows. Программа поддерживает работу с 32- и 64-битными версиями операционной системы, может использоваться в мультизагрузочных конфигурациях. Вряд ли HackBGRT можно рекомендовать начинающим пользователям Windows 10, но по большому счёту ничего сложного в её использовании нет.
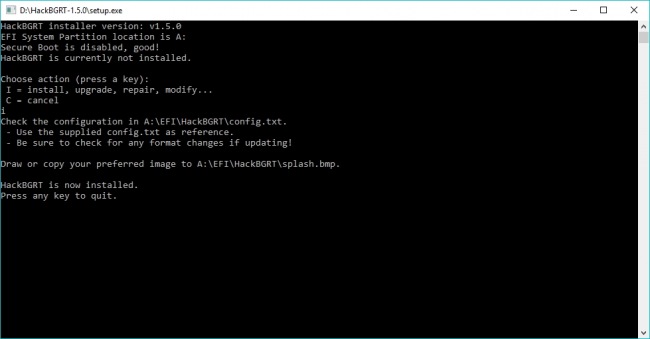
Утилита получила консольный инсталлятор, который сам проверяет систему на предмет совместимости, подключает раздел с EFI, открывает конфигурационный файл в Блокноте для внесения в него изменений (в большинстве случае не требуются), а затем и собственный вариант логотипа в Paint, который можно заменить на любой другой (в формате 24-bit BMP/DIB). При желании можно подготовить несколько файлов изображений, тогда HackBGRT будет показывать их в случайном порядке.
Создатель HackBGRT рекомендует отключить SecureBoot для применения изменений, другие его советы и рекомендации по настройке утилиты доступны на официальном сайте . Распространяется программа бесплатно и с открытым исходным кодом, язык интерфейса — английский.
Внимание! Операции с UEFI могут привести к невозможности загрузки компьютера, не поленитесь запастись диском восстановления системы.
How to Change Windows 7 Boot Screen Animation
Tired of watching the same animation again and again every time you boot Windows 7? Then you are in luck. There is a very easy way to change Windows 7 boot screen. Windows 7 Boot Updater makes it possible to change boot animation, text as well as background. This application works for all versions of Windows 7: 32bit or 64bit, SP1.
The application works by modifying the BOOTMGR system file. Since the application is in beta version and modifies certain critical system files it is always recommended to backup before using it. Though in our testing we found that the application worked well on a Windows 7 x64 SP1 system without any problems.
The following steps cover how to change Windows 7 boot screen:
Step 1:
Step 2:
Run the application and load boot screen file (.bs7). Some boot screens are given below in the article.
![]()
Step 3:
Check that you have loaded correct boot screen using using play. Click ‘Apply’ to to change the boot screen.
![]()
Selected boot screens for Windows 7:
While there are many boot screens out there we have handpicked a few best ones for our readers. The download link is given beside each image. There is also a source link for the author of the respective boot screen.
Update -Links in the below table are updated and working.
| No. | Name | Preview | Download | Source |
|---|---|---|---|---|
| 1. | Android Particle boot screen | Download | ||
| 2. | Trolling Windows 7 boot screen | Download | ||
| 3. | Need for Speed Run animation | Download1 | ||
| 4. | Windows 7 dial boot screen | Download | ||
| 5. | Aperture Science blue logo | Download | ||
| 6. | Stargate boot screen | Download | ||
| 7. | Windows 7 progress counter | Download | ||
| 8. | Windows 8 boot screen | Download | ||
| 9. | Digital Distribution boot screen | Download | ||
| 10. | Windows 7 spiral boot screen | Download |
More boot skins :
We have listed only selected boot skins. More can be found at the following locations:
If you liked the article or have any trouble following this article just drop a comment.
You may also like:
Share the post «How to Change Windows 7 Boot Screen Animation»
changing windows 10 boot logo
Replies (5)
Hi Zerjed. I’m Greg, an installation specialist and 8 year Windows MVP, here to help you.
I’m sorry but you’ll need to explain a bit more. I cannot make out what you’re trying to ask. Are you stuck on the BIOS splash screen? Are you asking if you can customize the Windows 10 startup animation (No)?
Please clarify so we can help you better.
Windows MVP 2010-20
Over 100,000 helped in forums in 10 years
I do not quit for those who are polite and cooperative.
I will walk you through any steps and will not let you fail.
16 people found this reply helpful
Was this reply helpful?
Sorry this didn’t help.
Great! Thanks for your feedback.
How satisfied are you with this reply?
Thanks for your feedback, it helps us improve the site.
How satisfied are you with this reply?
Thanks for your feedback.
Hi Zerjed. I’m Greg, an installation specialist and 8 year Windows MVP, here to help you.
I’m sorry but you’ll need to explain a bit more. I cannot make out what you’re trying to ask. Are you stuck on the BIOS splash screen? Are you asking if you can customize the Windows 10 startup animation (No)?
Please clarify so we can help you better.
yes im asking » if you can customize the Windows 10 startup animation «
with » boot environment: BIOS» because most of programs requires UEFI as boot environment.
im asking if its possible to happen with boot environment: BIOS
4 people found this reply helpful
Was this reply helpful?
Sorry this didn’t help.
Great! Thanks for your feedback.
How satisfied are you with this reply?
Thanks for your feedback, it helps us improve the site.
Unbranded Boot
You can suppress Windows elements that appear when Windows starts or resumes and can suppress the crash screen when Windows encounters an error that it cannot recover from. This feature is known as Unbranded Boot.
The first user to sign in to the device must be an administrator. This ensures that the RunOnce registry settings correctly apply the settings. Also, when using auto sign-in, you must not configure auto sign-in on your device at design time. Instead, auto sign-in should be configured manually after first signing in as an administrator.
Requirements
WindowsВ 10 Enterprise, Windows 10 Professional, or WindowsВ 10 Education.
Terminology
Turn on, Enable: To make the setting available to the device and optionally apply the settings to the device. Generally «turn on» is used in the user interface or control panel, whereas «enable» is used for command line.
Configure: To customize the setting or sub-settings.
Embedded Boot Experience: this feature is called «Embedded Boot Experience» in Windows 10, build 1511.
Custom Boot Experience: this feature is called «Custom Boot Experience» in Windows 10, build 1607 and later.
Turn on Unbranded Boot settings
Unbranded Boot is an optional component and is not enabled by default in Windows 10. It must be enabled prior to configuring. For end-users, Unbranded Boot is available through Control Panel > Programs > Programs and Features > Turn Windows features on or off.
If Windows has already been installed you cannot apply a provisioning package to configure Unbranded Boot; instead you must use BDCEdit to configure Unbranded boot if Windows is installed.
BCDEdit is the primary tool for editing the startup configuration and is on your development computer in the %WINDIR%\System32 folder. You have administrator rights for it. BCDEdit is included in a typical Windows Preinstallation Environment (Windows PE) 4.0. You can download it from the BCDEdit Commands for Boot Environment in the Microsoft Download Center if needed.
Turn on Unbranded Boot by using Control Panel
- In the Search the web and Windows field, type Programs and Features and either press Enter or tap or click Programs and Features to open it.
- In the Programs and Features window, click Turn Windows features on or off.
- In the Windows Features window, expand the Device Lockdown node, and check or clear the checkbox for Unbranded Boot.
- Click OK. The Windows Features window indicates Windows is searching for required files and displays a progress bar. Once found, the window indicates Windows is applying the changes. When completed, the window indicates the requested changes are completed.
- Click Close to close the Windows Features window.
Configure Unbranded Boot settings at runtime using BCDEdit
Open a command prompt as an administrator.
To disable the F8 key during startup to prevent access to the Advanced startup options menu, type the following:
To disable the F10 key during startup to prevent access to the Advanced startup options menu, type the following:
To suppress all Windows UI elements (logo, status indicator, and status message) during startup, type the following:
To suppress error display during boot, type the following:
Configure Unbranded Boot using Unattend
You can also configure the Unattend settings in the Microsoft-Windows-Embedded-BootExp component to add Unbranded Boot features to your image during the design or imaging phase. You can manually create an Unattend answer file or use Windows System Image Manager (Windows SIM) to add the appropriate settings to your answer file. For more information about the Unbranded Boot settings and XML examples, see the settings in Microsoft-Windows-Embedded-BootExp.
Unbranded Boot settings
The following table shows Unbranded Boot settings and their values.
| Setting | Description |
|---|---|
| DisableBootMenu | Contains an integer that disables the F8 and F10 keys during startup to prevent access to the Advanced startup options menu. Set to 1 to disable the menu; otherwise; set to 0 (zero). The default value is 0. |
| DisplayDisabled | Contains an integer that configures the device to display a blank screen when Windows encounters an error that it cannot recover from. Set to 1 to display a blank screen on error; otherwise; set to 0 (zero). The default value is 0. |
| HideAllBootUI | Contains an integer that suppresses all Windows UI elements (logo, status indicator, and status message) during startup. Set to 1 to suppress all Windows UI elements during startup; otherwise; set to 0 (zero). The default value is 0. |
| HideBootLogo | Contains an integer that suppresses the default Windows logo that displays during the OS loading phase. Set to 1 to suppress the default Windows logo; otherwise; set to 0 (zero). The default value is 0. |
| HideBootStatusIndicator | Contains an integer that suppresses the status indicator that displays during the OS loading phase. Set to 1 to suppress the status indicator; otherwise; set to 0 (zero). The default value is 0. |
| HideBootStatusMessage | Contains an integer that suppresses the startup status text that displays during the OS loading phase. Set to 1 to suppress the startup status text; otherwise; set to 0 (zero). The default value is 0. Customize the boot screen using Windows Configuration Designer and Deployment Image Servicing and Management (DISM)If Windows has not been installed and you are using Windows Configuration Designer to create installation media with settings for Unbranded Boot included in the image, or you are applying a provisioning package during setup, you must enable Unbranded Boot on the installation media with DISM in order for a provisioning package to successfully apply. First you have to create the image or package. Create a provisioning package or create a new Windows image in Windows Configuration Designer by following the instructions in Create a provisioning package. In the Available customizations page, select Runtime settings > SMISettings and then set the value for the boot screen settings. The following values are just examples.
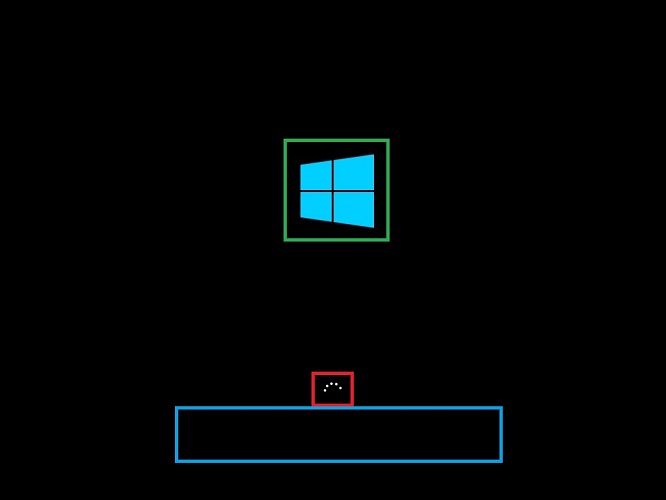
See SMISettings in the Windows Configuration Designer reference for more information about the available SMISettings. Once you have finished configuring the settings and building the package or image, you use DISM to apply the settings. Open a command prompt with administrator privileges. Copy install.wim to a temporary folder on hard drive (in the following steps, it assumes it’s called c:\wim). Create a new directory. Mount the image. Enable the feature. Commit the change. In the following image, the BootLogo is identified by the green outline, the BootStatusIndicator is identified by the red outline, and the BootStatusMessage is identified by the blue outline.
Replace the startup logoThe only supported way to replace the startup logo with a custom logo is to modify the Boot Graphics Resource Table (BGRT) on a device that uses UEFI as the firmware interface. If your device uses the BGRT to include a custom logo, it is always displayed and you cannot suppress the custom logo. |