- How to Change Your Account Name on Windows 10
- Change Account Name and Rename User Account Folder in Windows 10
- Method 1: Classic Control Panel
- Method 2: User Accounts Advanced Control Panel
- What about Your User Folder Name?
- Changing user accounts in Windows 10
- Managing user accounts with Advanced User Accounts control panel
- Managing User Account names from Control Panel
- Rename user account folder
- Windows 10 Default Account
- Replies (5)
How to Change Your Account Name on Windows 10


When you set up a new Windows 10 PC, the part where you choose your username may catch you off guard. If that’s the case, you may choose the first thing that pops into your head or something random and temporary that you intend to change later. But surprisingly enough, changing your account name in Windows 10 isn’t exactly a straightforward process. It can be done, but there are a few important things to consider as you go about it. Read on for the details.
Change Account Name and Rename User Account Folder in Windows 10
Your username is part of your identity used to sign in to Windows 10. Mistakes can sometimes happen when creating a username. There are several ways you can fix that.
Currently, the Settings app doesn’t offer an option to edit usernames. There are two ways to work around this limitation.
Method 1: Classic Control Panel
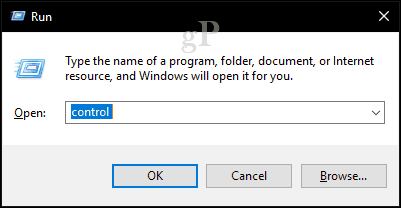
Find and open the classic Control Panel. One way to do this is to press Windows + R and then type Control then hit Enter.
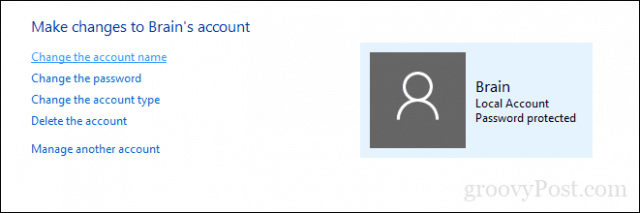
Open the User Accounts control panel, then click Manage another account.
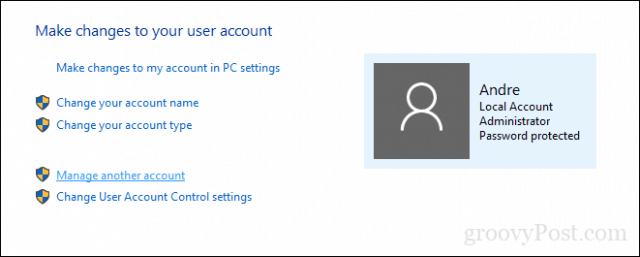
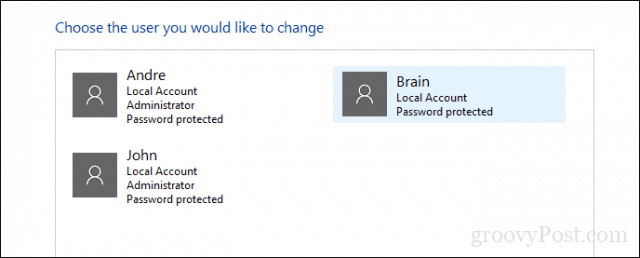
Click the account you want to edit.
Click Change the account name.
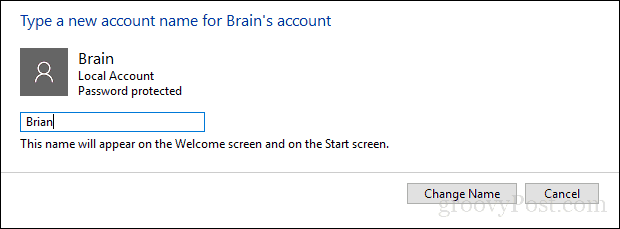
Enter the correct username for the account then click Change Name.
Method 2: User Accounts Advanced Control Panel
There is another way you can do it.
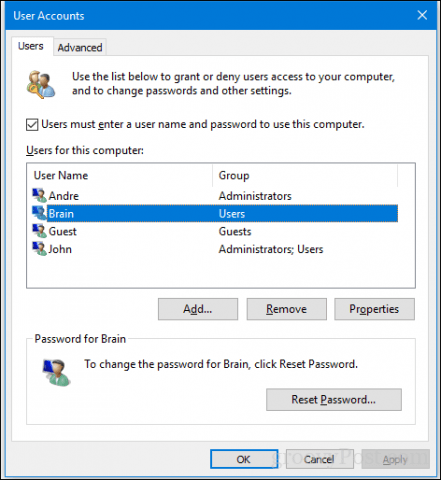
Press Windows key + R, type: netplwiz or control userpasswords2 then hit Enter.
Select the account, then click Properties.
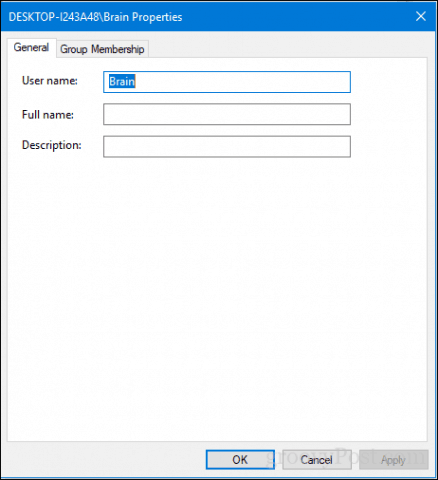
Select the General tab then enter the user name you want to use. Click Apply then OK, then click Apply then OK again to confirm the change.
What about Your User Folder Name?
Changing the username is pretty basic, but this change is not reflected in the User folder located within the C: drive. Renaming it can be risky—sometimes sticking with it or just creating a new user account then copying your files to the new account is a better option. Yes, it’s annoying, but it’s better than ending up with a corrupt user profile.
If you must change it to hush your OCD, there is an advanced option available. This involves using the command line to access the security identifier (SID) then making the necessary change in the Registry. Before you go any further, enable then log into the built-in Administrator account. As a precaution, create a system restore point in advance.
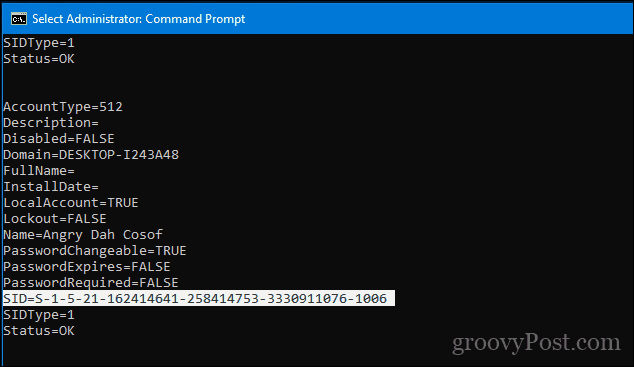
To access all the information within the SID requires using the Windows Management Instrumentation Command-line to reveal the value needed to find and change it in the Registry. Open the command prompt with Administrator privileges, type: wmic useraccount list full then hit Enter. Scroll down then take note of the SID values for the account you want to change.
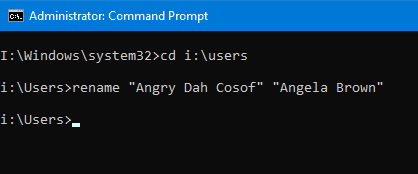
The next step is to rename the account. Doing this from the command line is just as easy.
For example, rename “Angry Dah Cosof” “Angela Brown”
Open Start, type: regedit
Right-click Regedit.
Click Run as administrator.
Remember that SID value we accessed earlier? Now is the time to reference it.
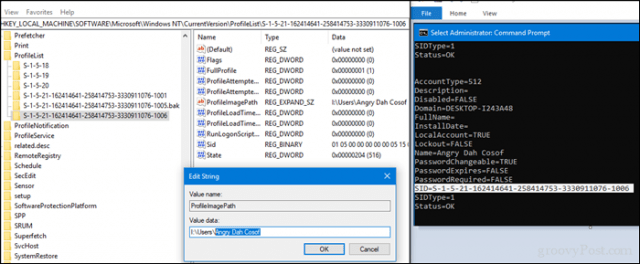
Once you find it, select it, then double-click the value ProfileImagePath. You will see the old name we had earlier is still there. Change it to the new name you want to use.
There you have it, the name you actually intended. Mistakes like this can happen, but there is always a way to fix them.
Changing user accounts in Windows 10
Changing a user’s account name in Windows is one of the very basic tasks, at least you would expect so but that is not very true on Windows 10 (also on Windows 8 and 8.1). You could click or tap on Settings → Accounts and do things like changing the Account picture and password. However there is nowhere with in this Account settings you will find an option to change the account name. This article explains how to change a user account name in Windows 8, Windows 8.1 and Windows 10.
Managing user accounts with Advanced User Accounts control panel
Advanced User Accounts control panel, otherwise known as Netplwiz lets you perform several user management tasks such as create new users, changing the account name, assigning users to groups, manage passwords and set some security features.
Step 1. To access Advanced User Accounts panel type netplwiz in Search the web and Windows box next to your Windows button then click or tap on Netplwiz (Windows application).
In case of Windows 8, click or tap Search from the Charms bar.

Step 2: In the Advanced User Accounts panel, select the user you want to modify and click Properties
 Windows 10: Advanced User Accounts Panel
Step 3: In the properties window for the user, enter the new user name and click OK.
 Windows 10: Change User Account Name
Step 4: Restart for the changes to take effect.
Managing User Account names from Control Panel
- Type control panel in Search the web and Windows box next to your Windows button
 and click or tap on Control Panel (Windows application).
 - In case of Windows 8, click or tap Search from the Charms bar.
- In Control Panel set the View by option to Category.
- Click on User Accounts.
- Click on User Accounts again.
- Then click on Change your account name.
- You will be prompted to enter an administrator password to continue.
- After that enter a new account name and click Change Name.
- Restart for the changes to take effect.
 and click or tap on Control Panel (Windows application).
Article updated on 24-Jan-2016
Rename user account folder
The procedure described above changes the user account name but the user account folder under c:\users folder will still have the old name. The below steps explain how to rename old user profile folder
Warning: Using Registry Editor incorrectly can cause serious, system-wide problems that may require you to re-install Windows to correct them.
- Login to the system as an user who is in the administrator group. It should be a different user from the one that you are trying to change.
- Open File Explorer and navigate to C:\Users folder. Rename the old folder corresponding to the old user account
- Open Registry editor — In the Windows search box next to the start button type regedit and select regedit command from the search result.
- Navigate to HKEY_LOCAL_MACHINE\SOFTWARE\Microsoft\Windows NT\CurrentVersion\ProfileList
Here you will find several keys that starts with S-1-5 corresponding to each user profile in your system. Check the registry value ProfileImagePath to find out the one corresponding to the old user account you are changing. - Double-click on the registry value and modify the folder name.
- Close registry editor and restart your PC.
- Log in as the new user name that was changed and it should pick up the profile from the new path.


Windows 10 Default Account
How do I stop the Default account from booting up first?
After a Restart, my Windows 10 (ver 1903, now) comes up in the Default account, complaining about an incorrect password — which I don’t have. To log in, I have to force another login error message, then it gives me the choice (in the lower left corner) to choose to log into the Default account, or my own account — and then I can log in to my account
I believe this is also the reason I cannot get Autologon to work — it wants to always come up in the Default account — which IS marked as «disabled» in Computer Management. I bought this PC from a refurbisher, so do not have the Win 10 install disk.
Replies (5)
My name is Andre Da Costa; an Independent Consultant, Windows Insider MVP and Windows & Devices for IT MVP. I’m here to help you with your problem.
Press Windows key + R
Type: control userpasswords2
Hit Enter
Check ‘Users must enter a user name and password to use this computer’
Click Apply then OK.
Press Windows key + R to open Run.
Type netplwiz into the Run bar and hit Enter.
Select the User account you are using under the User tab.
Check by clicking «Users must enter a user name and password to use this computer» checkbox and click on Apply.
Sign-out and sign-in again to check if issue persist.
Open Start > Settings > Accounts > Sign in options
Click in the Require sign in list box
Choose Always
If that does not work.
Press WIN + R, type regedit and click on «run».
Navigate to the following path:
Change value of the key Enabled from 0 to 1
There’s one more problem to solve: The user SYSTEM automatically changes the value to 0. So we will disallow the user SYSTEM to change it.
Right mouse click at registry key UserSwitch -> Permissions
Click on Advanced and then on the Disable inheritance-button; if your are prompted with two options now, choose the first one (Convert inherited permissions into explicit ones for this object)
At the top of the dialog, change the owner from SYSTEM to the group Administrators (if your Windows is not in English, the name might differ a bit, e.g. in German it would be «Administratoren»)
Select the group Administrators entry -> Allow -> full control
Double click the entry for SYSTEM, select type Deny and click on Show advanced permissions. Here Clear all -> only check Set value
Exit then restart to see if the problem is resolved.
Was this reply helpful?
Sorry this didn’t help.
Great! Thanks for your feedback.
How satisfied are you with this reply?
Thanks for your feedback, it helps us improve the site.
How satisfied are you with this reply?
Thanks for your feedback.
Hi T4. I’m Greg, an installation specialist and 10 year Windows MVP here to help you.
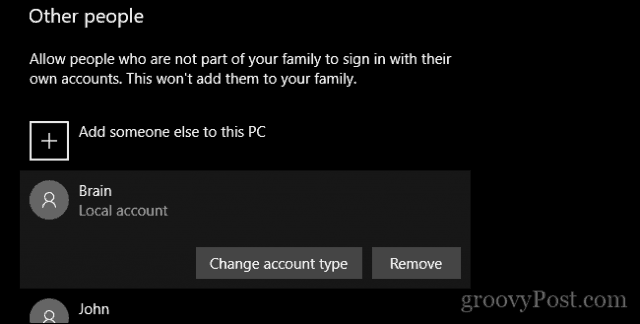
Sign in with an Admin account and remove the faulty account (after backing up any files you need from it) in Settings > Accounts > Family & Other People.
However it sounds like you might benefit more from a Reset or the even better gold standard Clean Install following the illustrated steps in this link which compile the best possible Install of Windows which will stay that way as long as you stick with the tools and methods given, has zero reported problems, and is better than any amount of money could buy: http://answers.microsoft.com/en-us/windows/wiki.
Then if that isn’t a much better install than you have now, To create Windows 10 Installation Media (if necessary on another PC) install the Media Creation Tool and follow the directions here: http://windows.microsoft.com/en-us/windows-10/m. . Uncheck the box for Recommended Settings to choose the exact version and bit rate for the target PC only.
Insert media, boot it by powering up PC while pressing the BIOS Boot Menu Key here: https://www.sysnative.com/forums/hardware-tutor.
If the media won’t boot you may need to enter BIOS/UEFI Setup (pressing key given in chart in link above) to turn off Fast Boot or Fast Startup first.
Choose the boot device as a UEFI device if offered, skip the Product Key screen and choose your licensed version only if offered. On second screen choose Install Now, then Custom Install, then at the drive selection screen delete all partitions down to Unallocated Space to get it cleanest, click Next to let it create needed partitions and start install — this makes it foolproof.
You will get and keep the best possible install to the exact extent you stick with the steps, tools and methods in the linked tutorial. It’s a better install than any amount of money could buy and a great learning experience that will make you the master of your PC because you will learn everything that works best and how to apply it with your own hands.
If you have files that aren’t backed up you can use the same bootable media to try to rescue your files using this method: http://answers.microsoft.com/en-us/windows/wiki.
I hope this helps. Feel free to ask back any questions and keep me posted. If you’ll wait to rate whether my post helped you, I will keep working with you until it’s resolved.
Standard Disclaimer: There are links to non-Microsoft websites. The pages appear to be providing accurate, safe information. Watch out for ads on the sites that may advertise products frequently classified as a PUP (Potentially Unwanted Products). Thoroughly research any product advertised on the sites before you decide to download and install it.
Windows MVP 2010-20
Over 100,000 helped in forums in 10 years
I do not quit for those who are polite and cooperative.
I will walk you through any steps and will not let you fail.


