- How to Change the Icon Size in Windows 10
- How to Change the Size of Desktop Icons in Windows 10
- How to Change the Size of the Taskbar Icons
- How to Change the Size of Icons in File Explorer
- How to Change Icons on Windows 10
- 1. Change Desktop Icons on Windows 10
- 2. Change Folder Icons on Windows 10
- 3. Change a Type of File’s Icon on Windows 10
- How to change desktop icon size and view to Details and List view in Windows 10
- Change desktop icons size in Windows 10
- 1] Medium icons view
- 2] Large icons view
- 3] Small icons view
- List view for Desktop icons
- Display view for Desktop icons
- How to Change Desktop Icon Spacing in Windows 10?
- Steps to Change Desktop Icon Spacing (Horizontal and Vertical) in Windows 10
- About Nick
- www.makeuseof.com
- Follow MUO
- How to Customize Any Icon in Windows 10
- Where to Find Custom Icons for Windows 10
- Converting PNG Images to ICO Icons
- How to Change Program Icons in Windows 10
- Pinning Custom Icons to the Taskbar
- How to Change Individual Folder Icons in Windows 10
- How to Change All Windows Folder Icons at Once
- How to Change File Icons by Type
- How to Change Drive Icons in Windows
- How to Create Blank Taskbar Icons
- Creating Dummy Batch Files
- Set Up a Blank Icon
- Creating and Pinning Shortcuts
- How to Change the Desktop Icon Size on Windows 10
- Windows 10 Desktop Icons Missing?
- Customize Every Icon in Windows
- Subscribe To Our Newsletter
- One More Step…!
How to Change the Icon Size in Windows 10
By Melanie Pinola 29 April 2019
Wish the desktop icons in Windows 10 were bigger so you could stop squinting at them or they’d be easier to tap on a touch screen laptop? Or do you wish they were smaller so the shortcuts didn’t take up as much space on your laptop’s screen? Not to worry, we have a list of short steps on how to change the icon size in Windows 10.
How to Change the Size of Desktop Icons in Windows 10
1. Right-click on an empty space on the desktop.
2. Select View from the contextual menu.

3. Select either Large icons, Medium icons, or Small icons. The default is medium icons.
On my laptop with a native 1600 by 900 pixels display, the large option looks huge, the small size is too small, and the medium size looks just right (as Goldilocks would say). Your mileage might vary depending on your screen’s display resolution. Changing the size of the icons on the desktop doesn’t affect the size of the icons elsewhere in Windows 10, but there are ways you can change those too.
How to Change the Size of the Taskbar Icons
If you want to change the size of the icons in your taskbar, there’s a different setting for that, which will also change the size of text, apps, and other items across Windows 10.
1. Right-click on an empty space on the desktop.
2. Select Display settings from the contextual menu.
3. Move the slider under «Change the size of text, apps, and other items» to 100%, 125%, 150%, or 175%.
4. Hit Apply at the bottom of the settings window. Windows might ask you to log out and log back in for a more consistent experience.
This will not only make the icons in the taskbar a bit larger, but it will also make text bigger in apps like Microsoft Edge and Calendar, as well as in Windows 10 notification windows.
How to Change the Size of Icons in File Explorer
If you’d like larger or smaller icons or thumbnails in particular folders, you can change those on the fly in File Explorer.
Just head to your folder location and use your mouse’s scroll wheel to zoom in or out, effectively switching the view between Windows 10’s large icons, medium icons, small icons, list, details, tiles, and content views.
Although File Explorer will remember your last setting when you open this folder again, this is a folder-specific setting, so you’ll have to adjust each folder you’d want different icon and text sizes for.
How to Change Icons on Windows 10
It is a good way to customize your own Windows OS and improve the using experience by changing the icons on Windows 10. If you are bored with the default icons on your Windows 10 computer, you can use the following ways to change icons on Windows 10 easily.
1. Change Desktop Icons on Windows 10
Step 1: Click Start > select Settings > choose Personalization click Themes.
Step 2: Slide the left pane and locate to Related Settings. Then choose Desktop icon settings.
Step 3: In the Desktop Icon Settings window, select the desktop icon you want to change and click Change Icon.
Step 4: Choose a new icon from the list or click Browse to input an icon and tap OK.
Tip: The icon type can be exe, dll, or ico.
Step 5: Click OK to confirm the change.
2. Change Folder Icons on Windows 10
Step 1: Right-click the folder and select Properties in the context menu.
Step 2: Choose Customize and click Change Icon in the Properties window.
Step 3: You can replace the folder icon with a basic/personalized one. Then click OK to save the change.
Step 4: Hit OK to finish changing the folder icon.
3. Change a Type of File’s Icon on Windows 10
Different from personalizing desktop icons or folder icons, changing the icon of a type of file needs the help of the third-party tool like File Types Manager and here it will be used as the utility.
Step 1: Get File Types Manager on your Windows 10 PC.
Step 2: Find the file type that you want to change its icon. Then close the Find box.
Step 3: Right-click the file and choose Edit Selected File Type.
Step 4: Click the 3-dots button in the pop-out window.
Step 5: Pick one of the existing icons. You can also input your own icon by clicking Browse > click OK.
Step 6: At last, don’t forget to click OK to execute the operation.
How to change desktop icon size and view to Details and List view in Windows 10
On your Windows desktop, we place icon shortcuts to our oft-accessed programs, files and folders. While the default icons view is that they are displayed as icons in Medium size, there are other ways too, that icons can be displayed. Today, let us have a look at how we can change desktop icons size or view in Windows 10 to Large, Small, and even Details and List view – as they appear in File Explorer in Windows 10.
When you right-click on the Windows desktop, select View, you will see 3 options, Large icons, Medium icons and Small icons.
Change desktop icons size in Windows 10
Apart from there 3 view, you can also display the desktop icons in List & Details view, as we display our files and folders in File Explorer. Let us see each of these 5 views.
1] Medium icons view
This is the default setting as shown below, and what you see on your desktop.
2] Large icons view
To make the icons larger, display Large icons from the context menu.
3] Small icons view
To make the icons smaller, display Small icons from the context menu.
Bonus Tip: Hold down the Ctrl key and use your mouse scroll wheel to quickly resize the icons from Small to Extra large.
List view for Desktop icons
To display the icons as a List, press Ctrl+Shift+0+8 keys. To revert, right-click on desktop and select Medium icons view.
Display view for Desktop icons
To display the icons in Details view, press Ctrl+Shift+6 keys. You will see the same columns here which are displayed in your File Explorer.
Yoga Surya J adds in the comments: You can press Ctrl + Shift + (0 till 9) for more variations.
To revert, right-click on desktop and select Medium icons view.
If you want to add more columns here, you can change the folder details to display. You can open any folder, right-click near the column titles and select the other columns like Authors, categories, Tags, Titles, Date created, etc.
Date: August 27, 2019 Tags: Desktop, Icons
How to Change Desktop Icon Spacing in Windows 10?
The following tutorial will help you to learn how to change the desktop icon spacing, both vertical and horizontal in Windows 10. Desktop icon spacing has a default value for -1125 units for each of horizontal and vertical spacing. This spacing can be changed by tweaking specific keys in the registry Editor. The steps are very simple and you can change the value back to default anytime by applying the same process. The parameter of icon spacing runs from -480 to -2730. So you can select any value within this range.
Steps to Change Desktop Icon Spacing (Horizontal and Vertical) in Windows 10
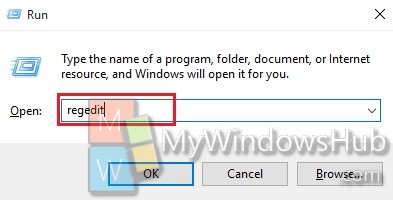
1. press Windows+R to open Run window, type regedit and hit Enter.
2. Navigate to the following location
HKEY_CURRENT_USER\Control Panel\Desktop\WindowMetrics
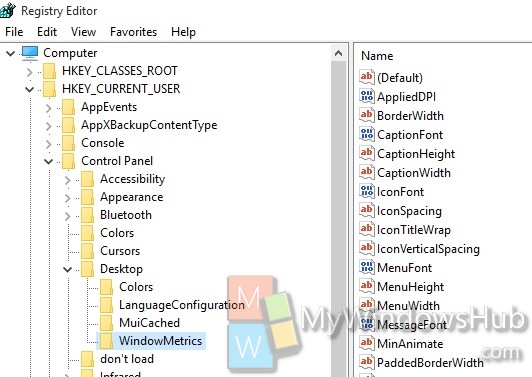
3. In the right panel, find out WindowMetrics. This is the horizontal spacing. Double click on IconSpacing to modify the value. Choose any value between -480 to -2730 where -480 represents the minimum spacing and -2780 represents the maximum spacing.
4. Now the vertical spacing is same as step 4. All you need to do is double click on IconVerticalSpacing. Now set any value between -480 to -2730. Tap OK to save changes. The icon spacing is thus changed.
5. Reboot the computer to save the changes.
About Nick
Nick is a Software Engineer. He has interest in gadgets and technical stuffs. If you are facing any problem with your Windows, feel free to ask him.
www.makeuseof.com
Follow MUO
How to Customize Any Icon in Windows 10
Here’s how to change icons on Windows 10, including program shortcuts, folders, file types, and much more.
While the default Windows icons get the job done, they aren’t particularly exciting. If you want to put a personal spin on your computer, changing Windows 10 icons is a great way to do this.
We’ll show you how to change icons on Windows 10, including program and folder icons. With a bit of work, you’ll have an all-new interface!
Where to Find Custom Icons for Windows 10
Before you start changing Windows 10 icons, you need some new icons to replace them with. The OS has a few additional icons built-in, but they’re not that great.
Flaticon is a great resource for all your Windows icon needs. The site contains over a million high-quality icons arranged in thousands of convenient packs. You can grab everything in a pack at once, or download single icons.
The site offers downloads in several formats. We recommend downloading them in PNG for easy conversion to the ICO format. Keep all the raw downloads in a folder called PNG Icons or similar.
If you don’t find what you’re looking for here, try Findicons, IconArchive, or GraphicBurger. We’ve also looked at some great Windows icon packs in the past.
Converting PNG Images to ICO Icons
Windows uses ICO files for its icons. Thus, you’ll need to convert images from PNG (or other formats) before you use them as icons.
ConvertICO offers an easy way to do this. You can upload up to 50 PNG images at once to convert them into the ICO format. If you prefer, you can also enter the URL of an image you want to convert, cutting out the middle step of downloading the PNG.
Keep all your ICO files in their own folder. Make sure you put this somewhere permanent, as moving icon files after you have assigned them will cause problems.
How to Change Program Icons in Windows 10
Windows 10 makes it easy to change the program icon for a shortcut, but not the main executable. Thus, you should make a desktop shortcut for the app icon you want to change, if you don’t have one already.
To do this, search for an app in the Start menu, then right-click its name and choose Open file location. In the resulting folder, right-click the program name and choose Send to > Desktop (create shortcut).
Now you can modify the new shortcut on your desktop. Right-click it and choose Properties to open a new window. Here, switch to the Shortcut tab and click the Change Icon button at the bottom.
You’ll see a list of alternative icons included in the app, if there are any. To set your own icon, click Browse and navigate to the place where you saved your ICO files.
Double-click one to select it, then choose OK on both open dialog boxes. That’s all you have to do to change a program icon in Windows 10.
Pinning Custom Icons to the Taskbar
Want to customize the icons on your Taskbar too? The easiest way to do this is to follow the steps above to create custom desktop icons. After that, simply right-click a shortcut and choose Pin to Taskbar.
If you’d rather, you can customize an icon already pinned to your Taskbar. While holding Shift, right-click the app icon and choose Properties. From here, you can follow the same steps as above to set a new icon.
You may need to wait a few moments for changes you make in this way to take effect.
How to Change Individual Folder Icons in Windows 10
Changing a folder icon is similar to the above process. Right-click the folder you’d like to change and choose Properties.
On the resulting window, switch to the Customize tab. Select the Change Icon button at the bottom to select a new icon from your computer. Windows includes many default icons for this, but most of them are old-school and ugly. Hit Browse to locate your custom icons instead.
If you ever change your mind, just open this window and choose Restore Defaults to get the original icon back.
How to Change All Windows Folder Icons at Once
Want to change all the standard folder icons on your computer with one action? You’ll have to dig into the Registry to do so. Remember that it’s possible to damage your system by doing this, so take care if you choose to do so.
First, type regedit into the Start menu to open the utility. You’ll need to provide administrator permissions to continue. Navigate to the following location:
Now, right-click on the Explorer folder in the left navigation tree and select New > Key. Name the new key Shell Icons, then select it in the left panel. In the blank space on the right, right-click and choose New > Expandable String Value. Set its name as 3. Repeat this to create another string called 4.
Now, double-click the 3 string you just made. In the Value data field, enter the location of your folder icon in quotes. An easy way to do this by holding Shift while right-clicking your ICO file, then selecting the Copy as path option.
It should look something like this:
Repeat this for the 4 string, then click OK and exit the Registry Editor.
If you don’t see the change take effect upon opening a new File Explorer window, you’ll need to restart File Explorer for your changes to take effect. To do this, press Ctrl + Shift + Esc to open the Task Manager. Click More details to expand it if needed. On the Processes tab, find Windows Explorer. Right-click this and choose Restart.
This should apply your new icon to all folders. To remove this in the future, simply delete the Shell Icons Registry key you created.
We tested this method as working in Windows 10 version 20H2, but other users have reported that it has no effect. Your mileage may thus vary depending on your version of Windows 10.
How to Change File Icons by Type
Normally, for each file type, Windows shows an icon of the default program. If you’d like to change this, you can use a free utility called FileTypesMan to change the icon for any file type.
After downloading and running it, press Ctrl + F to locate the file type you want to change. Double-click it in the list to open a new window with many more options. Next to the Default Icon field, you’ll see a . button.
Click this and you’ll open the familiar Windows dialog box that lets you change the icon.
Using this, you can set up separate icons to distinguish file types, even if they open in the same program. You might want to make it easier to pick out JPG and HTML files at a glance, or spot old DOC Word files not using the newer DOCX format, for instance.
How to Change Drive Icons in Windows
Want to change the icons that you see in This PC for your various computer drives? A free utility called Drive Icon Changer makes this easy.
It’s similar to FileTypesMan mentioned above, but much more basic. Simply select a drive and the desired icon, and it will apply them for you after a restart. That’s all it takes.
How to Create Blank Taskbar Icons
Usually, all of your Taskbar icons appear alongside each other. If you’d like to add some space—perhaps to separate icons by type—you can achieve this with a workaround.
Creating Dummy Batch Files
To start, create a new folder somewhere you can keep it permanently. Name it Spaces or something similar. Inside this folder, right-click again and choose New > Text document. Double-click the file to open it.
Inside the text file, enter the following. This will create a batch file that’s a dummy; it immediately opens and closes a Command Prompt window if you click on it.
After this, go to File > Save As. In the saving dialog box, give the file a name ending in .BAT. If you want to create multiple spaces, you should then copy, paste, and rename the file so you have several named Space1.bat, Space2.bat, and so on.
Set Up a Blank Icon
Windows has blank icons built-in. But in our testing, these can appear as black squares on your Taskbar instead of transparent boxes, which is no good. This means you’ll need to quickly make your own «blank» icon.
Open an image editor (we used Paint.NET) and create a canvas that’s perfectly square: 256×256 will work. Press Ctrl + A to select the entire image, then press Del to erase it. This will create a transparent square when saved as a PNG.
However, if you leave it like this, you’ll run into the same black block problem. Thus, you need to take the Pencil tool, zoom in, and use it to draw a single pixel in a corner of the image. This will effectively be invisible when it sits on your Taskbar.
Save the file as a PNG, then use an online converter as mentioned above to convert this into an ICO file.
Creating and Pinning Shortcuts
Now, right-click each Space file you made and choose Create shortcut, as you’ll need a shortcut, not the main BAT file, in order to change the icon. Then right-click each shortcut file, select Properties, and use the Change Icon button to select your new blank icon.
Once this is done, you’ll need to add one more element in order to add these shortcuts to your Taskbar. In the Shortcut tab of each BAT file, enter explorer in front of everything in the Target box. Make sure there’s a space before the opening quotes.
Now you can right-click all your Space files and choose Pin to taskbar. They’ll appear as blank icons, allowing you to drag them wherever you like and group your other icons.
How to Change the Desktop Icon Size on Windows 10
Just want to adjust the size of Windows 10 icons on your desktop? That’s an easy fix. On the desktop, you can right-click any empty space and choose View to select Small icons, Medium icons, or Large icons.
If you don’t like one of those presets, hold the Ctrl key and scroll your mouse wheel. This gives you more granular control over icon size.
In a File Explorer window, you’ll find more size options under the View menu. The method of scrolling your mouse wheel while holding Ctrl works, too.
Windows 10 Desktop Icons Missing?
If you don’t see any icons on your desktop, chances are that you’ve hidden them all. Getting them back takes just a few clicks.
Right-click anywhere on your desktop, then select View > Show desktop icons if it’s not already checked. With this enabled, you should see your desktop icons with no problem.
If this didn’t fix your problem, your computer may be in tablet mode, which prevents your desktop icons from showing. To disable tablet mode, visit Settings > System > Tablet.
Finally, if you’re missing the default Windows 10 system icons, you’ll need to restore them in another menu. Go to Settings > Personalization > Themes and on the right side of the window, select Desktop icon settings.
This will launch a new window where you can toggle the icons for This PC, your user folder, Network, Control Panel, and the Recycle Bin. While here, you can also change the icons for these shortcuts.
Customize Every Icon in Windows
Now you know how to change nearly every icon on your Windows system. Whether you want to completely overhaul everything or just want to change a few shortcut icons, you have the tools to personalize your computer in a fun way.
If you love personalization, it thankfully doesn’t end here. There are many other ways to customize the look and feel of your Windows environment.
Want to know how to make Windows 10 look better? Use these simple customizations to make Windows 10 your own.

Ben is a Deputy Editor and the Onboarding Manager at MakeUseOf. He left his IT job to write full-time in 2016 and has never looked back. He’s been covering tech tutorials, video game recommendations, and more as a professional writer for over six years.
Subscribe To Our Newsletter
Join our newsletter for tech tips, reviews, free ebooks, and exclusive deals!
One More Step…!
Please confirm your email address in the email we just sent you.


