- How to change system default font in all parts completely
- Смена системного шрифта Windows 10
- Как изменить шрифт в Windows 10: 3 способа
- Содержание
- Изменение шрифта в Windows 10 с помощью редактора реестра
- Изменение шрифта в Windows 10 с помощью программы Winaero Tweaker
- Изменение шрифта в Windows 10 с помощью программы Advanced System Font Changer
- Восстановление до стандартных шрифтов
- How to change the default font in Windows 10
- Steps to change the default font in Windows 10
- Wrapping it up
How to change system default font in all parts completely
I don’t like cleartype font because it hurts my eyesight. So I tried to change the default font in Windows Vista and 7 as follows. First, I turned off cleartype and changed Segoe UI to Tahoma in ‘Personalize’ menu. Second, I modified Segoe UI to Tahoma in the registry ‘HKEY_LOCAL_MACHINE\SOFTWARE\Microsoft\Windows NT\CurrentVersion\Font’.
To change default font in not almost but all parts, you must modify registry. But registry modification makes a problem that for example when I click ‘Control Panel>Date and Time’ the window looks ugly because the font size is too large and so some letters are cut outside the window.
Anyone who challenged to change system font and size?
I really wanna Microsoft to give users the option to change system default font and size in all parts completely.
Thank you, Grzegorz Krzymiński. But the method makes default scale larger and cannot reduce font scale in Windows 7.
And the method, which I already know, does not solve my question.
I have searched this site and found a very useful tip except one problem which is mentioned at the end. This problem is what I also wanna solve.
How can I change system default font size to 8, 9 or other? If I discover the solution I can remove font smoothing in all window parts and get appropriate font size.
Below is the summary of how to completely disable ClearType and font smoothing in Windows 7.
1. Disable ClearType by opening “Control Panel->Fonts->Adjust ClearType text” and unchecking “Turn on ClearType”.
Alternatively you can change the value of the following registry key from 2 to 1:
[HKEY_CURRENT_USER\Control Panel\Desktop]
«FontSmoothingType»=dword:00000001
2. Disable font smoothing by unchecking «Smooth edges of screen fonts» in “Control Panel->System->Advanced system settings -> Performance Settings->Visual Effects.
Alternatively you can change the value of the following registry key from 2 to 1:
[HKEY_CURRENT_USER\Control Panel\Desktop]
«FontSmoothing»=»1»
3. Change window elements fonts. To do this, open “Control Panel->Personalize->Window Color->Advanced appearance settings” and change all fonts from Segoe UI 9 to any other font (Windows XP uses Tahoma 8 for all elements by default).
These settings are stored in the following registry path:
4. Now you need to make the system believe that it has no Segoe UI fonts and that it must replace it with for example Таhoma. Please note that there is no need to delete any fonts.
Run regedit.exe and make the following changes in the registry:
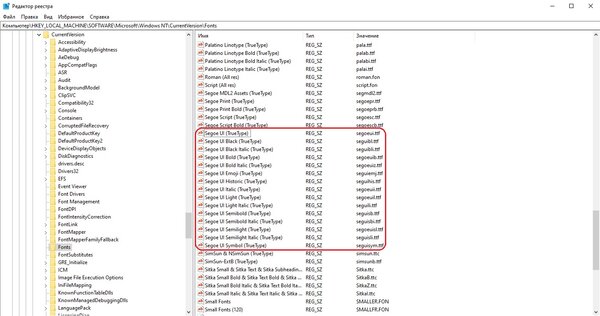
[HKEY_LOCAL_MACHINE\SOFTWARE\Microsoft\Windows NT\CurrentVersion\Fonts]
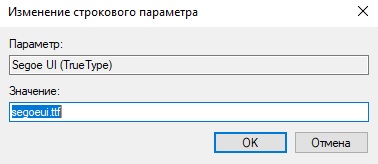
«Segoe UI (TrueType)»=»»
«Segoe UI Bold (TrueType)»=»»
«Segoe UI Italic (TrueType)»=»»
«Segoe UI Bold Italic (TrueType)»=»»
[HKEY_LOCAL_MACHINE\SOFTWARE\Microsoft\Windows NT\CurrentVersion\FontSubstitutes]
«Segoe UI»=»Tahoma»
If you would like to revert it back here are the defaults:
[HKEY_LOCAL_MACHINE\SOFTWARE\Microsoft\Windows NT\CurrentVersion\Fonts]
«Segoe UI (TrueType)»=»segoeui.ttf»
«Segoe UI Bold (TrueType)»=»segoeuib.ttf»
«Segoe UI Italic (TrueType)»=»segoeuii.ttf»
«Segoe UI Bold Italic (TrueType)»=»segoeuiz.ttf»
«Segoe UI Semibold (TrueType)»=»seguisb.ttf»
«Segoe UI Light (TrueType)»=»segoeuil.ttf»
«Segoe UI Symbol (TrueType)»=»seguisym.ttf»
[HKEY_LOCAL_MACHINE\SOFTWARE\Microsoft\Windows NT\CurrentVersion\FontSubstitutes]
«Segoe UI»=-
5. Restart the computer.
Congrats! We are done! Now absolutely in the whole system the user defined fonts are used without any ClearType or smoothing.
In case somebody would like to disable ClearType in the whole system, but enable it in Office 2007 (Office 2007 in Windows XP uses ClearType always, regardless of system settings), then you need to complete all the above steps, except the first one.
It seems to be OK now, we disabled ClearType and font smoothing, changed system fonts, but there is one imperfection.
By default the system uses Segoe UI 9. We changed the font to Tahoma, but the system font size remained the same.
Question remains: How to change the system font size to 8?
Смена системного шрифта Windows 10
Как изменить шрифты элементов Windows 10
После того, как мы установим новый шрифт (файл с расширением .ttf расшифровывается, как «шрифт истинного типа»), в операционной системе Windows 10 , ничего не поменяется. Гуманистический гротеск «SEGOE UI», как неподвижная и непоколебимая , массивная ледяная глыба , будет стоять на своем месте и с завидным постоянством топить мимо проплывающие Титаники:). Так как же растопить этот лёд?
Ручками в реестр лезть не будем, нечего нам там делать. Создадим документ в формате « .txt » и скопируем туда вот эти данные:
Windows Registry Editor Version 5.00
[HKEY_LOCAL_MACHINE\SOFTWARE\Microsoft\Windows NT\CurrentVersion\Fonts]
«Segoe UI (TrueType)»=»»
«Segoe UI Black (TrueType)»=»»
«Segoe UI Black Italic (TrueType)»=»»
«Segoe UI Bold (TrueType)»=»»
«Segoe UI Bold Italic (TrueType)»=»»
«Segoe UI Historic (TrueType)»=»»
«Segoe UI Italic (TrueType)»=»»
«Segoe UI Light (TrueType)»=»»
«Segoe UI Light Italic (TrueType)»=»»
«Segoe UI Semibold (TrueType)»=»»
«Segoe UI Semibold Italic (TrueType)»=»»
«Segoe UI Semilight (TrueType)»=»»
«Segoe UI Semilight Italic (TrueType)»=»»
[HKEY_LOCAL_MACHINE\SOFTWARE\Microsoft\Windows NT\CurrentVersion\FontSubstitutes]
«Segoe UI»=»ИМЯ ШРИФТА»
» Файл » → » Сохраните как » → в формате » Fonts.reg «.
Как только шрифт надоел и захотелось новый, нажимаем на файле » Fonts.reg » пр.кн.мыши → Изменить → Там где «ИМЯ ШРИФТА» вписываем название своего, заранее установленного шрифта , например Ubuntu → » Файл » → » Сохранить » → Закрываем файл → Жмакаем два раза по файлу и соглашаемся с изменением значений реестра → Нажимаем Ctrl + Alt + Del , выходим и снова входим в систему.
Воспользуйтесь готовым батником (кодировка — ANSI) от IT Simply : ссылка .
Третий способ мне нравится больше всего, хоть и придётся установить для этих дел, целую программу Winaero Tweaker (гибко настраивает внешний вид и поведение операционной системы).
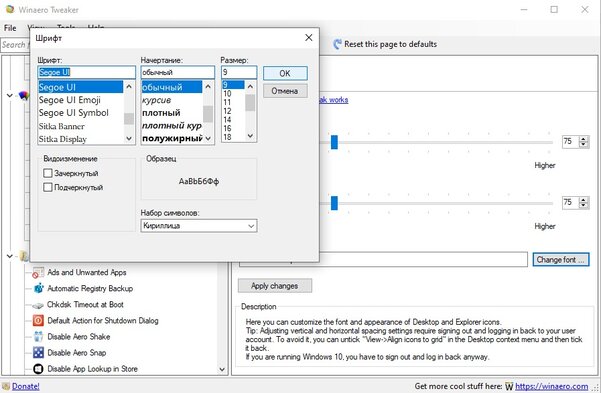
О всех особенностях приложения говорить не будем. только шрифты. Кликаем по Icons → Настраиваем горизонтальный интервал (между буквами) → Вертикальный интервал (превращаем буквы в дядю Стёпу — милиционера) → Change font (настраиваем новый шрифт) → Apply changes (Применяем изменения) → Sign out now (Выйти сейчас. кнопка появится внижнем левом углу после применения изменений) → Снова заходим в систему → Шрифт поменялся.
В окне «Выполнить» наберите: %SYSTEMROOT%\Fonts
В cmd: cd c:\windows\fonts следующая команда : dir
В проводнике Windows : С:\windows\fonts
В тракторе они под сидушкой , а в доме под подушкой 🙂
Ролик глупый, можете не смотреть ( создавал его под впечатлением, когда у меня хакеры скомуниздили первый сайт, поэтому много тупил, болтал и нёс всякую несусветную чушь ):
Как изменить шрифт в Windows 10: 3 способа
Стандартно в операционной системе Windows 10 для всех элементов используется шрифт Segoe UI. К сожалению, изменить его в настройках параметров ОС нельзя — такой возможности просто нет. Для изменения системного шрифта придётся прибегнуть к работе с реестром или запуску сторонних приложений, созданных специально для этих целей. Эта статья поможет изменить шрифт на компьютере с Windows 10 тремя способами разной степени сложности, плюс имеется отдельный пункт о том, как вернуть шрифт по умолчанию.
Содержание
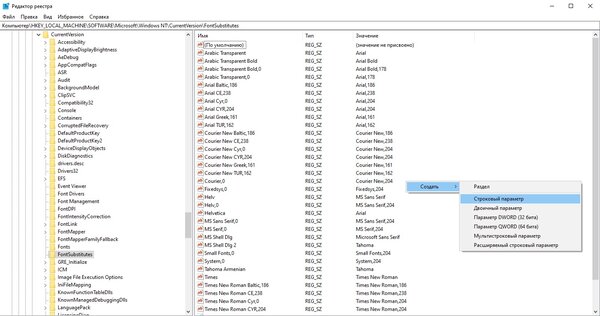
Изменение шрифта в Windows 10 с помощью редактора реестра
Заменить стандартный шрифт в операционной системе можно при помощи редактора реестра — преимущество данного способа в том, что пользователю не нужно загружать дополнительный софт.
Перед тем, как приступить к процессу замены, пользователю нужно найти название нужного ему шрифта:
- откройте проводник;
- введите в адресную строку C:\Windows\Fonts;
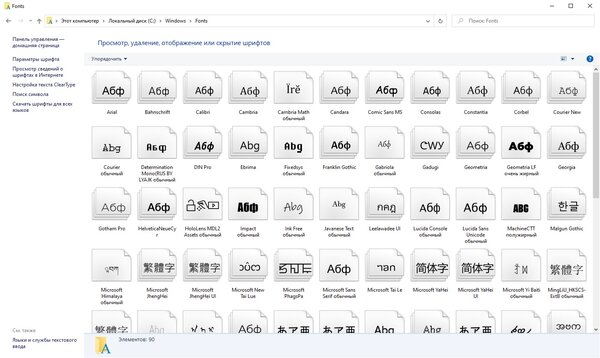
Теперь можно приступать к процессу замены стандартного системного шрифта.
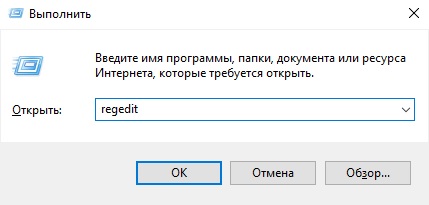
- нажмите клавиши Windows + R на клавиатуре;
- в появившемся окне введите команду regedit, после чего нажмите на кнопку «ОК»;
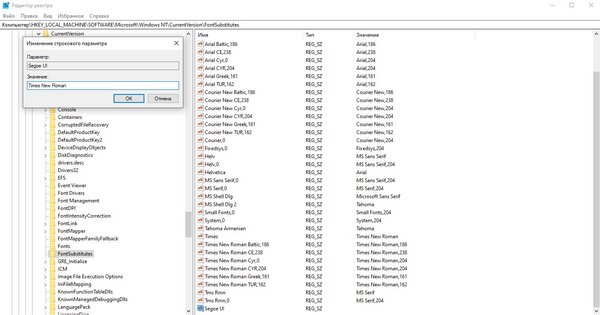
Важное уточнение: шрифт в меню «Пуск» и «Параметры» не меняется, он останется стандартным.
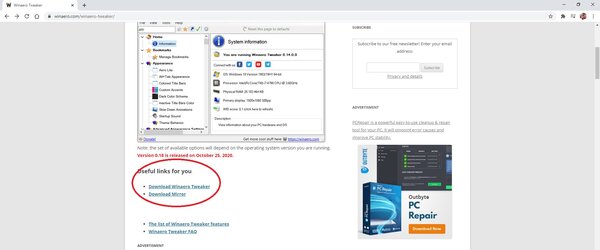
Изменение шрифта в Windows 10 с помощью программы Winaero Tweaker
Если пользователь по каким-то причинам не желает работать с редактором реестра, можно воспользоваться специальной полностью бесплатной программой Winaero Tweaker, которая позволяет настраивать внешний вид операционной системы Windows 10. Важно уточнить, что если предыдущий способ заменял все системные шрифты ОС на один выбранный вариант, то настройка при помощи ПО более гибкая.
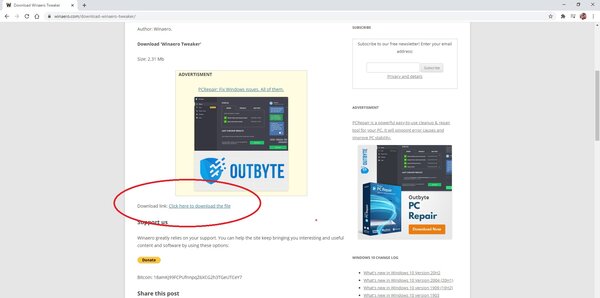
- перейдите на официальный сайт Winaero Tweaker;
- пролистайте вниз до ссылки Download Winaero Tweaker, кликните по ней;

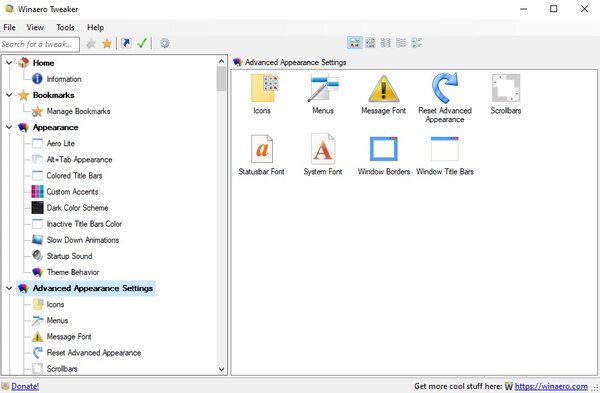
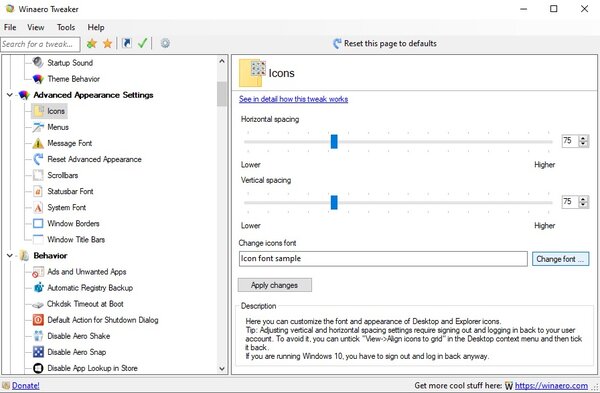
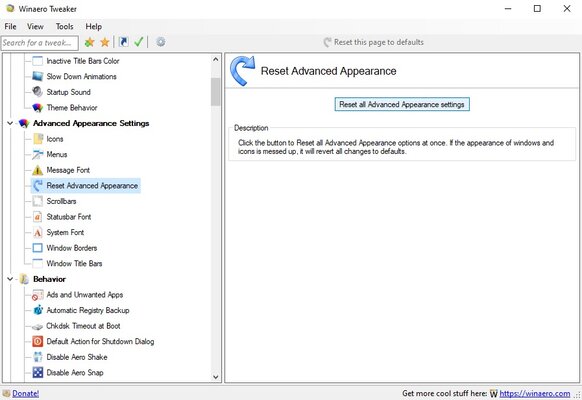
Пункт меню «Advanced Appearance Settings» позволяет настраивать шрифты отдельно для определённых элементов системы. То есть, пользователь может выбрать один шрифт для иконок, другой — для заголовков окон, а третий в качестве системного шрифта.
Список доступных для настройки элементов:
- Icons — подписи иконок;
- Menus — меню программ;
- Message Font — шрифт для сообщений программ;
- Statusbar Font — шрифт для строки состояния;
- System Font — системный шрифт (заменяет Segoe UI на любой другой);
- Window Title Bars — шрифт для заголовка окон.
В случае, если пользователь захочет отказаться от изменённых шрифтов, нужно лишь открыть меню «Advanced Appearance Settings», кликнуть по пункту «Reset Advanced Appearance» и в окне справа нажать на единственную кнопку «Reset Advanced Appearance settings». После этого нужно перезагрузить компьютер.
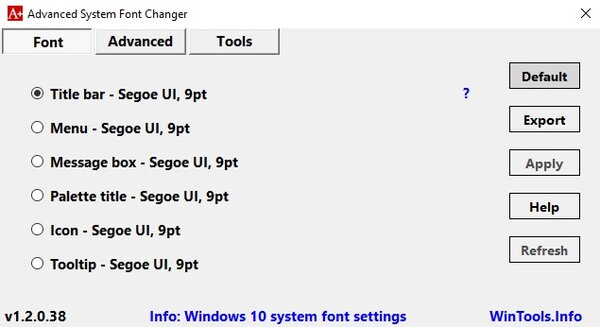
Изменение шрифта в Windows 10 с помощью программы Advanced System Font Changer
Если предыдущее приложение обладает целой россыпью функций для кастомизации операционной системы Windows 10, то программа Advanced System Font Changer создана специально для изменения системных шрифтов. Соответственно, интерфейс и сам процесс работы в данном случае немного проще.
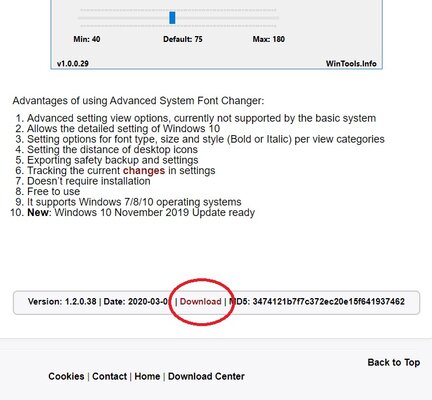
- скачайте программу Advanced System Font Changer с официального сайта разработчика;
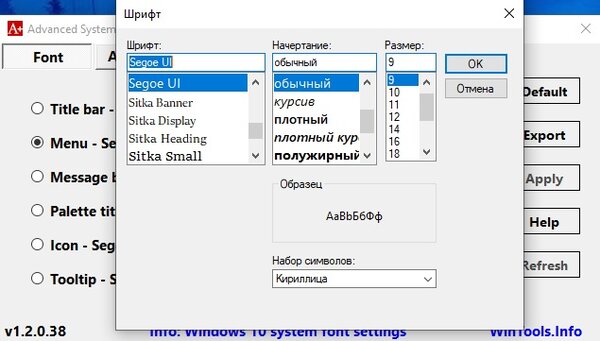
Список доступных для настройки элементов:
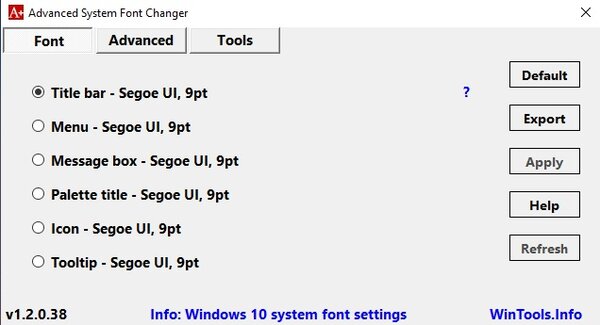
- Title bar — шрифт для заголовка окон;
- Menu — меню программ;
- Message box — шрифт для сообщений программ;
- Palette title — шрифт для заголовков панелей в окнах;
- Icon — подписи иконок;
- Tooltip — шрифт для строки состояния.
В случае, если пользователь захочет отказаться от изменённых шрифтов, ему нужно нажать на кнопку «Default» в правом верхнем углу приложения.
Восстановление до стандартных шрифтов
В случае, если после проделанных манипуляций пользователь захочет восстановить стандартный шрифт, нужно будет выполнить лишь несколько простых команд:
- откройте проводник;
- введите в адресную строку C:\Windows\Fonts;
- слева в меню кликните по пункту «Параметры шрифтов»;
How to change the default font in Windows 10
Are you looking to change the default font in your Windows 10 but seem to be stuck at how you can actually do it? That’s okay. We know how that feels. But we’ve also got a way out for you! Windows 10 has definitely made life easier by enhancing user experience but while doing this it has also limited the customizability of the OS. Where in earlier versions of Windows 10, you could change the default font using the Control Panel or Personalization settings, now you have to do it manually through the Windows registry. You can indeed use your favorite font in OS features like message boxes icons, title bars, etc. instead of using the default font Segoe UI, with a simple trick! Follow the guide to modify the registry to change the system font and spice up your dull and average-looking interface.
Steps to change the default font in Windows 10
So before you jump in and learn the art of spicing things up for your PC, just be cautious about messing things up when you’re modifying the registry. We suggest you create a system restore point that you can revert back to in case something goes wrong. Once you’ve done that, get started by following the steps below:
Step 1: Launch the Control Panel from the Start Menu.
Step 2: Click on the “Appearance and Personalization” option from the side menu.
Step 3: Click on “Fonts” to open fonts and select the name of the one you want to use as default.
Step 4: Now open the Notepad application and paste the following code into the empty text file:
Step 5: Be sure to replace the font name you want to change Segoe UI within the last line of the registry code
Step 6: Click on File on the top menu options and then save your file as a .reg file by using the extension option “All files”
Step 7: From wherever your file is saved, double-click on it to merge it with the registry by clicking Yes and OK
Step 8: Simply restart your computer to let the changes take effect
Wrapping it up
That was pretty simple, wasn’t it? Even though the chances were slim, if you faced any issues while making changes in the font registry in Windows 10, you can revert back to the system restore point you created in the start. But if you were able to successfully change the default font you’ll now be loving the new look your system just got. We really hope you were able to make the most out of this article. Let us know how it went for you in the comment box.


