- Use DISM to Check and Repair Windows 10 Image
- SFC /ScanNow: Using System File Checker to Scan and Repair System Files
- DISM /RestoreHealth: How to Repair Windows Image?
- Repair Windows Component Store with PowerShell
- Use DISM Offline Component Store Repair If Windows Won’t Boot
- DISM: проверка и восстановление системных компонентов образа Windows 10
- SFC /scannow: Проверка и восстановление системных файлов Windows
- DISM /RestoreHealth: Восстановление хранилища компонентов образа Windows
- Восстановление поврежденного хранилища компонентов Windows 10/Server 2016 с помощью PowerShell
- Восстановление хранилища компонентов оффлайн если Windows не загружается
Use DISM to Check and Repair Windows 10 Image
You can use the SFC (System File Checker) and DISM (Deployment Image Servicing and Management) commands to check and repair the integrity of system files and components of your Windows 10 image. These tools may be very useful if your Windows is unstable, errors appear when you trying to run apps or services, after a virus infection, etc. In this article, we will look on how to use the DISM and SFC tools to check and repair you Windows 10 image and system files.
SFC /ScanNow: Using System File Checker to Scan and Repair System Files
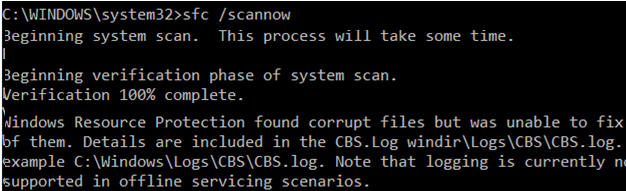
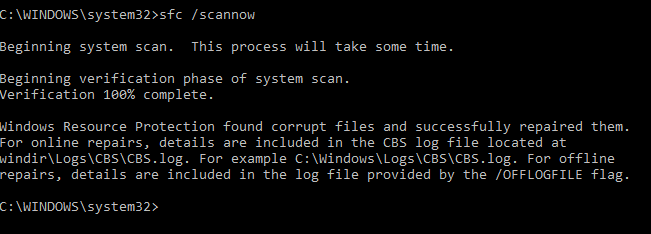
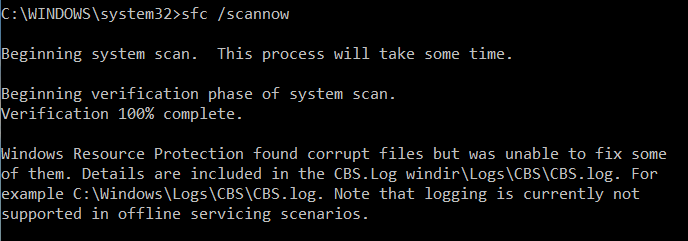
It is recommended to use DISM to restore Windows after you have checked the integrity of your system files using the SFC tool. The sfc /scannow command scans protected system files and if they are missing or corrupted it tries to restore their original copies from Windows system component store (C:\Windows\WinSxS folder).
If sfc /scannow command returns the error “ Windows Resource Protection found corrupt files but was unable to fix some of them “, it is likely that the tool could not get the necessary files from Windows component store (see the image below).
In this case you can try to repair the component store (your Windows image) using the DISM.exe command.
After the image repair, you can try using SFC to restore your system files.
DISM /RestoreHealth: How to Repair Windows Image?
To scan a Windows image for errors and fix them, the DISM /Cleanup-image parameter is used. The commands considered below are executed in the elevated command prompt (with the administrator privileges).
Run the following command to check if there are any flags of corruption of the Windows image component store (not applicable for Windows 7/Server 2008R2). This command checks the CBS flag set by one of the system processes.
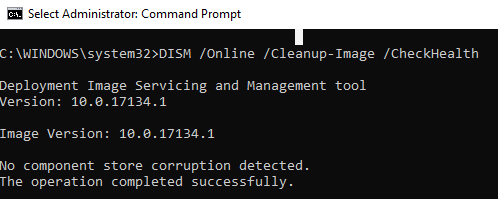
DISM /Online /Cleanup-Image /CheckHealth
When running this command, the component store scan is not performed. The command checks only the events previously written to the Windows logs. No changes are made. The command will check if the image is marked as corrupted and if it can be fixed.
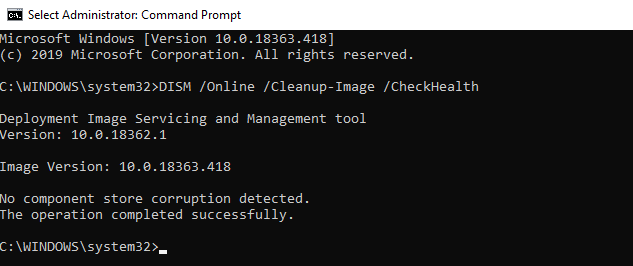
In this example, the command has returned that the Windows 10 image has no corruptions:
DISM /Online /Cleanup-Image /ScanHealth – perform a full scan of the Windows component store for corruptions (it takes quite a long time: 10-30 minutes).
In some cases the DISM /ScanHealth returns the following errors:
- The component store is repairable;
- DISM Error 1726 – “The remote procedure call failed”;
- DISM Error 1910 – “The object exporter specified was not found”.
It definitely means that your Windows 10 image is corrupted and needs to be repaired.
To fix these errors, automatically download and replace the files of corrupted or missing components with original file versions from Windows Update (your computer must have the direct Internet access), run this command:
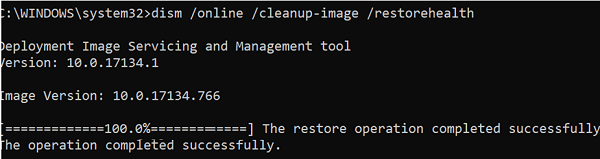
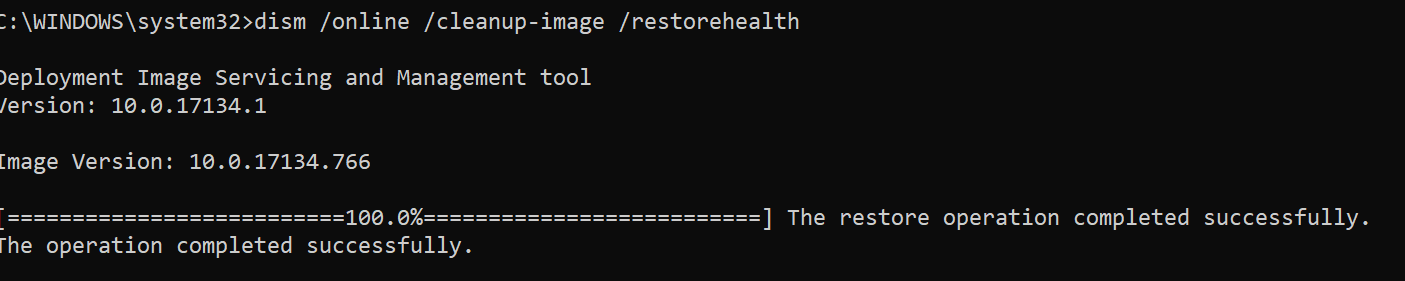
DISM /Online /Cleanup-Image /RestoreHealth
The process of scanning and repair of the components may take quite a long time (30 minutes or more).
If the repair has been successful, the following message will appear:
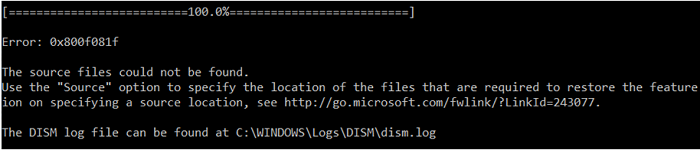
If your computer (server) has no direct Internet access (located behind a proxy, or have used internal WSUS to get security and build update) or Windows Update service is disabled, then the following errors appear when restoring the component store:
- 0x800f0906 – The source files could not be downloaded. Use the source option to specify the location of the files that are required to restore the feature;
- 0x800f0950 – DISM failed. No operation was performed;
- 0x800F081F – The source files could not be found. Use the “Source” option to specify the location of the files that are required to restore the feature.
You can specify a WIM or an ESD file with the original Windows installation image to be used as a source to restore the system component files. Suppose, you have mounted an installation Windows 10 ISO to the virtual drive E:. To repair the component store from the source image use one of these commands:
DISM /online /cleanup-image /restorehealth /source:E:\sources\install.wim
Or:
DISM /online /cleanup-image /restorehealth /source:E:\sources\install.esd
To prevent the use of Windows Update online services and use only the local WIM/ESD file to scan and repair your Windows image:
DISM /online /cleanup-image /restorehealth /source:E:\sources\install.wim /limitaccess
Or:
DISM /online /cleanup-image /restorehealth /source:E:\sources\install.esd /limitaccess
dism /online /cleanup-image /restorehealth /limitaccess
You can find the DISM log of scanning and repair of the system files here: C:\Windows\Logs\CBS.log .
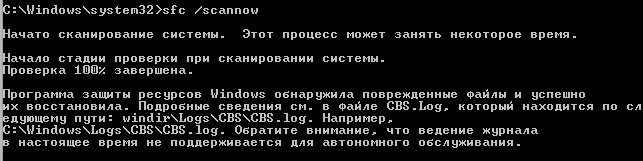
After the component store has been repaired, you can start the system file checker tool sfc /scannow . It is likely that it will be able to restore the corrupted files (Windows Resource Protection found corrupt files and successfully repaired them).
Repair Windows Component Store with PowerShell
The version of PowerShell for Windows 10 and Windows Server 2016/2019 has some cmdlets similar to the DISM commands discussed above. To scan the Windows component store and find any corruptions, run this command:
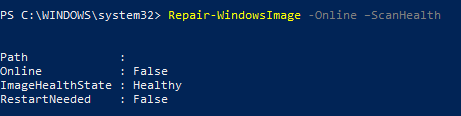
Repair-WindowsImage -Online –ScanHealth
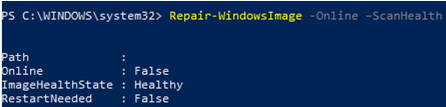
If there are no errors in the component store, the following message appears:
To repair system components and files, run:
Repair-WindowsImage -Online -RestoreHealth
Repair-WindowsImage -Online -RestoreHealth -Source F:\sources\install.wim:1
Where 1 is the index of your Windows edition from the WIM or ESD file (you can display the list of Windows editions in a WIM file as follows: Get-WindowsImage -ImagePath «F:\sources\install.wim» ).
Use DISM Offline Component Store Repair If Windows Won’t Boot
If Windows does not boot correctly, you can use DISM to check and repair system files of your Windows image offline.
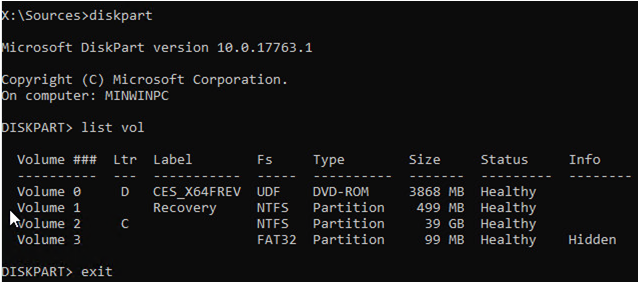
- To do it, boot from the installation (LiveCD/USB) disk and press Shift + F10 on the initial Windows install screen;
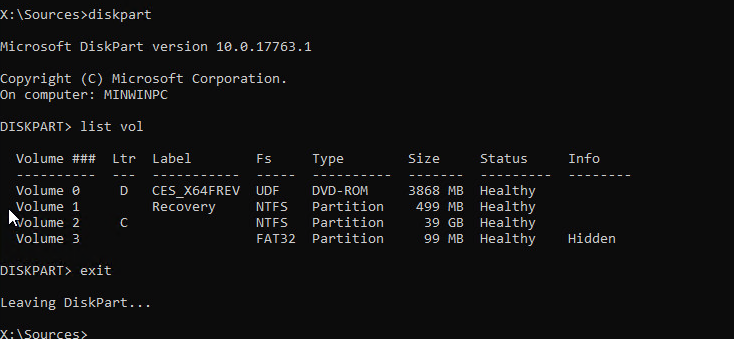
- To check the drive letters assigned in WinPE, run the command diskpart -> list vol (in my example, the letter C:\ is assigned to the disk, on which Windows is installed, and I will use it in the next commands);

- Check the system files and repair the corrupted ones with the command: sfc /scannow /offbootdir=C:\ /offwindir=C:\Windows
- To repair the offline WIndows component store, use the following command (I am using a WIM file with the Windows 10 installation image from which the computer is booted as a source to restore my offline Windows image):
Dism /image:C:\ /Cleanup-Image /RestoreHealth /Source:D:\sources\install.wim - If there is not enough free space on the target disk, you will need a separate drive, e. g., F:\, on which you will create an empty folder mkdir F:\scratch . Perform a repair of the component store using the scratch dir with the command: Dism /image:C:\ /Cleanup-Image /RestoreHealth /Source:D:\sources\install.wim /ScratchDir:F:\scratch


DISM: проверка и восстановление системных компонентов образа Windows 10
Для проверки целостности системных файлов и восстановления поврежденных файлов (библиотек) компонентов в Windows (Windows Server) можно использовать команды SFC и DISM (Deployment Image Servicing and Management). Данные утилиты могут быть крайне полезными, если операционная система Windows работает нестабильно, появляются ошибки при запуске стандартных приложений или служб, после вирусного заражения и т.д.
Утилита DISM включена в состав Windows, начиная с Vista и может быть использована во всех поддерживаемых версиях начиная с Windows 7/Windows Server 2008 R2 (есть ограничения) заканчивая последними билдами Windows 10 / Windows Server 2019. В этой статье мы рассмотрим, как использовать утилиты DISM и SFC для проверки и восстановления целостности образа и системных файлов Windows 10.
SFC /scannow: Проверка и восстановление системных файлов Windows
Утилиту DISM для восстановления Windows обычно рекомендуется использовать после утилиты проверки целостности системных файлов SFC (System File Checker). Команда sfc /scannow сканирует защищенные системные файлы Windows, и, если они отсутствуют или повреждены, попробует восстановить их оригинальные копии из хранилища системных компонентов Windows (каталог C:\Windows\WinSxS).
Если команда sfc /scannow возвращает ошибку “ Программа защиты ресурсов Windows обнаружила повреждённые файлы, но не может восстановить некоторые из них / Windows Resource Protection found corrupt files but was unable to fix some of them ”, скорее всего утилита не смогла получить необходимые файла из хранилища компонентов (образа) Windows.
В этом случае вам нужно попробовать восстановить хранилище компонентов (ваш образ Windows) с помощью DISM.
После восстановления образа вы можете повторно использовать утилиту SFC для восстановления системных файлов.
DISM /RestoreHealth: Восстановление хранилища компонентов образа Windows
Для сканирования образа Windows на наличие ошибок и их исправления используется параметр DISM /Cleanup-image . Рассмотренные ниже команды выполняются в командной строке, запущенной с правами администратора.
Чтобы проверить наличие признака повреждения хранилища компонентов образа Windows (флага CBS) , который выставил один из системных процессов, выполните следующую команду (не применимо к Windows 7/Server 2008R2):
DISM /Online /Cleanup-Image /CheckHealth
При запуске этой команды не выполняется сканирование хранилища, проверяются лишь записанные ранее значения и события в журнале Windows. Изменения не вносятся. Команда проверит, не помечен ли образ как поврежденный и возможно ли устранить данное повреждение.
В этом примере команда вернула, что с образом все хорошо:
No component store corruption detected.
The operation completed successfully.
DISM /Online /Cleanup-Image /ScanHealth – выполнить полное сканирование хранилища компонентов на наличие повреждений в системных образа Windows (выполняется довольно долго от 10 до 30 минут).
Если команда /ScanHealth возвращает ошибки:
- Хранилище компонентов подлежит восстановлению (The component sore is repairable);
- Ошибка: 1726. Сбой при удалённом вызове процедуры;
- Ошибка: 1910. Не найден указанный источник экспорта объекта.
Это однозначно говорит о том, что ваш образ Windows 10 поврежден и его нужно восстановить.
Чтобы исправить ошибки, автоматически скачать и заменить файлы повреждённых или отсутствующих компонентов эталонными версиями файлов (библиотек) из центра обновлений Windows (на компьютере должен быть доступ в Интернет), выполните:
DISM /Online /Cleanup-Image /RestoreHealth
Процесс сканирования и восстановления компонентов может быть довольно длительным (30 минут или более).
Если восстановление выполнится успешно, появится сообщение:
Восстановление выполнено успешно. Операция успешно завершена.
The restore operation completed successfully. The operation completed successfully.
Если на компьютере (сервере) отсутствует доступ в Интернет или отключена служба Windows Update, то при восстановлении хранилища компонентов появляются ошибки вида:
- 0x800f0906 — Не удалось скачать исходные файлы. Укажите расположение файлов, необходимых для восстановления компонента, с помощью параметра Источник (0x800f0906 — The source files could not be downloaded. Use the source option to specify the location of the files that are required to restore the feature);
- Ошибка: 0x800f0950 — Сбой DISM. Операция не выполнена (0x800f0950 — DISM failed. No operation was performed);
- Ошибка: 0x800F081F. Не удалось найти исходные файлы. Укажите расположение файлов, необходимых для восстановления компонента, с помощью параметра Источник (Error 0x800f081f, The source files could not be found. Use the «Source» option to specify the location of the files that are required to restore the feature).

Вы можете указать WIM или ESD файл с оригинальным установочным образом Windows, который нужно использовать в качестве источника для восстановления файлов компонентов системы. Предположим, вы смонтировали установочный ISO образ Windows 10 в виртуальный привод E:. Для восстановления хранилища компонентов из образа используйте одну из команд:
DISM /online /cleanup-image /restorehealth /source:E:\sources\install.wim
Или:
DISM /online /cleanup-image /restorehealth /source:E:\sources\install.esd
Чтобы запретить использовать центр обновлений Windows в Интернете, и выполнять сканирование и восстановление образа Windows только из локального WIM/ESD файла:
DISM /online /cleanup-image /restorehealth /source:E:\sources\install.wim /limitaccess
Или:
DISM /online /cleanup-image /restorehealth /source:E:\sources\install.esd /limitaccess
dism /online /cleanup-image /restorehealth /limitaccess
Журнал сканирования и восстановления системных файлов утилиты DISM можно найти здесь: C:\Windows\Logs\CBS.log .
После восстановления хранилища компонентов вы можете запустить утилиту проверки системных файлов sfc /scannow . Скорее всего она успешно восстановит поврежденные файлы (Программа защиты ресурсов Windows обнаружила поврежденные файлы и успешно их восстановила).
Восстановление поврежденного хранилища компонентов Windows 10/Server 2016 с помощью PowerShell
В версии PowerShell в Windows 10 и Windows Server 2016/2019 есть аналоги рассмотренных выше команд DISM. Для сканирования хранилища компонентов и поиска повреждений в образе выполните:
Repair-WindowsImage -Online –ScanHealth
Если ошибок в хранилище компонентов не обнаружено, появится сообщение:
ImageHealth State: Healthy
Для запуска восстановления системных компонентов и файлов наберите:
Repair-WindowsImage -Online -RestoreHealth
Repair-WindowsImage -Online -RestoreHealth -Source E:\sources\install.wim:1
Где, 1 – индекс используемой у вас редакции Windows из WIM или ESD файла (список редакций Windows в WIM файле можно вывести так: Get-WindowsImage -ImagePath «E:\sources\install.wim» ).
Восстановление хранилища компонентов оффлайн если Windows не загружается
Если Windows не загружается корректно, вы можете выполнить проверку и исправление системных файлов в оффлайн режиме.
- Для этого загрузитесь с установочного (загрузочного диска) и на экране начала установки нажмите Shift + F10
- Чтобы разобраться с буквами дисков, назначенных в среде WinPE, выполните команду diskpart -> list vol (в моем примере диску, на котором установлена Windows присвоена буква C:\, эту букву я буду использовать в следующих командах);
- Проверим системные файлы и исправим поврежденные файлы командой: sfc /scannow /offbootdir=C:\ /offwindir=C:\Windows
- Для исправления хранилища компонентов используйте следующую команду (в качестве источника для восстановления компонентов мы используем WIM файл с установочным образом Windows 10, с которого мы загрузили компьютер):
Dism /image:C:\ /Cleanup-Image /RestoreHealth /Source:D:\sources\install.wim - Если на целевом диске недостаточно места, то для извлечения временных файлов нам понадобится отдельный диск достаточного размера, например F:\, на котором нужно создать пустой каталог: mkdir f:\scratch и запустить восстановление хранилища компонентов командой:
Dism /image:C:\ /Cleanup-Image /RestoreHealth /Source:D:\sources\install.wim /ScratchDir:F:\scratch