- 6 Ways to Check Hard Disk Health on Windows 10
- 1. Check the BIOS
- 2. Optimize and Defrag in Windows 10
- 3. Use The HDD Manufacturer’s Tools
- 4. Windows CHKDSK Tool
- 5. Use WMIC
- 6. Use a Third-Party Hard Disk Health Checking Tool
- CrystalDiskInfo
- Выполнение диагностики жесткого диска в Windows 10
- Выполняем диагностику жесткого диска в Windows 10
- Способ 1: Специальное программное обеспечение
- Способ 2: Системные средства Windows
6 Ways to Check Hard Disk Health on Windows 10

Your hard drive is the soul of your PC, the place where all your most important data is stored. While most PC components can be replaced, the invaluable data on your hard drive can’t if you haven’t created a backup. For this reason, ensuring your hard drive stays healthy is crucial. (Anyone get the dull hard drive-related pun?)
There are various ways to check on your hard drive health – from built-in methods in Windows to your HDD manufacturer’s diagnostic tools, and we talk you through the best methods.
1. Check the BIOS
So long as you’re using a relatively modern motherboard, you can run hard drive checks in the BIOS, free from any OS-based interference.
Reboot your PC, and after it’s switched off and on again repeatedly, press Delete , F2 , F12 , or whichever button the boot screen tells you will take you to your BIOS.
Once in the BIOS, the exact instructions will depend on your motherboard manufacturer. On my MSI Mortar WiFi B550M, in the BIOS, I can go to “Settings -> Advanced -> NVME self-test” to test the health of my NVMe drives.

While you’re in the BIOS, it’s also a good place to see whether the hard drive you want to check on is actually being detected by your PC/motherboard.
On Dell and HP laptops, you should be able to check hard drive health by going to the BIOS and looking for “Diagnostics.”
2. Optimize and Defrag in Windows 10
Traditional SATA hard drives may have largely made way for much faster solid-state drives, but they’re still very popular and remain an affordable way to store things like pictures, videos and other non-strenuous file types. SSDs work a little differently, and while they never need defragmentation (because fragmentation relates to where the data is physically stored on the drive, which isn’t a factor on SSD) they do sometimes need optimizing.

If you feel like your non-SSD hard drive is slowing down, then you should check to see how fragmented it is. You can do this using Windows 10’s built-in defrag tool (type “defrag” into the Start menu, then go to “Defragment and Optimize Drives”), then selecting the drive and clicking “Analyze.” If fragmentation gets detected, click “Optimize” (formerly called “Defrag”) for that drive.
We actually found that the free app Defraggler does a better job of detecting and reducing fragmentation, but not everyone wants to install extra apps when the functionality is built right into the OS.
You can also optimize your SSD on the Windows 10 defrag and optimize tool, though Windows 10 should be taking care of the process automatically.
3. Use The HDD Manufacturer’s Tools
Most major hard drive manufacturers provide free robust tools to monitor your hard drive health and performance. The first step to knowing which one to use is, of course, knowing the make of your hard drive.

If you know the make of your hard drive, you can skip this part. If you don’t, press the Win key, type “device manager,” and click when it appears in the search results.
In Device Manager, unstack the “Disk drives” option and make a note of the model number of your hard drive. Next, type the model number into Google to bring up results that will show you the make of the hard drive.

After that, go to the manufacturer’s support page and search for its hard drive utility. To help you out, here are links to the relevant download pages of some of the biggest hard drive brands:
Each of these tools functions a little differently, but most importantly, each one has diagnostic features that let you test your hard drive health.
4. Windows CHKDSK Tool
Windows CHKDSK Tool is a built-in Windows tool that will scan your disk to find system errors and bad sectors and show if there are any problems with your hard disk. It will both scan and fix problems it can fix and will let you know if there is a bigger problem that it can’t fix. You can use this tool to both check hard disk health and fix bad sectors and errors if possible.
To use CHKDSK, right-click on the drive you would like to check for errors, select “Properties,” click on the “Tools” tab, then click on the “Check now” button.


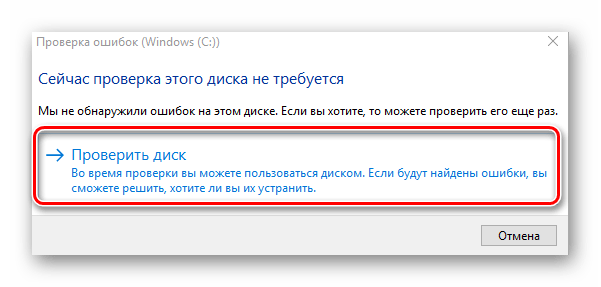
A dialog will open with two options to fix errors and scan for bad sectors. You can select these options if you want to fix errors and bad sectors; otherwise, you can just click on “Start” to get a basic report of hard disk problems (if there are any).

This tool is very basic and focuses on finding system errors and bad sectors. It will only let you know if there are any big problems and nothing more, so only use it as a basic hard disk checking and fixing tool.
5. Use WMIC
WMIC is a command-line interface that lets you perform many administrative tasks, including checking hard disk health. It uses the S.M.A.R.T (Self-Monitoring, Analysis and Reporting Technology) feature of hard disks to see status and provide a simple conclusion, like “OK,” “Pred Fail,” etc. It is still a very basic command that offers very little information but is quick and a built-in feature of Windows.
To check a hard disk with WMIC, press the Win + R buttons to open the Run dialog. Type cmd and click “OK” to open the Windows command prompt.

and hit Enter. When the WMI interface is ready, type:
and press Enter again. You will see the status of your hard disk after a short delay.

6. Use a Third-Party Hard Disk Health Checking Tool
You can also use a third-party hard disk health checking tool that will offer much more information than just good or bad status. These tools use the same “S.M.A.R.T” feature of hard disks to fetch data, just like WMIC. However, they provide all the details to you instead of just showing good or bad status.
CrystalDiskInfo
For this purpose, CrystalDiskInfo is a really simple, yet powerful, tool. It is a free-to-use tool that is extremely light and offers all the required information, such as temperature, health status, hard disk type and features, and other attributes, like read/write error rate, spin-up time, etc.
The standard tool comes as a 4 MB .exe file, and its installer contains ads, so make sure you use the “Custom Installer” option and uncheck the side tool (ad). Once installed, all you need to do is launch the program, and you will see all the information about your hard disk(s) in the main interface. The tool will also check the hard disk health after every 10 minutes (by default) and alert you if there is anything wrong.

There are also other third-party hard disk health-checking tools like Hard Disk Sentinel and HDDScan. These are much more advanced with loads of extra features, but for an average user, CrystalDiskInfo should work perfectly.
You can use the above-mentioned tools to check hard disk health in your Windows PC. If you don’t need extra details, then the Windows built-in tools should work great. If you’re having trouble with Windows 10 updates, then read our list of the latest Windows 10 update problems and how to fix them. We also have a handy guide for checking CPU temperatures in Windows 10.
Выполнение диагностики жесткого диска в Windows 10

Осуществление диагностики жесткого диска требуется для того, чтобы узнать детальную информацию о его состоянии или найти и исправить возможные ошибки. В операционной системе Windows 10 предусмотрено несколько системных инструментов по проведению этой процедуры. Кроме этого разработано разное стороннее программное обеспечение, позволяющее проверить качество функционирования HDD. Далее мы детально разберем данную тему.
Выполняем диагностику жесткого диска в Windows 10
Некоторые пользователи задались вопросом о проверке рассматриваемого комплектующего из-за того, что оно начало издавать характерные звуки, например, щелчки. При возникновении подобной ситуации мы рекомендуем обратиться к другой нашей статье по ссылке ниже, где вы узнаете основные причины и решения этой проблемы. Мы же переходим непосредственно к методам анализа.
Способ 1: Специальное программное обеспечение
Детальную проверку и исправление ошибок винчестера проще всего осуществить с помощью специального стороннего программного обеспечения. Одним из представителей такого софта является CrystalDiskInfo.
- После скачивания установите и запустите софт. В главном окне вы сразу увидите информацию об общем техническом состоянии HDD и его температуру. Ниже находится раздел со всеми атрибутами, где отображаются данные всех критериев диска.
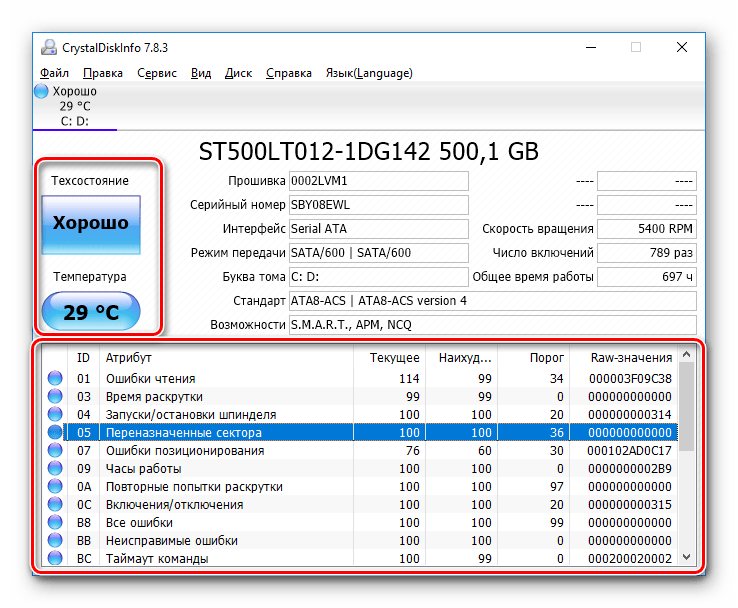
Переключаться между всеми физическими накопителями вы можете через всплывающее меню «Диск».

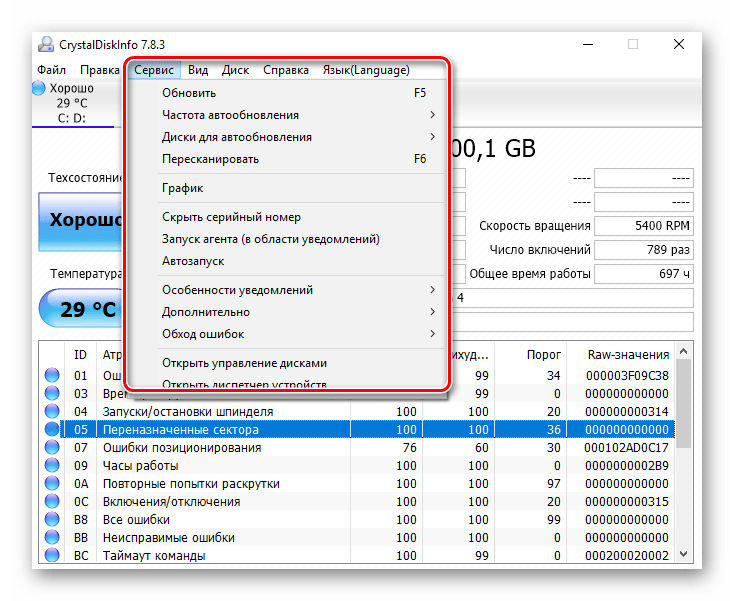
Во вкладке «Сервис» доступно обновление информации, отображение дополнительных графиков и расширенные инструменты.
Возможности CrystalDiskInfo огромные, поэтому мы предлагаем ознакомиться со всеми ними в другом нашем материале по следующей ссылке.
На просторах интернета присутствует и другое ПО, разработанное специально для проверки HDD. В нашей статье по ссылке ниже рассказано о лучших представителях подобного софта.
Способ 2: Системные средства Windows
Как уже было сказано в начале статьи, в Виндовс есть встроенные инструменты, позволяющие выполнить поставленную задачу. Каждый из них работает по разным алгоритмам, однако проводит примерно одинаковую диагностику. Разберем каждое средство по отдельности.
Проверка на наличие ошибок
В меню свойств логических разделов жесткого диска имеется функция для поиска и исправления проблем. Запускается она следующим образом:
- Перейдите в «Этот компьютер», кликните правой кнопкой мыши на необходимом разделе и выберите пункт «Свойства».
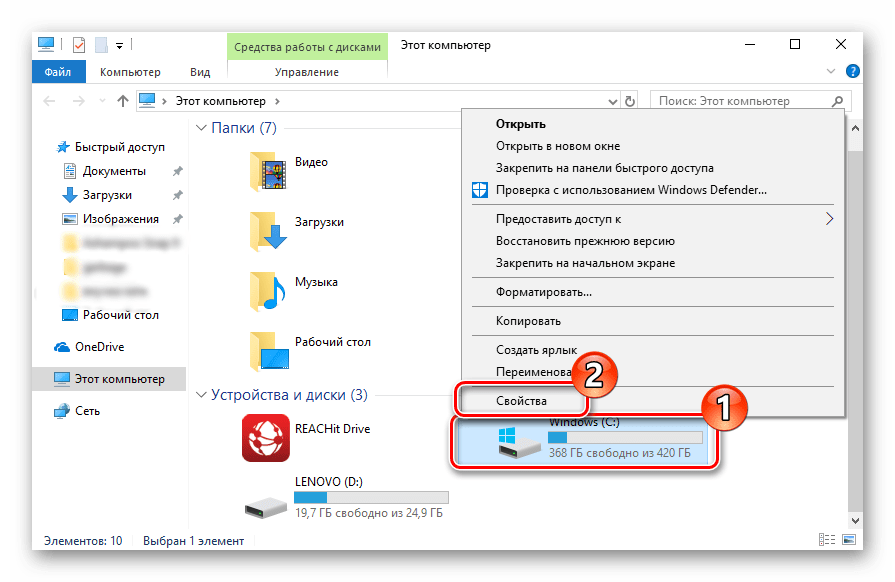
Переместитесь во вкладку «Сервис». Здесь находится инструмент «Проверка на наличие ошибок». Он позволяет найти и исправить неполадки файловой системы. Нажмите на соответствующую кнопку, чтобы произвести запуск.

Иногда такой анализ выполняется автоматически, поэтому вы можете получить уведомление о ненадобности проведения сканирования на данный момент. Нажмите на «Проверить диск» для повторного старта анализа.
Во время сканирования лучше не осуществлять каких-либо других действий и дождаться завершения. Его состояние отслеживается в специальном окне.
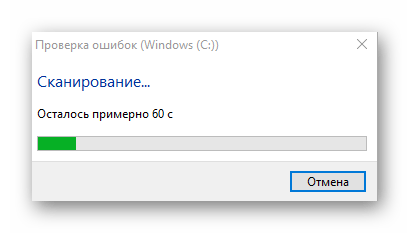
После окончания процедуры найденные проблемы файловой системы будут исправлены, а работа логического раздела оптимизирована.
Check Disk
Сканирование носителей с файловой системой FAT32 или NTFS доступна с помощью утилиты Check Disk, а запускается она через «Командную строку». Она не только проводит диагностику выбранного тома, но и восстанавливает битые секторы и информацию, главное задать соответствующие атрибуты. Пример оптимального сканирования выглядит так:
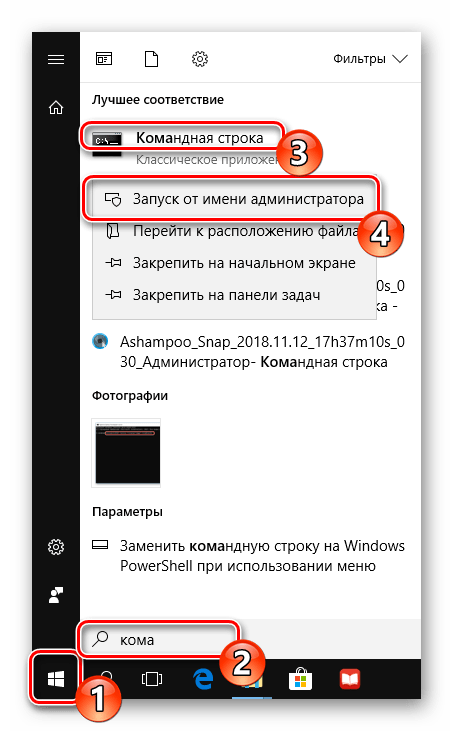
- Через меню «Пуск» отыщите «Командную строку», кликните на ней ПКМ и запустите от имени администратора.
Напечатайте команду chkdsk C: /F /R , где С: – раздел HDD, /F – автоматическое решение проблем, /R – проверка битых секторов и восстановление поврежденной информации. После ввода нажмите на клавишу Enter.
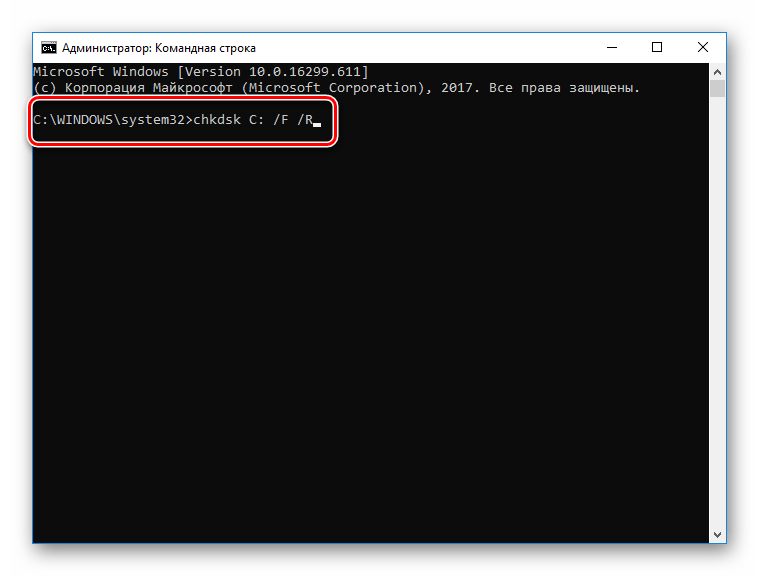
Если вы получили уведомление, что раздел задействуется другим процессом, подтвердите его начало при следующем перезапуске компьютера и выполните его.

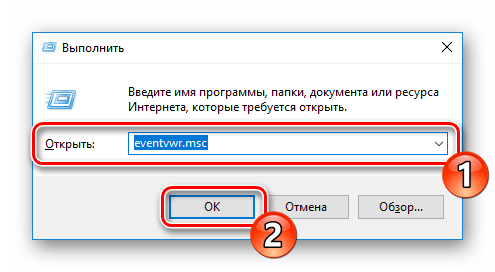
Результаты анализа помещаются в отдельный файл, где их можно подробно изучить. Его нахождение и открытие выполняется через журнал событий. Сначала откройте «Выполнить» комбинацией клавиш Win + R, там напишите eventvwr.msc и кликните на «ОК».
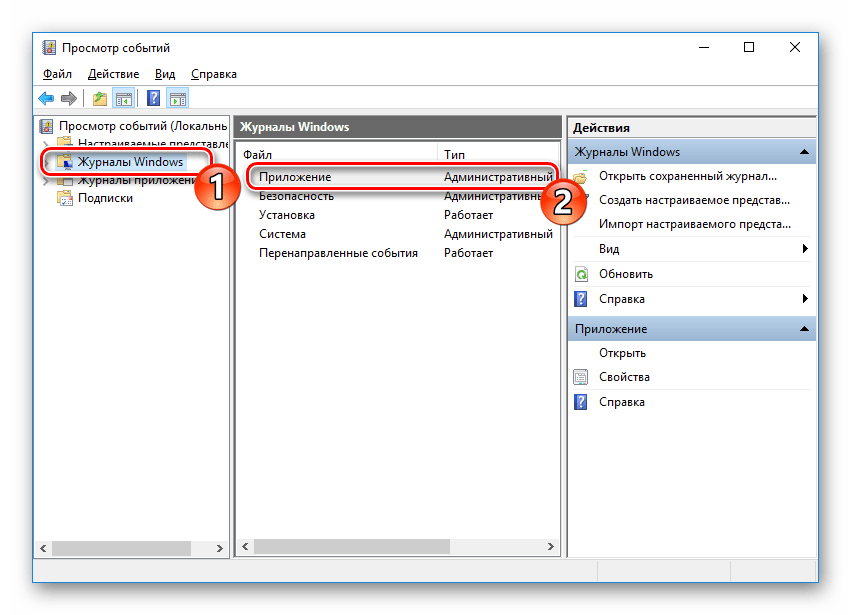
В директории «Журналы Windows» перейдите в раздел «Приложение».
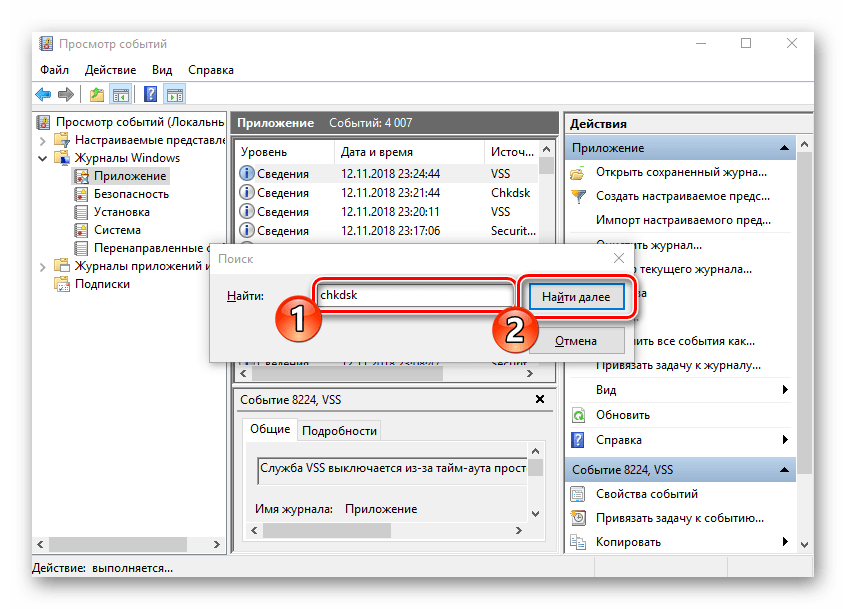
Нажмите на нем ПКМ и выберите «Найти».

В поле введите chkdsk и укажите «Найти далее».
Запустите найденное приложение.
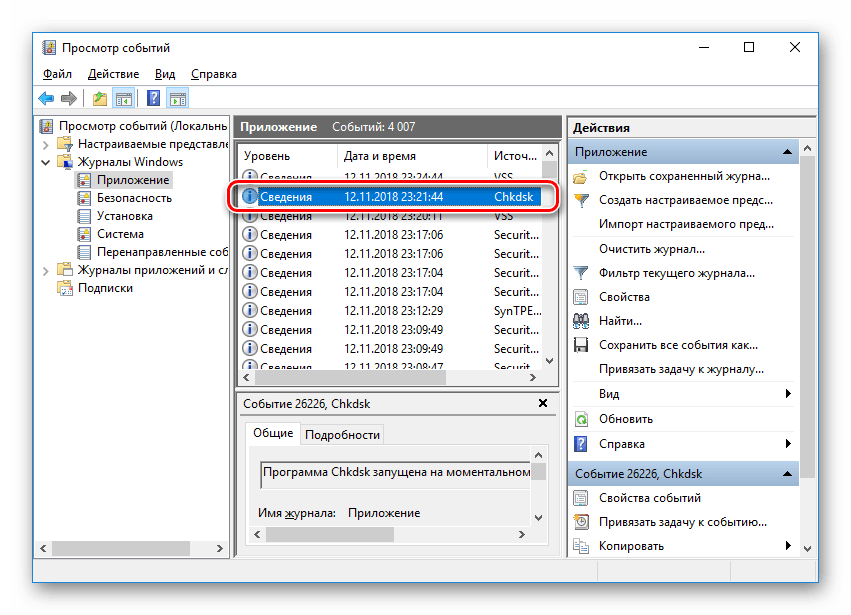
В открывшемся окне вы можете детально изучить все подробности диагностики.

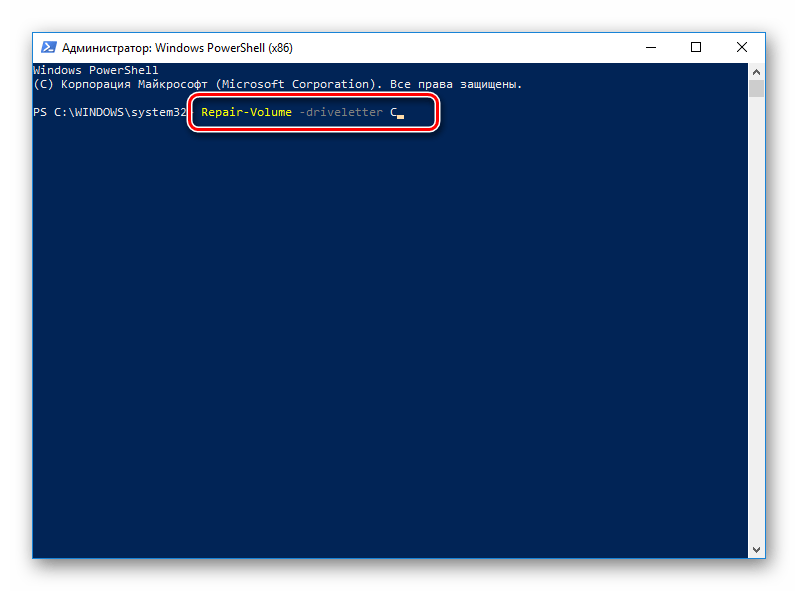
Repair-Volume
Управление определенными процессами и системными операциями удобнее всего осуществлять через PowerShell – оболочку «Командной строки». В ней присутствует утилита для анализа HDD, а запускается она за несколько действий:
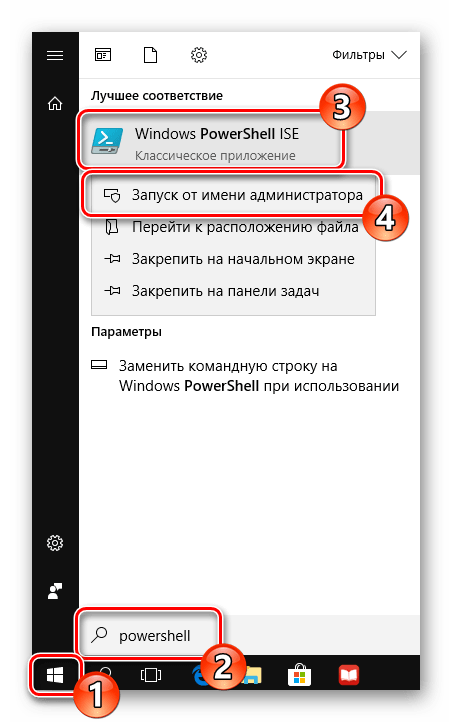
- Откройте «Пуск», через поле поиска найдите «PowerShell» и запустите приложение от имени администратора.
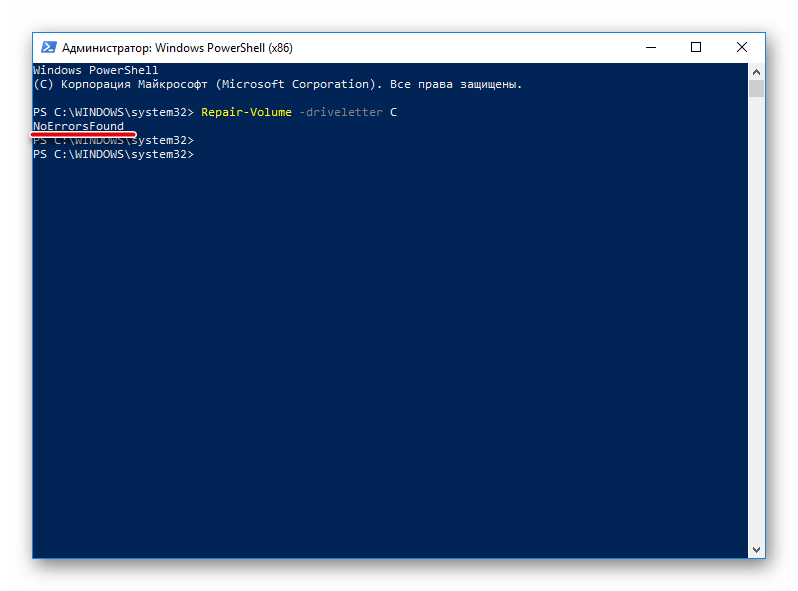
Впишите команду Repair-Volume -driveLetter C , где C – имя необходимого тома, и активируйте ее.
Найденные ошибки будут по возможности исправлены, а в случае их отсутствия вы увидите надпись «NoErrorsFound».
На этом наша статья подходит к логическому завершению. Выше мы рассказали об основных методах диагностики жесткого диска. Как видите, существует их достаточное количество, что позволит провести максимально детальное сканирование и выявить все возникшие ошибки.


