- Ubuntu Documentation
- Introduction
- Prerequisites
- Setting up
- Installation
- Checking a drive for SMART Capability
- Enabling SMART
- Testing a Drive
- Results
- Suggested application: GSmartControl
- Advanced: Running as Smartmontools as a Daemon
- Actions in case of trouble
- Personal computer
- Server
- Testing
- Utility: Checking all disks at once
- Testing drives behind MegaRAID
- Examples of SMART reports
- Узнаём данные S.M.A.R.T. в Linux. Контроль состояния HDD или SSD
- S.M.A.R.T.
- Contents
- Smartmontools
- smartctl
- Run a test
- View test results
- Generate table with attributes of all disks
- smartd
- daemon management
- Define the devices to monitor
- Notifying potential problems
- Power management
- Schedule self-tests
- Alert on temperature changes
- Complete smartd.conf example
- Console applications
Ubuntu Documentation
Introduction
Smartmontools is a set of applications that can test hard drives and read their hardware SMART statistics. Note: SMART data may not accurately predict future drive failure, however abnormal error rates may be an indication of possible hardware failure or data inconsistency.
This how to will help you to configure Smartmontools to do actions such as shut down the computer or send an e-mail when the disk is going to fail.
Prerequisites
- A modern S.M.A.R.T. capable hard disk
Setting up
Installation
You can install the smartmontools package from the Synaptic Package Manager (see SynapticHowto), or by typing the following into the terminal:
Checking a drive for SMART Capability
To ensure that your drive supports SMART, type:
where /dev/sda is your hard drive. This will give you brief information about your drive. The last two lines may look something like this:
Enabling SMART
In the case that SMART is not enabled for your drive, you can enable it by typing:
Testing a Drive
You may run any type of test while the drive is mounted although there may be some drop in performance. There are three types of test that can be conducted on a drive:
- Short
- Extended (Long)
- Conveyance
To find an estimate of the time it takes to conduct each test, type:
The most useful test is the extended test (long). You can initiate the test by typing:
Results
You can view a drive’s test statistics by typing:
To display detailed SMART information for an IDE drive, type:
To display detailed SMART information for a SATA drive, type:
Note: This also works for IDE drives in new kernels that are being run through the SCSI stack and show up as /dev/sdX
Suggested application: GSmartControl
Take a look at GSmartControl. It’s a nice graphical frontend to smartctl; it shows all SMART values, and highlights those that indicate old age or impending failure, plus you may run tests on demand:


As usual, you may install it from Synaptic or running sudo apt-get install gsmartcontrol.
Advanced: Running as Smartmontools as a Daemon
You can run Smartmontools in the background and have it check drives and email when there are issues:
Open the file /etc/default/smartmontools with your favourite text editor. For example (using vim): sudo vim /etc/default/smartmontools. Uncomment the line start_smartd=yes.
How smartd is going to scan the disks and what it will do in case of errors is controlled by the daemon configuration file, /etc/smartd.conf. Again, use your favourite text editor to open this file. There should be one uncommented line, similar to:
In this example (which is the default for Karmic), smartd will:
scan for all ATA/SCSI devices (DEVICESCAN). The rest of the file will be ignored;
mail a report to the ‘root’ account in case of trouble (-m);
but instead of the mail command, it will execute /usr/share/smartmontools/smartd-runner and feed the report to it (-M exec program).
/usr/share/smartmontools/smartd-runner is a script that basically saves the report to a temporary file, and then runs anything it finds in /etc/smartmontools/run.d/; take a look there to understand what you already have (there should be a script that mails the report).
There are several -M directives that change when and how often reports are sent. You need to specify (-m something) in order to use them, even if you’re not sending any mail.
You may include some useful options:
In this example, smartd will:
check the SMART health status (-H);
report increases in both SMART error logs (-l);
check for failure of any Usage Attributes (-f);
schedule an Offline Immediate Test every Friday at 11 am, a Long Self-Test every Friday at 1 pm, and a Conveyance Self-Test every Friday at 3 pm (-s) — see the smartd manual page for what these tests do so you can choose what suits you.
You may also replace DEVICESCAN with the path of the device which you’d like to be monitored (e.g. /dev/sda), and the daemon will only monitor this drive. You’ll need one such line for each device.
Actions in case of trouble
You’ll want to configure the actions smartd will take in case of trouble. If all you want is a notification shown on your desktop, skip to «Personal computer» below.
Most of the time, you only need to place a script in /etc/smartmontools/run.d/. Whenever smartd wants to send a report, it will execute smart-runner and the latter will run your script.
You have several variables available to your script (again, see the smartd manpage). These come from a test run:
Your script also has a temporary copy of the report available as «$1». It will be deleted after you finish but the same content is written to /var/log/syslog.
Personal computer
For a visual notification, you may just install smart-notifier. You will see a large popup with the report:

Alternatively, you may create a custom notification (bubble) as seen in other GNOME programs.
You will need to install the libnotify-bin package:
Now create a text file called 60notify in /etc/smartmontools/run.d:
and add the following to the file:
(The DISPLAY=:0.0 part is a variable assignment that helps programs to locate your X server. It’s already set for your terminal, but the script lacks it since it is being run inside a different session).
Now give it execute permissions:
This will produce a nice libnotify bubble with a warning icon:

You may also experiment with Zenity:
Notice: Be very careful with these scripts as they are run under the root account.
Server
Here, you may wish to handle things differently. In this example we want to mail an admin and shut down the server. Comment out the line that contains DEVICESCAN, by adding # to the beginning of the line. Then, add this to the end of the file:
(Be sure not to add any whitespace after the «\»)
Now, we are going to make the script which is going to shut down the computer *after* we mail the admin. Create a text file called 99shutdown in /etc/smartmontools/run.d and add the following to the file:
The number 99 at the start of the filename is to ensure that it is called last when smartd-runner runs. It will wait 40 seconds and then shut down the computer. Of course, you may customize this at will; you may not wish to turn off the server.
Now, it is time to start the daemon:
Testing
If you want to test all these actions, add -M test after exec /usr/share/smartmontools/smartd-runner and restart the daemon (sudo service smartmontools restart). When the daemon comes up, it will execute the script immediately with a test message. Notice: If you included the shutdown -h line, the script will shut down the computer as soon as the service starts. To fix this, you will have to start the computer in recovery mode and remove the -M test option from /etc/smartd.conf.
Before running this, be sure to check that you have a «mail» command, and do a test first to your address. On my default Fiesty:
The program ‘mail’ can be found in the following packages:
- mailx
- mailutils
Try: sudo apt-get install
Make sure you have the ‘universe’ component enabled
bash: mail: command not found
Utility: Checking all disks at once
Note: Following the Gentoo Wiki I made a modified script which checks all the disk in /dev/disk/by-id/ Just invoke the script below as follows:
The script creates a directory named smart-logs and stores all the files there.
(Remember to give execute permissions to the script with chmod +x smart.sh).
Testing drives behind MegaRAID
If /dev/sda is a MegaRAID device then straightforward execution of smartctl on it is not effective. It just returns an empty report for the controller itself. To get S.M.A.R.T. attributes of a drive behind the RAID controller you need to use the following command:
Examples of SMART reports
See large collection of smartctl reports for various hard drives here.
Smartmontools (последним исправлял пользователь linuxhw 2019-12-24 11:07:49)
The material on this wiki is available under a free license, see Copyright / License for details
You can contribute to this wiki, see Wiki Guide for details
Источник
Узнаём данные S.M.A.R.T. в Linux. Контроль состояния HDD или SSD
Дата добавления: 07 июля 2012

S.M.A.R.T. (Self-Monitoring, Analisys and Reporting Technology) — это технология, предоставляющая пользователю различные данные о текущем состоянии жесткого диска или твердотельного накопителя. Анализируя данные S.M.A.R.T., пользователь может оценить состояние своих накопителей и решить, требуют ли они замены или ещё смогут работать долго и без сбоев.
Консольный способ: smartmontools
Узнать данные S.M.A.R.T. в чистом виде нам поможет утилита под названием smartmontools .
Приведем пример установки для дистрибутивов на основе Debian:
Количество атрибутов может отличаться в зависимости от модели диска.
В этой таблице нам нужно смотреть на значение поля RAW_VALUE для нужного атрибута. Именно оно показывает текущее значение атрибута.
Наиболее важные показатели:
Raw_Read_Error_Rate — количество ошибок чтения. Ненулевое значение должно сильно насторожить, а большие значение и вовсе говорят о скором выходе диска из строя. Известно, что на дисках Seagate, Samsung (семейства F1 и более новые) и Fujitsu 2,5? большое значение в этом поле является нормальным. Для остальных же дисков в идеале значение должно быть равно нулю;
Spin_Up_Time — время раскрутки диска. Измеряется в миллисекундах т.е. в моём случае это 1.3 секунды. Чем меньше — тем лучше. Большие значения говорят о низкой отзывчивости;
Start_Stop_Count — количество циклом запуска/остановки шпинделя;
Reallocated_Sector_Ct — количество перераспределённых секторов. Большое значение говорит о большом количестве ошибок диска;
Seek_Error_Rate — количество ошибок позиционирования. Большое значение говорит о плохом состоянии диска;
Power_On_Hours — количество наработанных часов во включённом состоянии. По нему можно узнать сколько проработал диск во включённом состоянии. Довольно полезно, например, если покупать ноутбук с витрины и хочется узнать долго ли он там стоял;
Power_Cycle_Count — количество включений/выключений диска;
Spin_Retry_Count — количество попыток повторной раскрутки. Большое значение говорит о плохом состоянии диска;
Temperature_Celsius — температура диска в градусах Цельсия. При слишком высокой температуре диски могут быстрее выйти из строя;
Reallocated_Event_Count — количество операций перераспределения секторов;
Offline_Uncorrectable — количество неисправных секторов. Большое значение говорит о повреждённой поверхности.
Более наглядный графический способ: gnome-disk-utility
В графическом варианте и с описанием атрибутов, данные SMART представляет программа gnome-disk-utility . В русской локализации в меню она называется как «дисковая утилита». В английской локализации известна как «Disks».
Пример установки для дистрибутивов на основе Debian:
Запускаем программу. 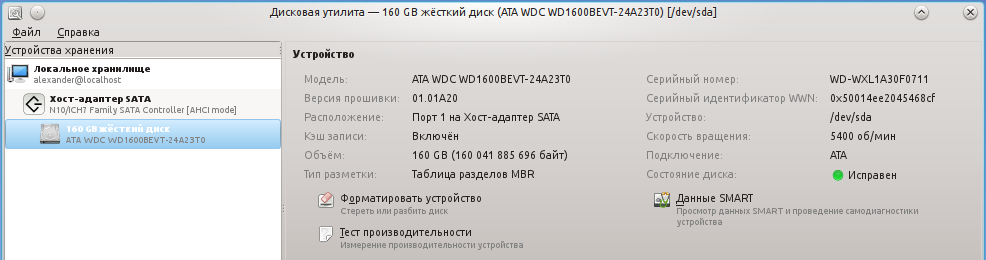
В поле «состояние диска» уже можно увидеть оценку состояния диска на основе данных S.M.A.R.T. Чтобы увидеть значение конкретных атрибутов нажимаем на кнопку «Данные SMART»: 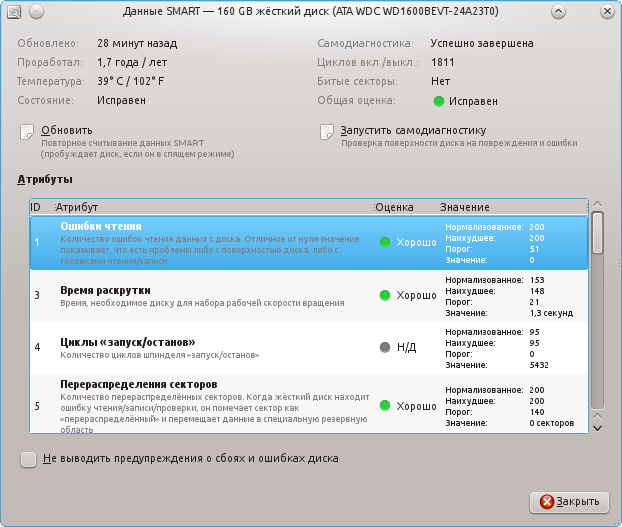
Пример данных о SSD (Твёрдотельном накопителе): 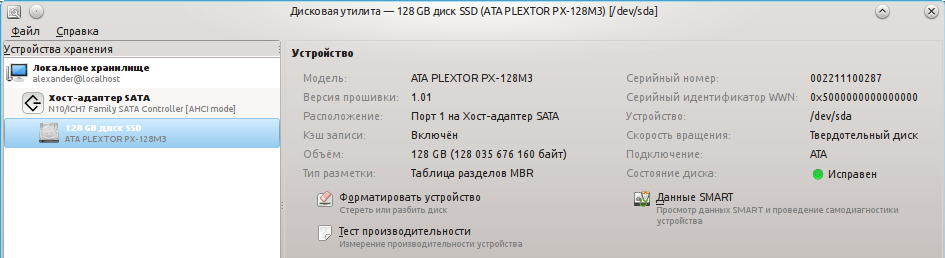
S.M.A.R.T.: 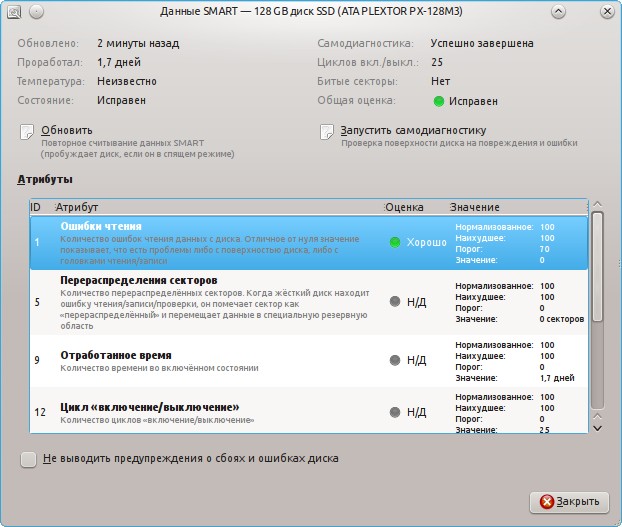
Здесь всё понятно и наглядно. Также присутствует описание атрибутов и оценка их показаний. Проблемные значения будут выделены красным цветом.
Источник
S.M.A.R.T.
S.M.A.R.T. (Self-Monitoring, Analysis, and Reporting Technology) is a supplementary component built into many modern storage devices through which devices monitor, store, and analyze the health of their operation. Statistics are collected (temperature, number of reallocated sectors, seek errors. ) which software can use to measure the health of a device, predict possible device failure, and provide notifications on unsafe values.
Contents
Smartmontools
The smartmontools package contains two utility programs for analyzing and monitoring storage devices: smartctl and smartd . Install the smartmontools package to use these tools.
SMART support must be available and enabled on each storage device to effectively use these tools. You can use #smartctl to check for and enable SMART support. That done, you can manually #Run a test and #View test results, or you can use #smartd to automatically run tests and email notifications.
smartctl
smartctl is a command-line tool that «controls the Self-Monitoring, Analysis and Reporting Technology (SMART) system built into most ATA/SATA and SCSI/SAS hard drives and solid-state drives.»
The -i / —info option prints a variety of information about a device, including whether SMART is available and enabled:
If SMART is available but not enabled, you can enable it:
You may need to specify a device type. For example, specifying —device=ata tells smartctl that the device type is ATA, and this prevents smartctl from issuing SCSI commands to that device.
Run a test
There are three types of self-tests that a device can execute (all are safe to user data):
- Short: runs tests that have a high probability of detecting device problems,
- Extended or Long: the test is the same as the short check but with no time limit and with complete disk surface examination,
- Conveyance: identifies if damage incurred during transportation of the device.
The -c / —capabilities flag prints which tests a device supports and the approximate execution time of each test. For example:
Use -t / —test= flag to run a test:
View test results
You can view a device’s overall health with the -H flag. «If the device reports failing health status, this means either that the device has already failed, or that it is predicting its own failure within the next 24 hours. If this happens […] get your data off the disk and to someplace safe as soon as you can.»
You can also view a list of recent test results and detailed information about a device:
Generate table with attributes of all disks
![]() This article or section needs language, wiki syntax or style improvements. See Help:Style for reference.
This article or section needs language, wiki syntax or style improvements. See Help:Style for reference.![]()
smartd
The smartd daemon monitors SMART statuses and emits notifications when something goes wrong. It can be managed with systemd and configured using the /etc/smartd.conf configuration file. The configuration file syntax is esoteric, and this wiki page provides only a quick reference. For more complete information, read the examples and comments within the configuration file, or read smartd.conf(5) .
daemon management
To start the daemon, check its status, make it auto-start on system boot and read recent log file entries, simply start/enable the smartd.service systemd unit.
smartd respects all the usual systemctl and journalctl commands.
Define the devices to monitor
To monitor for all possible SMART errors on all disks, the following setting must be added in the configuration file.
Note this is the default smartd configuration and the -a parameter, which is the default parameter, may be omitted.
To monitor for all possible SMART errors on /dev/sda and /dev/sdb , and ignore all other devices:
To monitor for all possible SMART errors on externally connected disks (USB-backup disks spring to mind) it is prudent to tell smartd the UUID of the device since the /dev/sdX of the drive might change during a reboot.
First, you will have to get the UUID of the disk to monitor: ls -lah /dev/disk/by-uuid/ now look for the disk you want to Monitor
I know that my USB disk attached to /dev/sde during boot. Now to tell smartd to monitor that disk simply use the /dev/disk/by-uuid/ path.
Note that you may additionally need -d removable for smartd to work.
Now your USB disk will be monitored even if the /dev/sdX path changes during reboot.
Notifying potential problems
To have an email sent when a failure or new error occurs, use the -m option:
To be able to send the email externally (i.e. not to the root mail account) a MTA (Mail Transport Agent) or a MUA (Mail User Agent) will need to be installed and configured. Common MUAs are msmtp and Postfix, but perhaps the easiest dma will suffice. Common MTAs are sendmail and Postfix. It is enough to simply configure S-nail if you do not want anything else, but you will need to follow these instructions.
The -M test option causes a test email to be sent each time the smartd daemon starts:
Emails can take quite a while to be delivered. To make sure you are warned immediately if your hard drive fails, you may also define a script to be executed in addition to the email sending:
To send an email and a system notification, put something like this into /usr/local/bin/smartdnotify :
If you are running a desktop environment, you might also prefer having a popup to appear on your desktop. In this case, you can use this script (replace X_user and X_userid with the user and userid running X respectively) :
This requires libnotify and a compatible desktop environment. See Desktop notifications for more details.
You can also put your custom scripts into /usr/share/smartmontools/smartd_warning.d/ :
This scripts notifies every logged in users on the system via libnotify.
This script requires libnotify and procps-ng and a compatible desktop environment.
You can execute your custom scripts with
Power management
If you use a computer under control of power management, you should instruct smartd how to handle disks in low power mode. Usually, in response to SMART commands issued by smartd, the disk platters are spun up. So if this option is not used, then a disk which is in a low-power mode may be spun up and put into a higher-power mode when it is periodically polled by smartd.
On some devices the -n does not work. You get the following error message in syslog:
As an alternative, you can use the -i option of smartd. It controls how often smartd spins the disks up to check their status. Default is 30 minutes. To change it create and edit /etc/default/smartmontools .
For more info see smartd(8) .
Schedule self-tests
smartd can tell disks to perform self-tests on a schedule. The following /etc/smartd.conf configuration will start a short self-test every day between 2-3am, and an extended self test weekly on Saturdays between 3-4am:
Alert on temperature changes
smartd can track disk temperatures and alert if they rise too quickly or hit a high limit. The following will log changes of 4 degrees or more, log when temp reaches 35 degrees, and log/email a warning when temp reaches 40:
Complete smartd.conf example
Putting together all of the above gives the following example configuration:
- DEVICESCAN smartd scans for disks and monitors all it finds
- -a monitor all attributes
- -o on enable automatic offline data collection
- -S on enable automatic attribute autosave
- -n standby,q do not check if disk is in standby, and suppress log message to that effect so as not to cause a write to disk
- -s . schedule short and long self-tests
- -W . monitor temperature
- -m . mail alerts
Console applications
- skdump — utility to monitor and manage SMART devices to monitor and report hard disk drive health.
http://0pointer.de/blog/projects/being-smart.html || libatasmart
iostat -x (from sysstat ) also provides some disk health metrics: in particular, high values in the f_await column mean that the disk does not respond quickly to requests, and might be failing.
Источник


