- Help protect my PC with Microsoft Defender Offline
- When should I use Microsoft Defender Offline?
- Where can I find scan results?
- Using Windows Defender Offline on Windows 7 and Windows 8.1
- Просмотр результатов проверки антивирусных программ Microsoft Defender Review Microsoft Defender Antivirus scan results
- Использование диспетчера конфигурации для проверки результатов сканирования Use Configuration Manager to review scan results
- Использование cmdlets PowerShell для проверки результатов сканирования Use PowerShell cmdlets to review scan results
- [SOLVED] Windows Defender Deleted Files, How To Get Back Easily [MiniTool Tips]
- Summary :
- Quick Navigation :
- Part 1 – Problem Arises: Windows Defender Deleted My Files
- Can You Recover Files Deleted from Windows Defender
- Part 2 – Solutions: Recover Data Removed by Windows Defender
- How to Get Back Files Deleted by Windows Defender
- How to Restore Quarantined Files Windows Defender
- Part 3 – Prevent Windows Defender from Deleting Useful Files
- Solution 1: Add Exceptions to Windows Defender
- Solution 2: Disable/Turn off Windows Defender
- Part 4 – Conclusion
- Windows Defender Deleted My Files FAQ
- ABOUT THE AUTHOR
Help protect my PC with Microsoft Defender Offline
Microsoft Defender Offline is a powerful offline scanning tool that runs from a trusted environment, without starting your operating system. This topic describes how to use Microsoft Defender Offline in Windows 10, Windows 8.1, and Windows 7.
When should I use Microsoft Defender Offline?
Run Microsoft Defender Offline if:
Windows Security (named Windows Defender Security Center in previous versions of Windows) detects rootkits or other highly persistent malware on your PC and alerts you to use Microsoft Defender Offline. You might see a message stating that malware was found on your device, or receive a message in Windows Security notifying you that additional cleaning is required.
You suspect your PC might have malware that’s hiding on it, but your security software doesn’t detect anything. In this situation, you can start a Microsoft Defender Offline scan from Windows Security settings. Here’s how:
Select Start , and then select Settings > Update & Security > Windows Security > Virus & threat protection .
On the Virus & threat protection screen, do one of the following:
In an up-to-date version of Windows 10: Under Current threats, select Scan options.
In previous versions of Windows: Under T hreat history, select Run a new advanced scan.
Select Microsoft Defender Offline scan, and then select Scan now.
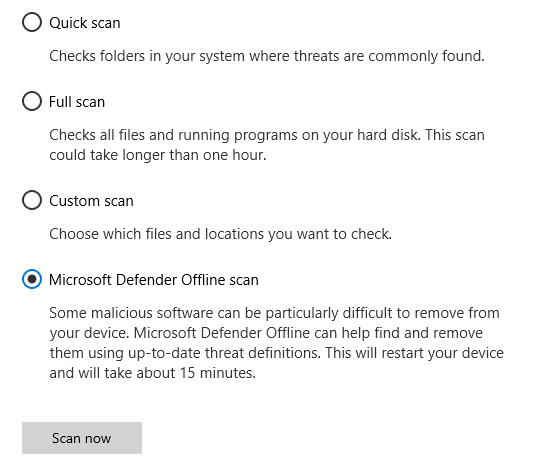
You’ll be prompted that you’re about to be signed out of Windows. After you are, your PC should restart. Microsoft Defender Offline will load and perform a quick scan of your PC in the recovery environment. When the scan has finished (usually takes about 15 minutes), your PC will automatically restart.
Before you use Microsoft Defender Offline, make sure you save any open files and close all apps and programs.
You typically need administrator rights on the PC on which you plan to run Microsoft Defender Offline.
If you experience a Stop error on a blue screen when you run the offline scan, force a restart and try running a Microsoft Defender Offline scan again. If the blue-screen error happens again, contact Microsoft Support.
Where can I find scan results?
To see the Microsoft Defender Offline scan results:
Select Start , and then select Settings > Update & Security > Windows Security > Virus & threat protection .
On the Virus & threat protection screen in Windows 10, under Current threats, select Scan options, and then select Protection history (In previous versions of Windows it may say Threat history).
Using Windows Defender Offline on Windows 7 and Windows 8.1
Note: On older versions of Windows, Microsoft Defender Offline is still called by its old name: Windows Defender Offline
If you’re running Windows Defender Offline on Windows 7 or Windows 8.1, follow these four basic steps:
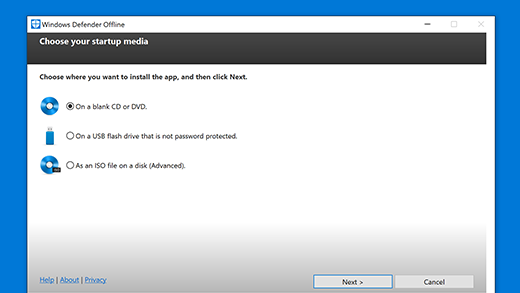
Download Windows Defender Offline and install it to a CD, DVD, or USB flash drive.
Restart your PC using the Windows Defender Offline media. This means having the CD, DVD, or flash drive you created in step 1 inserted in the PC when you restart it. Follow the prompts to boot from the drive containing this media.
Scan your PC for viruses and other malware.
Remove any malware that’s found from your PC.
Windows Defender Offline will walk you through these four steps when you’re using the tool. If you’ve been prompted in Microsoft Security Essentials or Windows Defender Security Center to download and run Windows Defender Offline, it’s important to do so. Doing this helps make sure that your data and PC aren’t compromised.
To get started, find a blank CD, DVD, or USB flash drive with at least 250 MB of free space, and then download and run the tool. You’ll be guided through the steps to create the removable media.
Note: We recommend that you download Windows Defender Offline and create the CD, DVD, or USB flash drive on a PC that isn’t infected with malware—the malware can interfere with the media creation.
Просмотр результатов проверки антивирусных программ Microsoft Defender Review Microsoft Defender Antivirus scan results
Область применения: Applies to:
После завершения антивирусного сканирования Защитника Майкрософт, будь то проверка по запросу или запланированное, результаты записывают, и вы можете просмотреть результаты. After a Microsoft Defender Antivirus scan completes, whether it is an on-demand or scheduled scan, the results are recorded and you can view the results.
Использование диспетчера конфигурации для проверки результатов сканирования Use Configuration Manager to review scan results
Использование cmdlets PowerShell для проверки результатов сканирования Use PowerShell cmdlets to review scan results
Следующий кодлет возвращает каждое обнаружение на конечной точке. The following cmdlet will return each detection on the endpoint. Если существует несколько обнаружения одной и той же угрозы, каждое обнаружение будет перечислены отдельно, в зависимости от времени каждого обнаружения: If there are multiple detections of the same threat, each detection will be listed separately, based on the time of each detection:

Можно указать, чтобы ограничить выход только для обнаружения -ThreatID определенной угрозы. You can specify -ThreatID to limit the output to only show the detections for a specific threat.
Если вы хотите перечислить обнаружения угроз, но объединить обнаружения одной и той же угрозы в один элемент, можно использовать следующий cmdlet: If you want to list threat detections, but combine detections of the same threat into a single item, you can use the following cmdlet:

Дополнительные сведения о том, как использовать PowerShell с антивирусным вирусом Microsoft Defender и Defender, см. в этой ссылке. See Use PowerShell cmdlets to configure and run Microsoft Defender Antivirus and Defender cmdlets for more information on how to use PowerShell with Microsoft Defender Antivirus.
[SOLVED] Windows Defender Deleted Files, How To Get Back Easily [MiniTool Tips]
By Sarah | Follow | Last Updated January 15, 2021
Summary :
This article tells how to restore files from Windows defender if Windows Defender deletes your files by mistake. In addition, it also discusses how to add exclusion in Windows Defender and how to disable Windows Defender temporarily or permanently when necessary.
Quick Navigation :
Part 1 – Problem Arises: Windows Defender Deleted My Files
Windows Defender is an easy tool for many Windows users, but there are still some people who don’t know clearly about it. Here in this part, I’ll introduce it briefly and show you a common problem caused by it.
As a built-in anti-malware program, the Windows Defender is widely used around the world. But with the widespread of this tool, a variety of problems begin to show up. Among them, Windows Defender deleted my files draws the attention of many people.
In most cases, the Windows Defender plays a great role in quarantining harmful files that it has found on the users’ computer. Yet, like many other programs or even people, it tends to make mistakes sometimes. No wonder there are people saying their useful files have been quarantined and deleted by Windows Defender mistakenly.
A real case:
Hey, everyone! I use some program with .exe extension, windows defender reads those as a virus and it deletes them while I still want them! How to stop windows defender from deleting a program that I want to keep it? – hichamcheaib said on Microsoft Community
It is said that Windows Defender ATP now gives support to the USB devices like USB flash drive.
Can You Recover Files Deleted from Windows Defender
Here comes the question: can you recover files deleted by Windows Defender. The answer to this question is definitely a yes, but the more annoying question is how to recover data deleted by Windows Defender. In order to help users work this out, I decide to introduce a wonderful hard disk drive recovery tool named MiniTool Power Data Recovery (which is a piece of fabulous data recovery software for Windows 10 and other Winodws systems).
As long as you have this powerful recovery tool at hand, you’re able to get back permanently deleted files, lost files in a damaged/lost partition or missing files saved on a CD/DVD. According to statistics, it has helped a large number of people find back their needed files successfully. More importantly, this tool owns good compatibility and high security, so you don’t need to worry about the compatibility conflict and unnecessary data damage.
I will show you mainly 3 things in the following content respectively and minutely:
- How to recover files removed by Windows Defender
- How to restore quarantined items
- How to turn off Windows Defender
Of course, you can pick out the part that you’re most interested in to read first.
Part 2 – Solutions: Recover Data Removed by Windows Defender
When you actually find your files are deleted by Windows Defender, please don’t panic. Here in this part, I provide both an efficient way to recover permanently deleted files from computer and the method for restoring quarantined files from Windows Defender.
After finding many users complained that Windows Defender has deleted a wrong file or folder on their PC, I decide to do something to help. That’s why I introduce the reliable and powerful data recovery tool to help them recover Windows Defender deleted files.
How to Get Back Files Deleted by Windows Defender
Step 1: download MiniTool Power Data Recovery Trial Edition. One of the biggest differences between a trial edition and an advanced edition is: the trial edition is only able to help you scan the disk and preview the found data; it can’t help you recover any of the found files. (I will take the trial edition as an example in the following steps to show you how to recover your files deleted by Windows Defender.)
If you want to know the differences between different license types, please click here.

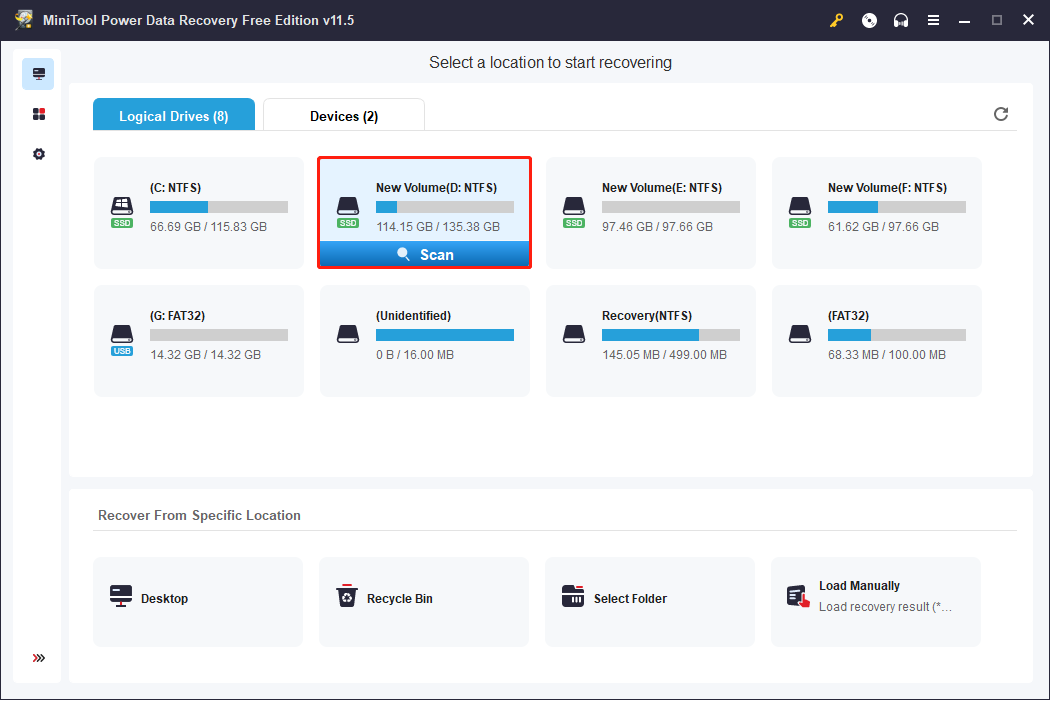
Step 2: in this step, you should run the software and enter its main interface to select a proper option from the left side. Then, determine the original location of your deleted file/folder and select the corresponding partition from the right side. Finally, click on the “Scan” button to detect them.

Step 3: wait for the scan of the selected drive. You’ll see more and more files and folders are found by the software and displayed in order. At this time, you should browse them in order to find the ones that have been deleted by Windows Defender by mistake. (“Find” and “Filter” can be used to locate an exact file quickly)

Step 4: finally, please check the Windows Defender deleted files you want to recover, and then press the “Save” button in the lower right corner to set a storage directory for them.

Yet, sometimes, you may not be able to find needed files from the scanning result, especially when C: drive is the object of the scan (since many files will be saved to the system drive as long as the system is running and the system drive is easy to become the object of attacks). On this occasion, I advise you to perform a full scan on the whole disk that includes the partition holding Windows Defender deleted files to see what happens.
This is how to recover data deleted by Windows Defender with MiniTool Power Data Recovery.
Related reading:
- Click here to know more details on how to recover deleted files on PC.
- If the problem occurs on a Mac computer, you may as well turn to MiniTool Mac Data Recovery, which is designed for Mac OS, to finish Mac file recovery independently.
How to Restore Quarantined Files Windows Defender
I will take Windows 10 as an example to show you how to restore quarantined files Windows Defender. The operations in other Windows systems are basically the same.\
Step 1:
- Put your cursor into the “Search the web and Windows” text box
- Type “windows defender” and select Windows Defender from the search result list.
You can also click on the start button at the bottom left of the screen -> select “All apps” -> navigate to “W” & click on “Windows System” to open -> select “Windows Defender”.

Step 2:
- Navigate to “History” tab and you’ll see “Quarantined items”, which is checked by default.
- Then, you need to click on “View details” at the bottom to show hidden files.

Step 3:
- Check the quarantined file you want to recover under “Detected item”.
- Click on the “Restore” button in the lower right corner to finish recovery.

If the detected item list is empty, you should suspect that Windows Defender has already removed the quarantined items and you need to turn to the previous method to restore items removed by Windows Defender.
Part 3 – Prevent Windows Defender from Deleting Useful Files
In this part, I am going to tell you some useful tips of using Windows Defender. I will mainly show you two things:
- How to stop Windows Defender from deleting a file mistakenly anymore
- How to disable/turn off this tool temporarily or permanently
As you all know, Windows Defender (which is called Microsoft Anti Spyware before) is an antivirus program designed by Microsoft Windows to protect your computer against malicious codes, such as viruses, spyware and rootkits. It is able to run on Windows XP and Windows Server 2003, and it has been built in Windows Vista, Windows 7, Windows 8 and Windows10.
Unlike other similar free products that can only scan the system, Windows Defender is able to do many other things:
- Monitor the system in real time.
- Remove the installed Active X plug-ins.
- Clear the history of most Microsoft programs and other commonly used programs.
But as I know, Windows Defender may remove useful files by taking them as threats sometimes. Considering this, I feel it’s necessary to show you how to prevent Windows Defender from deleting a needed file mistakenly.
Here, I provide two solutions. (In the following content, I will still take Windows 10 as an example)
Solution 1: Add Exceptions to Windows Defender
This tells you how to add files, folders, file types or processes to Windows Defender, as exceptions.
- Open the Windows Defender by using the way I have mentioned in “How to Restore Quarantined Files Windows Defender” (included in part 2).
- Click on the “Settings” button on the top right of the interface. Then, the corresponding window will pop up.
- At this time, you need to scroll down to the “Exclusions” option, and then click on “Add an exclusion”
- Choose to “Exclude a file”, “Exclude a folder”, “Exclude a file extension” or “Exclude a .exe, .com or .scr process”. You can add as many files and folders to the exclusion list as you want. Besides, if you add a wrong file/folder/file type/process, you may just click on it and choose “Remove”.
- After that, you can close the “Settings” window to put an end to this work.

Solution 2: Disable/Turn off Windows Defender
- Disable Windows Defender temporarily under Settings.
- Make use of the Local Group Policy Editor.
- Rely on the Registry Editor.
Another way to effectively stop Windows Defender from deleting a file mistakenly is disabling or turning off the Windows Defender permanently. But you may as well think twice before doing so. Here, I provide 3 approaches.
Approach 1: disable Windows Defender temporarily under “Settings”.
- Also, you need to open Windows Defender by the way you prefer.
- Click on the “Settings” button on the top right of the interface to see a pop-up window.
- Find “Real-time protection” and turn off the toggle switch under it.

But, as you can see from the picture above, this method can only turn off the Windows Defender temporarily. And it will be turned on after a while automatically. So, I will show you how to disable the Windows Defender permanently in the following approaches.
Approach 2: make use of Local Group Policy Editor.
You are allowed to use the Local Group Policy Editor to permanently disable Windows Defender from your Windows 10 Pro or any other enterprise variant.
Step 1: press “Win + R” on the keyboard to open “Run” command.
Step 2: then, type “gpedit.msc” into the text box and click on the “OK” to open the Local Group Policy Editor window. (You can also type “gpedit.msc” into the “Search the web and Windows” text box and then press “Enter” to open Local Group Policy Editor directly)

Step 3: open “Computer Configuration”, “Administrative Templates” and “Windows Components” one after another to locate “Windows Defender”.

- Select “Windows Defender” and double click on “Turn off Windows Defender” in the right panel.
- Then, check “Enabled” (instead of “Not Configured”) and click on “Apply” button in the lower right corner.
- At last, click on “OK” button to save changes and close the “Turn off Windows Defender” window.

Approach 3: rely on Registry Editor.
You can also turn to the Registry to disable Windows Defender permanently if you’re running Windows 10 Home. (The Local Group Policy Editor won’t be available for home users)
- Press “Win + R” on the keyboard to open “Run” command.
- Then, type “regedit” into the text box and click on the “OK” button (You can also type “regedit” into the “Search the web and Windows” text box and then press “Enter” directly).
- Then, choose “Yes” in the pop-up “User Account Control” window.

Step 2: open “Computer”, “HKEY_LOCAL_MACHINE”, “SOFTWARE”, “Policies” and “Microsoft” successively in order to locate “Windows Defender”.

- Select “Windows Defender” and double click on “DisableAntiSpyware” in the right panel to see a pop-up “Edit DWORD (32-bit) Value” window (you can also right click on “DisableAntiSpyware” and choose “Modify…” to see this window).
- Then, change the value data from 0 to 1.
- Click on the “OK” button to confirm.
- At last, you can restart your computer to make those changes take effect.

Part 4 – Conclusion
Undeniably, Windows Defender is a very useful antivirus program in most cases. However, you have to admit the fact that it could make mistakes sometimes – regarding important files as threats and deleting them. Windows Defender deleted my files is not a rare issue.
Like other data loss cases, the first thing you should do after you found Windows Defender has deleted your files by mistake is stopping using the target drive (you’d better turn off the computer immediately). Then, you should resort to MiniTool Power Data Recovery to recover your deleted files easily, without others’ help. Or you may check the quarantined files in Windows Defender and then choose to restore them independently.
After telling you how to retrieve files deleted by Windows Defender, I shared 2 more skills with you:
- One is how to add exclusion in Windows Defender.
- The other is how to disable Windows Defender temporarily or permanently when necessary.
Hope these things are helpful for you.
Windows Defender Deleted My Files FAQ
- Open Windows search box and type Windows Defender.
- Click Windows Defender settings.
- Click on the Open Windows Defender Security Center button.
- Select Virus & threat protection from the left sidebar.
- Click Virus & threat protection settings in the right pane.
- Click Add or remove exclusions under Exclusions.
- Click + and select File, Folder, File Type, or Process.
- Define exact files, folders, and even file types. Then, save changes.
- Open Windows Defender Security Center.
- Click the Virus & threat protection link.
- Find Threat history and click on it.
- Click See full history under Quarantined threats area.
- Select the file you want to recover.
- Click Restore.
- Find Windows search box/icon on taskbar and click it.
- Type services.msc and press Enter.
- Sroll down to find the Security Center service.
- Right click on the Security Center service.
- Choose Reset and wait.
- Restart your computer.
ABOUT THE AUTHOR

Position: Columnist
Sarah is working as editor at MiniTool since she was graduated from university, having rich writing experiences. Love to help other people out from computer problems, disk issues, and data loss dilemma and specialize in these things. She said it’s a wonderful thing to see people solving their problems on PC, mobile photos, and other devices; it’s a sense of accomplishment. Sarah likes to make friends in life and she’s a huge music fan.


