- How to Check Real USB Capacity in Linux Terminal
- Install F3 on Linux
- Checking USB Capacity
- f3probe
- Booting ISO Files Without a USB stick
- 9 Responses to “How to Check Real USB Capacity in Linux Terminal”
- Linux check the physical health of a USB stick [ Flash drive ]
- Linux check USB stick or errors
- Linux command to check the physical health of a USB stick
- Say hello to f3 tool
- How to install f3 tool on Linux
- Testing performance with f3read/f3write
- Quick capacity tests with f3probe on Linux
- How to correct capacity to actual size for my USB stick in Linux
- Conclusion
- Как «вылечить» поврежденный USB-накопитель в Linux?
- Удаление бэд-блоков с USB-накопитель с помощью fsck
- Полная очистка
- Создание новой файловой системы
How to Check Real USB Capacity in Linux Terminal
So you bought a USB flash drive to create a Linux live USB. But how do you know it’s not fake? f3, which stands for fight flash fraud, can test real USB capacity. This tutorial shows you how.
Install F3 on Linux
For Debian, Ubuntu, Linux Mint, Elementary OS users, f3 is available in software repository. Simply execute the command below:
Arch Linux, Manjaro, Apricity OS users can install f3 from AUR repository with Yaourt package manager.
Checking USB Capacity
Before testing the real capacity, make sure the data on the flash drive is backed up and then format it, which can be done with Gparted partition editor.
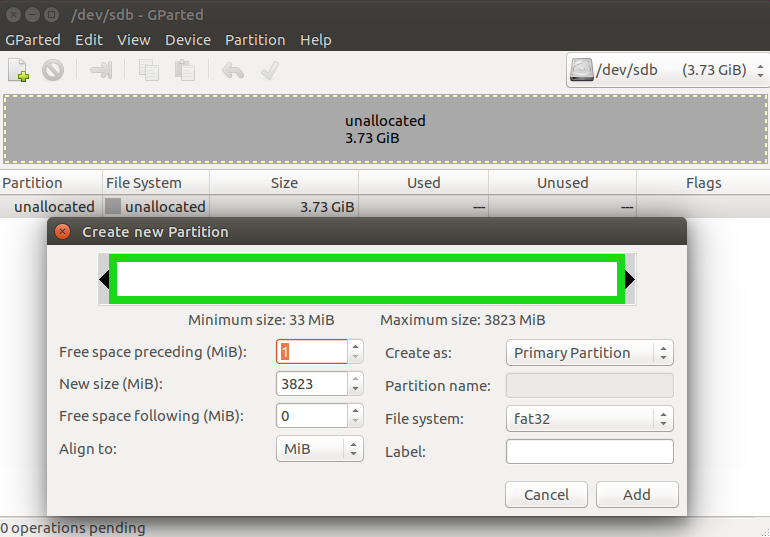
Close Gparted when it’s done.
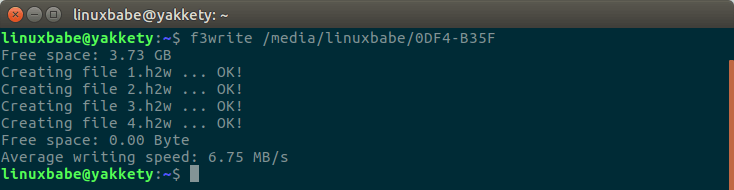
Now back in your terminal, use f3write command to let f3 write a file to your flash drive.
When writing to flash drive, f3write fills the filesystem with 1GB files named N.h2w, where N is a number (i.e. /7+/).
Then use f3read command to check if the file can be read.
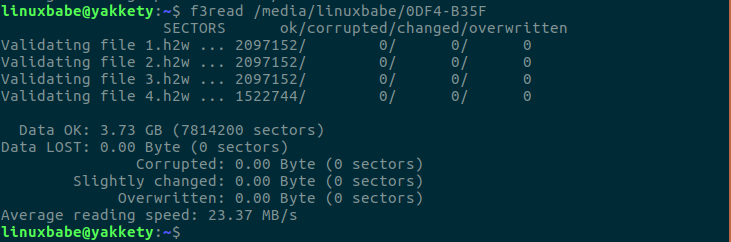
If you see from the output that some sectors are corrupted, then your USB flash drive is fake. You should ask for your money back.
f3probe
F3 also comes with a command line utility named f3probe, which is recommended for testing USB flash drives of large capacity due to its fast test speed.
First find out the block device name of your flash drive with lsblk command:
Mine is /dev/sdb. Make sure you identified it correctly.

Then run the following command. Replace /dev/sdb with the actual block device name of your flash drive.
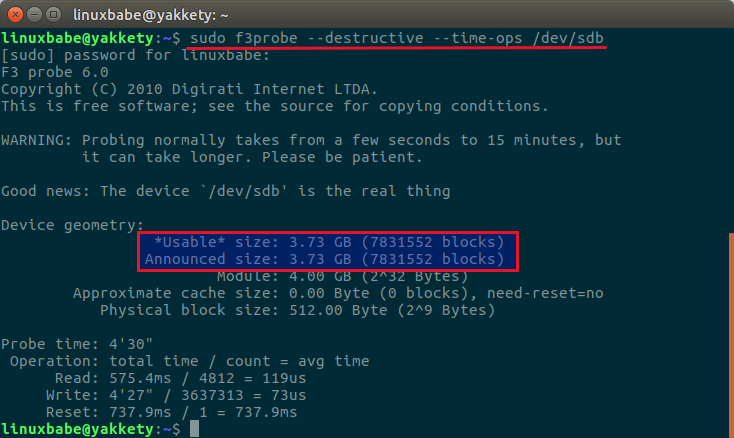
If the usable size equals announced size, then your USB drive is not fake. Otherwise, you should ask for your money back.
Booting ISO Files Without a USB stick
Ever wondered if you can boot Linux and Windows ISO files without creating a live USB or live CD? Yes, you can. Please read the following tutorial:
That’s it! I hope this tutorial helped you verify USB capacity in Linux. As always, if you found this post useful, then please subscribe to our free newsletter or follow us on Twitter or like our Facebook page. Thanks for visiting!
[Total: 20 Average: 4.6 ]
9 Responses to “How to Check Real USB Capacity in Linux Terminal”


Hi
Mt grateful thanks for the use of your software. I’m no technowhizz but I followed it carefully and got the check done. I’d become concerned about 2 x 128Gb Samsung EVO Plus microSDXC class 10 cards. They showed ALL of the features that others said indicated a fake, ie, black card edges – not white, packaging slots not fully punched through, made in Korea – not the Philippines, not in truly tamper-proof packs, generic, non-Samsung SD adapters, etc.
They checked out at 116Gb each, passed the read/write test at that figure except for one with a loss of 16.32 Mb, at roughly 16Mb/sec on a bog standard USB2 OTG adapter into my laptop.
F3 probe also declares them a pass and ‘the real thing’ but the thing I am suspicious of is the capacity. Should it not be nearer 128Mb? If it makes any odds, they were FAT32 formatted by G-Parted.
Regards
Will

I just stumbled upon your software and I am so glad that I did I have not been using Linux for long so I guess I am a newbie I purchased two supposedly 2TB USB flash drives on ebay but became suspicious that they where not what they calmed to be and as I say I found your software and it was so easy to use it confirmed that my USB drives are only 1TB and not 2TB as stated using your evidence (I sent them a copy of my terminal results ) I contacted the seller and was reimbursed my purchase money and told me to keep the USB Drives
many thanks for this software I

Could I suggest you change the reference in the code from `/dev/sdb` to `/dev/sdx`.
Newbies might cut and paste `sudo f3probe –destructive –time-ops /dev/sdb`, and due to the –destuctive flag, will probably trash their second drive.

First find out the block device name of your flash drive with lsblk command:

Not really sold on this utility as an alternative to h2testw. It takes about 6min to write one of its 1GB test files to a Lexar 128GB Cl 10 thumb drive on a USB 3.0 port on a Lenovo x220 laptop @2.86MB/s. But I can copy a 1G video file to the the drive in about 8-10 secs.
Anybody know what to make of this?

Usually when you copy files to a flash drive it buffers it in memory before committing it to disk which makes it seems to be faster. If you pull out the drive before it actually saves it to the disk, then the actual file on the disk may become corrupt.
Before removing a drive in linux you should umount it which should commit the file to the disk, other than that you can use the sync command. In windows you would normally eject the USB device. You will notice this when you are in a hurry trying to copy a large file for a friend on a USB drive, they see it is done and the just pull the drive without a proper eject. Or when you do a proper eject, it takes a while.

THX, for this tutorial, i use it to check sticks and ssd’s i ordered from WISH. If you want an USB stick for free order 2TB sticks from wish for 5 – 10 €, use this tutorial, kontakt wish support and send them a picture from the output of fprobe. Get your money Back….. Have fun.
Источник
Linux check the physical health of a USB stick [ Flash drive ]
Linux check USB stick or errors
The procedure to check the physical health of a USB pen drive in Linux:
- Open the terminal application.
- Insert your USB stick or pen drive into Linux system.
- To test and detect bad sector in USB flash memory or pen drive, run: badblocks -w -s -o error.log /dev/sdX
- To error check USB flash drive, you can use the f3write and f3read commands, which is an alternative to h2testw app from Windows operating systems.
Let us see all commands and examples in details.
Linux command to check the physical health of a USB stick
First, find out your USB stick or flash drive name under Linux, run:
lsblk
The output indicated that I am using /dev/sda for USB and /dev/nvme0n1 for NVme pci ssd.
Warning: This will destroy any previously stored data on your USB pen/stick. Make sure you choose correct USB device name under Linux.
Once inserted the USB pen/stick, run the following command to search a device for bad blocks:
sudo badblocks -w -s -o error.log /dev/sda
Gif 01: Test usb stick health using badblocks command in Linux
Use the cat command to view error.log:
cat error.log
Say hello to f3 tool
From the project home page:
f3 is a simple tool that tests flash cards capacity and performance to see if they live up to claimed specifications.
F3 stands for Fight Flash Fraud, or Fight Fake Flash.
How to install f3 tool on Linux
First, make sure you have compilers installed and running on Linux. If not, see the following tutorilas:
Download file using the wget command:
wget https://github.com/AltraMayor/f3/archive/v7.2.tar.gz
Untar tar ball on Linux, run:
tar xvf v7.2.tar.gz
Compile it:
make
Install it:
make install
Testing performance with f3read/f3write
Use the following two command. First, f3write will write large files to your mounted USB pen disk. For example, my /dev/sda is mounted at /mnt/:
f3write /mnt/
Next, f3read will check if the flash disk contains exactly the written files:
f3read /mnt/
Zero data lost indicate that my USB pen drive working fine.
- No ads and tracking
- In-depth guides for developers and sysadmins at Opensourceflare✨
- Join my Patreon to support independent content creators and start reading latest guides:
- How to set up Redis sentinel cluster on Ubuntu or Debian Linux
- How To Set Up SSH Keys With YubiKey as two-factor authentication (U2F/FIDO2)
- How to set up Mariadb Galera cluster on Ubuntu or Debian Linux
- A podman tutorial for beginners – part I (run Linux containers without Docker and in daemonless mode)
- How to protect Linux against rogue USB devices using USBGuard
Join Patreon ➔
Quick capacity tests with f3probe on Linux
If you believe you have bought a fake flash drive, try the following Linux commands. The f3probe command is the fastest drive test and suitable for large disks because it only writes what’s necessary to test the drive. It operates directly on the (unmounted) block device and needs to be run as a privileged user (be careful with device names again as —destructive option deletes all data):
sudo ./f3probe —destructive —time-ops /dev/sdb
Sample outputs:
The outputs from the above indicate that I do not have fake usb drive.
Good news: The device `/dev/sdb’ is the real thing
How to correct capacity to actual size for my USB stick in Linux
Run f3fix command to creates a partition that fits the actual size of the fake drive. Only use to correct size for the fake drive. Use f3probe’s output to determine the parameters for i3fix:
sudo ./f3fix —last-sec=16477878 /dev/sdb
Conclusion
You learned how to check the health status of a USB stick in Linux and further learned how to find out the actual size of a USB pen drive in case you got a faked USB pen drive.
🐧 Get the latest tutorials on Linux, Open Source & DevOps via
Источник
Как «вылечить» поврежденный USB-накопитель в Linux?
Флэшки есть у всех. Маленькие, удобные – что может быть лучше для сохранения данных. Но бывает, что флэшки повреждаются или вообще отказываются работать. Если вы пользователь Linux и подобное случилось с вами, исправить все будет несложно.
Примечание: описанные методы работают не только для USB-накопителей, но и для жестких дисков тоже.
Интересно: Как отформатировать защищенную от записи флешку. Читаем здесь.
Удаление бэд-блоков с USB-накопитель с помощью fsck
Простой способ починить флэш-накопитель (и вообще любой накопитель) – инструмент fsck. Он удаляет поврежденные сектора, или «бэд-блоки», из-за которых чаще всего и возникают проблемы с чтением. Чтобы удалить поврежденные сектора с флэшки, откройте терминальное окно и введите следующие команды.
Сначала нужно узнать метки дисков. Сделайте это, введя команду lsblk. Появится список всех подключенных накопителей.
Примечание: по команде lsblk появляется список всех дисков, не только USB-накопителей. Будьте внимательны, чтобы не перепутать флэшку с жестким диском.

Чтобы удалить бэд-блок, запустите команду fsck либо в отдельном разделе (например, /dev/sdc1), либо на всем диске (например, /dev/sdc). По окончании процесса ваша флэшка будет снова полностью работоспособна в Linux.
sudo fsck /dev/sdc1
Примечание: здесь предполагается, что метка флэш-накопителя — /dev/sdc (или /dev/sdc1). У разных пользователей метки могут быть другими.
Полная очистка
Иногда USB-накопитель совершенно не читается, и спасти что-то с него уже не получится. Все, что остается в этой ситуации – очистить все данные и начать сначала. Лучший инструмент для этого – dd.
Возьмите метку накопителя, которую вы нашли прежде командой lsblk, и дальше действуйте по предыдущему алгоритму (/dev/sdc1 – раздел, /dev/sdc – весь диск):
sudo dd if=/dev/zero of=/dev/sdc
Создание новой файловой системы
Очистка флэшки (или любого другого накопителя) делает все записанные данные на ней бесполезными. Это значит, что нужно создать новый раздел данных. Выберите желаемую файловую систему и введите соответствующую команду:
sudo mkfs.msdos -f 32 /dev/sdc1
Ext4
sudo mkfs.ext4 -f /dev/sdc1
NTFS
sudo mkfs.ntfs -f /dev/sdc1
Заключение
USB-флэшки – полезные девайсы. С ними легко переносить данные с одного компьютера на другой вне зависимости от установленной ОС. Вот почему важно знать, что делать, если флэшка вдруг стала недоступной. К счастью у Linux есть мощные инструменты, способные легко «вылечить» флэш-накопитель.
Источник


