- Configure proxy server settings in Windows
- Summary
- How to configure proxy server settings through Web Proxy Auto-Discovery Protocol (WPAD)
- How to configure proxy server settings in Internet Explorer or by using Group Policy
- Proxy Auto Configuration (PAC) files/Automatic Configuration Script
- Proxy/Firewall client software
- Command line setting
- More information
- Как узнать и сбросить настройки прокси-сервера WinHTTP в Windows 10
- Что такое WinHTTP прокси
- Проверьте настройки прокси-сервера
- Как сбросить настройки прокси WinHTTP в Windows 10
- How To Check the Proxy Server Settings on Your Computer
- Check Proxy Settings in Windows
- Windows 10 Settings App
- Control Panel
- Check Proxy Settings in Mac OS X
- Check Proxy Settings in Linux
- Checking Microsoft Windows proxy server settings
Configure proxy server settings in Windows
This article describes how to configure proxy server settings in Windows.
Original product version: В Windows 10 — all editions, Windows Server 2012 R2
Original KB number: В 2777643
Home users: This article is intended for use by support agents and IT professionals. If you’re looking for more information about how to configure a proxy on a home computer, please see the following article:
Summary
Several methods are available to configure Windows to use a proxy server to connect to the Internet. The method that will work the best for you depends on the kinds of apps that you’re using.
How to configure proxy server settings through Web Proxy Auto-Discovery Protocol (WPAD)
We recommend you use WPAD to configure Windows to use an Internet proxy server. The configuration is done through DNS or DHCP. It requires no settings on client computers. Users can bring computers and devices from home or other locations, and automatically discover the Internet proxy server configuration.
How to configure proxy server settings in Internet Explorer or by using Group Policy
If you prefer to statically configure client computers with their Internet proxy server settings, use one of the following methods:
- Manually configure the settings in Internet Explorer.
- Configure domain-joined computers by using Group Policy.
Applications that don’t obtain proxy settings from Internet Explorer may have to have settings within each app to configure proxy settings.
Proxy Auto Configuration (PAC) files/Automatic Configuration Script
Proxy Auto Configuration (PAC) file settings can also be manually configured in Internet Explorer or by using Group Policy. When you use Microsoft Store apps, the kind of app determines whether proxy settings that are obtained from PAC files are used. Additionally, the app may have to have settings to configure proxy settings.
Proxy/Firewall client software
Proxy/Firewall client software is specific to the brand of proxy server that you use. Microsoft Forefront Threat Management Gateway (TMG) 2010 is an example of a proxy server that can use client software to control proxy settings. Proxy/Firewall client software that’s installed as an LSP driver won’t work in Windows with any Modern/Microsoft Store apps, but will work with standard apps. Proxy/Firewall client software that’s installed as a WFP driver will work with Windows in all apps. Contact the proxy server manufacturer if you have other questions about how to use the manufacturer’s client software together with Windows.
The TMG/ISA firewall client tool is LSP based and will not work with Modern/Microsoft Store apps.
Command line setting
You can also configure proxy server settings by using the netsh winhttp set proxy command. This option is recommended only for testing, because it isn’t easy to deploy. The command must be executed at a command prompt by using Administrative credentials. We don’t recommend this option for mobile computers. The reason is most users can’t change this setting when they connect to a different network.
More information
For more information about how to configure proxy server settings by using Group Policy, see the following article:
Internet Explorer Maintenance Extension Tools and Settings
Как узнать и сбросить настройки прокси-сервера WinHTTP в Windows 10
В этом посте будет показано, как найти настройки прокси-сервера вашего компьютера Windows с помощью PowerShell, CMD, реестра и т. Д. Кроме того, если у вас возникли проблемы с загрузкой обновлений Windows или другие проблемы с сетевым подключением, вы можете выполнить сброс Настройки прокси на вашем компьютере с Windows 10 и посмотрите, поможет ли это вам.
Что такое WinHTTP прокси
Microsoft заявляет, что Windows HTTP Services (WinHTTP) – это технология доступа к HTTP, которая предоставляет разработчикам высокоуровневый интерфейс с поддержкой сервера для интернет-протокола HTTP/1.1. WinHTTP предназначен для использования преимущественно в серверных сценариях серверными приложениями, которые взаимодействуют с HTTP-серверами. WinHTTP также предназначен для использования в системных службах и клиентских приложениях на основе HTTP.
Проверьте настройки прокси-сервера
Я не использую прокси, поэтому некоторые записи могут быть не видны на моих скриншотах.
1] Командная строка

Вы должны использовать встроенный инструмент netsh.exe в вашей операционной системе Windows.
Чтобы просмотреть информацию о прокси-сервере вашего компьютера, откройте командную строку с повышенными привилегиями, введите следующую команду и нажмите клавишу ВВОД:
Есть и другие способы найти настройки прокси вашего ПК.
2] Google Chrome
В браузере Chrome введите следующее в адресную строку и нажмите Enter:
Вы увидите настройки прокси здесь.
3] Mozilla Firefox
В браузере Firefox введите следующее в адресную строку и нажмите Enter:
Прокрутите вниз и нажмите кнопку Настройки сетевого прокси, чтобы увидеть их.
4] Редактор реестра
Откройте REGEDIT и перейдите к следующей клавише:
Клавиша ProxyEnable контролирует настройки прокси. 0 отключает их, а 1 включает их. Если вы используете прокси, вы получите его значение под ключом ProxyServer .
5] PowerShell
Запустите PowerShell от имени администратора и выполните следующую команду:
6] Свойства обозревателя
Откройте «Свойства обозревателя»> вкладка «Подключения»> нажмите кнопку «Настройки сети». Там вы увидите настройки прокси-сервера.
7] Настройки Windows
Откройте «Настройки Windows»> «Сеть и Интернет»> «Прокси». Здесь вы увидите настройки прокси-сервера.
Как сбросить настройки прокси WinHTTP в Windows 10
Если ваша система использует прокси-сервер и вы хотите удалить его, откройте командную строку с повышенными привилегиями, введите следующую команду и нажмите клавишу ВВОД:
Это позволит удалить прокси-сервер и настроить «прямой доступ» к Интернету.
Говоря о сбросе настроек, вот несколько публикаций на этом сайте, которые помогут вам сбросить другие функции:
Сбросить все параметры локальной групповой политики | Сбросить приложения Магазина Windows | Сброс кеша Магазина Windows | Сбросить настройки клавиатуры | Сброс настроек сенсорной панели | Сброс устройства Surface Pro | Сброс настроек браузера Microsoft Edge | Сбросить настройки Internet Explorer | Сбросить корзину | Сброс настроек браузера Chrome | Сброс настроек Firefox | Сброс настроек безопасности Windows | Сбросить настройки брандмауэра Windows | Сброс Winsock | Сбросить TCP/IP | Сброс кеша DNS | Сбросить Центр обновления Windows | Сбросить каждый компонент Центра обновления Windows | Сбросить пароль Windows.
How To Check the Proxy Server Settings on Your Computer
In case they’ve been changed by a hacker
If you feel your Internet connection is slower than what it should be or you notice that certain websites get blocked while browsing, it could be because all your Internet traffic is going through a proxy server.
A proxy server is basically just another computer that sits between you and your ISP. It’s usually configured in corporate environments to filter web traffic going to and from employee computers. In this article, I’ll show you how you can check your proxy settings to see if your computer is indeed using a proxy server or not.
In most cases, you won’t actually be able to turn off the proxy server, since it is controlled by an administrator. However, there are times when personal computers accidentally or maliciously get set to use a proxy server.
Check Proxy Settings in Windows
In Windows, most browsers will use the proxy settings that are set on the computer. Each browser has a settings page to adjust proxy settings, but they normally just link to the settings dialog in Windows itself.
In Windows 10, there are two ways to go about changing the settings: via the Settings app or via the traditional Control Panel. I’ll mention both methods here because the Control Panel method is what you’ll need to use for Windows 7, 8 or Windows Vista.
Windows 10 Settings App
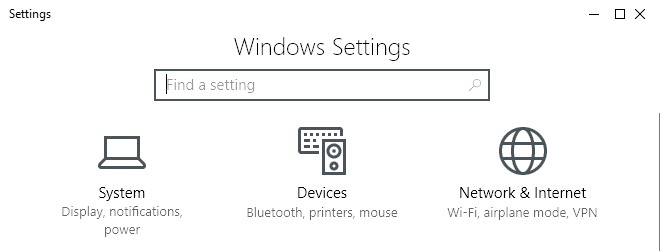
Click on Start and then click on the gear icon (Settings) at the far left. In Settings, click on Network & Internet.
In the left-hand pane, click on Proxy at the very bottom.
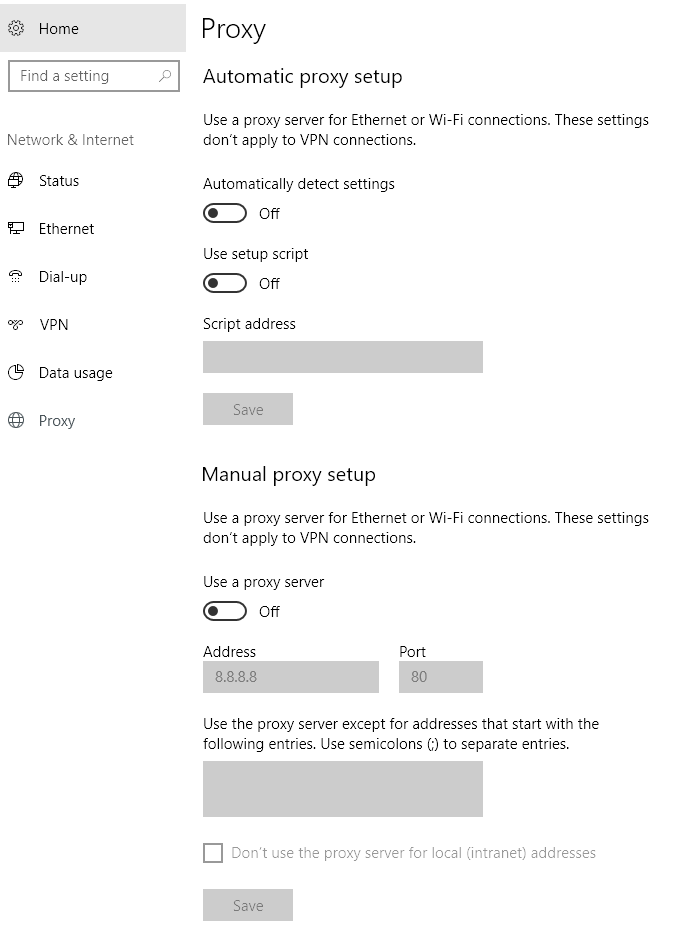
Here you have all the settings that are related to setting up a proxy in Windows. It’s basically split into two configurations: either Automatic or Manual proxy setup. In 99% of the cases, everything should be set to Off. If anything is turned on, your web traffic could be going through a proxy.
Control Panel
If you’re using an older version of Windows or if you just like the old way, you can edit the same settings via the Control Panel. Note that whichever way you choose to edit the settings, there are only one set of proxy settings in Windows.
Once you open Control Panel, just click on Internet Options.

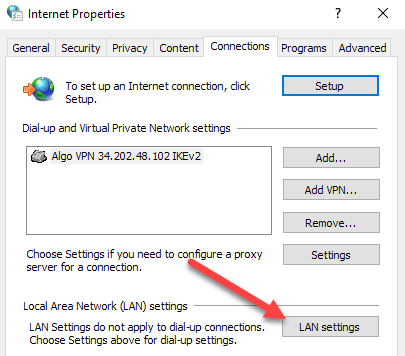
In the Internet Options dialog, go ahead and click on the Connections tab and then click on LAN settings at the bottom.
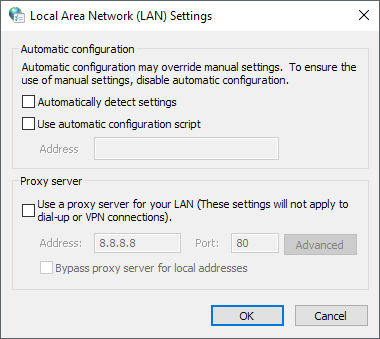
Here you will see all the same settings as in the Settings app shown above. Anything you configure here will show up there and vice versa.
Check Proxy Settings in Mac OS X
If you are using a Mac with OS X, then the procedure is similar. You have to change the proxy settings in System Preferences as this is where most browsers check automatically.
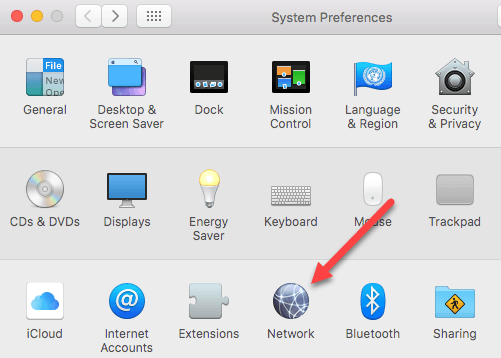
Open System Preferences and click on Network. On the left-hand side, make sure to select the connected or active network connection. You can have different proxy settings for each type of network connection.
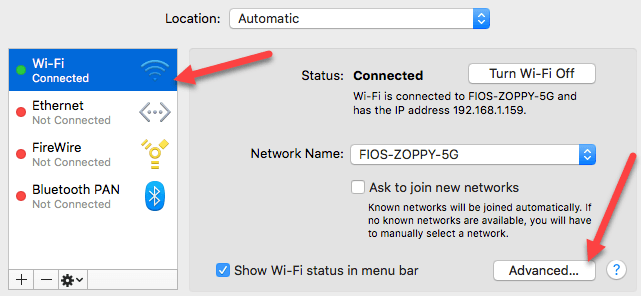
At the bottom, click on the Advanced button. Click on the Proxies tab and you’ll see a bunch of different protocols you can configure.
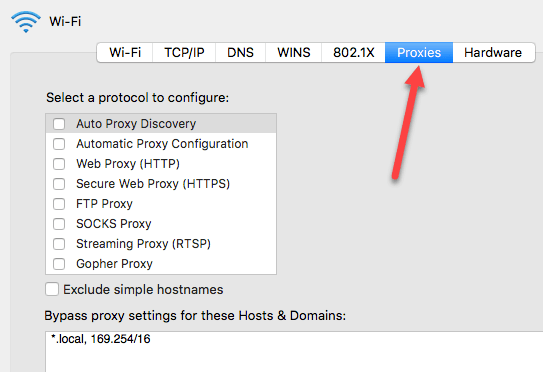
For example, if you click on Web Proxy (HTTP), you’ll be able to enter the proxy server IP address, port number, username and password.
Check Proxy Settings in Linux
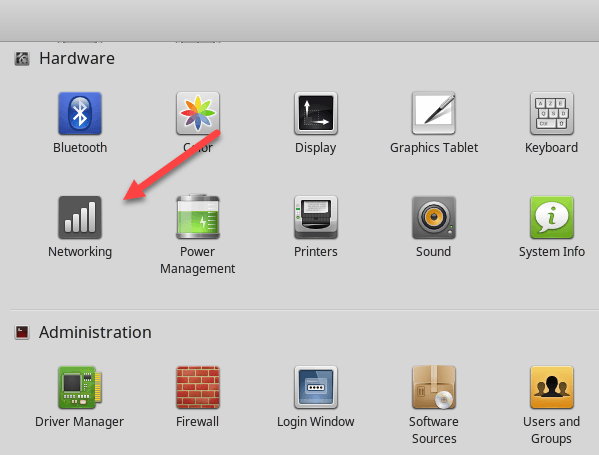
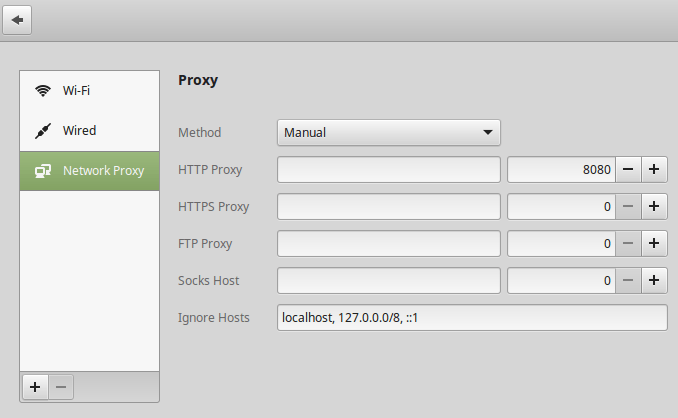
In Linux, it really depends on what distribution you are running. Mostly, though, it’s going to be some version of KDE or GNOME. For example, in Linux Mint Cinnamon, which is based heavily on GNOME, you would click on the button and then click on System Settings.

Next, you would scroll down to Hardware and then click on Networking.
Finally, if you click on Network Proxy, you can choose from Automatic or Manual.
This is pretty much the same procedure for Ubuntu also, which uses Unity and GNOME. It’ll be different if you are using a different desktop environment. If you have any questions, feel free to comment. Enjoy!
Founder of Help Desk Geek and managing editor. He began blogging in 2007 and quit his job in 2010 to blog full-time. He has over 15 years of industry experience in IT and holds several technical certifications. Read Aseem’s Full Bio
Checking Microsoft Windows proxy server settings
From within Internet Explorer
- Click on the gear icon in the upper, right-hand corner of the Internet Explorer window.
- Select Internet options.
- Click on the Connections tab.
Click on LAN settings.
If «Use a proxy server for your LAN» has a check in the checkbox, then a proxy server has been set. Click on the Advanced button to see the details for the proxy server.
In the example above, I can see that the proxy server in use is running on the local loopback address for the system, i.e., 127.0.0.1, so the proxy server software is running on the system itself and is handling both HTTP and HTTPS connections. It is listening on port 55833.
From a command prompt
Alternatively, you can also view the proxy server settings by querying the Windows Registry from a command prompt as shown below:
The first reg query command shows that ProxyEnable is set to 1 , since 0x1 indicates that the value is hexadecimal 1, which is the same as decimal 1, indicating a proxy server is being used for the currently logged in user under whose account the command was run. If the value was zero, then no system-wide proxy server is in use. The second reg query command shows the IP address for the proxy server. In this case the proxy server has been set up by malware on the system to route HTTP and HTTPS traffic through a proxy server it has installed on the system.
On another system configured to use a SOCKS proxy server set up via a PuTTY SSH connection, the same reg query command shows the following:
Again, the 127.0.0.1 address indicates the SOCKS proxy server is running on the system on which the command was issued. In this case the SOCKS proxy server is listening on port 1080.
If I wanted to change the proxy server settings so that any browser using the system-side proxy server setting would no longer use the proxy server, I could change the value of ProxyEnable in the Windows registry to be zero with the following reg add command:
reg add «HKCU\Software\Microsoft\Windows\CurrentVersion\Internet Settings» /v ProxyEnable /t REG_DWORD /d 0 /f
The /d followed by a zero specifies that the data to assign to the registry ValueName, which was specified as ProxyEnable by the /v , is a zero. The /t specifies that the data type for the registry value is REG_DWORD and the /f forces an overwrite of the current value without a prompt appearing asking if you are sure you want to overwrite it. Without the /f , a window will open asking for confirmation of the replacement of the current value in that registry location.
The value for ProxyServer in the registry remains the same, but browsers will no longer use the proxy.
If you wished to enable the use of the proxy server agin, you could issue the same reg add command, but with /d 1 , instead of /d 0 .
Note: if you change the proxy server setting within Google Chrome and leave Chrome open when you change the value of ProxyEnable to zero or one with the reg add command, you will need to get Chrome to check the setting again by going through the steps to view the proxy server setting in Chrome or close and reopen Chrome.
Running show-firefox-proxy-setting.bat on the system that was configured to use an HTTP and HTTPS proxy listening on port 55833, as noted in Finding the proxy setting for Firefox from a command line, showed the following, since it was configured to use the system proxy settings:
I.e., no proxy information was displayed. If it had been configured for «manual proxy configuration» with 127.0.0.1 for both the HTTP Proxy and SSL Proxy setting with port 55833 for both, it would have shown the following:
I.e., the proxy server setting information displayed only applies to a «manual proxy configuration» for Firefox.
Running the batch file on the system configured to use the SOCKS proxy where Firefox was configured to use a «manual proxy configuration», showed the following:
When Firefox is configured for «No proxy», it will show something similar to the following:
I.e., it will show user_pref(«network.proxy.type», 0); .
If you wish to check the proxy server setting for an account on the system other than the one under which you are currently logged in, you can specify the Security Identifier (SID) for the account, instead of HKCU as shown below.
You can determine the SID for an account from the command line by using the VBScript determine-sid script as shown below:
The script must be run from an administrator account. The user account name and the name of the computer, since the script can also query remote computers, can be specified on the command line. E.g., in the case above the username is «Sue» and the computer name is «Onda». If they aren’t specified on the command line, a window will appear prompting for both.
Created: Wednesday January 7, 2015
Last modified: Saturday September 9, 2017 10:34 AM


