- How to check that .NET is already installed
- Check SDK versions
- Check runtime versions
- Check for install folders
- More information
- runtime_checks pragma runtime_checks pragma
- Синтаксис Syntax
- Примечания Remarks
- Параметры директивы pragma runtime_checks Parameters of the runtime_checks Pragma
- Проверка того, установлена ли платформа .NET How to check that .NET is already installed
- Проверка версий пакета SDK Check SDK versions
- Проверка версий среды выполнения Check runtime versions
- Проверка папок установки Check for install folders
- Дополнительные сведения More information
- Call Windows Runtime APIs in desktop apps
- Modify a .NET project to use Windows Runtime APIs
- .NET 5: Use the Target Framework Moniker option
- Earlier versions of .NET: Install the Microsoft.Windows.SDK.Contracts NuGet package
- Configure projects that multi-target different versions of .NET
- Modify a C++ Win32 project to use Windows Runtime APIs
- Add Windows 10 experiences
- Support Windows XP, Windows Vista, and Windows 7/8 install bases
- Conditional compilation
- Runtime checks
- Related Samples
- Find answers to your questions
How to check that .NET is already installed
This article teaches you how to check which versions of the .NET runtime and SDK are installed on your computer. If you have an integrated development environment, such as Visual Studio or Visual Studio for Mac, .NET may have already been installed.
Installing an SDK installs the corresponding runtime.
If any command in this article fails, you don’t have the runtime or SDK installed. For more information, see the install articles for Windows, macOS, or Linux.
Check SDK versions
You can see which versions of the .NET SDK are currently installed with a terminal. Open a terminal and run the following command.
You get output similar to the following.
Check runtime versions
You can see which versions of the .NET runtime are currently installed with the following command.
You get output similar to the following.
Check for install folders
It’s possible that .NET is installed but not added to the PATH variable for your operating system or user profile. In this case, the commands from the previous sections may not work. As an alternative, you can check that the .NET install folders exist.
When you install .NET from an installer or script, it’s installed to a standard folder. Much of the time the installer or script you’re using to install .NET gives you an option to install to a different folder. If you choose to install to a different folder, adjust the start of the folder path.
dotnet executable
C:\program files\dotnet\dotnet.exe
.NET SDK
C:\program files\dotnet\sdk\
.NET Runtime
C:\program files\dotnet\shared\
dotnet executable
/home/user/share/dotnet/dotnet
.NET SDK
/home/user/share/dotnet/sdk/
dotnet executable
/usr/local/share/dotnet/dotnet
.NET SDK
/usr/local/share/dotnet/sdk/
More information
You can see both the SDK versions and runtime versions with the command dotnet —info . You’ll also get other environmental related information, such as the operating system version and runtime identifier (RID).
runtime_checks pragma runtime_checks pragma
Отключает или восстанавливает /RTC настройки параметров компилятора. Disables or restores the /RTC compiler option settings.
Синтаксис Syntax
#pragma runtime_checks( « [ Среда выполнения-проверка-параметры ] «, < restore | off > ) #pragma runtime_checks( « [ runtime-check-options ] «, < restore | off > )
Примечания Remarks
Нельзя включить проверку времени выполнения, которая не была включена параметром компилятора. You can’t enable a run-time check that wasn’t enabled by a compiler option. Например, если не указать /RTCs в командной строке, при указании параметра #pragma runtime_checks( «s», restore) не будет включена проверка кадра стека. For example, if you don’t specify /RTCs on the command line, specifying #pragma runtime_checks( «s», restore) won’t enable stack frame verification.
Объект runtime_checks pragma должен находиться за пределами функции и вступает в силу при первой функции, определенной после появления pragma . The runtime_checks pragma must appear outside a function, and takes effect at the first function defined after the pragma is seen. restore Аргументы и off включают параметры, указанные в параметре runtime_checks pragma On или OFF. The restore and off arguments turn options specified in the runtime_checks pragma on or off.
Параметры проверки среды выполнения могут быть равны нулю или большему числу параметров, приведенных в следующей таблице. The runtime-check-options can be zero or more of the parameters shown in the following table.
Параметры директивы pragma runtime_checks Parameters of the runtime_checks Pragma
| Параметры Parameter(s) | Тип проверки времени выполнения Type of run-time check |
|---|---|
| s | Включает проверку (кадра) стека. Enables stack (frame) verification. |
| c | Сообщает, когда значение назначается меньшему типу данных, что приводит к потере данных. Reports when a value is assigned to a smaller data type that results in a data loss. |
| u | Сообщает об использовании переменной перед ее определением. Reports when a variable is used before it’s defined. |
Эти параметры являются теми же, которые используются с /RTC параметром компилятора. These parameters are the same ones used with the /RTC compiler option. Например: For example:
Использование runtime_checks pragma с пустой строкой ( «» ) является особой формой директивы: Using the runtime_checks pragma with the empty string ( «» ) is a special form of the directive:
При использовании off параметра происходит включение проверок ошибок во время выполнения, перечисленных в приведенной выше таблице. When you use the off parameter, it turns the run-time error checks listed in the table above, off.
При использовании restore параметра он сбрасывает проверки ошибок во время выполнения до тех, которые были указаны с помощью /RTC параметра компилятора. When you use the restore parameter, it resets the run-time error checks to the ones that you specified using the /RTC compiler option.
Проверка того, установлена ли платформа .NET How to check that .NET is already installed
Эта статья описывает, как проверить, какие версии среды выполнения .NET и пакета SDK установлены на компьютере. This article teaches you how to check which versions of the .NET runtime and SDK are installed on your computer. Если у вас есть интегрированная среда разработки, такая как Visual Studio или Visual Studio для Mac, то возможно, платформа .NET уже установлена. If you have an integrated development environment, such as Visual Studio or Visual Studio for Mac, .NET may have already been installed.
При установке пакета SDK устанавливается и соответствующая среда выполнения. Installing an SDK installs the corresponding runtime.
Если любая команда из этой статьи завершается ошибкой, среда выполнения или пакет SDK не установлены. If any command in this article fails, you don’t have the runtime or SDK installed. Дополнительные сведения см. в статьях, посвященных установке в Windows, macOS или Linux. For more information, see the install articles for Windows, macOS, or Linux.
Проверка версий пакета SDK Check SDK versions
Вы можете узнать, какие версии пакета SDK для .NET установлены, с помощью терминала. You can see which versions of the .NET SDK are currently installed with a terminal. Откройте терминал и выполните приведенную ниже команду. Open a terminal and run the following command.
Вы получите результат, аналогичный приведенному ниже. You get output similar to the following.
Проверка версий среды выполнения Check runtime versions
Вы можете узнать, какие версии среды выполнения .NET установлены, с помощью приведенной ниже команды. You can see which versions of the .NET runtime are currently installed with the following command.
Вы получите результат, аналогичный приведенному ниже. You get output similar to the following.
Проверка папок установки Check for install folders
Возможно, платформа .NET установлена, но не добавлена в переменную PATH для профиля операционной системы или пользователя. It’s possible that .NET is installed but not added to the PATH variable for your operating system or user profile. В данном случае команды из предыдущих разделов могут не работать. In this case, the commands from the previous sections may not work. В качестве альтернативы можно проверить существование папок установки .NET. As an alternative, you can check that the .NET install folders exist.
При установке с помощью установщика или сценария .NET устанавливается в стандартную папку. When you install .NET from an installer or script, it’s installed to a standard folder. В большинстве случаев установщик или сценарий, который вы используете для установки .NET, предоставляет возможность установки в другую папку. Much of the time the installer or script you’re using to install .NET gives you an option to install to a different folder. Если вы решили выполнить установить в другую папку, измените начало пути к папке. If you choose to install to a different folder, adjust the start of the folder path.
Исполняемый файл dotnet dotnet executable
C:\program files\dotnet\dotnet.exe C:\program files\dotnet\dotnet.exe
Пакет SDK для .NET .NET SDK
C:\program files\dotnet\sdk\<версия>\ C:\program files\dotnet\sdk\
Среда выполнения .NET .NET Runtime
C:\program files\dotnet\shared\<тип среды выполнения>\<версия>\ C:\program files\dotnet\shared\
Исполняемый файл dotnet dotnet executable
/home/user/share/dotnet/dotnet /home/user/share/dotnet/dotnet
Пакет SDK для .NET .NET SDK
/home/user/share/dotnet/sdk/
Среда выполнения .NET .NET Runtime
/home/user/share/dotnet/shared/<тип среды выполнения>/<версия>/ /home/user/share/dotnet/shared/
Исполняемый файл dotnet dotnet executable
/usr/local/share/dotnet/dotnet /usr/local/share/dotnet/dotnet
Пакет SDK для .NET .NET SDK
/usr/local/share/dotnet/sdk/<версия>/ /usr/local/share/dotnet/sdk/
Среда выполнения .NET .NET Runtime
/usr/local/share/dotnet/shared/<тип среды выполнения>/<версия>/ /usr/local/share/dotnet/shared/
Дополнительные сведения More information
Версии пакета SDK и среды выполнения можно просмотреть с помощью команды dotnet —info . You can see both the SDK versions and runtime versions with the command dotnet —info . Вы также получите другие сведения о среде, такие как версия операционной системы и идентификатор среды выполнения (RID). You’ll also get other environmental related information, such as the operating system version and runtime identifier (RID).
Call Windows Runtime APIs in desktop apps
You can use Universal Windows Platform (UWP) APIs to add modern experiences to your desktop apps that light up for Windows 10 users.
First, set up your project with the required references. Then, call Windows Runtime APIs from your code to add Windows 10 experiences to your desktop app. You can build separately for Windows 10 users or distribute the same binaries to all users regardless of which version of Windows they run.
Some Windows Runtime APIs are supported only in desktop apps that have package identity. For more information, see Available Windows Runtime APIs.
Modify a .NET project to use Windows Runtime APIs
There are several options for .NET projects:
- Starting in .NET 5, you can add a Target Framework Moniker (TFM) to your project file to access WinRT APIs. This option is supported in projects that target Windows 10, version 1809 or later.
- For earlier versions of .NET, you can install the Microsoft.Windows.SDK.Contracts NuGet package to add all necessary references to your project. This option is supported in projects that target Windows 10, version 1803 or later.
- If your project multi-targets .NET 5 (or later) and earlier versions of .NET, you can configure the project file to use both options.
.NET 5: Use the Target Framework Moniker option
This option is only supported in projects that use .NET 5 (or a later release) and target Windows 10, version 1809 or a later OS release. For more background info about this scenario, see this blog post.
With your project open in Visual Studio, right-click your project in Solution Explorer and choose Edit Project File. Your project file should look similar to this.
Replace the value of the TargetFramework element with one of the following strings:
- net5.0-windows10.0.17763.0: Use this value if your app targets Windows 10, version 1809.
- net5.0-windows10.0.18362.0: Use this value if your app targets Windows 10, version 1903.
- net5.0-windows10.0.19041.0: Use this value if your app targets Windows 10, version 2004.
For example, the following element is for a project that targets Windows 10, version 2004.
Save your changes and close the project file.
Earlier versions of .NET: Install the Microsoft.Windows.SDK.Contracts NuGet package
Use this option if your app uses .NET Core 3.x or .NET Framework. This option is supported in projects that target Windows 10, version 1803 or a later OS release.
Make sure package references are enabled:
- In Visual Studio, click Tools -> NuGet Package Manager -> Package Manager Settings.
- Make sure PackageReference is selected for Default package management format.
With your project open in Visual Studio, right-click your project in Solution Explorer and choose Manage NuGet Packages.
In the NuGet Package Manager window, select the Browse tab and search for Microsoft.Windows.SDK.Contracts .
After the Microsoft.Windows.SDK.Contracts package is found, in the right pane of the NuGet Package Manager window select the Version of the package you want to install based on the version of Windows 10 you want to target:
- 10.0.19041.xxxx: Choose this for Windows 10, version 2004.
- 10.0.18362.xxxx: Choose this for Windows 10, version 1903.
- 10.0.17763.xxxx: Choose this for Windows 10, version 1809.
- 10.0.17134.xxxx: Choose this for Windows 10, version 1803.
Click Install.
Configure projects that multi-target different versions of .NET
If your project multi-targets .NET 5 (or later) and earlier versions (including .NET Core 3.x and .NET Framework), you can configure the project file to use the Target Framework Moniker to automatically pull in the WinRT API references for .NET 5 and use the Microsoft.Windows.SDK.Contracts NuGet package for earlier versions.
With your project open in Visual Studio, right-click your project in Solution Explorer and choose Edit Project File. The following example demonstrates a project file for an app that uses .NET Core 3.1.
Replace the TargetFramework element in the file with a TargetFrameworks element (note the plural). In this element, specify the Target Framework Monikers for all the versions of .NET you want to target, separated by semi-colons.
- For .NET 5 or later, use one of the following Target Framework Monikers:
- net5.0-windows10.0.17763.0: Use this value if your app targets Windows 10, version 1809.
- net5.0-windows10.0.18362.0: Use this value if your app targets Windows 10, version 1903.
- net5.0-windows10.0.19041.0: Use this value if your app targets Windows 10, version 2004.
- For .NET Core 3.x, use netcoreapp3.0 or netcoreapp3.1.
- For .NET Framework, use net46.
The following example demonstrates how to multi-target .NET Core 3.1 and .NET 5 (for Windows 10, version 2004).
After the PropertyGroup element, add a PackageReference element that includes a conditional statement that installs the Microsoft.Windows.SDK.Contracts NuGet package for any versions of .NET Core 3.x or .NET Framework that your app targets. The PackageReference element must be a child of an ItemGroup element. The following example demonstrates how to do this for .NET Core 3.1.
When you’re done, your project file should look similar to this.
Save your changes and close the project file.
Modify a C++ Win32 project to use Windows Runtime APIs
Use C++/WinRT to consume Windows Runtime APIs. C++/WinRT is an entirely standard modern C++17 language projection for Windows Runtime (WinRT) APIs, implemented as a header-file-based library, and designed to provide you with first-class access to the modern Windows API.
To configure your project for C++/WinRT:
- For new projects, you can install the C++/WinRT Visual Studio Extension (VSIX) and use one of the C++/WinRT project templates included in that extension.
- For existing projects, you can install the Microsoft.Windows.CppWinRT NuGet package in the project.
For more details about these options, see this article.
Add Windows 10 experiences
Now you’re ready to add modern experiences that light up when users run your application on Windows 10. Use this design flow.
вњ… First, decide what experiences you want to add
There’s lots to choose from. For example, you can simplify your purchase order flow by using monetization APIs, or direct attention to your application when you have something interesting to share, such as a new picture that another user has posted.
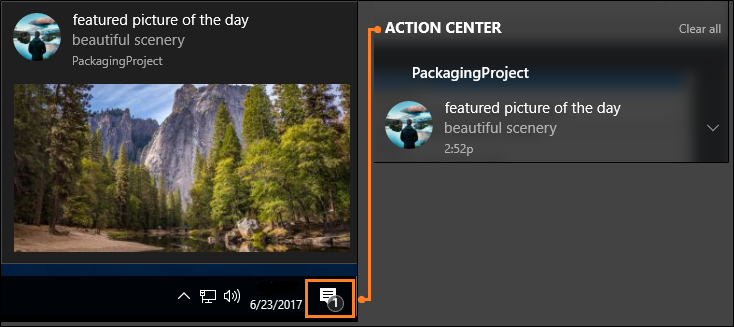
Even if users ignore or dismiss your message, they can see it again in the action center, and then click on the message to open your app. This increases engagement with your application and has the added bonus of making your application appear deeply integrated with the operating system. We’ll show you the code for that experience a bit later in this article.
Visit the UWP documentation for more ideas.
вњ… Decide whether to enhance or extend
You’ll often hear us use the terms enhance and extend, so we’ll take a moment to explain exactly what each of these terms mean.
We use the term enhance to describe Windows Runtime APIs that you can call directly from your desktop app (whether or not you have chosen to package your application in an MSIX package). When you’ve chosen a Windows 10 experience, identify the APIs that you need to create it, and then see if that API appears in this list. This is a list of APIs that you can call directly from your desktop app. If your API does not appear in this list, that’s because the functionality associated with that API can run only within a UWP process. Often times, these include APIs that render UWP XAML such as a UWP map control or a Windows Hello security prompt.
Although APIs that render UWP XAML typically cannot be called directly from your desktop, you might be able to use alternative approaches. If you want to host UWP XAML controls or other custom visual experiences, you can use XAML Islands (starting in Windows 10, version 1903) and the Visual layer (starting in Windows 10, version 1803). These features can be used in packaged or unpackaged desktop apps.
If you have chosen to package your desktop app in an MSIX package, another option is to extend the application by adding a UWP project to your solution. The desktop project is still the entry point of your application, but the UWP project gives you access to all of the APIs that do not appear in this list. The desktop app can communicate with the UWP process by using a an app service and we have lots of guidance on how to set that up. If you want to add an experience that requires a UWP project, see Extend with UWP components.
вњ… Reference API contracts
If you can call the API directly from your desktop app, open a browser and search for the reference topic for that API. Beneath the summary of the API, you’ll find a table that describes the API contract for that API. Here’s an example of that table:

If you have a .NET-based desktop app, add a reference to that API contract, and then set the Copy Local property of that file to False. If you have a C++-based project, add to your Additional Include Directories, a path to the folder that contains this contract.
вњ… Call the APIs to add your experience
Here’s the code that you’d use to show the notification window that we looked at earlier. These APIs appear in this list so you can add this code to your desktop app and run it right now.
Support Windows XP, Windows Vista, and Windows 7/8 install bases
You can modernize your application for Windows 10 without having to create a new branch and maintain separate code bases.
If you want to build separate binaries for Windows 10 users, use conditional compilation. If you’d prefer to build one set of binaries that you deploy to all Windows users, use runtime checks.
Let’s take a quick look at each option.
Conditional compilation
You can keep one code base and compile a set of binaries just for Windows 10 users.
First, add a new build configuration to your project.
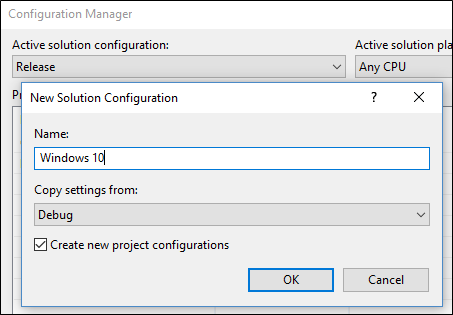
For that build configuration, create a constant that to identify code that calls Windows Runtime APIs.
For .NET-based projects, the constant is called a Conditional Compilation Constant.

For C++-based projects, the constant is called a Preprocessor Definition.

Add that constant before any block of UWP code.
The compiler builds that code only if that constant is defined in your active build configuration.
Runtime checks
You can compile one set of binaries for all of your Windows users regardless of which version of Windows they run. Your application calls Windows Runtime APIs only if the user is runs your application as a packaged application on Windows 10.
The easiest way to add runtime checks to your code is to install this Nuget package: Desktop Bridge Helpers and then use the IsRunningAsUWP() method to gate off all code that calls Windows Runtime APIs. See this blog post for more details: Desktop Bridge — Identify the application’s context.
Related Samples
Find answers to your questions
Have questions? Ask us on Stack Overflow. Our team monitors these tags. You can also ask us here.


