- Description of the Windows Registry Checker Tool (Scanreg.exe)
- Summary
- More Information
- To Restore Individual Files
- Known Issues for Windows Registry Checker
- References
- Which version of Windows operating system am I running?
- Find operating system info in Windows 10
- Related links
- Find operating system info in Windows 8.1 or Windows RT 8.1
- Related links
- Find operating system info in Windows 7
- Related links
- Get Windows Version
- How to get the Windows Version from the System Registry
- Helper function to read a string value from the registry:
- Get the OS version (e.g. «6.3»)
- Get the OS name (e.g. «Windows 8.1»)
- Check Windows version
- 7 Answers 7
- 3 ways to Check What version of Windows 10 installed you have
- Check Windows 10 version and Build Number
- Using winver command
- Using the Command Prompt
- Using About settings page
- Display windows 10 Build number on Desktop
Description of the Windows Registry Checker Tool (Scanreg.exe)
Summary
When you start your computer successfully, the Windows Registry Checker tool (Scanreg.exe) creates a backup of system files and registry configuration information (including user account information, protocol bindings, software program settings, and user preferences) once daily. Files that Windows Registry Checker backs up include System.dat, User.dat, System.ini, and Win.ini. This article describes the Windows Registry Checker tool.
More Information
Windows Registry Checker automatically scans the system registry for invalid entries and empty data blocks when it is started. If invalid registry entries are detected, Windows Registry Checker automatically restores a previous day’s backup. This is equivalent to running the scanreg /autorun command from a command prompt. If no backups are available, Windows Registry Checker tries to make repairs to the registry. This is equivalent to running the scanreg /fix command from a command prompt. If the registry contains more than 500 KB of empty data blocks, Windows Registry Checker automatically optimizes it.
Windows Setup runs the Windows Registry Checker tool to verify the integrity of the existing registry before it performs an upgrade. If it detects registry damage, it tries to fix it automatically.
The protected-mode version of the Windows Registry Checker tool (Scanregw.exe) can create a backup of the system files and scan the registry for invalid entries. If invalid entries are detected, it refers to the real-mode version of the Windows Registry Checker tool (Scanreg.exe) for a resolution.
You can configure Windows Registry Checker with a Scanreg.ini file. Settings that you can configure include:
Enabling or disabling the tool
The number of backups maintained (no more than five is recommended)
The location of the backup folder
Settings to add additional files to the backup set
For additional information about the Scanreg.ini file, click the article number below to view the article in the Microsoft Knowledge Base:
183603 How to Customize Registry Checker Tool Settings To start the Windows Registry Checker tool, click Start, click Run, type scanregw.exe in the Open box, and then click OK.
NOTE: To use the Windows Registry Checker tool with the /restore parameter, you must run the tool from a command prompt running outside of Windows. When you do so, you can choose up to five registry backup files listed for you to restore.
To Restore Individual Files
To restore individual files, follow these steps:
Click Start, point to Find, and then click Files Or Folders.
In the Named box, type rb0*.cab, and then click Find Now.
Double-click the cabinet file that contains the file that you want to restore.
Right-click the file that you want to restore, click Extract, and then choose the folder where the new file is to be placed. Microsoft recommends that you place the file in your Temp folder.
Restart your computer in MS-DOS mode (in Windows Millennium Edition, this requires that you restart with the Windows Millennium Edition Startup disk).
Copy the file that you extracted to the appropriate folder. Note that registry .dat files are typically marked as hidden and read-only, so you need to use both the attrib and copy commands to replace the existing file with the newly extracted one.
Known Issues for Windows Registry Checker
If your registry contains an entry that references a file (such as a .vxd file) that no longer exists, it is not repaired by Windows Registry Checker. Such errors are not typically damaging, and you can manually remove the entry.
The amount of conventional memory that is required by Windows Registry Checker is determined by the size of your registry. Windows Registry Checker may require 580 KB or more of free conventional memory to complete the repair process. If you encounter an «Out of Memory» error message, optimize your free conventional memory.
NOTE: Extended memory is required for Windows Registry Checker to operate properly, so it does not run when you start your computer with the Safe Mode Command Prompt Only option. The exception to this is the scanreg /restore command, which is the only Scanreg function that can run without extended memory memory.
References
For additional information about Registry Checker command line switches, click the article number below to view the article in the Microsoft Knowledge Base:
184023 Command-Line Switches for the Registry Checker Tool
Which version of Windows operating system am I running?
Find operating system info in Windows 10
To find out which version of Windows your device is running, press the Windows logo key + R, type winver in the Open box, and then select OK.
Here’s how to learn more:
Select the Start button > Settings > System > About .
Under Device specifications > System type, see if you’re running a 32-bit or 64-bit version of Windows.
Under Windows specifications, check which edition and version of Windows your device is running.
Related links
If you’re having a problem with activation, see Activate in Windows 10.
If you forgot the password you use to sign in to Windows devices or email, see How to reset your Microsoft password.
For info about updating Windows, see Windows Update: FAQ.
Find operating system info in Windows 8.1 or Windows RT 8.1
To find out which version of Windows your device is running, press the Windows logo key + R, type winver in the Open box, and then select OK.
If your device is running Windows 8.1 or Windows RT 8.1, here’s how to learn more:
If you’re using a touch device, swipe in from the right edge of the screen, tap Settings, and then tap Change PC settings. Continue to step 3.
If you’re using a mouse, point to the lower-right corner of the screen, move the mouse pointer up, click Settings, and then click Change PC settings.
Select PC and devices > PC info.
Under Windows you’ll see which edition and version of Windows your device is running.
Under PC > System type you’ll see if you’re running a 32-bit or 64-bit version of Windows.

Related links
If you’re having a problem with activation, see Activate Windows 7 or Windows 8.1
If you forgot the password you use to sign in to Windows devices or email, see How to reset your Microsoft password.
For info about updating Windows, see Windows Update: FAQ.
Find operating system info in Windows 7
Select the Start  button, type Computer in the search box, right-click on Computer, and then select Properties.
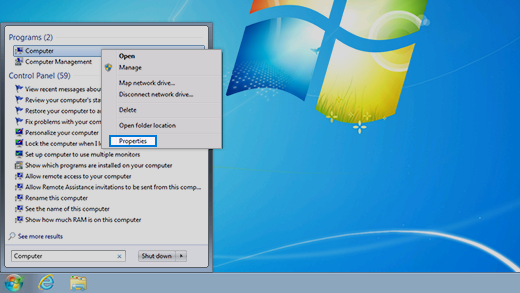
Under Windows edition, you’ll see the version and edition of Windows that your device is running.
Support for Windows 7 ended on January 14, 2020
We recommend you move to a Windows 10 PC to continue to receive security updates from Microsoft.
Related links
If you’re having a problem with activation, see Activate Windows 7 or Windows 8.1.
If you forgot the password you use to sign in to Windows devices or email, see How to reset your Microsoft password.
For info about updating Windows, see Windows Update: FAQ.
Get Windows Version
How to get the Windows Version from the System Registry
The Windows version is stored in the registry key: HKLM\SOFTWARE\Microsoft\Windows NT\CurrentVersion
The value CurrentVersion contains the version number as string(!):
| Version Number: | Operating System: |
| 5.0 | Windows 2000 |
| 5.1 | Windows XP |
| 5.2 | Windows XP 64bit |
| 5.2 | Windows Server 2003 / R2 |
| 6.0 | Windows Vista / Windows Server 2008 |
| 6.1 | Windows 7 / Windows Server 2008 R2 |
| 6.2 | Windows 8 / Windows Server 2012 |
| 6.3 | Windows 8.1 / Windows Server 2012 R2 |
| 10.0 | Windows 10 (Preview) |
The value ProductName contains the system name, e.g. «Windows 8.1»
Helper function to read a string value from the registry:
CString GetStringFromReg(HKEY keyParent, CString keyName, CString keyValName)
<
CRegKey key;
CString out;
if (key.Open(keyParent, keyName, KEY_READ) == ERROR_SUCCESS)
<
ULONG len=256;
key.QueryStringValue(keyValName, out.GetBuffer(256), &len);
out.ReleaseBuffer();
key.Close();
>
return out;
>
Get the OS version (e.g. «6.3»)
CString osversion = GetStringFromReg(HKEY_LOCAL_MACHINE, L» SOFTWARE\\Microsoft\\Windows NT\\CurrentVersion «, L» CurrentVersion «);
Get the OS name (e.g. «Windows 8.1»)
CString osname = GetStringFromReg(HKEY_LOCAL_MACHINE, L» SOFTWARE\\Microsoft\\Windows NT\\CurrentVersion «, L» ProductName «);
©1997-2021 Arclab®. All other trademarks and brand names are the property of their respective owners.
Check Windows version
How I can check in C++ if Windows version installed on computer is Windows Vista and higher (Windows 7)?
7 Answers 7
Similar to other tests for checking the version of Windows NT:
All the answers in this thread point you to using GetVersion or GetVersionEx for this test, which is incorrect. It seems to work, but it is risky. The primary source of appcompat problems for Windows OS upgrades comes from poorly written tests based on GetVersion results with bad assumptions or buggy comparisons.
The correct way to do this test is to use VerifyVersionInfo , not GetVersion or GetVersionEx .
If you are using the VS 2013 compiler toolset and the Windows 8.1 SDK, you can use the VersionHelpers.h and just call IsWindowsVistaOrGreater .
If you are using the VS 2013 v120_xp platform toolset to target Windows XP, you are actually using the Windows 7.1A SDK, so you need to use VeriyVersionInfo directly.
This code will work on Windows 2000 or later and give you a robust result. If you really needed this test to run on Windows 98 or Windows ME -and- you are using a compiler toolset old enough to actually run on that platform, you’d do the same test but with explicit rather than implicit linking. What’s in a version number?
Furthermore, using GetVersion or GetVersionEx will by default get the wrong version on Windows 8.1 and Windows 10. See Manifest Madness.
3 ways to Check What version of Windows 10 installed you have
Are you trying to find out the build number and version number of the Windows operating system running on your PC? Windows 10 is continually developed under Microsoft’s “Windows-as-a-Service” model. Each new “feature update” release brings with it a new name and version number, so it can be difficult to keep track of what’s actually running on your device. There are several ways to find the version and build number of the installed Windows 10. Here how to Check What version of Windows 10 installed you have.
Check Windows 10 version and Build Number
You can find the window version and build number using winver command, using command prompt or you can find it on Windows Registry. Let’s see first using winver command.
Using winver command
- Press Windows + R to open run window,
- Type command winver and click ok
- This will open the About Windows window displaying the Windows version and the build number in it.
example screenshot
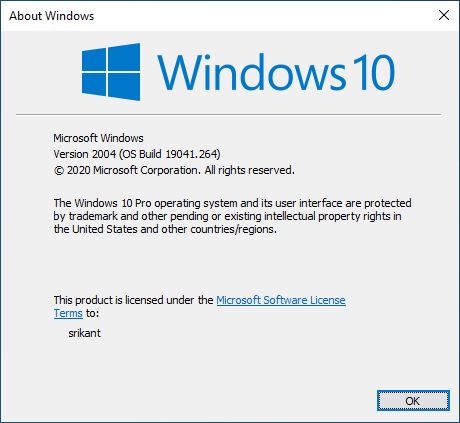
- Here this tells us that we’re running Windows 10 Pro Version 2004,
- And OS Build 19041.264, which is the latest publicly available build of Windows 10.
- We can also see that this copy of Windows is licensed.
- You can also launch winver manually, you’ll find winver.exe located in C: > Windows > System32.
- Double click on it this will open the same About windows.
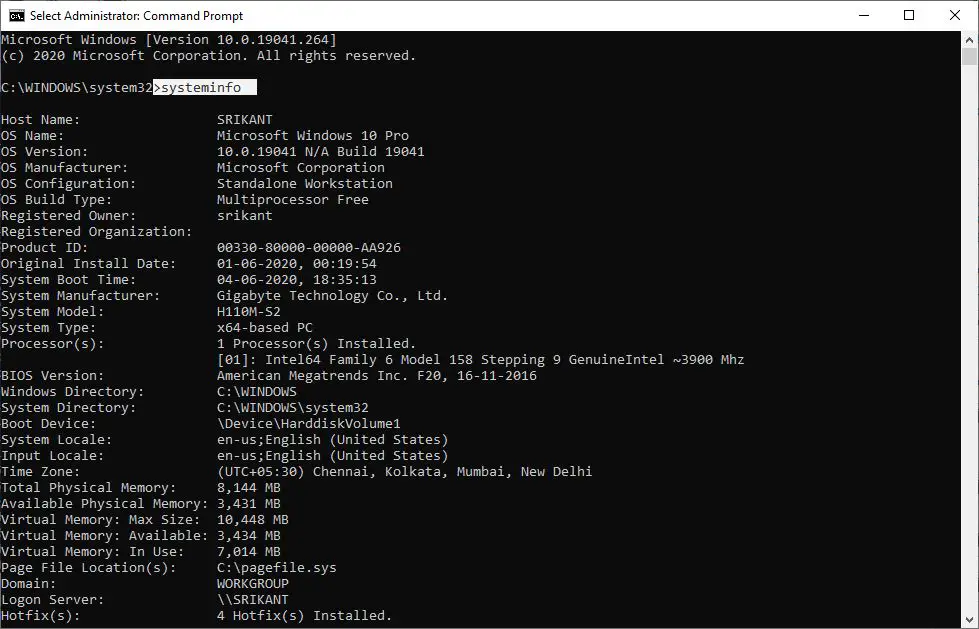
Using the Command Prompt
- Press Windows + R, type cmd and click ok
- This will open windows command prompt,
- Here type command systeminfo and press enter key.
- This will display detailed information about your computer,
- including Windows version,
- build number,
- OS install date, hotfixes installed.
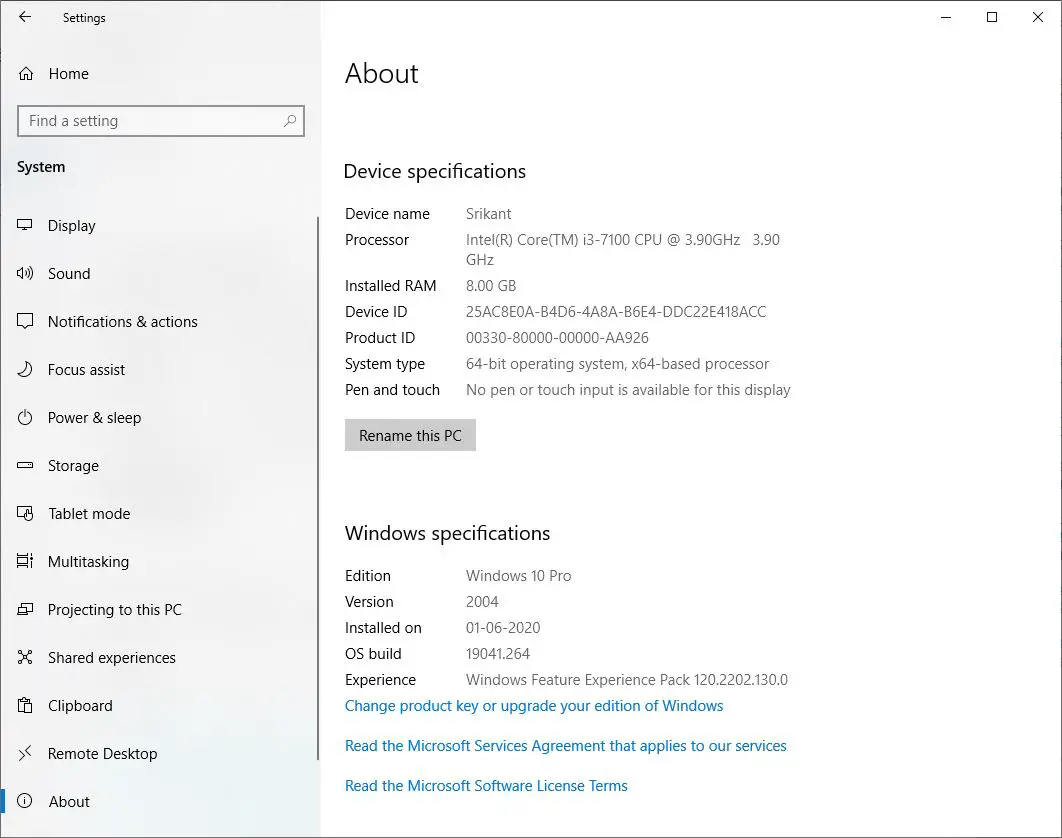
Using About settings page
- Press Windows + X and select settings,
- Now look for and select System,
- Click about on left-hand side
- Under About page, you should found the “Version number,
- And “OS Build”, the number should be 19041.xxx or later.
- That means we are currently using windows 10 version 2004 build 19041.264
Display windows 10 Build number on Desktop
- Press Windows + R, type regedit and ok,
- This will open Windows registry editor,
- navigate To the following key
- HKEY_CURRENT_USER\Control Panel\Desktop
- Making sure you’ve selected Desktop in the left pane,
- Look for PaintDesktopVersion in the right-hand pane of alphabetical entries.
- Double-click on it and change value data 0 to 1
- click ok and Close the registry window
- Restart Windows to take effect.
- That’s it, you should now see the Windows version painted on your Windows 10 desktop,

That’s all, I hope now you can easily Check What version of Windows 10 installed you have. Also, read:


