- Which version of Windows operating system am I running?
- Find operating system info in Windows 10
- Related links
- Find operating system info in Windows 8.1 or Windows RT 8.1
- Related links
- Find operating system info in Windows 7
- Related links
- Find windows OS version from command line
- Find OS Version and Service Pack number from CMD
- Check Windows version using WMIC command
- How to Find the Windows version, build and edition from ISO or DVD
- Find Windows version, build, edition from ISO file
- DISM Get-WimInfo showing the wrong version?
- How to change the download location in Windows 10, 8, 7
- Change default download location on PC
- How do I change the default save location in Windows 10?
- Run a System Scan to discover potential errors
- How to check your Windows version easily and quickly?
- How to Check the Version of Windows on my Computer
- Option 1: Accessing the About Windows Box
- Option 2: Opening the System Properties Window
- Windows 10:
- Windows 8.1:
- Windows 7:
- Resolve PC Issues with Auslogics BoostSpeed
- Option 3: Looking at the System Information
- Option 4: Using Command Prompt
Which version of Windows operating system am I running?
Find operating system info in Windows 10
To find out which version of Windows your device is running, press the Windows logo key + R, type winver in the Open box, and then select OK.
Here’s how to learn more:
Select the Start button > Settings > System > About .
Under Device specifications > System type, see if you’re running a 32-bit or 64-bit version of Windows.
Under Windows specifications, check which edition and version of Windows your device is running.
Related links
If you’re having a problem with activation, see Activate in Windows 10.
If you forgot the password you use to sign in to Windows devices or email, see How to reset your Microsoft password.
For info about updating Windows, see Windows Update: FAQ.
Find operating system info in Windows 8.1 or Windows RT 8.1
To find out which version of Windows your device is running, press the Windows logo key + R, type winver in the Open box, and then select OK.
If your device is running Windows 8.1 or Windows RT 8.1, here’s how to learn more:
If you’re using a touch device, swipe in from the right edge of the screen, tap Settings, and then tap Change PC settings. Continue to step 3.
If you’re using a mouse, point to the lower-right corner of the screen, move the mouse pointer up, click Settings, and then click Change PC settings.
Select PC and devices > PC info.
Under Windows you’ll see which edition and version of Windows your device is running.
Under PC > System type you’ll see if you’re running a 32-bit or 64-bit version of Windows.

Related links
If you’re having a problem with activation, see Activate Windows 7 or Windows 8.1
If you forgot the password you use to sign in to Windows devices or email, see How to reset your Microsoft password.
For info about updating Windows, see Windows Update: FAQ.
Find operating system info in Windows 7
Select the Start  button, type Computer in the search box, right-click on Computer, and then select Properties.
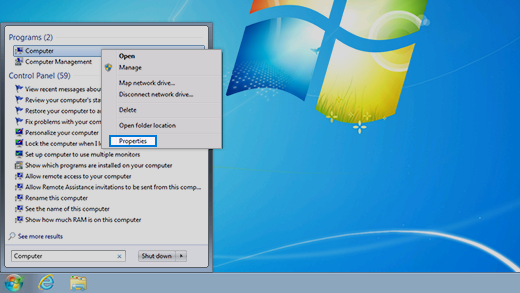
Under Windows edition, you’ll see the version and edition of Windows that your device is running.
Support for Windows 7 ended on January 14, 2020
We recommend you move to a Windows 10 PC to continue to receive security updates from Microsoft.
Related links
If you’re having a problem with activation, see Activate Windows 7 or Windows 8.1.
If you forgot the password you use to sign in to Windows devices or email, see How to reset your Microsoft password.
For info about updating Windows, see Windows Update: FAQ.
Find windows OS version from command line
Windows has command line utilities that show us the version of the Windows OS running on the computer, including the service pack number. There are multiple CMD commands that help with finding this, you can pick the one that suits your need. Ver command can show you the OS version whereas Systeminfo command can additionally give you service pack, OS edition and build number etc.
Find OS Version and Service Pack number from CMD
As you can see above, ver command shows only OS version but not the service pack number. We can find service pack number as well with Systeminfo command. Systeminfo dumps lot of other information too, which we can filter out using findstr command.
This command works on XP, Vista and Windows 7 and on Server editions also. Find below example for Win7.
In case of Windows 7 SP1, the output would be slightly different as below.
If you want to print more details, then you can use just ‘OS’ in the findstr search pattern. See example below for Server 2008.
Check Windows version using WMIC command
Run the below WMIC command to get OS version and the service pack number.
Example on Windows 7:
If you want to find just the OS version, you can use ver command. Open command window and execute ver command. But note that this does not show service pack version.
 This command does not show version on a Windows 7 system.
How to Find the Windows version, build and edition from ISO or DVD
Windows 10 ISO files downloaded from Microsoft will have descriptive names, such as en_windows_10_pro_10586_x64_dvd.iso and en_windows_10_pro_14393_x86_dvd.iso , depending upon the variant you downloaded. The file name depicts the language, version, build edition and the bitness of the Operating System contained in the ISO.

Let’s assume you have a copy of the Windows ISO with a generic name such as windows_10.iso (which doesn’t make any sense) obtained from a friend. To find the Windows version, build and edition from an ISO file or Windows Setup DVD, you can use the DISM tool.
Find Windows version, build, edition from ISO file
To find the Windows version, build and edition from an ISO file or DVD, use these steps:
- Mount the ISO file by double clicking on it. By default, Mount will be the default action for ISO files. If not, right-click on the file and choose “Mount” in the context menu.
- Double-click the drive letter of the mounted drive.
- Double-click the Sources folder.
- Sort folder contents by Name, and look for a file named install.wim . If install.wim is missing, then you’ll have install.esd .
Install.esd located in the Sources folder.
Open an elevated Command Prompt window, and then type the following command:
In the ISO file, if you have install.esd instead of install.wim , you’d type:
DISM can handle both these file formats ( .wim & .esd ), at least in Windows 10.
Running DISM command on install.esd
You’ll see the following output:
If you’re using Windows 7, running the above DISM command-line with the .esd file name parameter would throw the following error:
In that case, you can pass boot.wim as the parameter, as below: Running DISM command on boot.wim
Which results in the following output:
Note that for Multi-arch ISO files that include both 32-bit and 64-bit versions of Windows, the boot.wim, install.wim, install.esd file path varies slightly. These files are located under their respective architecture folders.
That’s it! You’ve now obtained the maximum information about the Operating System included in an ISO file, such as the OS version, edition, Service Pack level, architecture.
DISM Get-WimInfo showing the wrong version?
Sometimes, the Windows 8 or 10 ISOs may have the wrong version info (header?) causing the above DISM command to show the wrong version or build.
I downloaded the Windows 20 20H2 ISO (20H2 Build starts with 19042.nnn) from Microsoft.
- Filename: Win10_20H2_English_x64.iso
- SHA-256: e793f3c94d075b1aa710ec8d462cee77fde82caf400d143d68036f72c12d9a7e
Running DISM showed this:
Whereas, 20H2 build starts with 19042.nnn (as shown by the winver command)
The setup.exe (inside the 20H1 ISO) file’s version showed up as 19041.xxx, instead of 19042.nnn. So, it’s a glitch in this particular ISO.
So, be aware of the above issues. The above can happen sometimes.
How to change the download location in Windows 10, 8, 7


- Download Restoro PC Repair Tool that comes with Patented Technologies (patent available here).
- Click Start Scan to find Windows issues that could be causing PC problems.
- Click Repair All to fix issues affecting your computer’s security and performance
- Restoro has been downloaded by 0 readers this month.
Has it ever happened to you that when trying to download a file, folder or perhaps a program in Windows 8, Windows 7 or Windows 10, you didn’t had enough free disk space to do so ?Well, this is mainly because Windows 8, 7 and Windows 10, like any other Microsoft operating systems, have the default download location folder set in your C:/ drive where you also have your operating system. This is the reason why, most probably, you won’t have that much space available.
Tn the tutorial below, you’ll learn how easy it is to change the download location in Windows 8, 7 or Windows 10 in only five minutes of your time. Also, you can change the download location folder even when the message pops up saying that you don’t have enough free disk space on the partition. So, without wasting any more time, let’s begin the tutorial and set our new directory for our downloaded items.
Change default download location on PC
- After you power up the Windows 7, 8 or Windows 10 PC, you will have to left click on the desktop icon you will have in the start screen.
- Now after you get to your desktop feature right click on the “Windows Explorer” icon presented in the lower left side of the screen.
- Now from the menu that pops up you will need to left click on the “Desktop” icon.
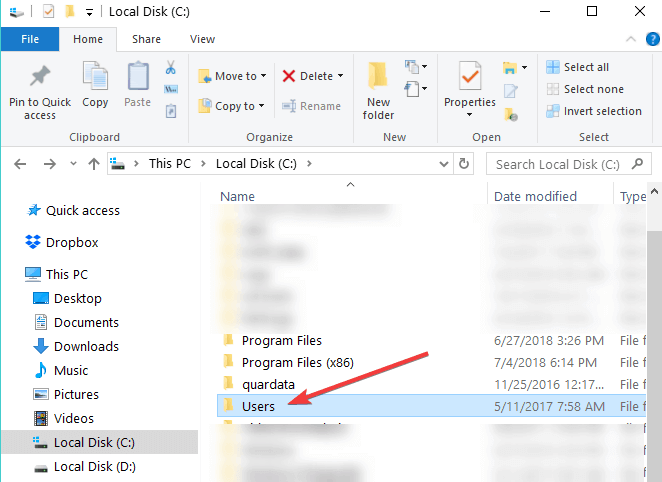
Note: You can also access the “Desktop” by double clicking (left clicking) on My Computer or This PC (depending on your OS version) and after the window with “My Computer” is opened you can left click on the “Desktop” icon in the left side of the screen. - Now, after you selected the “Desktop”, some icons will be shown in the right side of the window and you will need to double click (left click) on the folder with the name of your account.

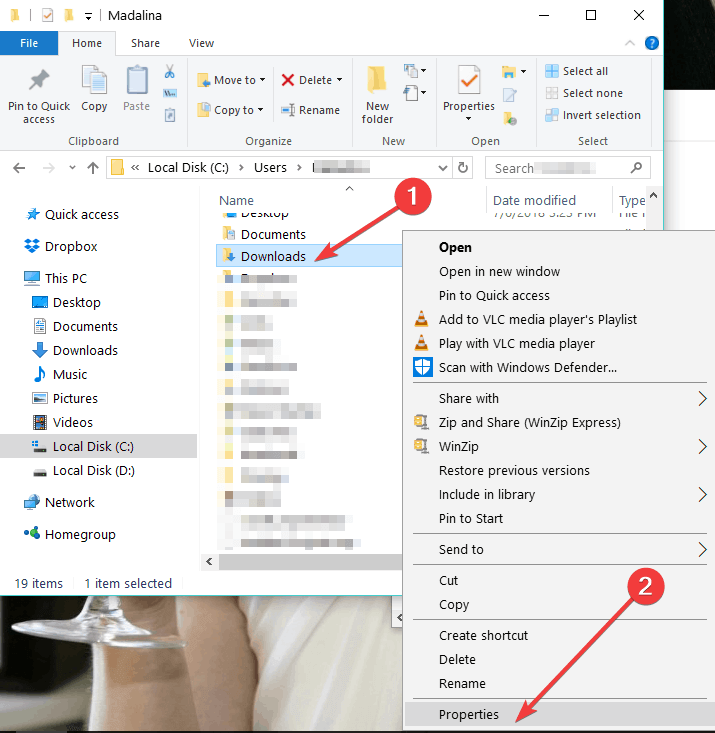
- In the folder you opened that had your account name, you will have to right click on “Downloads” folder presented there.
- After you right clicked the “Downloads” folder you will need to left click on “Properties”.
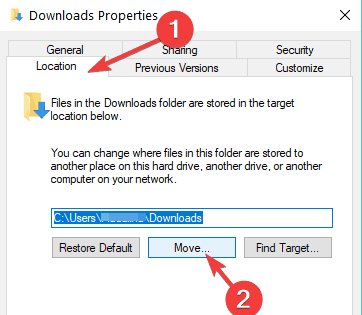
- Now that the “Properties” window is open, you will need to left click on the “Location” tab presented in the upper side of that window.
- Now that you have selected the “Location” tab you can see the path where the download items are going .
- Left click on the “Move…” button you have under the specified path.
- Now after you left clicked on “Move…” you will have to write there yourself the drive where you want your items to be downloaded and also in which folder.
Note: If the folder you have written does not exist after you left click on the “Apply” button situated in the lower right side of the screen you will be asked if you want to create that download folder and you will left click on “OK” to confirm. - Another “Move folder” window will appear which it will show you the old and the new location where you will have to left click on the “Yes” button situated in the lower right side of the screen.
- Now, you will have to left click on the “OK” button in the “Download Properties” window.
- Go to your new location where you selected to download your files and check if Windows 7, 8 or Windows 10 system has made a “Downloads” folder there.
Note: Reboot your Windows 7, 8 or Windows 10 device if it hasn’t created the “Downloads” folder to the new directory and check again after power up.
- RELATED: Can’t rename folders in Windows 10 [Fix]
How do I change the default save location in Windows 10?
If Windows 10 is your OS of choice, you can also change the download folder save location from the Settings page:
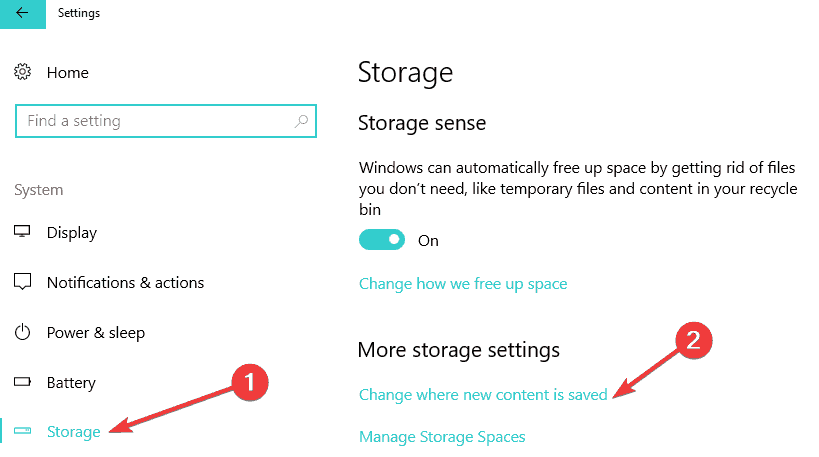
- Go to Settings > System > select Storage
- Now, click on the option ‘Change where new content is saved’
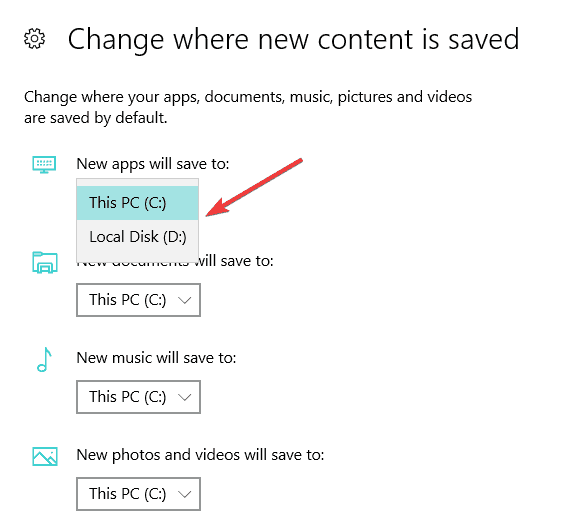
- Set your preferred download location for each item category.
Run a System Scan to discover potential errors


So, now you can go and download your files or programs in Windows 7, 8 or Windows 10 without having to worry about the download location. Share your thoughts on this article in the comments below and feel free to list your suggestions on what we can do to help you further in your Windows 7, 8 or Windows 10 computer.
Also, the location where a Windows 10 update is saved on your computer is tricky, but for that, you can check this fresh guide here on where’s the default download folder for the Windows 10 versions.
RELATED STORIES TO CHECK OUT:
How to check your Windows version easily and quickly?
Are you trying to update your drivers? Do you plan on buying a new software program for your PC? If so, then you probably need to ask yourself, “What is my Windows OS version?” This information is crucial for several things you’ll need for your computer. If you want to learn how to check the version of Windows on your PC, then you’ve come to the right place. In this post, we’re going to share with you the easy steps to get the details of your operating system.
How to Check the Version of Windows on my Computer
- Accessing the About Windows Box
- Opening the System Properties Window
- Looking at the System Information
- Using Command Prompt
Option 1: Accessing the About Windows Box
You can get the essential information about your operating system by accessing the About Windows box. You can do that by following these steps:
- Launch the Run dialog box by pressing Windows Key+R on your keyboard.
- Once the Run dialog box is open, type “winver” (no quotes), then click OK.
- The About Windows box will pop up. On the second line, you will see the OS build and version for your Windows. The fourth line tells you the edition of your operating system.
Option 2: Opening the System Properties Window
You can also access the System Properties window to find out the version of Windows installed on your computer. The steps vary depending on the OS you have. Here are the instructions:
Windows 10:
- On your keyboard, press Windows Key+S.
- Now, type “This PC” (no quotes).
- Right-click This PC from the results, then select Properties from the options.
- The System Properties window will pop up. Here, you will be able to see the basic details about your computer, including its OS type and edition.
To get more information about your operating system, you need to open the Settings app. Here are the steps:
- Press Windows Key+I on your keyboard. This should launch the Settings app.
- Select System.
- Click About in the left-pane menu,
- Go to the right pane to see the version, edition, installation date, and build of your operating system.
Windows 8.1:
- Press the Windows key on your keyboard.
- Inside the Search box, type “This PC” (no quotes).
- In the results, right-click This PC.
- Choose Properties from the menu.
- You will see the important details about your computer, including the edition and type of operating system you have.
To get more details about your Windows system, you can access PC Info. To do that, follow the instructions below:
- On your keyboard, press Windows Key, then type “PC Info” (no quotes).
- Select PC Info from the results.
- A new window will pop up. It will contain the information about your computer, including the activation status and edition of your Windows 8 OS.
Windows 7:
- Go to your taskbar and click the Windows icon.
- Right-click Computer, then select Properties from the menu.
- You will see the service pack, edition and system type of your Windows 7 OS in the pop-up window.

Resolve PC Issues with Auslogics BoostSpeed
Besides cleaning and optimizing your PC, BoostSpeed protects privacy, diagnoses hardware issues, offers tips for boosting speed and provides 20+ tools to cover most PC maintenance and service needs.
Option 3: Looking at the System Information
- Launch the Run dialog box by pressing Windows Key+R on your keyboard.
- Inside the Run dialog box, type “msinfo32.exe” (no quotes), then hit Enter.
- You will see the System Information window. It will contain the details about your Windows operating system.
Option 4: Using Command Prompt
- Press Windows Key+R to launch the Run dialog box.
- Type “cmd” (no quotes), then click OK. This should open Command Prompt.
- The first line you see inside Command Prompt is your Windows OS version.
- If you want to know the build type of your operating system, run the line below:
systeminfo | findstr Build
If you followed the steps we shared to a tee, you probably won’t need to ask, “What is my OS Windows version?” On the other hand, you might wonder if your operating system is the reason why you’re experiencing longer application startup times. Well, in some cases, the culprit is disk fragmentation. Many things can cause this issue, but we will discuss those in a different post. Meanwhile, the easiest way to resolve this problem is to install Auslogics Disk Defrag Pro. This reliable tool optimizes your drives for top speed and maximum efficiency.
Do you have other Windows-related woes you want to resolve?
Ask questions in the comments section below!


