- How to Check for Ports in Use in Windows 10
- Use Nirsoft CurrPorts
- Command Prompt Method
- TCPView
- How to Check Open Ports in Windows 10?
- How to Check Open Ports in Windows 10?
- Method 1: Using AB Command
- Method 2: Using AON Command
- How to Check Open Ports in Windows 10 Using CMD
- Way to Check Open Ports in Windows 10 Using CMD
- To find port-use with process names
- To find port-use with the process identifiers
- How to check COM port in Windows 10?
- RS-232 Testing Software
- Serial Port Monitor
- Issue: How to check RS-232 port?
- Solution: Serial Port Tester
- Why choose this serial port checking tool?
- Checking serial port: step-by-step instructions
- First case: monitoring the activity of serial ports
- Second case: Compare monitoring sessions
- Third case: Reproducing data to a COM port
- Conclusion
How to Check for Ports in Use in Windows 10

At any one time, there’s a whole bunch of information being sent between your Windows 10 PC and the endless void of the Internet. This is done using a process whereby network-dependent processes seek out TCP and UDP ports, which they use to communicate with the Internet. First, your data gets sent to remote ports at the destination or website your processes are trying to connect to, then it gets received at local ports back on your PC.
Most of the time, Windows 10 knows how to manage ports and ensure that traffic is being directed through the right ports so that those processes can connect with what they need to. But sometimes two processes may be assigned to one port, or maybe you just want to get a better picture of your network traffic and what’s going in and out.
That’s why wrote this guide that shows you how to get an overview of your ports and see which applications are using which ports.
Use Nirsoft CurrPorts
NirSoft is one of the best indie software developers, giving us great utilities, like PassView and WirelessKeyView. While some people will prefer checking their ports without installing third-party software (in which case, scroll down to the CMD method), CurrPorts is easily the fastest and most convenient way to view your ports.

Once you’ve installed CurrPorts, just open it to see a list of all your ports currently in use. If you’re looking for local ports in use, just click the “Local Port” column at the top to order the list by port number (handy if you’re looking for a specific one). You can do the same thing with remote ports, too.
If you want to really find specific ports, click the “Advanced Filters” icon at the top and enter your string in the format they suggest. It should look something like the below image.

Hit OK when you’re ready, and the list will filter down to your queries.
Command Prompt Method
The integrated – though not necessarily the simplest – way to check open ports is to use the trusty command prompt.
Click the Start button, type cmd , then right-click “Command Prompt” when it shows up in the search results. Click “Run as administrator.”
Once you’re in the elevated command prompt, enter the following command:
This will steadily bring up a list of ports that is probably quite long, along with the Windows processes that are using them. (You can press Ctrl + A , then Ctrl + C to copy all information to the clipboard.) On the average PC, there will be two main local IP addresses that contain ports on your PC.

The first, in our case, is “127.0.0.1.” This IP address is otherwise known as “localhost” or a “loopback address,” and any process listening to ports here is communicating internally on your local network without using any network interface. The actual port is the number you see after the colon. (See image below.)

The bulk of your processes will probably be listening to ports prefixed with “192.168.xxx.xxx,” which is your IP address. This means the processes you see listed here are listening for communications from remote Internet locations (such as websites). Again, the port number is the number after the colon.

TCPView
If you don’t mind installing a third-party app and want to have more control over what’s going on with all your ports, you can use a lightweight app called TCPView. This immediately brings up a list of processes and their associated ports.

What make this better than the command prompt is that you can actively see the ports opening, closing and sending packets. Just look for the green, red and yellow highlights. You can also reorder the list by clicking the column headings, making it easier to find the process you want or two separate processes vying for the same port.
If you do find a process or connection you want to close, just right-click that process. You can then select “End process,” which is exactly the same function as the one in Windows task manager. Or you can click “Close Connection” to leave the process open but stop it from listening on a given port.

If you’re having some trouble in Windows 10, then see whether a Windows update may be causing it. We also have a handy guide for managing the health of your hard drive in Windows 10.
Related:
Content Manager at Make Tech Easier. Enjoys Android, Windows, and tinkering with retro console emulation to breaking point.
How to Check Open Ports in Windows 10?
Windows 10 is the latest and the greatest in the long line of operating systems offered by Microsoft. It is constantly updated and many bug fixes are offered in these updates. Ports are used by all applications to communicate with the internet. These ports need to be opened by the application, automatically or in some cases, manually, by the user.
 How to Check Open Ports in Windows 10
In most cases though, the ports are opened automatically and the user isn’t informed about the ports that are opened when an application is installed. Therefore, in this article, we will discuss the method to check what ports have been opened on your computer. Make sure to follow the instructions carefully and accurately to avoid conflict.
How to Check Open Ports in Windows 10?
All applications installed on your computer that is communicating with the internet need to access a port on your computer in order to do so. Windows records the applications listening on a port and this record can be checked by the user anytime. There are, however, many methods to check this record. In this article, we have listed two of the easiest one which won’t require the installation of any third-party application.
Method 1: Using AB Command
In order to identify the application that is listening to a particular port on our computer, we will be using the “AB” command in the command prompt. This will list the name of the executable that has made the request to listen on the port. For that:
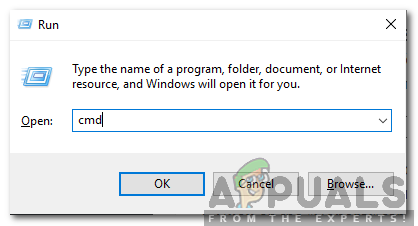
- Press “Windows” + “R” to open Run prompt.
- Type in “cmd” and press “Shift” + “Ctrl” + “Enter” to provide administrative privileges.
 Typing cmd in the Run Prompt and pressing “Shift”+ “Ctrl” + “Enter”
 - Type in the following command and press “Enter” to execute it. Typing in the command and executing it
- Wait for the list to be displayed, the name of the executable will be shown below the port information. The name of the executable is displayed below the port information
 Typing cmd in the Run Prompt and pressing “Shift”+ “Ctrl” + “Enter”
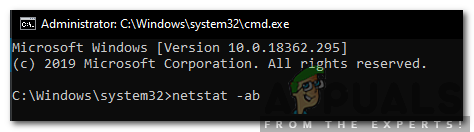 Typing in the command and executing it
 The name of the executable is displayed below the port information
Method 2: Using AON Command
There is another command that can be used to identify the process that is listening on a particular port. This command will show the PID number instead of the executable’s name. In order to use this command:
How to Check Open Ports in Windows 10 Using CMD
In this article, you will see the procedure to Check Open Ports in Windows 10 Using CMD (or Command Prompt). When an app uses a TCP/IP port on your device in order to access a network, that port would be locked out – no other program may be able to use it. And while everything related to ports and traffic is usually taken care of on its own by the system, there might be situations when you might have to know the application that is blocking a specific port.
Here you can find some built-in ways to do so- specifically the ways to check open ports using CMD or Command Prompt. Apart from using the Command Prompt, you can even consider using some third-party applications that can easily list the ports and the apps or processes that are using them.
Way to Check Open Ports in Windows 10 Using CMD
Here is how to check open Ports in Windows 10 Using CMD –
To find port-use with process names
Follow along with these steps to get the list of ports in use and the names of the processes tied up with them respectively.
Step-1: Open Run dialog box by pressing Win+R hotkeys. Type cmd in the text box and hit Shift + Ctrl + Enter keys altogether.
Step-2: Hit Yes on the UAC prompt.
Step-3: This will let you access an elevated Command Prompt on the screen. Here, type in or copy-paste the below-given code and hit Enter.
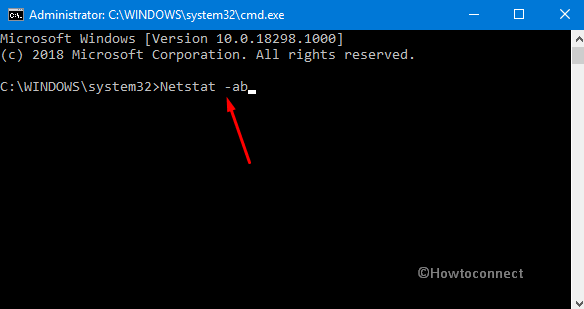
Wait for the entire result to load. Once you successfully run this command, simply scroll down to the port number you want to check. As shown below, you’ll be able to see the process’ name respectively below the port it is linked to.

To find port-use with the process identifiers
Usually, identifying the application which represented by a specific process name can be tricky. This method might help you identify the application that a process relates to.
Here also, first of all, launch the “Command Prompt” with admin rights using any of your preferred methods.
Copy-paste or type the below code and ensure to hit Enter.
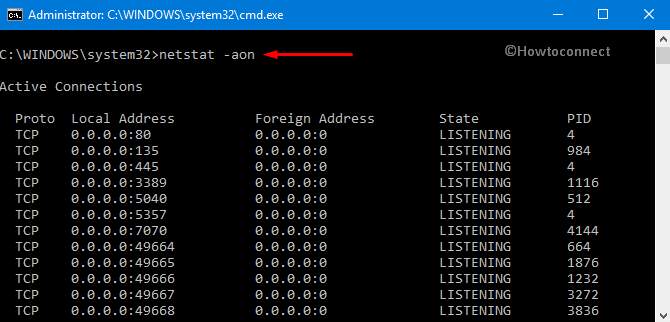
Finally, the result now will contain the “PID” or the process identifiers instead of the names. Simply scroll down to the port you want to check and note the PID corresponding to it.
Moving ahead, open Task Manager. To do so, perform a right-click on the taskbar and select the option namely “Task Manager”.
Go to the Processes tab. Right-click on the Name column and choose PID (see snapshot).
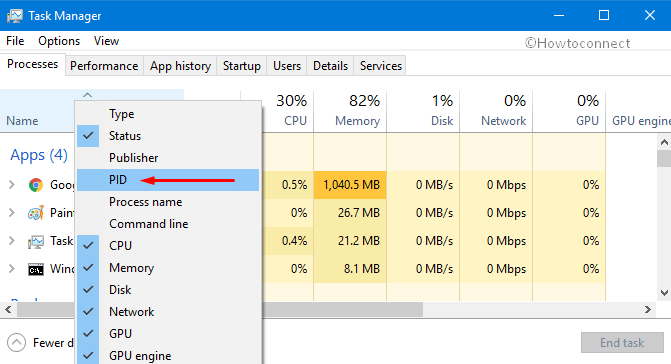
You just need to find the PID you note earlier. The ‘Name’ column corresponding to the PID must reveal the application associated with the port.
How to check COM port in Windows 10?
When working with serial devices it is important to have the ability to monitor and inspect the activity of your system’s RS232/422/485 ports. Examining the data flow traveling through the interfaces can be very helpful when installing new devices or troubleshooting a problem. It can be difficult to pinpoint where the problem is actually occurring.
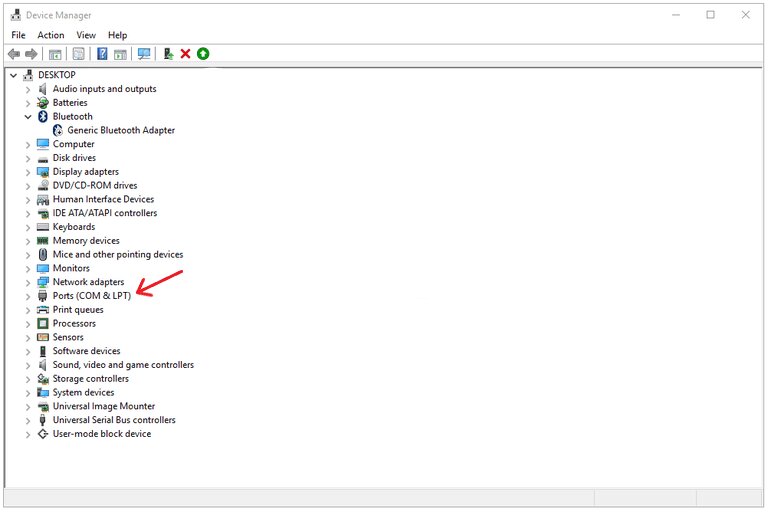
This is how to check RS232 port in Windows 10. Simply follow these steps to check serial ports:
«Control Panel > Device Manager > Ports»
Your system’s COM ports will be displayed.
In cases where the displayed information is insufficient for your needs, we offer a professional software application that provides an effective method of testing and analyzing your serial ports.
RS-232 Testing Software
Serial Port Monitor
Issue: How to check RS-232 port?
If you need to know how to check serial ports in the Windows operating system, you will find there are no native tools to perform this task. There is, however, a software solution that can be used for checking serial port activity and monitoring data transfer through the interfaces.
When problems arise between a serial device and an application, you need to know how to check RS232 communication. The typical method is to follow these general troubleshooting guidelines. We recommend that by developing an understanding of how serial devices work, you can save a substantial amount of time when taking down issues. A program like Serial Port Tester can be instrumental in increasing your knowledge of serial communication.
Solution: Serial Port Tester
There is an effective and efficient method of investigating issues that you may encounter during the development and testing of a serial device driver or application. COM Port Tester from Eltima software answers the question of how to check RS232 communication with a full-featured application which makes it easy to monitor, analyze, display, and log data from your RS232/422/485 serial ports.
Why choose this serial port checking tool?
- Ease of use. Serial Port Tester features a user-friendly interface. The program makes it easier to check your COM ports with an intuitive display of your serial interfaces.
Versatility . There are many scenarios in which COM Port Tester can be extremely useful. You can emulate the sending of data to a designated port in a variety of formats including string, octal, decimal, and binary. All data transmitted through the serial ports can be monitored and recorded in files for analysis at a later time.
Checking serial port: step-by-step instructions
In our demonstration, we will use Eltima Software’s Serial Port Tester as the program with which to test serial ports. We will show how to check an RS232 port is working in three different ways.
First case: monitoring the activity of serial ports
To monitor your serial port activity, use these simple steps:
1. Download and install Serial Port Tester. Launch the app and open a new monitoring session by following the next step.
2. From the main menu select “Session > New session”. Alternate methods to start a new session are using the ‘Ctrl + N’ keyboard shortcut or clicking “New” on the toolbar.
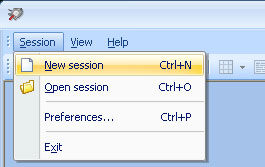
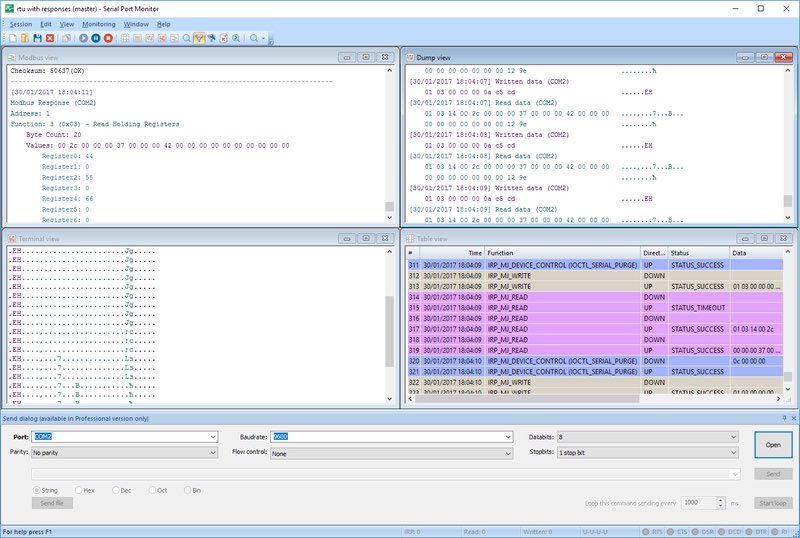
3. The “New monitoring session” window should now be displayed.
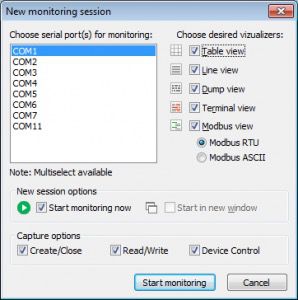
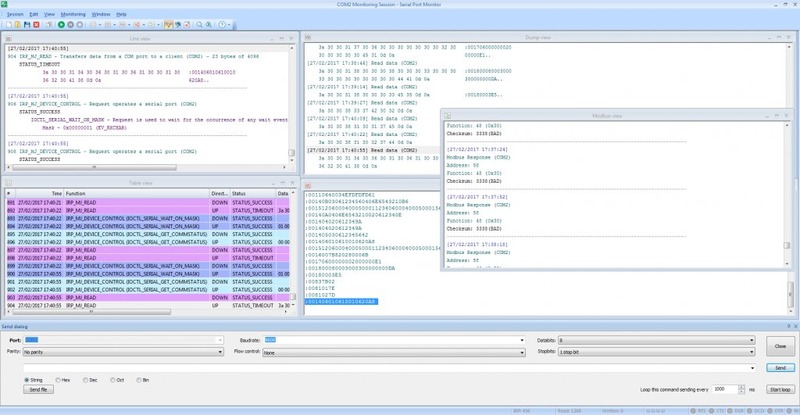
Select the viewing mode which will be used to display the monitored serial data:
- Line: displays lines of plain text containing IRP details;
- Terminal: presents the transmitted data as ASCII characters;
- Table: recorded IRPs are displayed in the form of a table.
- Dump: two-way serial communication is shown in hexadecimal and string formats;
- Modbus view displays all transmitted Modbus data (RTU and ASCII).
“Select all” or “Select none” can also be chosen as viewing options.
4. Select “Start monitoring now” if you want to immediately start monitoring the ports. You can choose the “New window” option to start the session in a clean window.
5. Use the “Capture options” menu to select the events to be monitored. Your choices are device control, create/close or read/write.
6. Click the “Start monitoring” button to begin the session.
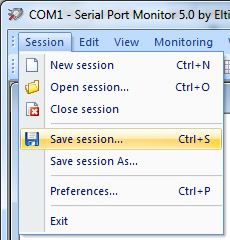
7. Save the session for late analysis by selecting “Session > Save session/Save session As” from the main menu.
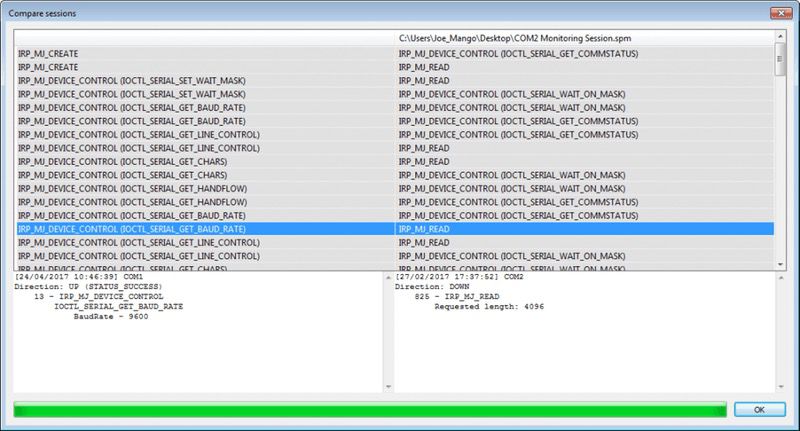
Second case: Compare monitoring sessions
Many valuable insights about your serial communication can be gained by a comparison of two saved sessions. Saving a monitoring session prior to making any changes and then saving a subsequent session provides the data with which to make your comparison. Differences in the sessions can easily be identified.
Here’s how to compare sessions:
- Start or open a monitoring session.
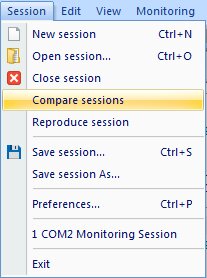
- On the main menu, click on “Session>Compare Sessions”.
- Select the monitoring file you will use for the comparison.
- Serial Port Tester displays the sessions in a side-by-side format. This improves the readability of the data and makes it easy to locate differences in the sessions.
Third case: Reproducing data to a COM port
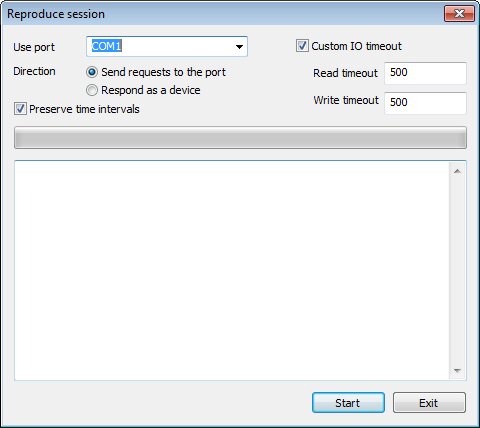
A feature of Serial Port Tester is its ability to reproduce a data transmission to a COM port. To send data to a serial port follow these steps:
- Open a current monitoring session or begin a new session.
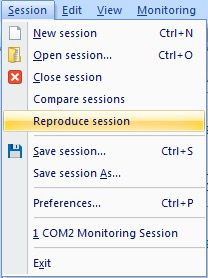
- “Select Session > Reproduce” and make any changes you wish to the parameters used in the data transmission.
- Use port — Specify the serial port that will be the recipient of the transmitted data.
- Send requests to this port — Enable this option if you want to emulate a data stream being sent from a serial application.
- Respond as a device — This option is used to emulate data being sent to a COM port from a serial device.
- Preserve time intervals — Use this option to select predetermined time intervals between data transmissions.
- Custom IO timeout — Define whatever Read/Write timeout parameters you want to enforce during the session.
- Click ”Start”.
Conclusion
Serial Port Tester is a versatile utility that can be extremely useful in many scenarios involving serial communication and devices. We have demonstrated some popular uses of the tool. You will find it a valuable addition to your software toolbox for identifying issues with serial devices and applications.


