- How to check your Windows 10 PC for memory problems
- How to diagnose memory problems on Windows 10
- Checking test results
- More Windows 10 resources
- The Dell XPS 15 is our choice for best 15-inch laptop
- Halo: MCC’s live service elements make it better, not worse
- Microsoft’s Surface Duo is not ‘failing up’
- These are the best PC sticks when you’re on the move
- Как проверить оперативную память (RAM) на ошибки в Windows
- Содержание:
- Симптомы некорректной работы ОЗУ
- Проверка оперативной памяти встроенными средствами
- Как узнать результаты проверки?
- Часто задаваемые вопросы
- How to Check Ram Type in Windows 10 like DDR, DDR2
- How to Check Ram Type in Windows 10
- Find using Task Manager
- How to Check Ram Type in Windows 10 through Command Prompt (Admin)
- How to Check Ram Type in Windows 10 via PowerShell
- Check Ram Size in Windows 10 using Settings
- Find RAM Size using System Information
- Using 3rd Party tools
- RAMMon
- ScanMyPC
- Closing words
How to check your Windows 10 PC for memory problems
On Windows 10, if applications keep crashing or they’re running very slowly, or you’re experiencing weird things, such as random reboots, freezes, or sudden Blue Screens of Death (BSOD), it could be difficult to pinpoint the root of the problem because it could be a software or hardware-related issue.
However, usually, the memory is the first thing you want to check. This is because if it’s a problem with one of the modules, you’ll need to take care of the issue quickly, as it cannot only cause your computer to misbehave, but a bad memory module can also corrupt files, which is not a good thing.
While there are a number of tools you can download off the internet, Windows 10 includes its own Windows Memory Diagnostic tool to check if your computer has memory problems.
In this Windows 10 guide, we walk you through the steps to use the Windows Memory Diagnostic tool to find out if you have a faulty memory stick.
How to diagnose memory problems on Windows 10
Using these steps requires you to restart your computer, so make sure to save any files you may have open and close any running applications before proceeding. Here goes:
- Open Control Panel.
- Click on System and Security.
Click on Administrative Tools.

Double-click the Windows Memory Diagnostic shortcut.
- Quick tip: Alternatively, you can also use the Windows key + R keyboard shortcut, type mdsched.exe, and click OK to launch the tool.
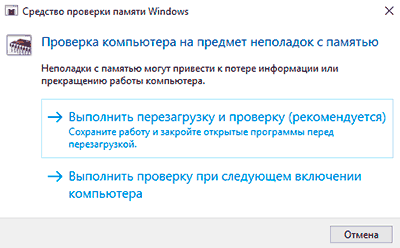
Click the Restart now and check problems option. (The tool also offers an option to schedule a test in the next reboot, if you can’t afford to close your applications and restart immediately.)
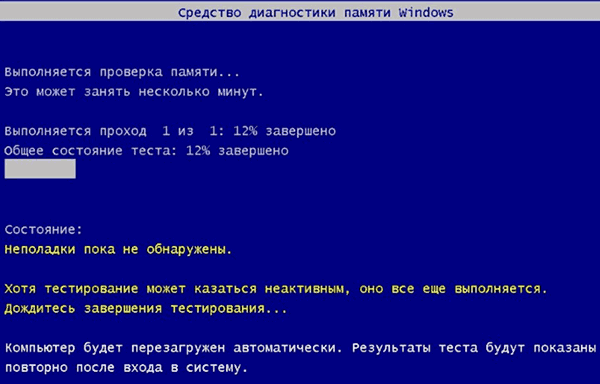
Once your computer reboots, it will start in the Windows Memory Diagnostics environment, and the tests will kick in the Standard mode right away. In this mode, the tool will run all the scans available in the Basic mode, in addition to LRAND, Stride6 (cache enabled), CHCKR3, WMATS+, and WINVC tests.
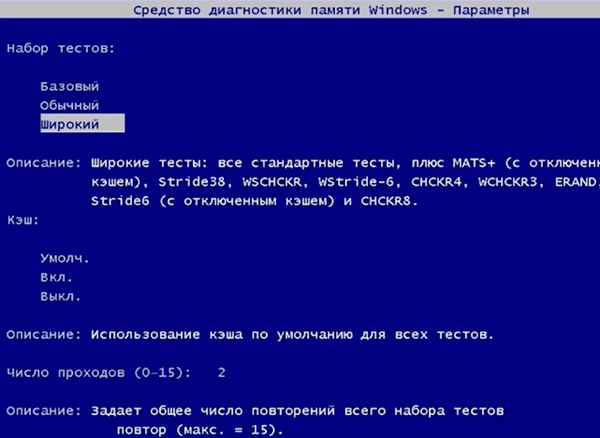
You can simply let the Standard mode test your computer’s memory, or you can also press the F1 key at any time to open the Windows Memory Diagnostic page to change the scan options.
On the options page, you can change the scan mode to Basic, which runs the MATS+, INVC, and SCHCKR (cache enabled) tests.
Or you can also select the Extended mode, which includes every test available using Standard mode, plus MATS+ (cache disabled), Stride38, WSCHCKR, WStride-6, CHCKR4, WCHCKR3, ERAND, Stride6 (cache disabled), and CHCKR8.
If necessary, you can navigate the different options using the TAB key to change cache settings. If you disable the cache, it’ll allow the tool to access the data in RAM directly, which ensures a complete test. In addition, you can also set a number of times the scan will be repeated to test your system’s memory modules.
After you’re done selecting your options, just press the F10 key to go back to the main page, and the scan will restart automatically.
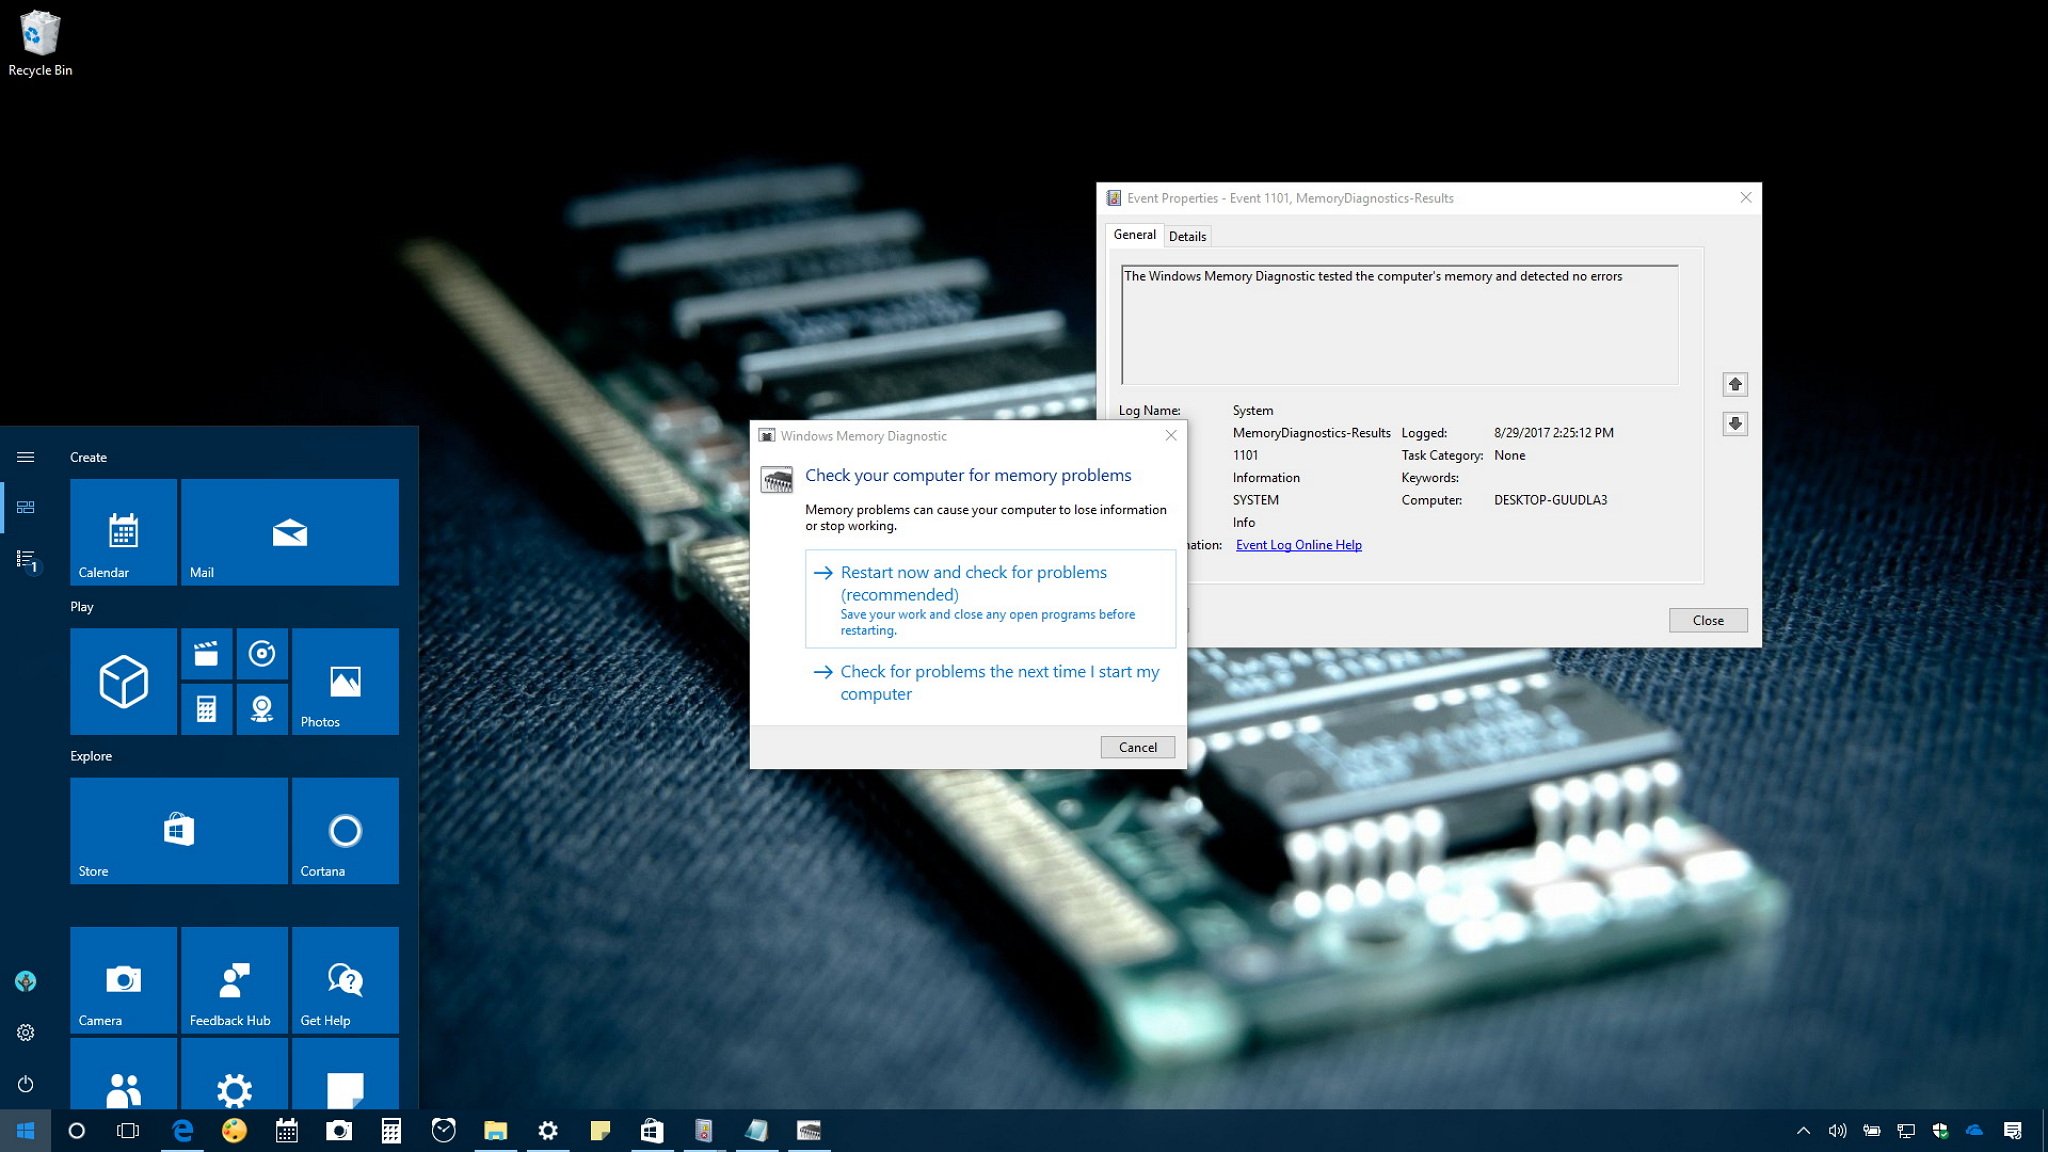
Checking test results
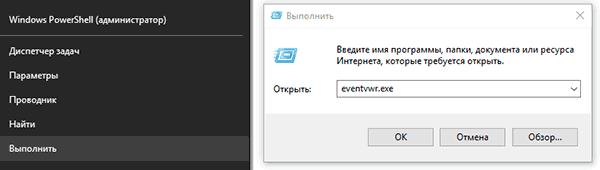
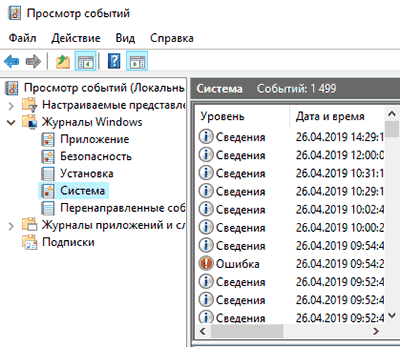
While you can see the status during the scan process, as soon as the test completes your computer will restart automatically, and you’ll need to use the Event Viewer to see the test results to find out if you have a bad RAM module.
- Open Start.
- Search for eventvwr.exe and press Enter to open Event Viewer.
- Expand the Windows Logs folder.
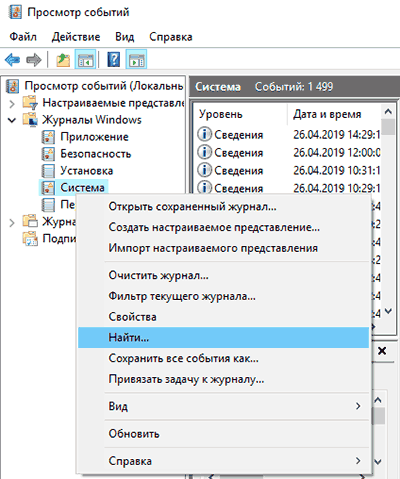
Right-click System, and click on Find.

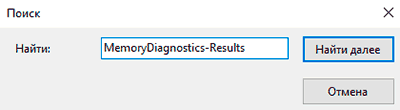
Type MemoryDiagnostics-Results, and click the Find Next button.
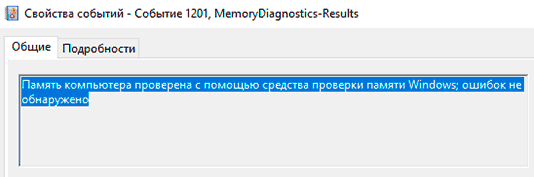
On Event Viewer, double-click the MemoryDiagnostics-Results source, and see the message. If the result reads «The Windows Memory Diagnostic tested the computer’s memory and detected no errors,» then you can discard memory as the root of the problem.
If the result shows one or more errors, you can try running an extended memory test, and recheck the results. If you continue to see at least one error, one of the RAM modules probably has problems, and it may need to be replaced.
Sometimes, when the test fails, the tool will be able to indicate which module has the problem with the results. However, if it’s unable to provide that information, you may need to remove and test each memory module until you find out the one that is faulty.
Although we’re focusing this guide on Windows 10, the Windows Memory Diagnostic tool has been available for years, which means that you can also use it on previous versions, including Windows 8.1 and Windows 7.
More Windows 10 resources
For more helpful articles, coverage, and answers to common questions about Windows 10, visit the following resources:
![]()
The Dell XPS 15 is our choice for best 15-inch laptop
For a lot of people, a 15-inch laptop is a perfect size that offers enough screen for multitasking, and in a lot of cases, some extra performance from powerful hardware. We’ve rounded up the best of the best at this size.
![]()
Halo: MCC’s live service elements make it better, not worse
Halo: The Master Chief Collection is more popular than ever, but some fans don’t agree with the live service approach 343 Industries has taken with it. Here’s why those elements are, at the end of the day, great for the game and for Halo overall.
![]()
Microsoft’s Surface Duo is not ‘failing up’
Microsoft announced this week that it was expanding Surface Duo availability to nine new commercial markets. While Surface Duo is undoubtedly a work in progress, this is not a sign of a disaster. It’s also doesn’t mean that Surface Duo is selling a ton either. Instead, the reason for the expansion is a lot more straightforward.
![]()
These are the best PC sticks when you’re on the move
Instant computer — just add a screen. That’s the general idea behind the ultra-portable PC, but it can be hard to know which one you want. Relax, we have you covered!
Как проверить оперативную память (RAM) на ошибки в Windows
Регулярная проверка оперативной памяти на ошибки, позволит обезопасить себя от утери важных данных и других проблем. Ниже мы приведем основные способы проверки ОЗУ встроенными средствами Windows.
Содержание:
Оперативная память является важным и достаточно надежным компонентом компьютера, от правильности работы которого зависит быстродействие и стабильность системы. К сожалению, с течением времени даже самые надежные компоненты начинают работать со сбоями, что может привести к большим проблемам.
Помимо этого, ОЗУ может давать сбои из-за неправильных драйверов или заражения компьютера вредоносными программами.
Симптомы некорректной работы ОЗУ
Неисправно работающая планка оперативной памяти может вызывать проблемы во время загрузки системы и в процессе её работы. ОС реагирует на это по-разному, выдавая синий экран с ошибками, уходя в перезагрузку или просто работая с большим замедлением. Если у пользователя наблюдаются подобные симптомы, следует срочно проверить ОЗУ на наличие ошибок.
Проверка оперативной памяти встроенными средствами
В Windows присутствует встроенная утилита, предназначенная для проверки оперативной памяти компьютера. Чтобы запустить данное средство необходимо проследовать следующим шагам:
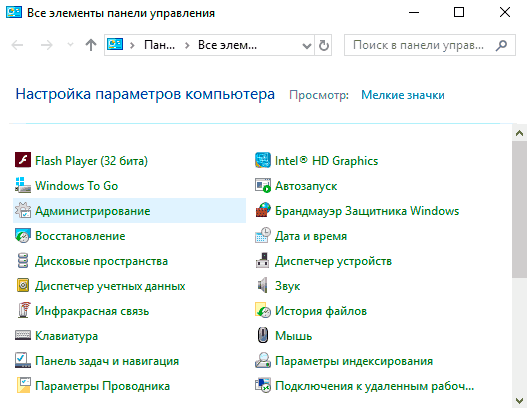
Шаг 1. Открываем «Панель управления» нажав ПКМ по кнопке «Пуск».

Шаг 2. В открывшемся окне выбираем режим отображения «Мелкие значки» и переходим в пункт «Администрирование».
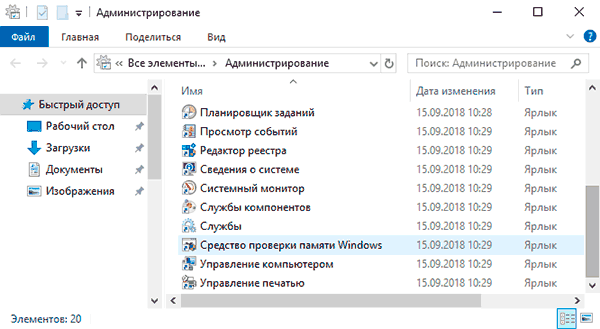
Шаг 3. В следующем окне необходимо выбрать «Средство проверки памяти Windows».
Шаг 4. Запускаем средство, выбрав первый пункт.
Шаг 5. Компьютер перезагрузится и вовремя новой загрузки начнется проверка ОЗУ.
В средстве диагностики присутствует несколько режимов работы. Их можно выбирать, если нажать клавишу F1. Первую проверку лучше пройти в базовом режиме, а последующие проверки выбирать в расширенном режиме, чтобы полностью проверить все ошибки с разными инструментами сканирования.
Как узнать результаты проверки?
Результаты проверки показываются после ее завершения на протяжении короткого промежутка времени, поэтому можно банально пропустить и не узнать результат.
Чтобы посмотреть результаты проверки в Windows, необходимо:
Шаг 1. Нажимаем ПКМ по кнопке «Пуск» и выбираем пункт «Выполнить». В открывшемся окне следует ввести команду eventvwr.exe и подтвердить действие Enter.
Шаг 2. В открывшемся окне переходим в пункт «Просмотр событий», затем открываем папку «Журналы Windows» и переходим к параметру «Система».
Шаг 3. Кликаем ПКМ по параметру «Система» и выбираем пункт «Найти».
Шаг 4. В открывшейся строке вводим MemoryDiagnostics-Results и нажимаем по кнопке «Искать далее».
Шаг 5. После того, как результат будет найден, закрываем окно поиска, заходим в MemoryDiagnostics-Results и смотрим результаты. Если проблем с ОЗУ не обнаружено, будет присутствовать следующее окно:
При наличии каких-либо ошибок, их список будет занесен в данное окно.
Стоит отметить, что сбоящая планка ОЗУ практически никогда не подлежит ремонту, поэтому самым верным решением будет её замена. Тем не менее, средство проверки памяти Windows 10 может устранять программные ошибки устройства. Для этого необходимо проверять каждую планку расширенным способом.
Часто задаваемые вопросы
Это сильно зависит от емкости вашего жесткого диска и производительности вашего компьютера. В основном, большинство операций восстановления жесткого диска можно выполнить примерно за 3-12 часов для жесткого диска объемом 1 ТБ в обычных условиях.
Если файл не открывается, это означает, что файл был поврежден или испорчен до восстановления.
Используйте функцию «Предварительного просмотра» для оценки качества восстанавливаемого файла.
Когда вы пытаетесь получить доступ к диску, то получаете сообщение диск «X: \ не доступен». или «Вам нужно отформатировать раздел на диске X:», структура каталога вашего диска может быть повреждена. В большинстве случаев данные, вероятно, все еще остаются доступными. Просто запустите программу для восстановления данных и отсканируйте нужный раздел, чтобы вернуть их.
Пожалуйста, используйте бесплатные версии программ, с которыми вы можете проанализировать носитель и просмотреть файлы, доступные для восстановления.
Сохранить их можно после регистрации программы – повторное сканирование для этого не потребуется.
How to Check Ram Type in Windows 10 like DDR, DDR2
Sometimes it becomes essential to know How to Check Ram Type in Windows 10 before you change or add a new memory stick or buy a new system. There are 24 RAM specifications like DDR, DDR2, SDRAM, EDRAM you might need to find out at this moment. Several built-in utilities help you to find out this info such as task manager, Command Prompt, PowerShell. You will get here few methods using these including 3rd party tools so that you could find out the memory type easily on your system.
How to Check Ram Type in Windows 10
Random Access Memory in short RAM is utilized by CPU as temporary memory storage to make the performance faster. RAM type determines the quality of memory chip and DDR, RDRAM, and SDRAM are supposed to be better.
Below methods will be thoroughly helpful to know How to Check Ram Type in Windows 10.
Find using Task Manager
When you want to check Ram Type in Windows 10, the task manager is the easiest and effective native utility. We have already written an article in some different context – How to Analyze Resources Performance in Task Manager Windows 10. You will get your requisite information from here in only a few clicks on your system.
- Make a right-click on any void space in the Taskbar and select Task Manager from the list.
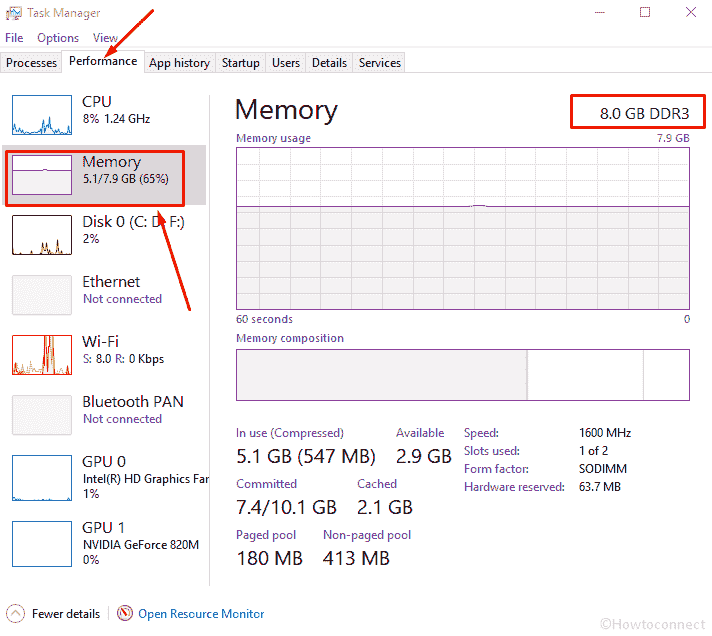
- The tool opens with Processes tab by default, so select Performance (just next) to switch.
- Once the Task Manager comes, do a click on Memory from the left pane.
- You will observe RAM type and size from the upper section which clearly reveals at the top.
- If you want extra information such as numbers of slots, committed memory, cached memory then go down just below the graphical view.
How to Check Ram Type in Windows 10 through Command Prompt (Admin)
Another way to check the ram type is possible through running a simple command in Command Prompt. This will output your RAM type in numeral form so we are giving a table deciphering the meaning of each number.
Step-1: Type cmd in the Cortana search box located beside Start.
Step-2: At once a UAC pop up will appear, choose Yes.
Step-3: Once “Command Prompt” appears at the top, put a right click on it and choose “Run as Administrator”.

Step-4: Type the below command here and Hit the Enter button:
wmic MemoryChip get MemoryType
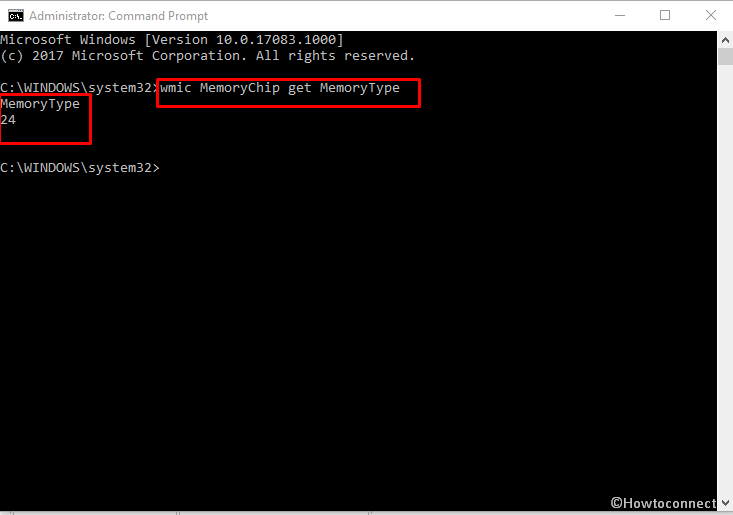
Description will not appear after the command runs instead you see number representation. Match the number with the following list to ascertain your RAM type.
| RAM type in Number | Type of Physical Memory |
| 0 | Unknown |
| 1 | Other |
| 2 | DRAM |
| 3 | Synchronous DRAM |
| 4 | Cache DRAM |
| 5 | EDO |
| 6 | EDRAM |
| 7 | VRAM |
| 8 | SRAM |
| 9 | RAM |
| 10 | ROM |
| 11 | Flash |
| 12 | EEPROM |
| 13 | FEPROM |
| 14 | EPROM |
| 15 | CDRAM |
| 16 | 3DRAM |
| 17 | SDRAM |
| 18 | SGRAM |
| 19 | RDRAM |
| 20 | DDR |
| 21 | DDR2 |
| 22 | DDR2 FB=DIMM |
| 24 | DDR3 |
| 25 | FBD2 |
How to Check Ram Type in Windows 10 via PowerShell
Fortunately, few PowerShell commands tell you the whole story of the Ram Type, size, number, slots manufacturer, serial number, speed and a lot more. And it needs the lesser effort rather than the command prompt because you can open it simply from Power user menu. So we suggest using PowerShell when you are going to Check Ram Type in Windows 10.
- Press Windows logo and X keys altogether and let the Power menu appear. Select Windows PowerShell (Admin) from the list.

- Select “Yes” on the “User account control” pop up covering the system screen.
- Soon you will experience Administrator: Windows PowerShell on your computer. Copy the following piece of command, paste there and then press Enter:
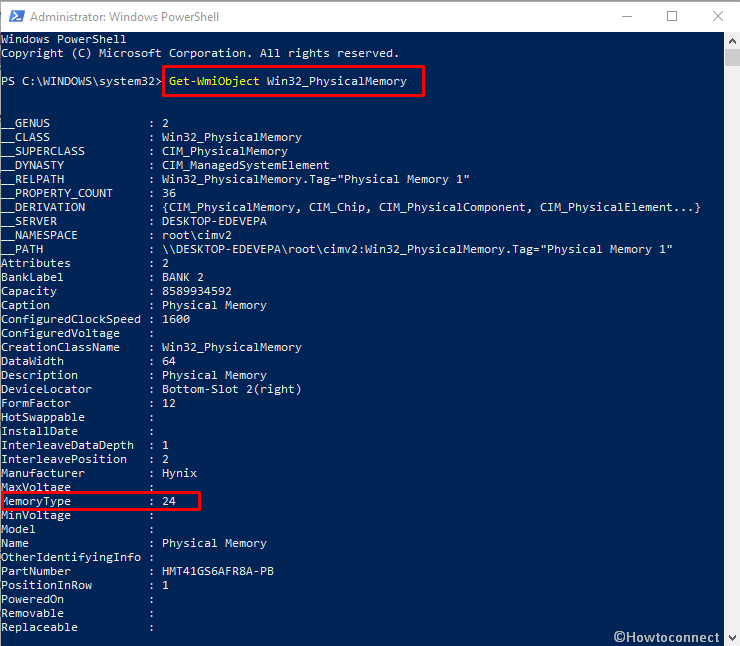
- One more command also works pretty effectively, so copy (without quotes) it from underneath, paste, and hit Enter as an alternative:

If you need to detect only the size of RAM there are two additional methods further.
Check Ram Size in Windows 10 using Settings
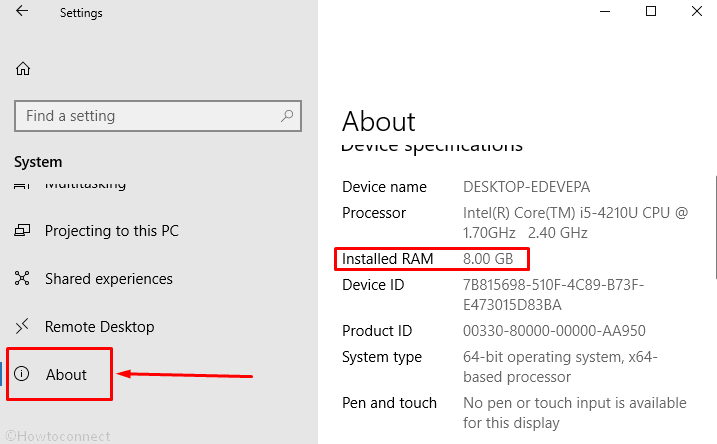
The Settings application has About section that includes the info about the Installed RAM. See the method –
- Hold down the Windows logo key and I letter on your keyboard at the same time.
- Once the Windows Settings appears, select System.
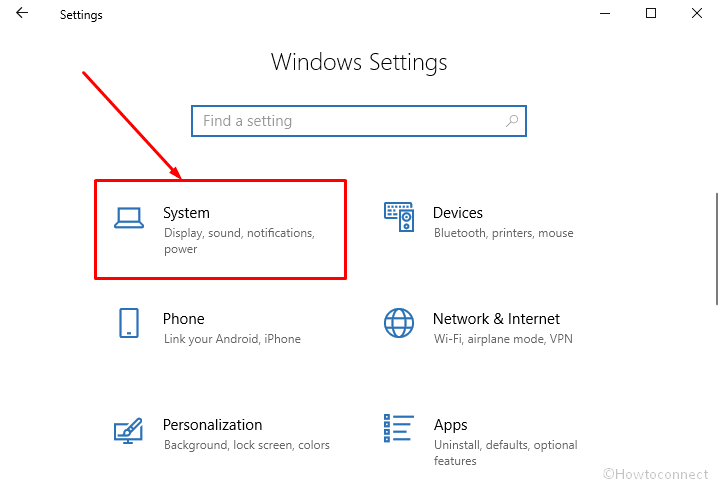
- Go to the left pane on the next screen, scroll down and make a click on About. Move to the opposite side and Locate Installed RAM to find the magnitude of the memory.
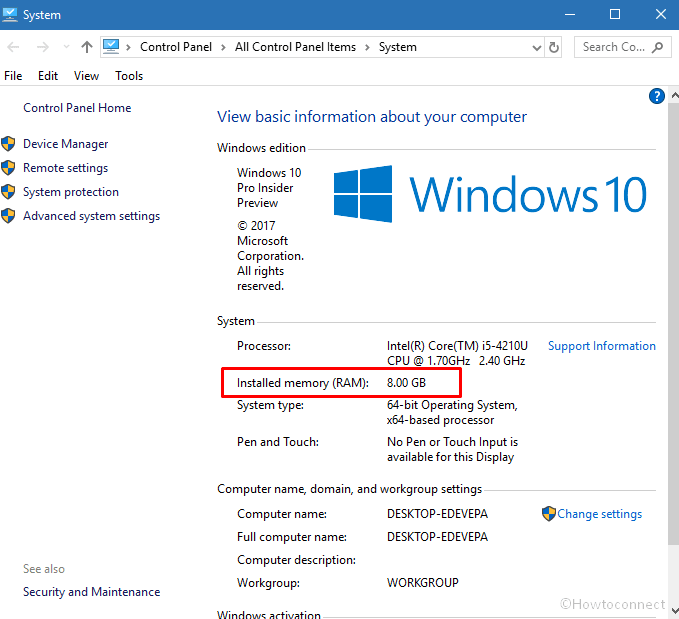
- If you want to see the same information on the Control panel then click on System info.

- Alternatively, You can get access the same location following this path – Control panel => System.
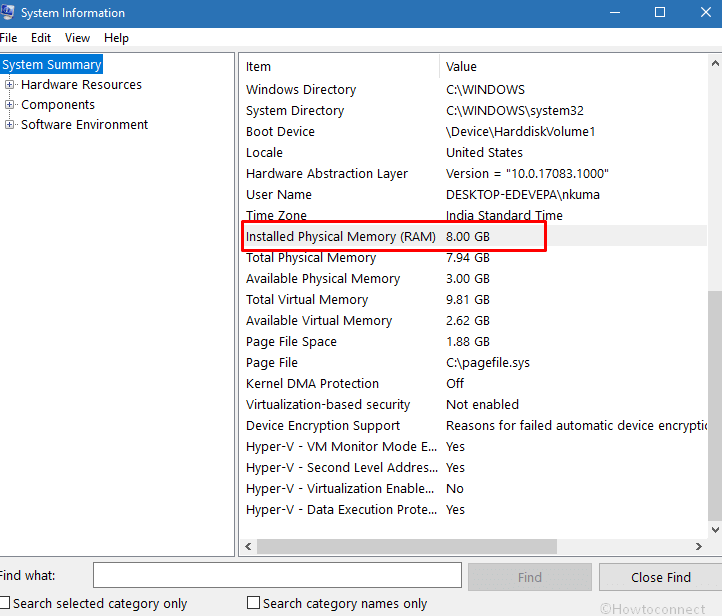
Find RAM Size using System Information
System information tool reveals a report of your PC configuration that includes RAM, Hardware resources, “components”, software environment. So far as the question of memory, you can find its volume installed on your computer.
- Perform a Click in the search bar located at the taskbar just before the Task view icon, type msinfo32 and then hit Enter.

- Once the System information window comes up, find Installed Physical Memory (RAM) and its volume.
This was all about How to Check Ram Type in Windows 10 using the built-in tools,
Using 3rd Party tools
Few third party tools play outstanding roles to check Ram type in Windows 10 when you are going to memory upgrade on your system. We are here sorting the foolproof applications taking into account that you could gain the info without a hitch.
CPU-Z is the most popular freeware and provides all the information about hardware in your computer. You get Ram type, channel #, size, NB frequency, cycle time, and a lots more on a simple interface. The powerful hardware detection tool is based on kernel-mode software driver and collects the information in real time. Qusere engine of this app is very prompt so you don’t need to wait anymore. So you can use this utility without hesitation to check the memory type on your Windows system.
1. Download CPU Z from here and install following the onscreen instructions.
2. Launch the tool and go to Memory tab see all the specifications.
RAMMon
This is a simple working Windows-based application that allows seeing the details of Ram modules. RAMMon uses system information dll SDK to retrieve data of memory installed on your device. You will find the RAM type such as DDR, DDR2, DDR4, XMP, EPP, write recovery time, maximum capacity, bandwidth speed comic locker speed and everything you need. Hinging on RAM type, and other distinct SPD data can be reclaimed as well, for example, the module thickness, width, and other. RAMMon is absolutely free for personal use and has a very small size.
- Navigate to RAMMon official website and download the utility https://www.passmark.com/ftp/rammon.exe.
- Open the tool and perceive all the data you wanted.
SIW is one more tool that lets you check ram type with a lot of additional information on Windows. If you need to find out Memory type, manufacturer name, total and used volume, number of slots, serial number then this is an ideal application. An extra feature is you can create XML report of the info provided by SIW. The software comes as trial version for 30 days, so grab it at current time without paying any cost.
1. Take SIW from https://www.gtopala.com/thank-you/siwviewer.php, download and install on your system. Double click on the Setup icon and allow to expand on the system screen.
2. Select Memory tab from the left pane and find the RAM Type in the Properties column.
ScanMyPC
ScanMyPC is one of the easy-going tools that displays RAM Type on the browser window. The app reads details set on your computer by the manufacturer with the model and throws out on its website. When you run ScanMyPC it automatically sends there and asks you to click on View results. You comprehend the description of System Manufacturer, System Series / Model, Motherboard, Total Installed Memory, Memory Type, Modules Installed, Operating System. If you need to get more about your RAM click on Show Advanced Details.
Closing words
When you have performed finding out with the help of How to Check Ram Type in Windows 10 like DDR, DDR2, SDRAM etc, choosing best one is easy. Now check the capacity that will fulfill your need and upgrade or purchase your memory chip to have a good computing experience. We hope the methods will help you to enjoy Windows 10 PC.


