- How to find computer serial number
- Author:
- COMMUNITY SOLUTIONS CONTENT DISCLAIMER
- SUMMARY
- How to find computer serial numbers on Windows 10
- How to determine PC serial number using PowerShell
- How to determine PC serial number using Command Prompt
- More Windows 10 resources
- The Dell XPS 15 is our choice for best 15-inch laptop
- Halo: MCC’s live service elements make it better, not worse
- Microsoft’s Surface Duo is not ‘failing up’
- These are the best PC sticks when you’re on the move
- Как узнать ключ Windows 7, 8, 10 ноутбука
- Как узнать ключ Windows 8
- #1 способ нахождения ключа
- #2 метод нахождения ключа системы
- Как узнать ключ Windows 10
- Зачем два ключа в ноутбуке
- Как узнать ключ Windows при помощи командной строки
- ShowKeyPlus
- Free PC Audit
- Как узнать ключ Windows с помощью Speccy и AIDA64
- Как узнать ключ Windows с помощью скрипта
- Программа SIW
- Почему вместо нормального ключа высвечиваются другие символы
How to find computer serial number
Author:
Yuval Sinay MVP
COMMUNITY SOLUTIONS CONTENT DISCLAIMER
MICROSOFT CORPORATION AND/OR ITS RESPECTIVE SUPPLIERS MAKE NO REPRESENTATIONS ABOUT THE SUITABILITY, RELIABILITY, OR ACCURACY OF THE INFORMATION AND RELATED GRAPHICS CONTAINED HEREIN. ALL SUCH INFORMATION AND RELATED GRAPHICS ARE PROVIDED «AS IS» WITHOUT WARRANTY OF ANY KIND. MICROSOFT AND/OR ITS RESPECTIVE SUPPLIERS HEREBY DISCLAIM ALL WARRANTIES AND CONDITIONS WITH REGARD TO THIS INFORMATION AND RELATED GRAPHICS, INCLUDING ALL IMPLIED WARRANTIES AND CONDITIONS OF MERCHANTABILITY, FITNESS FOR A PARTICULAR PURPOSE, WORKMANLIKE EFFORT, TITLE AND NON-INFRINGEMENT. YOU SPECIFICALLY AGREE THAT IN NO EVENT SHALL MICROSOFT AND/OR ITS SUPPLIERS BE LIABLE FOR ANY DIRECT, INDIRECT, PUNITIVE, INCIDENTAL, SPECIAL, CONSEQUENTIAL DAMAGES OR ANY DAMAGES WHATSOEVER INCLUDING, WITHOUT LIMITATION, DAMAGES FOR LOSS OF USE, DATA OR PROFITS, ARISING OUT OF OR IN ANY WAY CONNECTED WITH THE USE OF OR INABILITY TO USE THE INFORMATION AND RELATED GRAPHICS CONTAINED HEREIN, WHETHER BASED ON CONTRACT, TORT, NEGLIGENCE, STRICT LIABILITY OR OTHERWISE, EVEN IF MICROSOFT OR ANY OF ITS SUPPLIERS HAS BEEN ADVISED OF THE POSSIBILITY OF DAMAGES.
SUMMARY
The following article will help you to find the computer serial number
Please use one the method bellow to retrieve the computer serial number:
1. Using the buid in » wmic» command:
» wmic bios get serialnumber«
Tip: You can use the command » wmic csproduct get name» to retrieve the local computer model.
How to find computer serial numbers on Windows 10
 Source: Windows Central
On Windows 10, the ability to check the computer serial number can come in handy in many scenarios. For instance, when you need to create an inventory of the devices connected to your home network or organization, or need to contact technical support to troubleshoot a problem, order a replacement part, or check the warranty information.
Usually, you can find the required information on the sticker affixed on the back or bottom of your laptop or desktop, or checking the Basic Input/Output System (BIOS) or Unified Extensible Firmware Interface (UEFI) on your motherboard. However, if the sticker isn’t available or you don’t want to go through extra steps to access firmware, you can also use PowerShell and Command Prompt to retrieve this information quickly on Windows 10.
In addition, using commands can be useful to automate the process using a script when you need to retrieve the serial information from multiple devices.
In this Windows 10 guide, we’ll walk you through the steps to quickly find your device serial number using command lines.
How to determine PC serial number using PowerShell
To retrieve the serial number of your computer with a PowerShell command, use these steps:
- Open Start.
- Search for PowerShell, right-click the top result, and select the Run as administrator option.
Type the following command to find out the computer serial number and press Enter:
Get-WmiObject win32_bios | select Serialnumber
 Source: Windows Central
(Optional) Type the following command to determine device serial number and press Enter:
Get-CIMInstance win32_bios | format-list SerialNumber
(Optional) Type the following command to export the serial information to a text file and press Enter:
Get-WmiObject win32_bios | select Serialnumber > PATH\TO\EXPORT
In the command, make sure to replace «PATH\TO\EXPORT» with the path to the text file you want to export the serial number information.
For example, this command exports the output to the ComputerSerial.txt file in the C drive:
Get-WmiObject win32_bios | select Serialnumber > C:\ComputerSerial.txt
Source: Windows Central
Once you complete the steps, you’ll know the serial number of your desktop or laptop computer.
If you are using the command to export the output, you’ll find the file in folder location you specified. Also, since you exported it as a text format, you can open it with Notepad or any other text editor.
How to determine PC serial number using Command Prompt
To check the device serial number using a Command Prompt command, use these steps:
- Open Start.
- Search for PowerShell, right-click the top result, and select the Run as administrator option.
Type the following command to find out the computer serial number and press Enter:
wmic bios get SerialNumber
 Source: Windows Central
(Optional) Type the following command to export the serial information to a text file and press Enter:
wmic bios get SerialNumber > PATH\TO\EXPORT
In the command, make sure to replace «PATH\TO\EXPORT» with the path to the text file you want to export the serial number information.
For example, this command exports the output to the ComputerSerial.txt file in the C drive:
wmic bios get SerialNumber > C:\ComputerSerial.txt
Source: Windows Central
After you complete the steps, the command will return the serial number without needing to access the BIOS or going behind the device to look for the sticker.
Although these commands will work on any computer, custom-build devices don’t have a serial number. This means that the command output may read «To Be Filled By O.E.M.»
If you’re looking to retrieve the device model number, you can use these instructions.
More Windows 10 resources
For more helpful articles, coverage, and answers to common questions about Windows 10, visit the following resources:
![]()
The Dell XPS 15 is our choice for best 15-inch laptop
For a lot of people, a 15-inch laptop is a perfect size that offers enough screen for multitasking, and in a lot of cases, some extra performance from powerful hardware. We’ve rounded up the best of the best at this size.
![]()
Halo: MCC’s live service elements make it better, not worse
Halo: The Master Chief Collection is more popular than ever, but some fans don’t agree with the live service approach 343 Industries has taken with it. Here’s why those elements are, at the end of the day, great for the game and for Halo overall.
![]()
Microsoft’s Surface Duo is not ‘failing up’
Microsoft announced this week that it was expanding Surface Duo availability to nine new commercial markets. While Surface Duo is undoubtedly a work in progress, this is not a sign of a disaster. It’s also doesn’t mean that Surface Duo is selling a ton either. Instead, the reason for the expansion is a lot more straightforward.
![]()
These are the best PC sticks when you’re on the move
Instant computer — just add a screen. That’s the general idea behind the ultra-portable PC, but it can be hard to know which one you want. Relax, we have you covered!
Как узнать ключ Windows 7, 8, 10 ноутбука
Любая система быть лицензионной и иметь некий идентификатор, указывающий на эту лицензию. Программное обеспечение Windows – платное решение, а значит при покупке через интернет или диска, вы всегда будете иметь ключ продукта. Некоторые задаются вопросом, как узнать ключ Windows 7, 8 или 10. Для какого случая это нужно решать вам, главное, что здесь вы найдете множество вариантов, как выполнить данную процедуру.
Как узнать ключ Windows 8
Один из хороших вариантиков узнать лицензионный ключ Windows 8 – загрузить утилиту RWEEverything. Скачивание производить с этого сайта – http://rweverything.com/download.
Итак, процедура нахождения сведений о лицензионном ключе может понадобиться при случаях:
- Когда система повреждена до такой степени, что вариантом исправления проблемы будет являться переустановка системы.
- Накопитель, где инсталлирована Windows форматирован.
#1 способ нахождения ключа
Практически в каждом ноутбуке, с системой ОС, то есть там не стоит DOS, при этом лицензионной, присутствует зашитый в BIOS ключик. То есть это ключ активации OEM систем. Такой находится и в Windows 7, и в Windows 10. Ещё на днище устройства должна быть наклейка, где указан ключ продукта и парочку не относящихся к делу сведений. Когда скачаете чистую систему нужной редакции (например, Домашняя), можете ввести этот ключ, тем самым её активировав.

#2 метод нахождения ключа системы
Скачиваете программку по ссылке, которую я указал выше и проделываем такую процедуру:
- Запускаете файлик Rw.exe
- В окошке находим вкладку ACPI, а в другом окошке идём на вкладку MSDM. Находим строчку Data, где будет написан ваш лицензионный ключ.

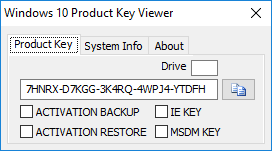
Как узнать ключ Windows 10
В этом разделе мы снова используем программу, но уже другую. Предыдущая тоже подойдет для любой системы.
Программка называется Product Key Viewer и скачать её можно с этого ресурса: https://safezone.cc/resources/windows-8-10-product-key-viewer.93.
Дальше на вкладке Product Key вы увидите вшитый в BIOS ключ. Но пользователи могут задаться вопросом, что у них в системе как бы два ключа.
Зачем два ключа в ноутбуке
Все ноутбуки, приобретаемые вами через интернет или в обычном магазине, имеют предустановленные версии OEM. Системка может быть любой. Версия OEM – это предустановленная на компьютере Windows, использующая специальную проверку подлинности сопоставлением 2-х ключей.
Первоначально идёт проверка ключа, вшитого в BIOS, дальше 25-значного лицензионного ключа, находящегося уже в системе, для активации системы также необходим так называемый OEM-сертификат.
Когда вы начнете переустанавливать Windows 10 и начнется активация, на серверах Microsoft начнется сопоставление данных ключей, 1-го и 2-го лицензионного. При условии, что оба ключа имеют отношение к Windows 10 Home для одного языка, то активация пройдет успешно (Для примера я указал десятую версию Home).
В одной из своих статей, как восстановить ключ от Windows 7 и 8, я рассматривал несколько инструментов, в список которых входит ProduKey. С помощью нехитрых действий вы можете узнать ключ Windows 10 и прочих версий ОС. Если у вас на компьютере стоит Microsoft Office, то и от этого софта вы увидите желаемый ключик.
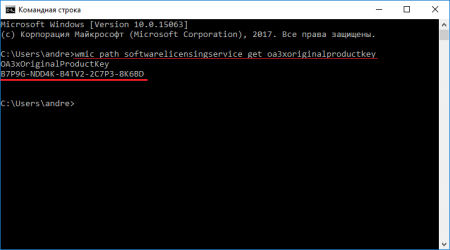
Как узнать ключ Windows при помощи командной строки
Оказывается, узнать ключ продукта можно, воспользовавшись командной строкой. Запускаем её с повышенными привилегиями и вводим следующую команду:
wmic path softwarelicensingservice get oa3xoriginalproductkey
Такая длинная строчка поможет обнаружить ключ из любой системы Windows.
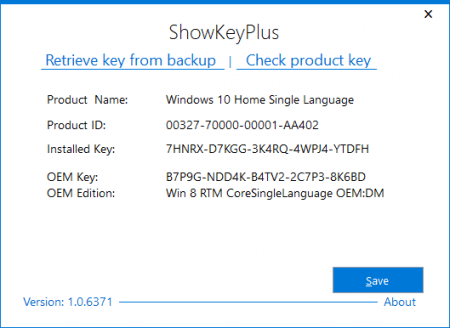
ShowKeyPlus
Дабы проверить ключ Windows, достаточно загрузить утилитку ShowKeyPlus. Она бесплатна и нет необходимости её устанавливать, а после открытия вы сразу увидите нужные данные.
Вы увидите имя системы, код продукта, сам ключ, и второй ключ для OEM системы.
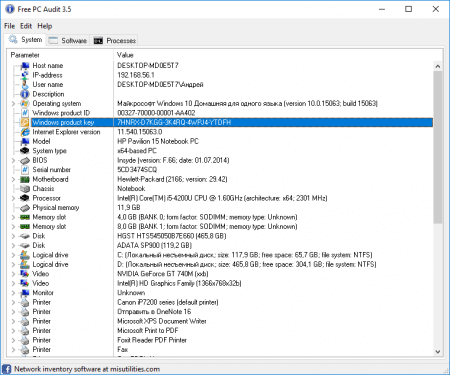
Free PC Audit
Очередное средство, поможет вам узнать о ключе Windows на любом компьютере. Она похожа на другие, рассмотренные нами инструменты. Скачиваете отсюда, запускаете и переходите на вкладку «System». Слева ищем раздел «Windows product key». А в правой части окошка высвечивается необходимая нам информация.
Как узнать ключ Windows с помощью Speccy и AIDA64
Итак, вот мы и подобрались к одной из моих любимых утилит, при помощи которой я смотрю сведения о системе и комплектующих называется AIDA64. В ней присутствует и опция для проверки ключа Windows. Всё, что нужно сделать – перейти на вкладку «Операционная система» и справа вы увидите строчку «Ключ продукта».
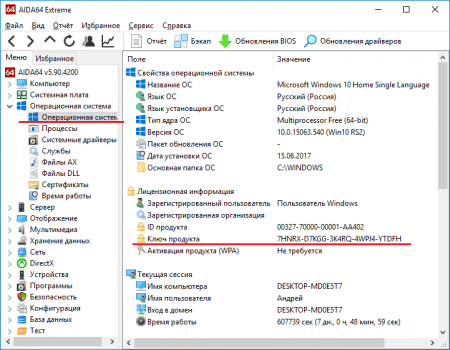
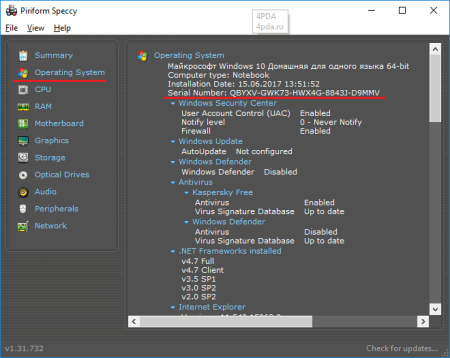
Второе аналогичное средство – это Speccy. Также перейдите на вкладку «Операционная система», которая там имеется и справа. Найдите строчку «Серийный номер». Вот и весь процесс.
Как узнать ключ Windows с помощью скрипта
Я не думаю, что кому-то захочется заморачиваться по поводу ввода скрипта, когда есть такие простые методы, описанные выше. Но я всё же, на всякий случай укажу этот способ.
Ниже указан скрипт, выполняющийся в виде файла с расширением VBS. Рассмотрим этот вариант.
Открываем стандартный блокнотик и вставляем в него это содержимое:
[stextbox >Set WshShell = CreateObject(“WScript.Shell”)
regKey = “HKLM\SOFTWARE\Microsoft\Windows NT\CurrentVersion\”
DigitalProductId = WshShell.RegRead(regKey & “DigitalProductId”)
Win8ProductName = “Windows Product Name: ” & WshShell.RegRead(regKey & “ProductName”) & vbNewLine
Win8ProductID = “Windows Product ID: ” & WshShell.RegRead(regKey & “ProductID”) & vbNewLine
strProductKey =”Windows Key: ” & Win8ProductKey
Win8ProductID = Win8ProductName & Win8ProductID & strProductKey
Const KeyOffset = 52
isWin8 = (regKey(66) \ 6) And 1
regKey(66) = (regKey(66) And &HF7) Or ((isWin8 And 2) * 4)
Cur = regKey(y + KeyOffset) + Cur
regKey(y + KeyOffset) = (Cur \ 24)
Cur = Cur Mod 24
Loop While y >= 0
winKeyOutput = Mid(Chars, Cur + 1, 1) & winKeyOutput
Loop While j >= 0
If (isWin8 = 1) Then
keypart1 = Mid(winKeyOutput, 2, Last)
winKeyOutput = Replace(winKeyOutput, keypart1, keypart1 & insert, 2, 1, 0)
If Last = 0 Then winKeyOutput = insert & winKeyOutput
a = Mid(winKeyOutput, 1, 5)
b = Mid(winKeyOutput, 6, 5)
c = Mid(winKeyOutput, 11, 5)
d = Mid(winKeyOutput, 16, 5)
e = Mid(winKeyOutput, 21, 5)
ConvertToKey = a & “-” & b & “-” & c & “-” & d & “-” & e
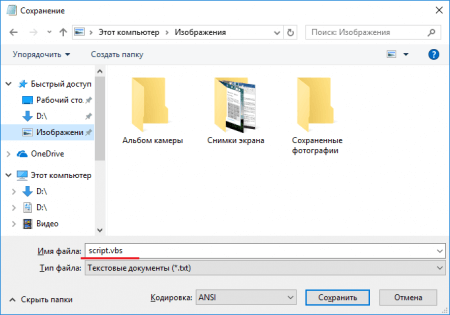
Сохранять файлик надо не с текстовым расширением, типа «.txt». Вы должны щелкнуть кнопочку «Файл», выбрать опцию «Сохранить как» и прописать какое-то имя на латинице, добавив приписку VBS. Другими словами, название может быть таким:
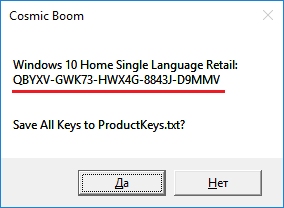
После запуска этого файла со скриптом вы должны увидеть уведомление в виде окна, где написан – название системы, ID и сам ключ.
Программа SIW
Последний раздел статьи. Используем программку SIW. Вам достаточно скачать её, запустить и перейти слева на вкладку «Лицензии».
Почему вместо нормального ключа высвечиваются другие символы
Иногда при попытке узнать ключ Windows 7, 8, 10 ноутбука или другого устройства возникает ситуация появления символов, совершенно не относящихся к ключу. Обычно такие системы активированы так называемыми MAK и VLK, а они, как правило, не сохраняются. Такие ключи не зарегистрированы на ПК, а находятся на серверах Майкрософт.
Еще подобный случай может иметь место при смене комплектующих, поэтому вспоминайте, может быть вы не так давно меняли свою системную плату или еще какой-то компонент.
Теперь вы знаете как узнать ключ windows 7, 8, 10 с помощью различного программного обеспечения и даже средствами самой системы.


