Question: Q: SSL Network Extender (SNX) is not working
I upgraded Mac Book OS to el capitan. Checkpoint VPN started not to work which was working yosemite. error message in the console as below;
all security (java and safari) settings has been revised accordingly.
04/10/2015 12:39:48[SNXNetMode] Checking communication to SNX Network Mode
04/10/2015 12:39:48[SNXNetMode] Failed to find /usr/bin/snx
04/10/2015 12:39:48[Component] Error, Can’t communicate with component.
04/10/2015 12:39:48[Director] Failed to connect to the component
04/10/2015 12:39:48[CShell] Failed to initialize
Can anybody help me to be able to skip this problem?
MacBook, OS X El Capitan (10.11)
Posted on Oct 4, 2015 4:10 AM
Just googled a bit more. Patch to SNX will be released in November 2015: https://forums.checkpoint.com/forums/thread.jspa?threadID=23363 .
For now what u can do is to:
1) disable SIP
2) Install SNX
3) enable SIP
And everything will be okay then 😉
Posted on Oct 31, 2015 7:33 AM
All replies
Loading page content
Page content loaded
I’m also having this issue after upgrading to «El Capitan».. tried doing a manual upgrade using root access, but still encountering same «failed to initialize» error.
Oct 5, 2015 5:52 PM
After upgrading to El Capitan, I found my SNX (SSL Network Extender) was no longer working. Specifically, when the Applet would begin to load I would get a dialogue indicating that the «SNX_Installer_Helper_Tool» (or something along those lines) need to install something and I needed to provide my system username and password. After doing so I would get the «Failed to initialize» error.
I found that Apple implemented a new security feature in El Capitan which restricts certain «things» from running from certain directories. This is called «System Integration Protection» or «rootless» for short. Apparently SNX runs from one of these, now restricted, directories and was causing my error. I simply had to disable «rootless» per these steps from OS X Daily and everything is working great now:
Oct 6, 2015 1:44 PM
Thanks for explaining the issue, @elkaboing .
However, is there any way to fix it without turning off the System Integration Protection? I’d want to keep it.
Maybe is there any way to install this snx tool by yourself, so the `/usr/bin/snx` command would work then?
I paste my logs from java snx installation, they are almost the same:
31/10/2015 02:59:01[Launcher] Launching chmod +x /Users/jtomaszewski/Library/Caches/SNXNM/snx_install.sh
31/10/2015 02:59:01[Launcher] Launching /Users/jtomaszewski/Library/Caches/SNXNM/snx_install.sh
31/10/2015 02:59:06[SNXNetMode] Checking communication to SNX Network Mode
31/10/2015 02:59:06[SNXNetMode] Failed to find /usr/bin/snx
31/10/2015 02:59:06[Component] Error, Can’t communicate with component.
31/10/2015 02:59:06[Director] Failed to connect to the component
31/10/2015 02:59:06[CShell] Failed to initialize
Источник
Checkpoint snx mac os
By Ralf Schlatterbeck
This is a project to connect to a Checkpoint SSL-VPN from a Linux client. The current version of checkpoint SNX (SSL Network Extender) for Linux no longer supports a command-line mode. The supported version involves a Browser with Java and is heavily dependent on the correct Java version and other configuration options in the Browser. Moreover it seems to only work with the Mozilla browsers (Firefox) not with others like Chrome. Last not least Java and the Browser like to die frequently.
The current Checkpoint solution still depends on a command-line utility called snx that needs root privileges and is installed either via automatic download (and install) from Java or by hand. The web-page for the SSL-VPN usually supports download of the correct snx-version for that endpoint for manual installation.
In the new solution the snx binary is called with the undocumented -Z Option. In that mode it does not do the password negotiation (which is done via the browser) but is only used for setting up the VPN connection.
This project is an attempt to duplicate the Browser-based login with a standalone program (in python) to get rid of all the Java version and Browser intergration headache. We still rely on the snx binary by Checkpoint which is called with the undocumented -Z option.
So far this is working for me with a Checkpoint SSL that uses username and password authentication and in addition a one-time password transmitted via SMS to the telephone of the person trying to connect. If you’re using certificate-based login or other methods, this will probably not work for you out-of-the-box but you may want to help me make it work.
Install and Run
Install via pip is the preferred way (replace pip with pip3 if you want to install for python3):
The following dependencies are needed but should be picked up automagically if you install via pip :
- Beautiful Soup version 4 ( python-bs4 Debian package)
- pycrypto ( python-crypto Debian package)
After installation you should be able to run snxconnect —help to find out about options. At least a host, and username must be given, either on the command-line via options or in a config file (see below).
The snxconnect program will currently create two files in the current working directory where the program is started:
- snxanswer : The not-yet-reverse-engineered answer of Checkpoint’s snx program to the caller, only created if the —debug option is given
- $HOME/.snxcookies : The cookies from the remote end in the format known from the perl LWP library (available in python as LWPCookieJar), this is only created if the —save-cookies option is given. The default cookie filename can be changed with the —cookiefile option.
If a cookie file is found, snxconnect tries to reconnect without asking for a password. This can be used if the connection has died prematurely before the connection time ran out. And, yes, it might be a security risk to save cookies to disk, so you have to explicitly enable this feature by setting save-cookies true in the config file or giving the —save-cookies option. Note that the cookies of course only have a limited lifetime and your connection isn’t very secure if you cannot be sure of the files on your disk. Moreover all users of the current machine can access the VPN connection anyway.
When you run Checkpoints snx for the first time with snxconnect it creates an X-Windows popup that lets you confirm the server fingerprint. I’ve not seen this popup with the Java framework (but Java died several times during my first experiments which is one of the reasons I wrote snxvpn , so that might be the reason I hadn’t seen the popup before). You have to confirm this popup. The server fingerprint is stored into a file with extension .db in /etc/snx .
For configuration, snxconnect accepts a config file $HOME/.snxvpnrc . The options there are the command-line long options (obtained with —help) where a ‘-‘ is replaced with ‘_’. For compatibility with .snxrc , the keyword server is an alias for host . You can see which options were picked up from the config-file by specifying —help , where defaults are displayed, the defaults from the config-file are displayed. Command-line options take precedence over config-file entries.
In addition a .netrc file is supported that can contain username and password by host name. Note that storing long-term login credentials on disk is a security risk. See the manual page for netrc for further details.
To install from source (from a git checkout) you need my sfreleasetools from Sourceforge. This adds the necessary Makefile includes to create the snxvpnversion.py from the git tag containing the latest version number. You can either install sfreleasetools in a sibling directory of snxvpn called releasetools or set the environment variable RELEASETOOLS pointing to your cloned version. You also need the rst2html command provided by docutils , on Debian Linux you can obtain it by installing the python-docutils package.
Once this is installed, call make without arguments. This will create the snxvpnversion.py which is used by the setup.py script.
Once the snxvpnversion.py has been created, the snxvpn package can be installed with normal:
Notes on snx Installation
From many posts on various mailinglists and forums, it is clear that installing snx isn’t straightforward. You need some non-standard libraries installed that snx needs to function. Moreover snx is a binary for the i386 architecture, not a modern 64-bit AMD/Intel architecture. I can only give hints for Debian installation here but the general steps will apply to other distributions, too.
Obtaining the snx binary in the first place can usually be achieved by connecting via web-browser to the SSL-VPN site via the browser, log in and (in my installation here at least) look in the Settings (in german Einstellungen) menu for an entry native application settings or similar (german «Native Anwendungseinstellungen bearbeiten»). In this menu I do have links for manual download of snx for Linux and Mac-OS.
First of all if you’re on a 64-bit architecture (called amd-64 at least by Debian) you need to enable multi-architecture support with:
Then you need to install some packages that contain libraries needed by snx , notably:
- libstdc++5:i386
- libxcb1:i386
- libaudit1:i386
- libgcc1:i386
- libxau6:i386
- libxdmcp6:i386
To check if you have all necessary libraries, you can run ldd on the snx binary (with sudo to root):
This should list a library file for each line and should not report any missing libraries.
Some Notes on the Mechanisms
This section discusses some of the internals of how the snx program is called by the Java framework and snxconnect .
The Login process via the browser is a standard login page with lots of Javascript and redirects. Passwords are sent in encrypted form to the VPN gateway. The encryption uses a 2048 bit RSA key and pads the password with random data before encryption (this is good). During login the browser (or this program) picks up a lot of cookies and can access necessary login information via Javascript. This information includes:
- RSA public key for the password encryption
- Username to be passed to snx
- A one-time password (different from the one received via telephone) to be passed to snx
- Host name for TLS connection
- Port for TLS connection
- A server fingerprint
All these (except the RSA key) are passed to the snx program for establishing the connection. The connection might use PPP internally as some of the error messages (which are sent as part of the i18n info in Javascript and map the error codes of snx to human-readable messages) suggest.
If you call snx with the undocumented -Z option by hand, it will terminate immediately. It obviously has other checks in place if it is called «correctly». To call snx correctly with this option, snx expects that standard input, output and error are UNIX pipes. Only if something goes wrong and snx dies with an error-message, these pipes are ever used. After startup, snx checks the existence of a logfile and creates it if it doesn’t exist or is not locked by another snx process. Then it creates some other lockfiles in /etc/snx/tmp and then immediately forks a child process and lets the parent process terminate. This forking and terminating sends the child process to the background. The first step the child process does is close the file-descriptors for standard input, output, and error.
After this, snx opens and listens on a TCP socket on port 7776 on the local machine. I haven’t found options for telling snx to use another port. The calling application (e.g., snxconnect or the original Java framework) is expected to pass the connection information detailed above in an undocumented binary format. After that snx establishes a VPN connection and reports back with another blob of binary information on the same socket. The socket must then be kept open by the calling application, otherwise snx terminates. It may well be that snx accepts further commands on that socket, e.g., for renewing the authentication after the VPN timeout has expired. We log the binary data received on that socket to the file snxanswer if debugging is enabled.
About
Command-line utility to connect to a Checkpoint SSL VPN
Источник
Information Technology


Checkpoint VPN SSL Network Extender Not Working After Windows, Mac OS, Java or Firefox Update
Remote access to office computers is common nowadays especially for those that work in the IT division. The popular Checkpoint VPN used for secure access to corporate network uses Active X (Windows) or Java Applet (Mac) for its SSL Network Extender. It can be a pain when a regular system update to your browser or java or Windows would break your VPN client.
Here’s a compilation of some the experiences I had and their fix. This will be my ever evolving document as Checkpoint would try to catch up with fixes for each system patch update.
WINDOWS SYSTEM PATCH
Symptoms: IE browser won’t display the VPN page.
Avoid installing the following Windows Security Updates:
KB2992611, KB3042058, KB2585542
If these are already installed, proceed to uninstall these from control panel — > system — > windows update — > installed updates.
FIREFOX UPDATE (Mac OS)
Any version beyond 51.0.1 will cause the Checkpoint VPN not to work.
Download and install either the version 51.0.1 or the extended support 45.9.0
Before uninstalling Firefox and you determined that you also have an incompatible Java versions (JDK 7u51,JDK 8u131), make sure to uninstall the java applet plugin per the instructions: Firefox Plug- in Uninstall
Firefox 45.9.0 ESR Download
Firefox 51.0.1 Download
Known incompatible Java versions that prevents the VPN from launching the Java applet: Java 7u51, Java 8u131
Solution: Downgrade Java
1. Uninstall Java
2. Install The Latest Supported Java
Once you got the supported versions installed, set your Java and firefox not to do an auto update.
MacOS: Disable Java auto update
System Preferences — > Java (located at the bottom)
From the Java Control Panel, select Update tab and disable the Check Updates Automatically.
Disable Firefox auto update:
MacOS: Firefox Preferences — > Advanced — > Update tab — > [x] Never Check For Update
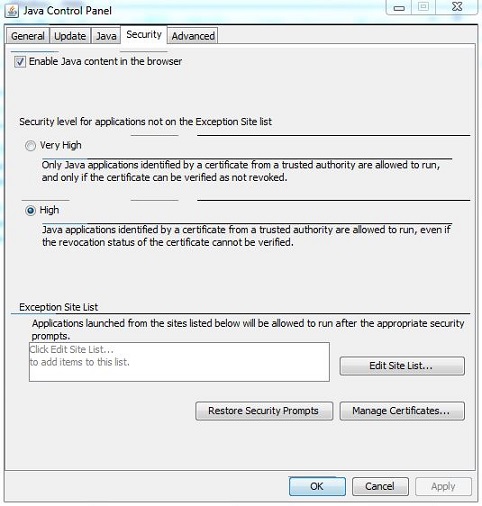
If things still not working well or you rather have the latest Java version installed for security reasons, you may try to add your VPN URL in the exception list.
Windows Exception Instructions
Control Panel — > Programs — > Java
At Security Tab, edit the Exception Site List to add your VPN site (i.e. https://vpn.mydomain.com:8080).
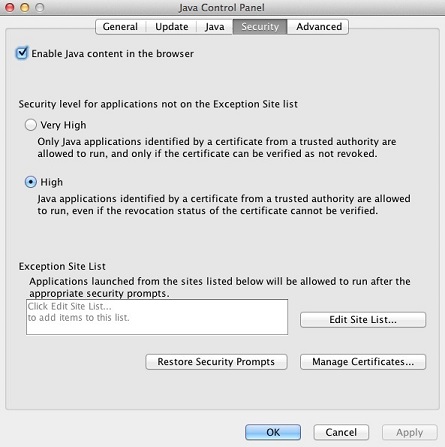
Mac Exception Instructions
System Preferences — > Java (located at the bottom)
At Security Tab, edit the Exception Site List to add your VPN site (i.e. https://vpn.mydomain.com:8080).
FIREFOX SELF SIGNED CERTIFICATE EXCEPTION FAILURE
You may have Self- Signed Certificates used internally by you workplace and your browser doesn’t provide exceptions, you need a lower version of Firefox to make it work.
Firefox 45.9.0 ESR Download
Tired of clicking the Certificate Exception Page?
Enable the Skip Certificate Error Add- on To Always Accept Self- signed Certs.
Warning: By doing this allows you to be exposed to websites with untrusted Cert Authority. Make sure that your computer and browser is only used for corporate internal network and not to browse the internet!
From your firefox browser, enter the following URL to install the add- on:
https://addons.mozilla.org/en- US/firefox/addon/skip- cert- error/
If patches was applied to the VPN server to address the Java issue and the client is still unable to connect, try forcing a re- download of the SNX client:
1. Delete CSHELL.JAR file from the cache (Temporary Files) in the Java Control panel
2. Connect to SNX gateway again to force a re- download of the SNX client
Источник


