- Клиент Checkpoint VPN Linux
- 6 ответов
- rkueny / snx_install.sh
- This comment has been minimized.
- skyrocknroll commented Dec 13, 2017 •
- This comment has been minimized.
- andrqm commented Feb 20, 2018
- This comment has been minimized.
- davidlebr1 commented May 14, 2018
- This comment has been minimized.
- flagod commented Jul 19, 2018
- This comment has been minimized.
- nachohc commented Jul 22, 2018 •
- This comment has been minimized.
- flagod commented Jul 26, 2018
- This comment has been minimized.
- musemby commented Jan 31, 2019 •
- This comment has been minimized.
- erzads commented Apr 12, 2019
- This comment has been minimized.
- pumukovic commented Jun 18, 2019
- This comment has been minimized.
- archenroot commented Aug 1, 2019
- This comment has been minimized.
- icedwater commented Oct 16, 2019
- This comment has been minimized.
- yelled1 commented Mar 11, 2020
- This comment has been minimized.
- yurayko commented Apr 15, 2020
- This comment has been minimized.
- matteoredaelli commented Apr 27, 2020
- This comment has been minimized.
- javorekm commented Aug 5, 2020 •
- Checkpoint vpn client linux download
- About
- Network Services | Off-campus Internet
- Contact Information
- Target Users
- Installation Instructions
- Step 1: Download Checkpoint VPN E84.30
- Step 2: Remove currently installed version
- Step 3: Install new version
Клиент Checkpoint VPN Linux
Есть ли клиент Linux для Checkpoint VPN? Предпочтительно для Ubuntu?
6 ответов
Я слышал хорошие вещи о Shrew, но я только видел, что он используется в Windows.
Я использую SNX (через контрольную точку), и он работает отлично. Его можно загрузить из здесь .
Я использовал это руководство , чтобы установить snx на моем клиенте, проверить его и проверьте, установлены ли у вас все необходимые пакеты.
Кроме того, вы можете создать файл .snxrc в /home/user/ и укажите там IP-адрес и имя пользователя, например:
Затем просто запустите snx , вам будет предложено ввести ваш пароль и все.
Существующий клиент является древним, и на данный момент AFAIK нет планов писать более новый. Есть частные VPN-клиенты Linux, которые должны работать с контрольной точкой — особенно проверьте vpnc и енот.
Я успешно подключился к Checkpoint (NGX R75) с помощью Shrew Soft, подробнее здесь: https://serverfault.com/a /386021/73387
Я предполагаю, что вы ищете клиента IPSEC, но если вы ищете SSL VPN, мне повезло с клиентом Checkpoint SNX в Ubuntu.
Я тоже искал его И я нашел VPN-клиент контрольной точки на форумах пользователей Checkpoint, я свяжу его с вами завтра.
OK Вот ссылка на документацию в RedHat:
НО, VPN-клиент Linux, похоже, устарел и больше не поддерживается, как и мой собственный опыт, лучше использовать OpenSwan VPN для подключения через VPN-шлюз Checkpoint VPN под Linux.
Источник
rkueny / snx_install.sh
| mkdir temp && cd temp |
| # for linux ‘amd64’ architecture install those packages: |
| sudo apt-get install libx11-6:i386 libpam0g:i386 libstdc++5:i386 lib32z1 lib32ncurses5 lib32bz2-1.0 |
| wget https://vpnportal.aktifbank.com.tr/SNX/INSTALL/snx_install.sh |
| sudo ./snx_install.sh |
| cd .. && rm -rf temp/ |
This comment has been minimized.
Copy link Quote reply
skyrocknroll commented Dec 13, 2017 •
sudo apt-get install libgtk2.0-0:i386 for ubuntu 16.04
This comment has been minimized.
Copy link Quote reply
andrqm commented Feb 20, 2018
This comment has been minimized.
Copy link Quote reply
davidlebr1 commented May 14, 2018
I had to install theses packages also apt-get install libstdc++5:i386 libpam0g:i386 libx11-6:i386
This comment has been minimized.
Copy link Quote reply
flagod commented Jul 19, 2018
Hi, why does the snx_install.sh script have 4000 lines of binary code at the end? Isn’t it supposed to be a shell script?
This comment has been minimized.
Copy link Quote reply
nachohc commented Jul 22, 2018 •
@flagod It’s a compressed tar archive located at the end of the script. In the line 17 extracts the file. it’s very common on proprietary software for Linux.
You can extract the snx binary:
This comment has been minimized.
Copy link Quote reply
flagod commented Jul 26, 2018
Thanks for the reply @nachohc ! is there any open source client that can be used as an alternative to snx?
This comment has been minimized.
Copy link Quote reply
musemby commented Jan 31, 2019 •
If anyone is getting SNX: Authentication failed errors you might want to ensure you have installed snx build 800007075 . See https://unix.stackexchange.com/questions/450229/getting-checkpoint-vpn-ssl-network-extender-working-in-the-command-line
This comment has been minimized.
Copy link Quote reply
erzads commented Apr 12, 2019
I know it’s been a long time, but do you have a newer snx version?
I have been using 800007075 but the checkpoint server was updated to use TLS 1.1 and now it doesn’t work.
I tried 800008061 too but no success.
They are advising us to use Windows. Help me =\
This comment has been minimized.
Copy link Quote reply
pumukovic commented Jun 18, 2019
In the same situation than @erzads . please an update tu use snx client with updated server to use TLS1.1 and upper. Please help
This comment has been minimized.
Copy link Quote reply
archenroot commented Aug 1, 2019
Well I am on gentoo system, where C14 support is default, so being on GCC 6/7/8, therefore missing the libstdc++.so.5 library on my system, doesn’t work.
Thx a lot, hopefully its against on later libstdc++ version
This comment has been minimized.
Copy link Quote reply
icedwater commented Oct 16, 2019
Can anyone verify the md5sum of this script? I got
This comment has been minimized.
Copy link Quote reply
yelled1 commented Mar 11, 2020
Can anyone verify the md5sum of this script? I got
@icedwater got
md5sum snx_install_800007075.sh
4372e9936e2dfb1d1ebcef3ed4dd7787 snx_install_800007075.sh
but likely because we got it from same source. Did u make it work?
Thanks,
This comment has been minimized.
Copy link Quote reply
yurayko commented Apr 15, 2020
This comment has been minimized.
Copy link Quote reply
matteoredaelli commented Apr 27, 2020
It works also for me. thanks!
I used 800007075 until the checkpoint server was updated to use TLS 1.1 . After that, until today, I used the following solution/workaround
This comment has been minimized.
Copy link Quote reply
javorekm commented Aug 5, 2020 •
Looks like older versions of SNX are not able to work with TLS 1.1. I am playing now with 800010003 from Checkpoint’s site (link given by @yurayko, thanks), but no success. From «connection aborted» I have shifted to «authentication failed». When looking into the debug log (-g option from command line) I see, that all is ok, but the communication on the end is not wrong, looks like a wrong format:
Источник
Checkpoint vpn client linux download
Linux setup Check Point Mobile Access VPN
This is a step-by-step tutorial to setup your Linux machine with all the required dependencies to work with Check Point Mobile Access VPN. This tutorial also includes some troubleshooting.
In the past year I had to setup my Ubuntu 18.04 laptop twice. Both times were very exhausting and took long hours until it was ready to use due to so many different errors hard to find the solution on Google. So no need to mention this tutorial (at the current state) is only useful if you’re working with a clean and recently installed Ubuntu LTS distro.
First make sure your operating system is up-to-date with:
Now you need some basic tooling for installing and building independent package vendors:
If your system has no Java version installed, make sure you install the version 8 (or higher). You can do that quickly with SDKMAN!, but first be sure you’re on your home directory with:
And then for installing SDKMAN!:
List the available Java versions and try to find the OpenJDK version 8 or higher (in my case it was 8.0.232-open ) and then install it:
For the Check Point Mobile Access required packages, you’ll need to install xterm and some SSL packages with the following commands:
If you’re running a 64 bit operating system, you’ll need to install some 32 bit compatible libraries:
Downloading the Shell Scripts
There are two shell script files you’ll need to download to setup Check Point Mobile Access VPN on your machine:
Both of them you can get on your company’s Mobile Access VPN page.

2. Click on «Settings» button

3. Click on «Download Installation for Linux» for both SSL Network Extender and Check Point Mobile Access Portal Agent

Running the Shell Scripts
The scripts you’ve just downloaded are just regular files. So we need to change their permissions to make them executable with the following commands:
The first script we’re going to run is the snx_install.sh , which should not give any errors when installing it.
Here comes the tricky part: running the other shell script. The script will ask you for your password because it’s going to run some things as sudo . Everything should be going fine until it gets to the last step: when it tries to run /usr/bin/cshell/launcher . That’s where it gets stuck. This executable file does not work properly with sudo .
When you notice it is stuck at the message above, open Ubuntu’s system monitor and try to find a process called launcher with 0% CPU usage and Sleeping status. Once you find it, kill it.
Do not ever type CTRL+C on the terminal or try to end its process or launcher ‘s. You must kill the launcher process. Otherwise, the script will do a clean-up and erase everything it has made that will allow you to make Check Point Mobile Access VPN work.
If you’ve done everything right, there should be an executable file called launcher at /usr/bin/cshell/ . If so, run it and it should have been displayed some logs as follows:
It means it has successfully been installed, and you should be fine trying to connect to the VPN now, but it doesn’t mean we don’t have more work to do.
If you end up with an error when you’re trying to run /usr/bin/cshell/launcher about a named pipe file called cshell.fifo inside the /tmp folder, just delete it with:
You need to disable one of your system’s startup applications. You should be able to see one of them called cshell with a marked checkbox. All it does is running the launcher executable file in /usr/bin/cshell/ . You must uncheck it because every time you let it run automatically it’s going to be run as sudo , which means it’s going to get stuck.

Now we’re going to do a little trick to make it start automatically without sudo : run it inside the .bashrc file, so every time you open up a terminal it’s going to run with your user normal permissions. Actually, we only want to run it once when you log in, right? So why don’t we simply run it inside .profile ? Because everything in .profile run as sudo , so the launcher is going to get stuck.
So here is the tricky part: let’s create a simple log file to check whether launcher should run every time you open up a terminal window. Add the following lines to the .profile file to remove the log file every time you log in.
On the .bashrc file add the following lines to check whether it should run the launcher file every time you open up a terminal window:
Restart your computer, log into your user account and check if the log file we created is on your home directory by opening a terminal and typing:
Then show its contents by using cat and it should be displayed as the following:
Now you should be all set. Open your company’s Check Point Mobile Access page and you should be able to connect everytime you log into your computer. Just remember to open up a terminal window first 🙂
About
Linux setup to work with Check Point Mobile Access VPN.
Источник
Network Services | Off-campus Internet
Contact Information

Starting 1-Jan-2021, Remote Client VPN and Endpoint Security Client versions E81.10 and lower may stop functioning and upgrade will fail and require a patch.
Target Users
Installation Instructions
Follow these instructions in order to install the latest version:
Step 1: Download Checkpoint VPN E84.30
Download and save the VPN client installation file from this link.
Don’t Run the downloaded MSI file at this point, make sure to note the file’s location.
Step 2: Remove currently installed version
To uninstall the currently installed version of Check Point VPN Client:
- Click on the magnifying glass near the Start button
 , write «Control Panel» ,Click on the «Control Panel» search result:
 , write «Control Panel» ,Click on the «Control Panel» search result:
- In the Control Panel window, click on «Programs and Features»:

- In the list of installed programs, right-click the Check Point VPN, and click «Uninstall»:
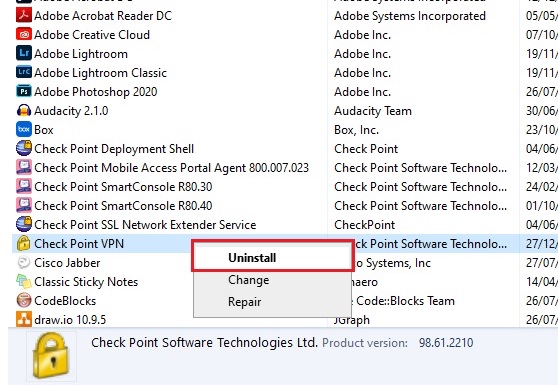
- Click «Yes» to proceed with the uninstall

- Click «Yes» to allow the app to make changes:


Step 3: Install new version
To install the latest version of Check Point VPN Client:
- Run the file downloaded in step 1: E84.30_CheckPointVPN_WithProfile.msi.
- If you are running the installer from outside the Weizmann Campus you might see these windows:
Click «More Info»
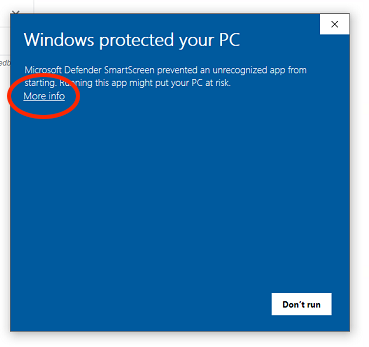
Click «Run Anyway»

- Click «Next» in the window that opens:

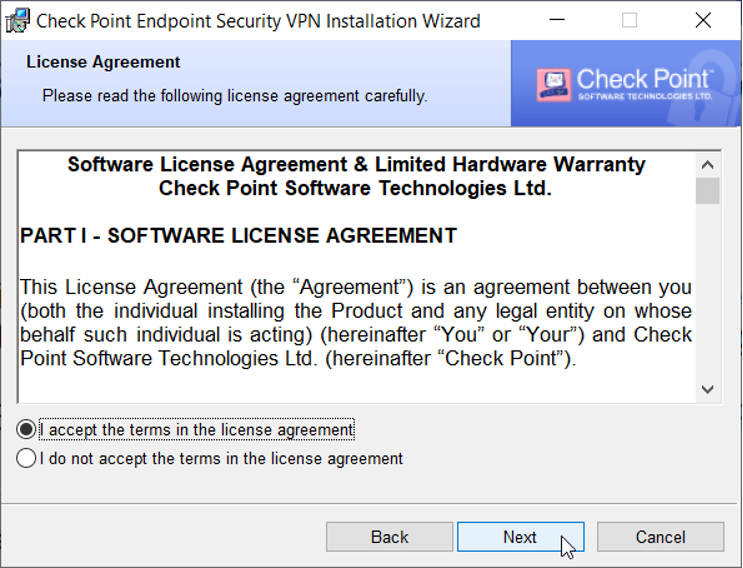
- Agree to the «License Agreement» and click «Next»:
- In «Destination Folder» window, click «Install»:

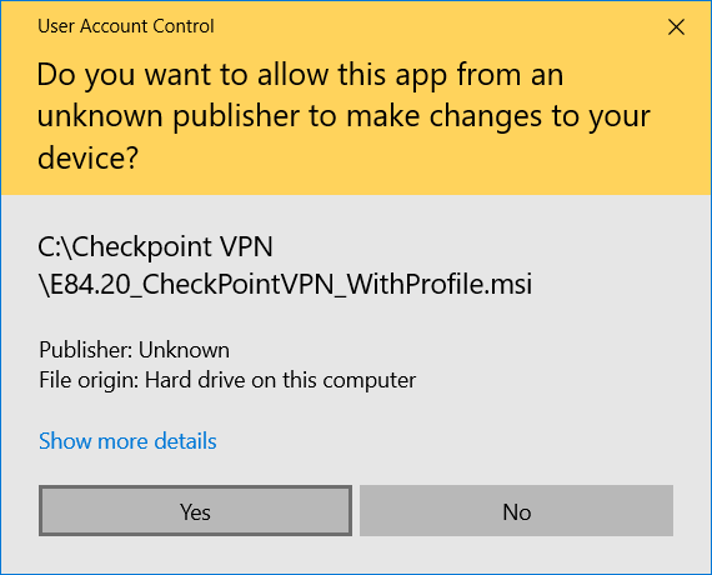
- Click «Yes» to proceed with the install, and allow the app to make changes:
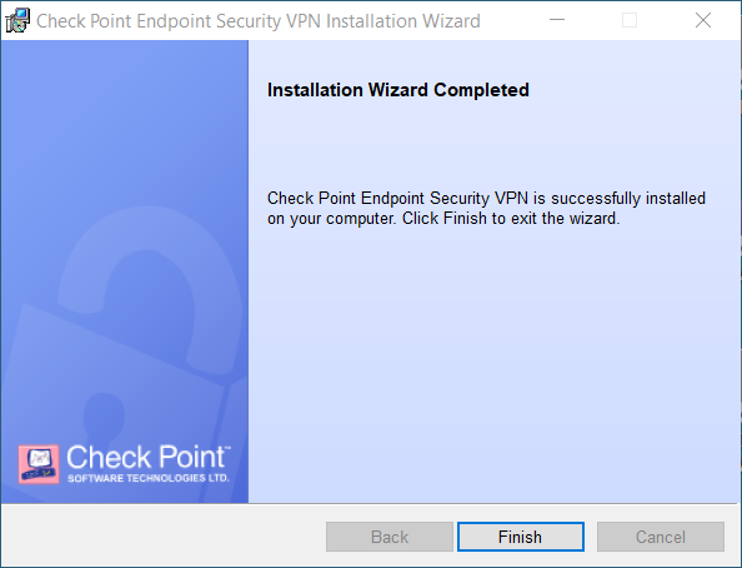
- You might be prompted to restart the computer. Save all open documents and click Yes to restart.
- Only for users outside Weizmann Network: Connect to the VPN in order to make sure the process was successful by entering your Weizmann UserID in Username field, and the 8 digits token in Tokencode field:
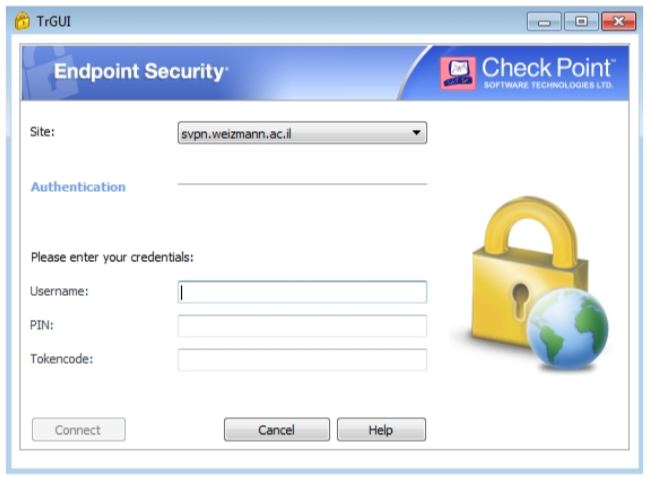
- Click Connect. The green lock icon in the taskbar will show a green dot upon successful connection.
Источник


