- Про ubuntu, chrome, youtube и аппаратное ускорение
- Выжимаем все соки из Chromium на Linux
- How To Enable Hardware Accelerated Video Decode In Google Chrome, Brave, Vivaldi And Opera Browsers On Debian, Ubuntu Or Linux Mint
- How to enable hardware-accelerated video decode in Google Chrome, Brave, Vivaldi And Opera web browsers on Debian, Ubuntu or Linux Mint (X11)
- How to check if hardware-accelerated video decoding is enabled and working in any Chromium-based web browser
Про ubuntu, chrome, youtube и аппаратное ускорение
Кто-нибудь в теме по вопросу? Расскажите мне плиз что и как. Оно там вообще есть? Как посмотреть? Как включить, если нет? Расскажите, пожалуйста. Стримеры переходят на 60 fps и оно у меня не тащит такое (((
По сетапу — ubuntu 18.04 на amd kaveri

На что из этого надо смотреть?
Жмакнул и получил но всё так же htop показывает под 100% нагрузки всего ЦП (((

Video Decode: Unavailable
на это
поставь хромиум из vaapi ppa
Нда, на 1080p60 тупо слайдшоу. Это вообще возможно исправить без замены ОС и/или железа?
Так, надо взять пересобранного хромого из ppa?
да
и поставить туда h294fy расширение
вот еще прекрасный тред
там еще в dri включить советуют
Источник
Выжимаем все соки из Chromium на Linux
В этой статье рассмотрим, как выжать все соки из Хромиума и максимально ускорить его или другой браузер на его движке (Chromium, Google Chrome, Opera, Vivaldi, Яндекс и др.). За счет включения многих экспериментальных возможностей по вынесу вычислений с процессора на видеокарту и включения использования находящихся в разработке программных алгоритмов. За счет этого наш любимый хромиум станет работать быстрее, может перестать тормозить или моргать экраном.
Поехали!
Как сделать резервную копию всего профиля браузера (настройки, история. закладки и пр.), написано в конце статьи.
Заходим по адресу chrome://gpu (да, именно так наберите в адресной строке или скопипастьте)!

Как видите, у меня везде зеленая надпись «Hardware accelerated», что говорит, что данная функция использует аппаратное ускорение за счет выноса вычислений на видеокарту, а «Enabled» говорит, что программный алгоритм включен.
Теперь зайдите в chrome://flags .Здесь и будем производить большую часть настройки.
На скриншоте красным прямоугольников выделил #ignore-gpu-blacklist . Дальше все опции из этого списка буду именовать именно вот так. Можно нажать Ctrl+F и найти настройку по ее скопипащенному названию.
Теперь у нас открыты и chrome://gpu , и chrome://flags . Смотрим, какие параметры есть в chrome://gpu , и, если параметр не зеленый, а желтый или красный, в chrome://flags изменяем соответствующую настройку. Осторожно, некоторые настройки могут сделать работу браузера нестабильной, зависит от железа.
Canvas — аппаратное ускорение отрисовки канваса
В chrome://flags это #ignore-gpu-blacklist
Отключается включением опции #disable-accelerated-2d-canvas
CheckerImaging — суть в том, что растеризация картинки убрана из зависимости от растеризации остальной области, с которой связана картинка, что позволяет отрисовывать веб-страницу, не дожидаясь окончания обработки картинки, как-то так. Говорят, сайт Юлмарта начинает отрисовываться намного быстрее.
Это параметр командной строки —enable-features=»CheckerImaging» , подробнее ниже.
Flash, Flash Stage3D, Flash Stage3D, Flash Stage3D Baseline profile — аппаратное ускорение декодирования флеш-контента
Тоже #ignore-gpu-blacklist
Compositing — аппаратное ускорение наложения слоев
Скорее всего, тоже #ignore-gpu-blacklist , я не встречал, чтобы это было не работало (было не зеленым) «из коробки».
Multiple Raster Threads — распараллеливание на несколько потоков процесса растеризации векторных элементов веб-страницы
#enable-gpu-rasterization —> Force-enabled for all layers / Принудительно для всех слоев.
Включение этой опции также может помочь, если у вас моргает экран при просмотре сайтов, в т.ч. вконтакте, и видео.
Native GpuMemoryBuffers — исключается дополнительный буфер при копировании элементов между CPU и GPU, по умолчанию выключено, почему — подробно написано по ссылке.
Это параметр командной строки —enable-native-gpu-memory-buffers , подробнее ниже.
Rasterization — применение видеокарты для растеризации
#enable-gpu-rasterization
Video Decode — аппаратное ускорение декодирования видео (при просмотре видео декодируется)
Video Encode — аналогично кодирование
Входит в #ignore-gpu-blacklist
WebGL, WebGL2 — поддержка рендеринга на видеокарте набора инструкций OpenGL, входящих в стандарт WebGL; автоматически выключается, если драйвер видеокарты их не поддерживает.
Входит в #ignore-gpu-blacklist
Еще есть опция #enable-zero-copy , выше приведена ссылка на статью инженеров Intel, которые разрабатывали эту функцию (судя по скриншотам и вступлению в статье, разработка происходит на Ubuntu, но коммерчески выгодна в первую очередь из-за Chrome OS). Есть подозрение, что ее работа будет очень специфична для конкретного железа.
#enable-tcp-fast-open — TCP Fast Open, ускоряет работу сетевого стека, фича ядра Linux, на Windows и MacOS недоступно, виндузятниги с**** ничего не подозревая наслаждаются ущербностью своей операционной системы, яблочники от них не сильно отстают (не воспринимайте близко к сердцу, это шутка).
#expensive-background-timer-throttling — ограничивает максимальную нагрузку на процессор фоновыми вкладками (т.е. не та вкладка, с которой вы сейчас работаете) до максимум 1%. Далеко не всегда уместно. Вдруг у вас в фоновой вкладке запущена торговля на бирже.
#v8-cache-options — например, в режиме «Cache V8 compiler data» V8 будет лучше кешировать javascript и не компилировать их заново. Опять же. на некоторых сложных веб-приложениях в теории может вызывать проблемы. V8 — это движок обработки ( в т.ч. компиляции) яваскрипта в Chromium, а компиляция javascript создает основную нагрузку на процессор при работе браузера.
#v8-cache-strategies-for-cache-storage — можно включить агрессивный кеш V8, речь о кеше в предыдущем абзаце, возможное последствия те же.
#shared-array-buffer — экспериментальные функции работы с памятью в javascript, подробное объяснение здесь.
#enable-simple-cache-backend —> Enabled/Включено — вместо реализации своего подобия файловой системы в блочном файле для кеша, работаем с файлами непосредственно внутри файловой системы, возлагая большую часть работы на операционную систему и уменьшая нагрузку на ввод-вывод с диска, в т.ч. уменьшаем количество переключений контекста, что должно ускорить работу.
Теперь про опции командной строки Chromium и Google Chrome. Теоретически, всякие иные поделия браузеры на движке Сhromium должны их поддерживать, но гарантии нет.
Закрываем все открытые копии Chromium, открываем терминал и выполняем вот такую команду:
В chrome://gpu видим, как стали зелеными пункты CheckerImaging и Native GpuMemoryBuffers (либо браузер вообще не запустился 🙂 ) Но ведь каждый раз запускать браузер через терминал неудобно, поэтому открываем графический редактор desktop-файлов и в нем дописываем в команду запуска браузера нужные нам параметры (обратите внимание, что на конце есть %U , оно заменяется на ссылку или путь к файлу, который нужно открыть, так что его не нужно удалять. В KDE это kmenuedit (вызов либо через терминал командой kmenuedit , либо подвести курсор к кнопке вызова меню приложений и нажать на правую кнопку мыши 1 раз, затем левой 1 раз нажать на «Редактор меню» в появившемся списке), на остальных DE (XFCE, GNOME, Budgie, LXDE, LXQt и др.) это menulibre .
Тру-униксоиды могут скопировать /usr/share/applications/chromium-browser.desktop в
/.local/share/applications/chromium-browser.desktop и отредактировать параметр Exec, получится то же самое:
В зависимости от DE, вам может потребоваться повторно вынести ярлык на рабочий стол и/или панели.
UPD 10.05.2018.
Здесь ведется полный список флагов для Chromium, который можно прописать непосредственно в Exec в Desktop-файле, чтобы не нужно было их все включать вручную:
Как измерить скорость работы браузера, понять, какие опции на вашем сочетании железа и видеодрайвера ускоряют работу, а какие замедляют?
Для этого запускайте онлайн бенчмарк web.basemark.com с различными сочетаниями настроек и сравнивайте количество набранных попугаев баллов.
В chrome://gpu браузер может мамой клясться, что включено аппаратное ускорение декодирования видео. Но ведь не каждое видео будет декодироваться аппаратно!
Открываем chrome://media-internals/ , параллельно запускаем проигрывание какого-нибудь видео с Youtube и смотрим, каким кодеком оно декодируется.
Сейчас Google все видео отдает в кодеке VP9 собственной разработки, но на довольно многих старых видеокартах возможно аппаратное декодирование только H.264; расширение h264ify заставит браузер сообщать, что он не поддерживает кодеки VP8 и VP9, что заставит Youtube отдавать видео в H.264. См. youtube.com/html5
По умолчанию так:
С включенным h264ify на его стандартных настройках:
Вообще нет единого нормального списка, какие драйверы и на каких видеокартах поддерживают аппаратное декодирование, но вот Chromium 62 появится полноценная работа VA-API (API для аппаратного ускорения кодирования и декодирования видео), которая была и раньше, но только на ChromeOS, а, например, здесь, Хромиум собирали и собирают с патчем, который включает это и на Линуксе. Для работы рекомендуется свежая версия libva; если у вас, к примеру, Ubuntu 16.04, то можно обновить весь графический стек отсюда, что рекомендуется пользователям современных и не очень видеокарт Intel и AMD, т.к. в наши дни опенсорсный графический стек развивается очень быстро, а мы в статье задействовали множество функций работы с видеокартой. Разработчики Ubuntu 17.10 работали над улучшением работы VA-API из коробки. Вообще, с проигрыванием видео на Линуксе никогда не встречал проблем, все хорошо работает из коробки. Для Firefox было дополнение, которое позволяло ролик с Youtube проигрывать во внешнем плеере mpv, что на очень старых машинах могло существенно снижать нагрузку на процессор.
— Памагите. Браузер перестал запускаться.
— Такое бывает очень редко, но все же иногда случается, когда настройки работы с видеокартой выкручиваются так, что у браузера не получается с ней работать. Открываем в файловом менеджере папку
— это ваша домашняя папка) и находим папку chromium (для Google Chrome она называется google-chrome, Vivaldi — Vivaldi и т.д.).
В ней хранится наш профиль. Можно просто переименовать папку, например, в chromium.old, а при следующем запуске chromium создаст ее заново и начнет с чистого листа. В качестве резервной копии (бекапа) рекомендую до проведения всех манипуляций заархивировать эту папку (и хранить, как зеницу ока). Если вы что-то поломали, а начинать с чистого профиля не хочется, то попробуйте открыть терминал внутри
/.config/chromium и выполнить команду:
где вместо ignore-gpu-blacklist подставьте название опции, которая, как вы думаете, с тала причиной неполадок. В ответ команда grep выдаст путь к файлу и номер строки, где есть шанс поправить настройку. Возможно, часть настроек хранится в SQLite базе данных, и тогда потребуется какая-нибудь программа для работы с SQLite-БД и поиска по ним. Честно говоря, ни разу не пробовал так делать.
За сим отчаливаю, спасибо за внимание, жду отзывов и вопросов в комментариях.
Источник
How To Enable Hardware Accelerated Video Decode In Google Chrome, Brave, Vivaldi And Opera Browsers On Debian, Ubuntu Or Linux Mint
Google Chrome 88 (and newer) has made hardware accelerated video decoding available on Linux, but it’s not enabled by default. Google Chrome is not the only Chromium-based web browser to support hardware acceleration on Linux though. This article explains how to enable hardware-accelerated video decoding in Google Chrome, Brave, Vivaldi and Opera web browsers running on Debian, Ubuntu, Pop!_OS or Linux Mint (Xorg only).
Using hardware-accelerated video decode in your web browser should result in using less CPU usage (and thus, less battery draining) when playing online videos.
It’s worth noting that Chromium web browser had patches that allowed making hardware accelerated video decoding available on Linux for some time, and some Linux distributions packaged it using those patches. So Chromium users have had hardware acceleration on Linux for some time, depending on their Linux distribution or if they installed the patched Chromium in some other way. E.g. on Ubuntu / Linux Mint there’s a PPA with VA-API patched Chromium builds. Thus, these instructions may also work for Chromium browser, depending on how it’s built.
I’d also like to add that these instructions to enable hardware accelerated video decoding also work on other Linux distributions, and not just Debian / Ubuntu-based Linux distributions, however, the driver names are different.
I tested these instructions using Ubuntu 20.10 desktop with Nvidia graphics, and the web browsers listed below installed using their original Ubuntu packaging (using a DEB package). Also tested using a laptop with Intel graphics (10th gen) on Ubuntu 20.04 and 20.10. I don’t own a device with AMD graphics to test this.
In my test, I was able to get hardware-accelerated video decode to work on Linux using:
- Google Chrome stable 88
- Brave stable 1.19
- Vivaldi snapshot 3.6 / [Edit] The latest Vivaldi stable 3.6 also works
- Opera Beta 74
Obviously, it should continue to work with versions newer than these (so Google Chrome 89, Brave 1.20, etc.).
For me, hardware-accelerated video decode didn’t work using:
Vivaldi stable 3.5. Vivaldi stable is now version 36, and that does have working hardware-accelerated video decoding- Opera stable 73
- Microsoft Edge — there’s not even a chrome://flags/#enable-accelerated-video-decode flag (to enable hardware-accelerated video decode).
You can use VA-API on XWayland, using the —use-gl=egl command line flag, but I did not try it. Starting with Google Chrome 91 (and other browsers based on Chromium 91), you’ll also need to append the —enable-features=VaapiVideoDecoder flag.
[[Edit]] I’ve tried using the instructions below, and then launch the browser with the —use-gl=egl flag on Wayland, on a laptop with Intel graphics, and hardware-accelerated video playback works. However, the videos stutter on this laptop with these settings. So in this case I prefer Firefox with hardware-accelerated video playback (on which, using Wayland and Firefox on the same laptop, video playback is fluid, but the CPU usage is greater than using a Chromium-based browser).
How to enable hardware-accelerated video decode in Google Chrome, Brave, Vivaldi And Opera web browsers on Debian, Ubuntu or Linux Mint (X11)
Things you need to enable hardware-accelerated video decode in the web browsers I mentioned above (so Google Chrome 88+, Brave 1.19+, Vivaldi 3.6+ and Opera 74+):
1. Enable the following web browser flags:
For browsers based on Google Chrome 90 and older:
- Override software rendering list: chrome://flags/#ignore-gpu-blocklist
- Hardware-accelerated video decode: chrome://flags/#enable-accelerated-video-decode
For browsers based on Google Chrome 91 and newer (there’s no hardware-accelerated video decode any more, but we’ll need to use a new command line flag — see step 4):
- Override software rendering list: chrome://flags/#ignore-gpu-blocklist
2. Install the VA-API driver to be able to decode media (source), as well as libva-drm2 and libva-x11-2 (these 2 are probably already installed, but just in case; I added these 2 in a later edit, after I noticed hardware acceleration was not working without them, and as soon as I installed vainfo, which has these 2 packages as dependencies, it would start working):
- For Intel Gen 7 and earlier hardware:
- For Nouveau and AMD drivers (I couldn’t get any browser to use hardware acceleration with the Nouveau drivers, maybe you have better luck):
- For proprietary Nvidia drivers — you can install them from the repositories or by using the Proprietary GPU Drivers PPA (e.g. launch the Additional Drivers dialog on Ubuntu and install it from there). If you’re using proprietary Nvidia drivers, you’ll also need a patched vdpau-va-driver ([[edit]] this patch no longer supports VP9, even if your graphics support it, so you must use the h264ify extension in all cases — see below). You can get it from here (you’ll also need libvdpau1 from here as it’s a dependency for vdpau-va-driver) for Debian / Ubuntu / Linux Mint / Pop!_OS, etc. The Ubuntu 20.04 package from there also works on Ubuntu 20.10 and newer. If you want to see the patches used by this package, download the .debian.tar.gz archive (from the same link as above) and look inside the «patches» folder. In case these DEBs don’t work on Debian (I did not try it), use the these links for vdpau-va-driver (orig.tar.gz | debian.tar.xz) and libvdpau (orig.tar.gz | debian.tar.xz) to download the .orig.tar.gz and .debian.tar.xz archives, and build the DEB package on your system. Also install libva-drm2 and libva-x11-2: sudo apt install libva-drm2 libva-x11-2
Why the non-free versions of the intel-media-va-driver and i965-va-driver ? In theory this should work with the free version (?), but in my test on a laptop with Intel Gen 10, hardware-accelerated video decoding only worked with the intel-media-va-driver-non-free driver, and not intel-media-va-driver (I’m not sure about the i965 driver, but I assumed it might be similar). There’s also someone else here, saying this got it working for them.
3. Only needed for graphics card that don’t support VP9 hardware video decoding: install the h264ify browser extension.
If your graphics card doesn’t support VP9 hardware video decoding, install the h264ify browser extension (or enhanced-h264ify — some users say this works for them while the original extension doesn’t; for me it’s the other way around) and make sure it’s enabled for VP9.
[[Edit]] Nvidia users: the patched vdpau-va-driver mentioned above no longer hardware accelerates VP9 in Chromium-based browser. So you must use the h264ify extension and avoid VP9 in order to get hardware-accelerated video decode.
If you still don’t see MojoVideoDecoder in the chrome://media-internals tab (see below in the section for how to check if hardware-accelerated video decoding is enabled and actually used by the browser), try to restart the web browser after installing this extension. I’ve seen cases where this was needed, and some in which it wasn’t required.
4. Launch the web browser using the —use-gl=desktop flag to enable VA-API hardware acceleration. [[Edit] With browsers based on Chromium 91 and newer, you’ll also need to launch it with the —enable-features=VaapiVideoDecoder flag.
To be able to use VA-API for video decoding you’ll need to launch the web browser, be it Chromium, Google Chrome, Brave, Opera or Vivaldi, using the following command line flag: —use-gl=desktop . This makes the web browser use OpenGL and disable ANGLE as the rendering backend. While there are places where I’ve read this shouldn’t be needed anymore, this was required in my test, with both Nvidia and Intel graphics (I don’t have AMD graphics to test this).
E.g. to launch Google Chrome using this flag:
Launch Brave using this:
To make this change permanent, copy the browser .desktop file from /usr/share/applications to
/.local/share/applications (if this folder doesn’t exist, create it). By copying the file here, we’re making sure it won’t be overwritten by an update. Then, open the .desktop file (e.g. brave-browser.desktop , brave-browser-beta.desktop , google-chrome.desktop , etc.) from this
/.local/share/applications location, with a text editor. In this file, search for the line starting with Exec= , and change the executable to include —use-gl=desktop . E.g. for Brave: Exec=/usr/bin/brave-browser-stable —use-gl=desktop , or for Google Chrome: Exec=/usr/bin/google-chrome-stable —use-gl=desktop %U
[Very important edit] With Chromium 91 (and any browsers based on it), the Hardware-accelerated video decode browser flag is gone. To get hardware-accelerated video playback, you’ll need to add a new command line flag: —enable-features=VaapiVideoDecoder
Add this flag just as you add the —use-gl=desktop flag. You’ll need both, or at least that’s what I needed to get hardware-accelerated video decode.
E.g. to launch Google Chrome with both of these flags, you’d use:
Or launch Brave instead:
Important note: If you see a completely white video image when launching the browser with —use-gl=desktop , check chrome://flags and make sure that Vulkan is not enabled there. Having Vulkan enabled and launching the browser using the —use-gl=desktop option will cause this to happen.
Another note, this time for Opera users: if after using the h264ify extension, you can no longer play videos on YouTube and other such websites, see the solutions from here to enable h264 support in Opera (note that if the web browser you’re using is Opera Beta, the folder must be /opera-beta ).
How to check if hardware-accelerated video decoding is enabled and working in any Chromium-based web browser
Now let’s check and see if the web browser is using hardware-accelerated video decoding.
First let’s check if the browser supports hardware-accelerated video. Do this by opening a new tab and visiting chrome://gpu . On this page you should see «Video Decode: Hardware accelerated » (in green, like here):
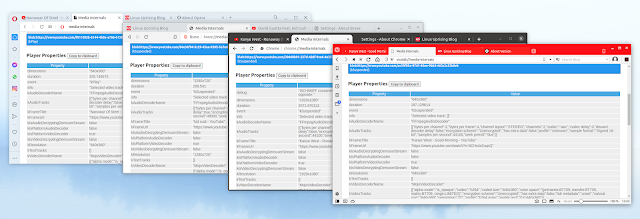
This means that your web browser now supports hardware-accelerated video decoding. But is it able to actually hardware decode video? Let’s check that too, by opening a YouTube video, then press Ctrl + Shift + i to open the Chrome DevTools. From the 3 vertical dots menu, click on More tools -> Media . Then click on the video title in the left-hand side panel of DevTools ( Players section), and look in the Video Decoder section of the Media tab from Chrome DevTools:
If it says the decoder name is VideoDecode Accelerator or, I’ve also seen this as VDAVideoDecoder (previously it was MojoVideoDecoder , and before that it was GpuVideoDecoder , so if you get any of those and you’re using an older browser version, that’s ok, you have hardware acceleration), and Hardware decoder is true , then you’re using hardware-accelerated video decoding. If it says FFmpegVideoDecoder , VpxVideoDecoder or Dav1dVideoDecoder (and in this case, the Hardware decoder should say false ), your web browser is not using hardware-accelerated video decoding.
Источник


