- Chris Kenst
- System PATH Setup
- Additional Resources:
- Chris Kenst
- Installing on macOS:
- Additional Resources
- How to Install Chrome Driver on Mac
- Step1: Download Chrome Driver
- Step2: Move the driver to the /usr/local/bin folder
- Какую версию chromedriver установить?
- Скачать ChromeDriver для Linux, Windows и Mac
- Установка ChromeDriver под Linux, Windows и Mac
- diemol / chromedriver-install.sh
- This comment has been minimized.
- diemol commented Oct 9, 2017
- Disclaimer
Chris Kenst
The ChromeDriver getting started guide isn’t super helpful if you are unfamiliar with including the ChromeDriver location in your PATH environment variable. The PATH variable helps Chrome find the downloaded ChromeDriver exe. Don’t get me wrong, I’ve updated PATH variables on Windows for years but never on a Mac, until now:
System PATH Setup
The following instructions will help you create your own PATH to a unique folder on your Mac or copy the file to an existing PATH directory for ChromeDriver.
- Download the ChromeDriver executable.
- Now we need to tell Selenium where it is and for that we have a few choices.To do this:
- Open up Terminal
- Run sudo nano /etc/paths
- Enter your password
- Go to the bottom of the file and enter the path you wish to add
- My PATH looks like: /Users/myname/Documents/WebDriver
- Control-x to quit
- Y to save
- Press enter to confirm
- To double check, quit Terminal and relaunch it. Run echo $PATH . You should see your newly added path in the stream of other paths already there.
- Finally, update your tests to run using Chrome and run your tests!
After running your tests, if your PATH isn’t set up correctly you get this helpful message:
Did this work for you? Did it solve your problem? Please leave a comment below.
Additional Resources:
Oh and if this article worked for you please consider sharing it:
Источник
Chris Kenst

The ChromeDriver getting started guide isn’t super helpful if you are unfamiliar with including the ChromeDriver location in your PATH environment variable. (The PATH variable helps Chrome find the downloaded ChromeDriver exe). Also it’s a lot of work for something so common. Never fear, here is a better way:
Installing on macOS:
Listed in order of easiest to hardest install, these are the best ways to install ChromeDriver on a Mac:
- The easiest way to install ChromeDriver is to use your package manager such as brew or npm to install the driver.
- In your terminal window with the Homebrew package manager:
- Install ChromeDriver with brew install cask chromedriver
- Confirm it was installed using chromedriver —version and seeing it returns a version. If it errors it wasn’t installed
- Other package managers like npm have similar commands npm install chromedriver
- In your terminal window with the Homebrew package manager:
- Run Chrome & ChromeDriver in a container using Docker. Simply download the combined container, start it and point your code at the right address.
- Specify it in your Selenium setup code and check it into source control like any other configuration detail. If you go this route, you can include additional drivers like GeckoDriver (aka Firefox) as well.
- Download the driver and add its location to your System PATH.
Which methods have you found the easiest or most success with? Which methods didn’t work for you? Please leave a comment below.
Additional Resources
Oh and if this article worked for you please consider sharing it or buying me coffee to say thanks.
Источник
How to Install Chrome Driver on Mac
Hi, in this tutorial we will learn how to install chrome driver on Mac OS. It is very easy. 😉
Step1: Download Chrome Driver
You need to go to the below address and download the chrome driver for Mac operating system based on (M1 or Intel chip versions).

Download mac64_m1.zip if your mac has Apple Silicon M1 CPU otherwise select the mac64.zip version if your mac has Intel CPU.

Step2: Move the driver to the /usr/local/bin folder
Now, we can move the driver a path which is defined as a path in your system. You can check them with the below command and you will see that /usr/local/bin folder is defined as a global path on your system.
sudo nano /etc/paths

If you want you can add a specific path here and you can move the chromedriver to this folder but as you see, /usr/local/bin folder is defined as a path by default.
Now, go to your downloads folder, find the chromedriver_mac64.zip file and unpack it. You will see the chromedriver executable file.

Now, we can run the below command and move the chromedriver file to the /usr/local/bin folder.
mv chromedriver /usr/local/bin
And now, you can define chrome driver as shown below in your tests and you can run your selenium tests by using Chrome driver.
If you face “Error: “chromedriver” cannot be opened because the developer cannot be verified. Unable to launch the chrome browser“, you need to go to usr/local/bin folder and right-click chromeDriver file and open it. After this step, re-run your tests, chrome driver will work.

Also, you can use Bonigarcia Webdriver Manager library in your project, for this you need to add its dependency in your project.
Then you can simply use it as follows:
For more complex usage please refer to the webdriver manager GitHub page .
I hope this article helps you and thanks for reading. 🙂 Please feel free to write your comments and questions. 😉

Onur Baskirt is a senior IT professional with 15+ years of experience. Now, he is working as a Senior Technical Consultant at Emirates Airlines in Dubai.
Источник

Для запуска тестов Selenium в Google Chrome, помимо самого браузера Chrome, должен быть установлен ChromeDriver. Установить ChromeDriver очень просто, так как он находится в свободном доступе в Интернете. Загрузите архив в зависимости от операционной системы, разархивируйте его и поместите исполняемый файл chromedriver в нужную директорию.
Какую версию chromedriver установить?
Мы должны установить именно ту версия которая была бы совместима с установленным Google Chrome на нашем ПК или VDS. В случае, если версии не совпадают, то мы получим данную ошибку:
selenium.common.exceptions.SessionNotCreatedException: Message: session not created: This version of ChromeDriver only supports Chrome version 81
Введите в адресную строку Google Chrome данный путь:
У вас появится вот такое окно:
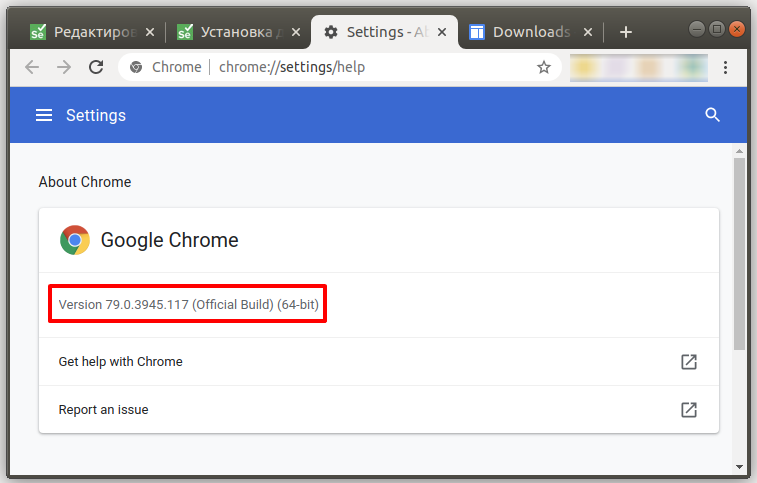
Рисунок 1 — Узнаем версию браузера Google Chrome
Скачать ChromeDriver для Linux, Windows и Mac
На данный момент актуальная версия драйвера 81.0.40 хотя у меня установлен более старый Google Chrome и последняя версия мне не подойдет. Как видно на рисунке выше, мне нужна версия 79.0.39 у вас может быть другая версия, нужно её скачать.
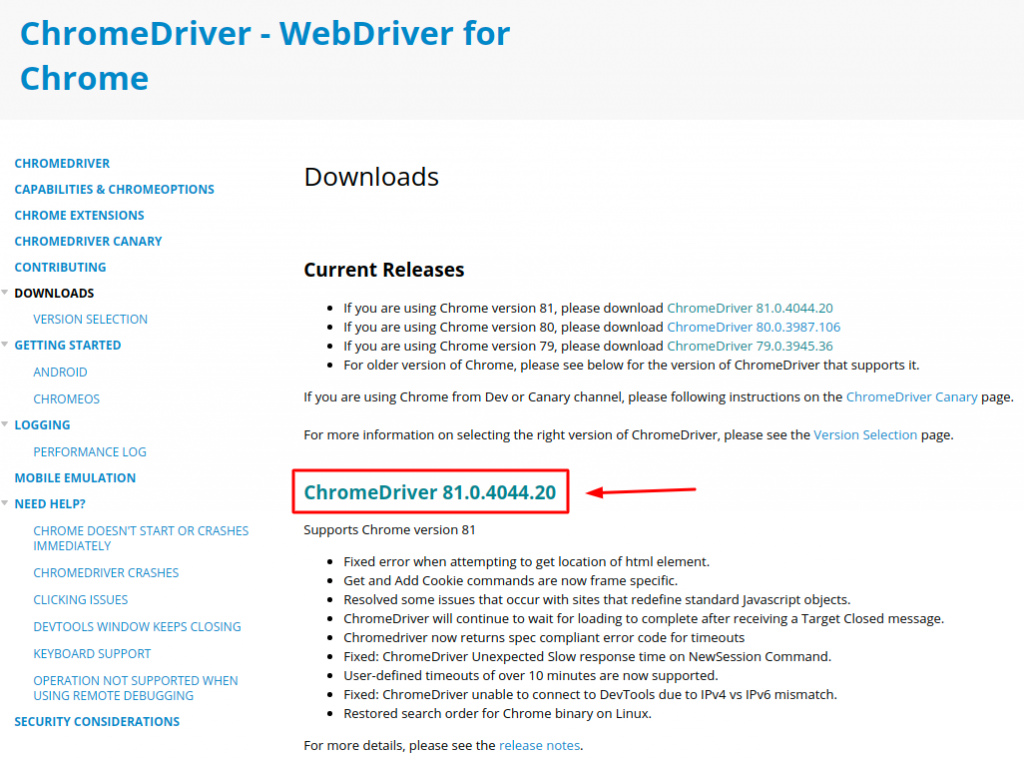
Рисунок 2 — Официальный сайт Google для загрузки драйвера chromedriver
На момент прочтения этой статьи версия может быть другой. Всегда выбирайте более новую версию, чтобы не поймать старые баги которые уже давно исправили в новой версии. НО! Помните, что вам нужно обновить и свой браузер Google Chrome если вы хотите работать с новой версией ChromeDriver.
Установка ChromeDriver под Linux, Windows и Mac
- Заходим на сайт https://chromedriver.storage.googleapis.com/index.html?path=79.0.3945.36/ (Проверьте сайт с Рис. 2 на обновления, тут версия: 79.0.3945);
- Скачиваем архив под вашу операционную систему;
- Распаковываем файл и запоминаем где находится файл chromedriver или chromedriver.exe (Windows).
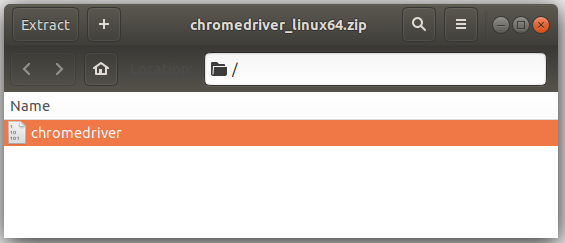
Рисунок 3 — Скаченный архив с ChromeDriver
Если у вас Linux дистрибутив или Mac, вам нужно дать файлу chromedriver нужные права на выполнения. Открываем терминал и вводим команды одна за другой.
Источник
diemol / chromedriver-install.sh
| #! /bin/bash |
| # download and install latest chromedriver for linux or mac. |
| # required for selenium to drive a Chrome browser. |
| install_dir= » /usr/local/bin « |
| version= $( wget -qO- https://chromedriver.storage.googleapis.com/LATEST_RELEASE ) |
| if [[ $( uname ) == » Darwin » ]] ; then |
| url=https://chromedriver.storage.googleapis.com/ $version /chromedriver_mac64.zip |
| elif [[ $( uname ) == » Linux » ]] ; then |
| url=https://chromedriver.storage.googleapis.com/ $version /chromedriver_linux64.zip |
| else |
| echo » can’t determine OS « |
| exit 1 |
| fi |
| curl -s -L » $url » | tar -xz |
| chmod +x chromedriver |
| sudo mv chromedriver » $install_dir « |
| echo » installed chromedriver binary in $install_dir « |
| #! /bin/bash |
| # download and install latest geckodriver for linux or mac. |
| # required for selenium to drive a firefox browser. |
| install_dir= » /usr/local/bin « |
| json= $( curl -s https://api.github.com/repos/mozilla/geckodriver/releases/latest ) |
| if [[ $( uname ) == » Darwin » ]] ; then |
| url= $( echo » $json » | jq -r ‘ .assets[].browser_download_url | select(contains(«macos»)) ‘ ) |
| elif [[ $( uname ) == » Linux » ]] ; then |
| url= $( echo » $json » | jq -r ‘ .assets[].browser_download_url | select(contains(«linux64»)) ‘ ) |
| else |
| echo » can’t determine OS « |
| exit 1 |
| fi |
| curl -s -L » $url » | tar -xz |
| chmod +x geckodriver |
| sudo mv geckodriver » $install_dir « |
| echo » installed geckodriver binary in $install_dir « |
This comment has been minimized.
Copy link Quote reply
diemol commented Oct 9, 2017
Disclaimer
This Firefox/Geckodriver script was taken from https://gist.github.com/cgoldberg/4097efbfeb40adf698a7d05e75e0ff51, and the Chromedriver is basically a copy of it
You can’t perform that action at this time.
You signed in with another tab or window. Reload to refresh your session. You signed out in another tab or window. Reload to refresh your session.
Источник


