- Getting started with OpenXR
- Getting started with OpenXR for HoloLens 2
- Getting started with OpenXR for Windows Mixed Reality headsets
- Getting the OpenXR Developer Tools for Windows Mixed Reality
- Building a sample OpenXR app
- Learning the OpenXR API
- Integrate the OpenXR loader into a project
- Reference official OpenXR NuGet package
- Include official OpenXR loader source
- Using preview extensions
- Troubleshooting
- Использование подключаемого модуля Опенкср в смешанной реальности для Unity Using the Mixed Reality OpenXR Plugin for Unity
- Предварительные требования Prerequisites
- Установка Опенкср с помощью средства «функция смешанной реальности» Installing OpenXR with the Mixed Reality Feature Tool
- Настройка управления подключаемым модулем XR для Опенкср Configuring XR Plugin Management for OpenXR
- Optimization Optimization
- Испытайте примеры сцен для Unity Try out the Unity sample scenes
- Примеры HoloLens 2 HoloLens 2 samples
- Использование МРТК с поддержкой Опенкср Using MRTK with OpenXR support
- Известные проблемы Known issues
- Следующие шаги Next steps
- Хотите оставить отзыв? Have Feedback?
Getting started with OpenXR
You can develop using OpenXR on a HoloLens 2 or Windows Mixed Reality immersive headset on the desktop. If you don’t have access to a headset, you can use the HoloLens 2 Emulator or the Windows Mixed Reality Simulator instead.
Getting started with OpenXR for HoloLens 2
To start developing OpenXR applications for HoloLens 2:
- Set up a HoloLens 2 or follow the instructions to install a recent version of the HoloLens 2 emulator. You should already have OpenXR 1.0 ready to go if you’re using a recent emulator image or the device has updated its OS.
- Make sure you’ve got the latest OpenXR runtime with all extensions present by launching the Store app from the device or emulator.
- Open the menu in the upper-right, select Downloads and updates, and choose Get updates.
If you’re using the emulator, the emulator image will reset each time you start it, and so your best bet is to just make sure that you have the latest version of the HoloLens 2 emulator image.
Getting started with OpenXR for Windows Mixed Reality headsets
To start developing OpenXR applications for immersive Windows Mixed Reality headsets:
- Be sure you’re running at least the Windows 10 May 2019 Update (1903), which is the minimum requirement for Windows Mixed Reality end users to run OpenXR applications. If you’re on an earlier version of Windows 10, you can upgrade by using the Windows 10 Update Assistant.
- Set up a Windows Mixed Reality headset or follow the instructions to enable the Windows Mixed Reality simulator.
That’s it! The Windows Mixed Reality OpenXR runtime is installed and made active automatically for all Windows Mixed Reality users. The Microsoft Store then keeps the runtime up to date.
To activate the Windows Mixed Reality OpenXR Runtime again, launch Mixed Reality Portal from the Start menu, and select «Fix it» at the top of the window. If that button is missing, the OpenXR runtime is already active.
Getting the OpenXR Developer Tools for Windows Mixed Reality
To try out the Windows Mixed Reality OpenXR Runtime, you can install the OpenXR Developer Tools for Windows Mixed Reality app. This app provides a demo of various OpenXR features, along with a System Status page with key information about the active runtime and current headset.
When using the HoloLens 2 emulator, the easiest way to install the OpenXR Developer Tools for Windows Mixed Reality is through the Windows Device Portal. Navigating to the «OpenXR» page and then clicking the «Install» button under «Developer Features», which also works on physical HoloLens 2 devices.

Building a sample OpenXR app
Be sure to install the tools you’ll need for OpenXR development if you haven’t already.
The BasicXrApp project shows a simple OpenXR sample with Win32 and UWP HoloLens 2 project files in Visual Studio. Because the solution contains a HoloLens UWP project, you’ll need the Universal Windows Platform development workload installed in Visual Studio to fully open it.
While the Win32 and UWP project files are separate because of differences in packaging and deployment, the app code inside each project is almost exactly the same!
After building an OpenXR Win32 desktop .EXE, you can use it with a VR headset on any desktop VR platform that supports OpenXR, whatever the headset type.
After building an OpenXR UWP app package, you can deploy that package to either a HoloLens 2 device or the HoloLens 2 Emulator.
Learning the OpenXR API
For a tour of the OpenXR API, check out this 60-minute video of the BasicXrApp sample in Visual Studio. The video shows how each of the major components of the OpenXR API can be used in your own engine, and also demonstrates some of the applications built on OpenXR today:
Integrate the OpenXR loader into a project
To get started with OpenXR in an existing project, you’ll include the OpenXR loader. The loader discovers the active OpenXR runtime on the device and provides access to the core functions and extension functions that it implements.
You can reference the official OpenXR NuGet package from your Visual Studio project or include the official OpenXR loader source from the Khronos GitHub repo. Either approach will give you access to OpenXR 1.0 core features, plus published KHR , EXT and MSFT extensions.
If you’re interested to experiment with MSFT_preview extensions as well, you can copy in preview OpenXR headers from the Mixed Reality GitHub repo.
Reference official OpenXR NuGet package
The OpenXR.Loader NuGet package is the easiest way to reference a prebuilt OpenXR loader .DLL in your Visual Studio C++ solution. This will give you access to OpenXR 1.0 core features, plus published KHR , EXT and MSFT extensions.
To add an OpenXR.Loader NuGet package reference to your Visual Studio C++ solution:
- In Solution Explorer, right-click the project that will use OpenXR and select Manage NuGet Packages. .
- Switch to the Browse tab and search for OpenXR.Loader.
- Select the OpenXR.Loader package and select Install in the details pane to the right.
- Select OK to accept the changes to your project.
- Add #include to a source file to start using the OpenXR API.
To see an example of the OpenXR API in action, check out the BasicXrApp sample app.
Include official OpenXR loader source
If you want to build the loader yourself, for example to avoid the extra loader .DLL, you can pull the official Khronos OpenXR loader sources into your project. This will give you access to OpenXR 1.0 core features, plus published KHR , EXT and MSFT extensions.
To get started here, follow the instructions in the Khronos OpenXR-SDK repo on GitHub. The project is set up to build with CMake — if you’re using MSBuild, you’ll need to copy the code into your own project.
Using preview extensions
The MSFT_preview extensions listed in the extension roadmap are experimental vendor extensions being previewed to gather feedback. These extensions are for developer devices only and will be removed when the real extension ships.
If you’re interested to try out the available MSFT_preview extensions, go through the following steps to update your project:
- Follow either of the approaches above to integrate an OpenXR loader into your project.
- Replace the standard OpenXR headers in your project with the preview headers from the Mixed Reality OpenXR repo on GitHub.
To then activate preview extension support on your target HoloLens 2 or desktop PC:
- To make sure you’ve got the latest OpenXR runtime with all extensions present, launch the Store app from within the target device or emulator, open the menu in the upper-right, select Downloads and updates and choose Get updates.
- Install the OpenXR Developer Tools for Windows Mixed Reality app from the Microsoft Store onto the target device and run it.
- Navigate to the Developer Settings tab and enable Use latest preview OpenXR runtime. This enables the preview runtime on your device, which has preview extensions activated.

- Confirm the Runtime version shown on the System Status tab of the OpenXR Developer Tools for Windows Mixed Reality matches the required version of the preview extensions you plan to try. If so, you should see the extension in the Extensions list. Once a stable extension is available, its preview extension will be removed.


See the Mixed Reality OpenXR repo for documentation of these preview extensions and samples of how to use them.
Troubleshooting
If you have trouble getting up and running with OpenXR development, check out our troubleshooting tips.
Использование подключаемого модуля Опенкср в смешанной реальности для Unity Using the Mixed Reality OpenXR Plugin for Unity
Начиная с Unity версии 2020,2, пакет подключаемого модуля Опенкср Microsoft Mixed Reality доступен с помощью диспетчера пакетов Unity (УПМ). Starting with Unity version 2020.2, Microsoft’s Mixed Reality OpenXR Plugin package is available using the Unity Package Manager (UPM).
Предварительные требования Prerequisites
- Unity 2020,2 или более поздней версии Unity 2020.2 or later
- Подключаемый модуль Unity Опенкср 0.1.3 или более поздней версии Unity OpenXR plugin 0.1.3 or later
- Visual Studio 2019 или более поздней версии Visual Studio 2019 or later
- Установка поддержки платформы UWP в Unity для приложений HoloLens 2 Install UWP platform support in Unity for HoloLens 2 apps
Если вы создаете приложения VR на компьютере с Windows, подключаемый модуль Опенкср в смешанной реальности не обязательно требуется. If you’re building VR applications on Windows PC, the Mixed Reality OpenXR plugin is not necessarily required. Однако необходимо установить подключаемый модуль, если вы настраиваете сопоставление контроллера для контроллеров HP reverbа G2 или создаете приложения, которые работают на гарнитурах HoloLens 2 и VR. However, you’ll want to install the plugin if you’re customizing controller mapping for HP Reverb G2 controllers or building apps that work on both HoloLens 2 and VR headsets.
Установка Опенкср с помощью средства «функция смешанной реальности» Installing OpenXR with the Mixed Reality Feature Tool
Установите подключаемый модуль Опенкср с помощью нового приложения средства «функция смешанной реальности». Install the OpenXR plugin with the new Mixed Reality Feature Tool application. Следуйте инструкциям по установке и использованию и выберите пакет подключаемого модуля Опенкср смешанной реальности в категории «набор средств смешанной реальности»: Follow the installation and usage instructions and select the Mixed Reality OpenXR Plugin package in the Mixed Reality Toolkit category:

Настройка управления подключаемым модулем XR для Опенкср Configuring XR Plugin Management for OpenXR
Чтобы задать Опенкср в качестве среды выполнения в Unity, сделайте следующее: To set OpenXR as the the runtime in Unity:
- В редакторе Unity перейдите к изменению > параметры проекта In the Unity Editor, navigate to Edit > Project Settings
- В списке параметров выберите Управление подключаемым модулем XR . In the list of Settings, select XR Plugin Management
- Установите флажки инициализировать XR при запуске и опенкср (Предварительная версия) . Check the Initialize XR on Startup and OpenXR (Preview) boxes
- Если нацеливание на HoloLens 2, убедитесь, что вы находитесь на платформе UWP, и выберите набор функций Microsoft HoloLens . If targeting HoloLens 2, make sure you’re on the UWP platform and select Microsoft HoloLens Feature Set

Если рядом с подключаемым модулем опенкср (Предварительная версия) отображается красный значок предупреждения, щелкните значок и выберите исправить все перед продолжением. If you see a red warning icon next to OpenXR Plugin (Preview), click the icon and select Fix all before continuing. Для вступления изменений в силу может потребоваться перезапустить редактор Unity. The Unity Editor may need to restart itself for the changes to take effect.

Теперь вы готовы начать разработку с помощью Опенкср в Unity! You’re now ready to begin developing with OpenXR in Unity! Перейдите к следующему разделу, чтобы узнать, как использовать примеры Опенкср. Continue on to the next section to learn how to use the OpenXR samples.
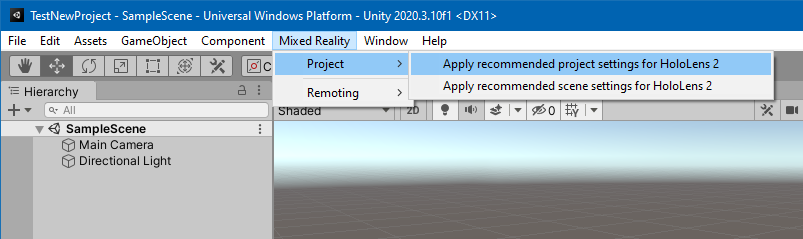
Optimization Optimization
Если вы разрабатываете для HoloLens 2, перейдите к смешанной реальности> опенкср > применить Рекомендуемые параметры проекта для HoloLens 2 , чтобы получить лучшую производительность приложения. If you’re developing for HoloLens 2, navigate to Mixed Reality> OpenXR > Apply recommended project settings for HoloLens 2 to get better app performance.
Испытайте примеры сцен для Unity Try out the Unity sample scenes
Чтобы использовать один или несколько примеров, установите арфаундатион 4.0 + из диспетчера пакетов: To utilize one or more of the examples, install ARFoundation 4.0+ from the Package Manager:

Примеры HoloLens 2 HoloLens 2 samples
- В редакторе Unity перейдите к окну > диспетчер пакетов . In the Unity Editor, navigate to Window > Package Manager
- В списке пакетов выберите подключаемый модуль Опенкср Mixed Reality . In the list of packages, select Mixed Reality OpenXR Plugin
- Выберите пример в списке образцы и нажмите кнопку Импорт . Locate the sample in the Samples list and select Import

Package Manager** 2. In the list of packages, select **OpenXR Plugin** 3. Locate the sample in the **Samples** list and select **Import**  —>
При обновлении пакета Unity предоставляет возможность обновления импортированных образцов. When a package is updated, Unity provides the option to update imported samples. При обновлении импортированного образца будут перезаписаны все изменения, внесенные в образец и связанные ресурсы. Updating an imported sample will overwrite any changes that have been made to the sample and associated assets.
Использование МРТК с поддержкой Опенкср Using MRTK with OpenXR support
МРТК Unity поддерживает подключаемый модуль Mixed Reality Опенкср, начиная с выпуска 2.5.3. MRTK Unity supports the Mixed Reality OpenXR plugin starting with the 2.5.3 release.
- Снова откройте средство «функция смешанной реальности » и выберите пакет подключаемого модуля Опенкср смешанной реальности в категории поддержка платформы. Open the Mixed Reality Feature Tool again and select the Mixed Reality OpenXR Plugin package in the Platform Support category
- Перейдите к скрипту компонента набора средств Микседреалити Toolkit в инспекторе и переключитесь в профиль дефаултопенксрконфигуратионпрофиле : Go to the MixedReality Toolkit component script in the Inspector and switch to the DefaultOpenXRConfigurationProfile profile:

Известные проблемы Known issues
При использовании функции отслеживания вручную добавьте следующую строку в файл Assets/микседреалититулкит. Generated/link.xml : When using the Hand Tracking feature, add following line in the Assets/MixedRealityToolkit.Generated/link.xml file:
Следующие шаги Next steps
Теперь, когда проект настроен для Опенкср и имеет доступ к примерам, ознакомьтесь с возможностями , которые в настоящее время поддерживаются в нашем подключаемом модуле опенкср. Now that you have your project configured for OpenXR and have access to samples, check out what features are currently supported in our OpenXR plugin.
Хотите оставить отзыв? Have Feedback?
Опенкср все еще экспериментально, поэтому мы будем рады получить отзывы, которые помогут улучшить его. OpenXR is still experimental, so we’d appreciate any feedback you can give us to help make it better. Вы найдете нас на форумах Unity , пометив сообщение на форуме с помощью Microsoft + опенкср и HoloLens 2 или Windows Mixed Reality. You’ll find us on the Unity Forums by tagging your forum post with Microsoft + OpenXR and either HoloLens 2 or Windows Mixed Reality.


