- Подключитесь используя anyconnect из командной строки
- Downloads and Guides: Advanced Instructions for AnyConnect on Windows
- File System Paths
- Command Line Access
- Collecting Logs
- Diagnostic Logs
- Statistic Logs
- Additional Information
- Install Cisco AnyConnect Secure Mobility Client on a Windows Computer
- Available Languages
- Download Options
- Objective
- Introduction
- Prerequisites
- Don’t use Windows? Check these other articles out!
- Applicable Devices | Software Version
- AnyConnect Software Version
- Install AnyConnect Secure Mobility Client
- Firmware versions 1.0.3.15 and later
- We recommend the following user license for use with the RV340 Series:
- Licensing Structure — Firmware versions 1.0.2.16 or lower
- Step 1
- Step 2
- Step 3
- Step 4
- Step 5
- Step 6
- Step 7
- Step 8
- Conclusion and Next Steps after Installation
- AnyConnect App
- Automated AnyConnect NAM Installation with Profile Conversion via Batch File Script
- Available Languages
- Download Options
- Contents
- Introduction
- Prerequisites
- Requirements
- Components Used
- Background Information
- Configure
- Creation of Batch file
- Anyconnect User-End Procedure
- Additional Information
- Verify
Подключитесь используя anyconnect из командной строки
Я пытаюсь использовать Cisco anyconnect 3.1 из командной строки Linux для подключения к серверу. Я могу подключиться, но мне нужно отправить по одному параметру за раз. Я хотел бы подключиться из сценария, который будет работать на другом сервере. Я могу это сделать? Что-то типа
Предполагается, /opt/cisco/anyconnect/bin/vpnagentd что работает так, как это должно быть автоматически:
Для подключения :
Заменить USERNAME , PASSWORD и HOST . В \ny конце принимается баннер входа в систему — это специфично для моего хоста.
Обратите внимание на одинарные кавычки ‘ вместо двойных кавычек » — это потому, что двойные кавычки говорят Bash интерпретировать определенные символы в строках, такие как восклицательные знаки, как команды истории Bash. Двойные кавычки приведут к сбою этой команды с ошибкой «событие не найдено», если пароль содержит восклицательный знак. Строки в одинарных кавычках передают восклицательные знаки без их интерпретации.
Чтобы отключить :
Это было проверено с AnyConnect v3.1.05160.
/.anyconnect_credentials | /opt/cisco/anyconnect/bin/vpn -s connect HOST
Я столкнулся с той же трудностью, пытаясь использовать Cisco AnyConnect от Mac OS X Terminal. Чтобы команда Cisco vpn получала свой ввод от стандартного ввода, необходимо указать параметр -s, который переводит команду Cisco vpn в интерактивный режим. Затем вы можете предоставить ответы, которые вы даете в интерактивном режиме.
Ответы, которые вам нужно дать, зависят от того, как администратор сервера VPN настроил сервер. Для меня интерактивные подсказки vpn
Итак, команда, которую я запускаю,
(Кавычки вокруг EOF предназначены для предотвращения расширения / замены команды / параметра в следующем входе.)
Выход в конце, чтобы выйти из интерактивного режима в Cisco VPN.
Мне нравится упрощать командную строку, поэтому я использую описанный выше подход в сценарии оболочки под названием gotowork. Как и выше, мне нужно указать группу, мое имя пользователя и пароль, состоящий из личного PIN-кода и пароля RSA SecurID. Я не должен отвечать на вышеизложенное «принять?» вопрос. Все, кроме пароля RSA находится в скрипте, поэтому командная строка
Я должен запустить его как root. Предположим, что PIN-код 1234. Основы сценария:
Используя anyconnect 3.1.05170. Протестировано на Debian 6, LinuxMint 17
Это то, что работало для меня на OSX El Capitan. Заполнители окружены [квадратными скобками].
Включить
Отключить
* Я знаю, что это похоже на ответ Питера С. выше.
Downloads and Guides: Advanced Instructions for AnyConnect on Windows
The Command Line Interface (CLI) is a mechanism for interacting with a computer operating system or software by typing commands to perform specific tasks, and is a valid way to use AnyConnect. The CLI has a command parser that will aid you in connecting, disconnecting, and gathering statistics. For most, the Graphic User Interface (GUI) is preferred, and a simpler means of connecting, using the GUI to connect is outlined in Downloads and Guides: Connect to AnyConnect VPN for Windows 10.
File System Paths
The default path, or unique location, of the Cisco AnyConnect VPN for Windows file system is: C:\Program Files (x86)\Cisco\Cisco AnyConnect Secure Mobility Client\
Command Line Access
- Press the Windows Key or the Start button, and type Command Prompt in the search bar.
- Double-click or press Enter to launch Command Prompt.
- Type, cdC:\Program Files (x86)\Cisco\Cisco AnyConnect Secure Mobility Client, and press Enter to change the directory.
- Type,vpncli.exe connect tc-vpn-1.vpn.umn.edu, and press Enter to launch the application.
- You will see a numbered list of pools, type the number that corresponds with the appropriate pool and press Enter.
- In most cases, AnyConnect-UofMSplit,would be the appropriate group.
- The default Internet ID is in square braces [ ], if that is correct, press Enter. Otherwise type the correct Internet ID, and press Enter.
- Type in your password when prompted, press Enter. Then complete the default Duo Push or Phone Call.
- If you wish to use a Duo authentication method other than the default, explore your options and usage in Using Duo Append Mode with Cisco AnyConnect.
- When connected, you should see the line, >> state: Connected.
- If you did not connect you should see the line, >>Login Failed, and will be presented with the pool selection prompt again.
- To disconnect type, vpncli.exe disconnect, and press Enter.
Collecting Logs
Exporting information from the Cisco AnyConnect Secure Mobility Client and Diagnostic and Reporting Tools can help locate and isolate a connection problem.
Diagnostic Logs
- Launch Cisco AnyConnect Diagnostics and Reporting.
- Click Next, select Default log bundle, and click Next.
- A Dart Bundle (.zip) will be created on the desktop.
- For troubleshooting purposes, you will likely be asked to attach this file as an email response to the ticket.
Statistic Logs
- Launch Cisco AnyConnect Secure Mobility Client, then click on the Advanced Window cog icon.
- The Cisco AnyConnect VPN Client window will open to the Statistics tab.
- Several sub-menus with individual panes will be displayed. Click on each to see that specific information.
- Click the Export Stats button, and choose the file destination to export statistics.
Additional Information
For additional assistance troubleshooting or connecting, please contact Technology Help.
Install Cisco AnyConnect Secure Mobility Client on a Windows Computer
Available Languages
Download Options
Objective
This article shows you how to download and install the Cisco AnyConnect Secure Mobility Client on a Windows Computer.
Introduction
AnyConnect Secure Mobility Client is a modular endpoint software product. It not only provides Virtual Private Network (VPN) access through Secure Sockets Layer (SSL) and Internet Protocol Security (IPsec) Internet Key Exchange version2 (IKEv2) but also offers enhanced security through various built-in modules.
Prerequisites
- Purchase client licenses from a partner like CDW or through your company’s device procurement. To find sellers, you can search for the license L-AC-PLS-LIC= Qty=25 Duration=12. For more details on licensing, open the Licensing Information tab below.
- Download the latest version of firmware available for your router.
Don’t use Windows? Check these other articles out!
Applicable Devices | Software Version
- RV340 | 1.0.03.21 (Download latest)
- RV340W | 1.0.03.21 (Download latest)
- RV345 | 1.0.03.21 (Download latest)
- RV345P | 1.0.03.21 (Download latest)
AnyConnect Software Version
Install AnyConnect Secure Mobility Client
This toggled section provides details on Anyconnect licensing.
AnyConnect client licenses allow the use of the AnyConnect desktop clients as well as any of the AnyConnect mobile clients that are available. To try out AnyConnect on mobile devices:
Firmware versions 1.0.3.15 and later
As of March 2019, server licenses using AnyConnect for RV34x fimware version 1.0.3.15 and later are no longer required. Now you will need only a client license to download and use the Cisco AnyConnect Secure Mobility Client. A client license enables the VPN functionality and are sold in packs of 25 from partners like CDW or through your company’s device procurement.
We recommend the following user license for use with the RV340 Series:
L-AC-PLS-LIC= Qty=25 Duration=12
Licensing Structure — Firmware versions 1.0.2.16 or lower
If you have not yet updated your firmware, please do so now. Click here to visit the downloads page and select your model. Then select Small Business Router Firmware. Choose the latest version available.
Want to know more about AnyConnect licensing? Here are some resources:
Step 1
Download the Cisco AnyConnect VPN Client here.

Step 2
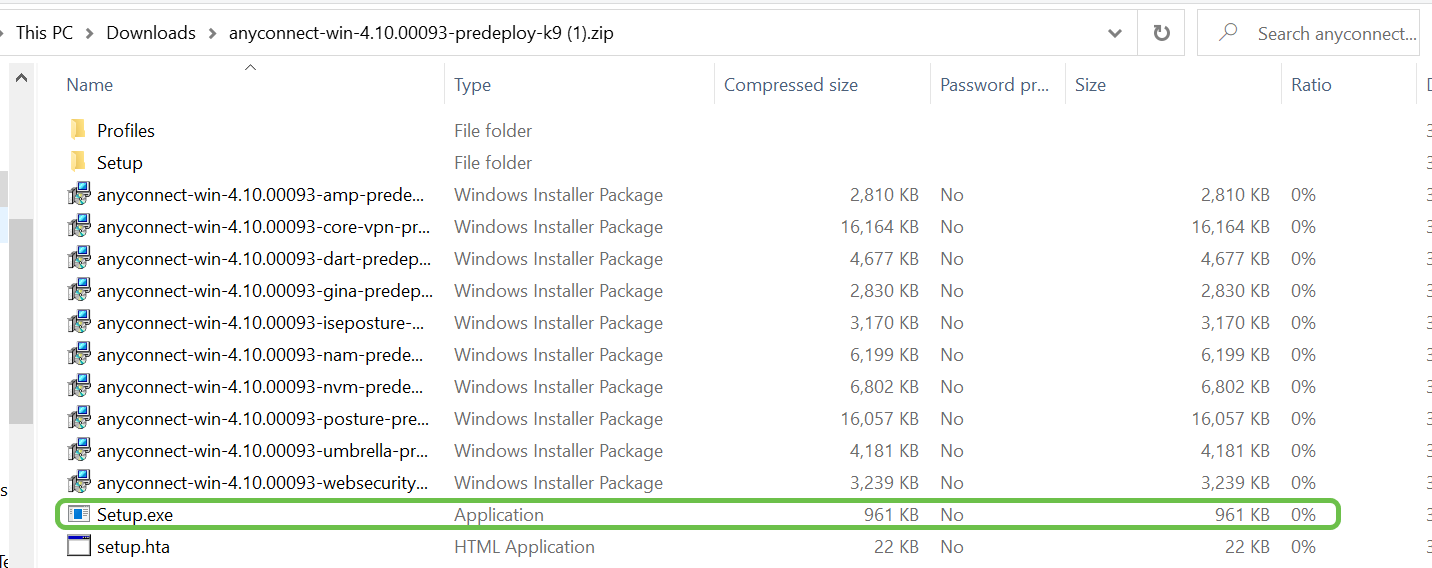
Navigate Windows File Explorer to the installer file. Double-click Setup.exe to initiate the installation process.
Step 3
A pop-up window may ask for permissions, in this case, select Yes. If your pop-up asks if you are sure you want to run this software, select Run.
Step 4
Check the check boxes for the modules that you need to install.
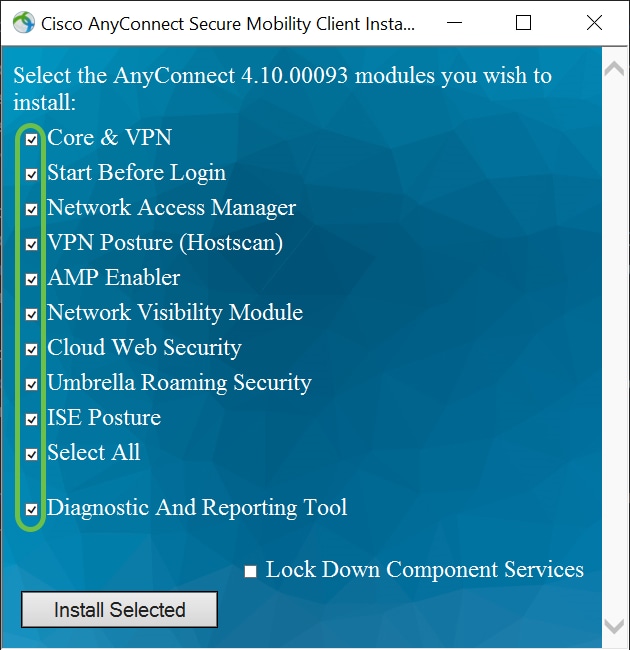
- Core & VPN — Includes AnyConnect core client with VPN capability.
- Start Before Login — User sees the AnyConnect GUI logon dialog before the Windows logon dialog box appears.
- Network Access Manager — It is a client software that provides a secure Layer 2 network.
- VPN Posture (Hostscan) — Provides the client the ability to identify the operating system, anti-virus, anti-spyware, and firewall software installed on the host.
- AMP Enabler — It is used as a medium for deploying Advanced Malware Protection (AMP) for endpoints.
- Network Visibility Module — Collects rich flow context from an endpoint on or off premise and provides visibility into network connected devices.
- Cloud Web Security — It is an endpoint component that routes HTTP traffic to a Cisco Cloud Web Security scanning proxy.
- Umbrella Roaming Security — Provides DNS-layer security when no VPN is active.
- ISE Posture — It is similar to VPN Posture; performs a client-side evaluation.
- Select All — Selects all modules.
- Diagnostic and Reporting Tool — It is used to collect data for troubleshooting AnyConnect installation and connection problems.
Step 5
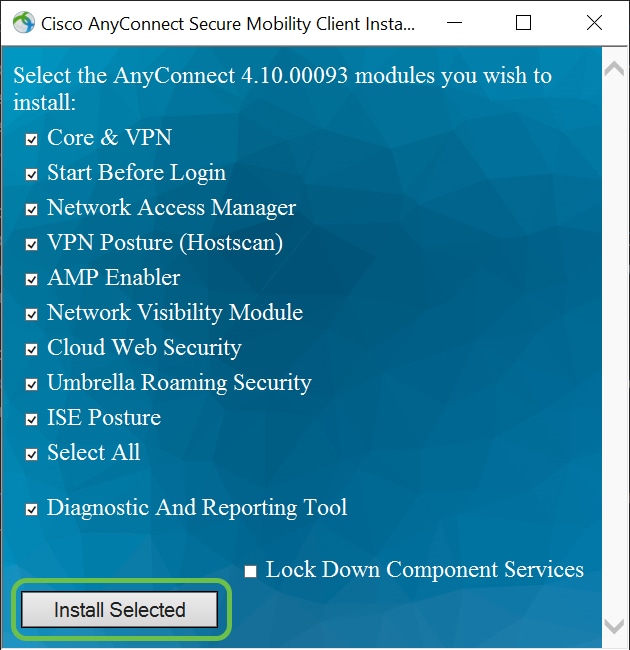
(Optional) Check the Lock Down Component Services check box if the feature needs to be enabled. Enabling this feature will prevent users from disabling the Windows Web Security service.

Step 6
Click Install Selected.
Step 7
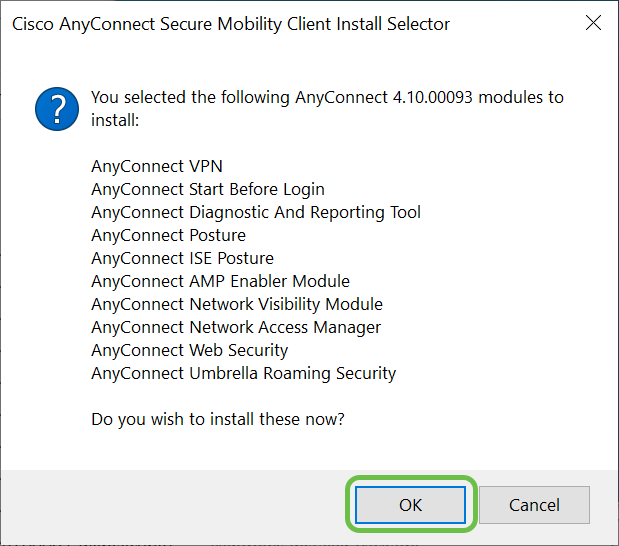
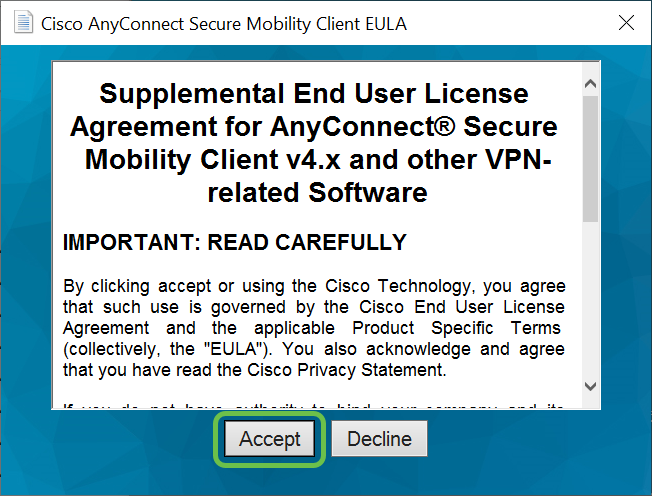
Step 8
Carefully review the Supplemental End User License Agreement and then click Accept.
Conclusion and Next Steps after Installation
There you have it! You have now successfully installed the Cisco AnyConnect Secure Mobility Client on your computer.

Wondering what the next steps are? Don’t worry. If you need help configuring AnyConnect on your router, check out Configure AnyConnect VPN Connectivity on the RV34x Series Router.
We want the best for our customers, so you have any comments or suggestions regarding this topic, please send us an email to the Cisco Content Team.
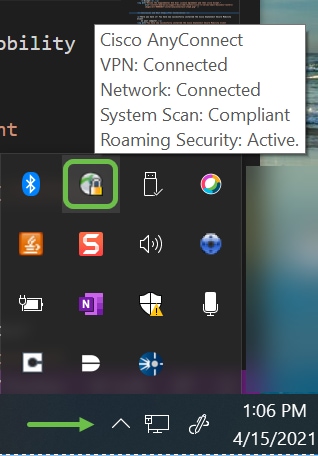
By the way, once the configurations are complete on the router, you can view your connection on the lower right-hand of your screen. Click the up arrow and hover over the AnyConnect icon to see the details.
AnyConnect App
The Anyconnect App can be downloaded from the Google Play store or the Apple store.
Automated AnyConnect NAM Installation with Profile Conversion via Batch File Script
Available Languages
Download Options
Contents
Introduction
This document describes in detail the steps required to install the Cisco Anyconnect NAM agent with the profiles conversion via batch file(.bat). The batch file can then be executed locally on the system or remotely to all the machines through the SCCM server in a large scale deployment. Cisco ISE can provision this software but it requires end user’s interaction and installation privileges.
Usage of Batch file script serves several benefits :
- All the wireless Profile conversion.
- VPN Module can be disabled if it is not desired.
- Reduce the manual implementation time and cost by executing the batch file and installing the AnyConnect modules all at once.
Prerequisites
Requirements
Cisco recommends that you have knowledge of these topics:
- Windows Operating System. Network Access Manager is not supported on Mac OS X or Linux.
- The system should have minimum storage of 50 MB for the AnyConnect packages.
- The WLAN service (WLAN AutoConfig) must be running in the systems.
Note: Conversion is not done if a Network Access Manager XML configuration file already exists (userConfiguration.xml).
Components Used
The information in this document is based on these software and hardware versions:
The information in this document was created from the devices in a specific lab environment. All of the devices used in this document started with a cleared (default) configuration. If your network is live, ensure that you understand the potential impact of any command.
Background Information
- The entire Cisco Anyconnect package should be downloaded from the Cisco site and extracted. The required msi files and configuration.xml file should be present in the location from where the batch file is executed.
These files have to be copied in the location C:\cisco :
2. The Network Access Manager module can be configured to convert some existing Windows 7 or later wireless profiles to the Network Access Manager profile format when the module is installed on the client system for the first time. Infrastructure networks that match these criteria that can be converted:
Only non-GPO native Wi-Fi user network profiles are converted.
Note: For WPA2 Enterprise profiles, a profile with the same name must be created through Network Access Manager Profile Editor in the configuration.xml file
3. The system is restarted after the installation and this should be notified to the users already.
Configure
Creation of Batch file
In this document, the assumed location of the Anyconnect msi, configuration.xml files is C:\cisco. These commands or the batch file with these commands must be executed from the same location.
Installation of the core VPN module is required for the NAM module to be installed. This command installs the core VPN module and hides the VPN module tile.
- msiexec /package anyconnect-win-4.6.04054-core-vpn-predeploy-k9.msi /norestart /passive PRE_DEPLOY_DISABLE_VPN=1
A timeout is required for the installation of the module to complete. This command induces a timeout of 15 minutes.
This command installs the NAM module with profile conversion enabled.
- msiexec /i anyconnect-win-4.6.04054-nam-predeploy-k9.msi PROFILE_CONVERSION=1 /norestart /passive
A timeout is required for the installation of the module to complete. This command induces a timeout of 15 minutes.
This command copies the configuration.xml profile which is created with the NAM Profile editor, to the required location.
- xcopy configuration.xml C:\ProgramData\Cisco\Cisco AnyConnect Secure Mobility Client\Network Access Manager\newConfigFiles
This command indicates that the required installation and conversion is complete and notifies that a reboot is initiated in 2 minutes.
- echo «Your machine will reboot in 2 minutes. Please save your work»
This command initiates a restart the Windows Operating System in 2 minutes
- shutdown -r -t 120
Note: All these commands or the batch file with these commands must be executed with administrative privileges and in the same order.
Anyconnect User-End Procedure
- Once the Anyconnect agent is installed on the machine when the machine restarts, the Anyconnect icon pops up and the user is connected to preferred SSID in the list.

2. One can connect to other SSIDs from the drop-down menu provided in the AnyConnect NAM Module UI.

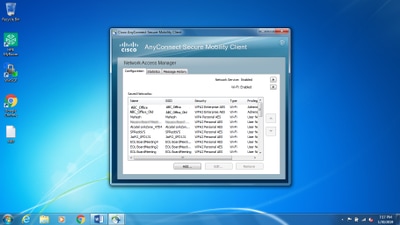
3. In order to view the saved networks, click on the list icon provided in the NAM module UI and then click Manage Networks, as shown in the image.
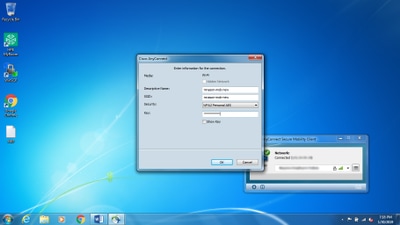
4. Connections to any network provided by the adapters managed by the AnyConnect NAM module must be made from AnyConnect NAM.
Example: In order to connect to a new wifi connection Mnason-mob-new, select the network, a pop-up screen is thrown for the key. Enter the wifi password in the Key field to connect to the new network.


Additional Information
Native Supplicant tray icon may confuse the users to connect to a network as NAM must be used and not the Native Supplicant. These changes can be made to the Windows registry to hide the network connectivity tray icon:
- Navigate to HKEY_LOCAL_MACHINE\SOFTWARE\Microsoft\Windows\CurrentVersion\Policies\Explorer.
- Edit the value of the REG_DWORD named HideSCANetwork to 1 (hexadecimal) if present or create one if it is not present.
- Restart the system.
Note: This change to the registry was tested with Windows 7 and Windows 10.

Verify
Use this section to confirm that your configuration works properly.
After the changes to the registry and the reboot, the network connectivity tray should be hidden.


