- Install Cisco AnyConnect Secure Mobility Client on a Mac Computer
- Available Languages
- Download Options
- Objective
- Introduction
- AnyConnect Software Version
- Install AnyConnect Secure Mobility Client
- Prerequisites
- Check these other articles out!
- Applicable Devices | Software Version
- Licensing Information
- Step 1
- Step 2
- Step 3
- Step 4
- Step 5
- Step 6
- Step 7
- Step 8
- Step 9
- Step 10
- Step 11
- Step 12
- Step 13
- Additional Resources
- AnyConnect App
- View a video related to this article.
- AnyConnect macOS 11 Big Sur Advisory
- Available Languages
- Download Options
- 1. Introduction
- 2. About the AnyConnect System Extension
- 3. Approving the AnyConnect System Extension
- 3.1 Extension Approval by End User
- 3.2 Extension Approval using MDM
- How to Install Cisco AnyConnect on a Mac
- Step 2
- Step 3
- Step 4
- Step 5
- Step 6
- Step 7
- Step 8
- Step 9
- Download Cisco AnyConnect Secure Mobility Client Latest Version
- What’s new in Cisco AnyConnect 4.8
- System Requirements for Cisco VPN Client
- VPN URL in trusted sites
- Check which AnyConnect version is currently installed on your computer
- Download AnyConnect
- Download AnyConnect for Windows
- Download AnyConnect for Apple iOS
- Download AnyConnect for Android
- Installing the Cisco AnyConnect 4.8
- Using Cisco AnyConnect 4.8
- Starting and connecting to the VPN using AnyConnect
Install Cisco AnyConnect Secure Mobility Client on a Mac Computer
Available Languages
Download Options
Objective
This article shows you how to download and install the Cisco AnyConnect Secure Mobility Client version 4.9.x on a Mac Computer.
This article is only applicable to the RV34x series routers, not Enterprise products.
Introduction
AnyConnect Secure Mobility Client is a modular endpoint software product. It not only provides Virtual Private Network (VPN) access through Secure Sockets Layer (SSL) and Internet Protocol Security (IPsec) Internet Key Exchange version2 (IKEv2) but also offers enhanced security through various built-in modules.
AnyConnect Software Version
Install AnyConnect Secure Mobility Client
This toggled section provides details and tips for beginners.
Prerequisites
- You need to purchase client license(s) from a partner like CDW or through your company’s device procurement. There are options for 1 user (L-AC-PLS-3Y-S5) or packets of licenses including one year for 25 users (AC-PLS-P-25-S). Other license options available as well, including perpetual licenses. For more details on licensing, check out the links in the Licensing Information section below.
- Download the latest version of firmware available for your router.
Check these other articles out!
Applicable Devices | Software Version
- RV340 | 1.0.03.21 (Download latest)
- RV340W | 1.0.03.21 (Download latest)
- RV345 | 1.0.03.21 (Download latest)
- RV345P | 1.0.03.21 (Download latest)
Licensing Information
AnyConnect client licenses allow the use of the AnyConnect desktop clients as well as any of the AnyConnect mobile clients that are available. You will need a client license to download and use the Cisco AnyConnect Secure Mobility Client. A client license enables the VPN functionality and are sold in packs of 25 from partners like CDW or through your company’s device procurement.
Want to know more about AnyConnect licensing? Here are some resources:
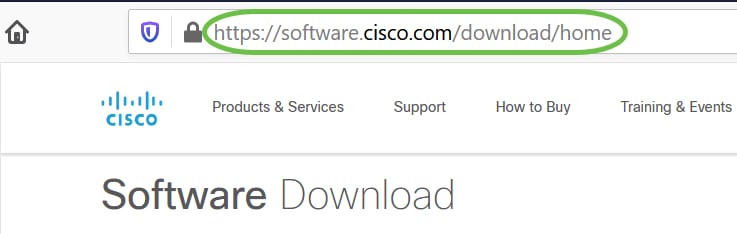
Step 1
Open a web browser and navigate to the Cisco Software Downloads webpage.
Step 2
In the search bar, start typing ‘Anyconnect’ and the options will appear. Select AnyConnect Secure Mobility Client v4.x.
Step 3
Download the Cisco AnyConnect VPN Client. Most users will select the AnyConnect Pre-Deployment Package (Mac OS) option.

The images in this article are for AnyConnect v4.9.x, which was latest version at the time of writing this document.
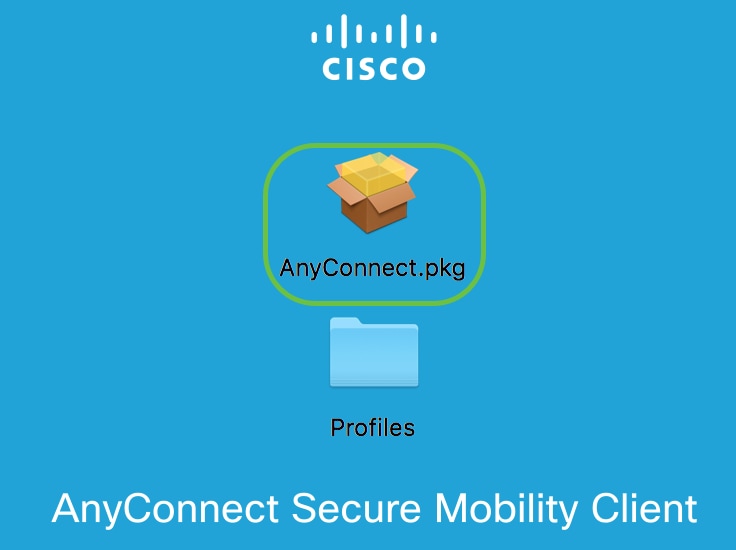
Step 4
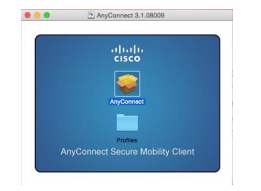
Double-click the installer.
Step 5
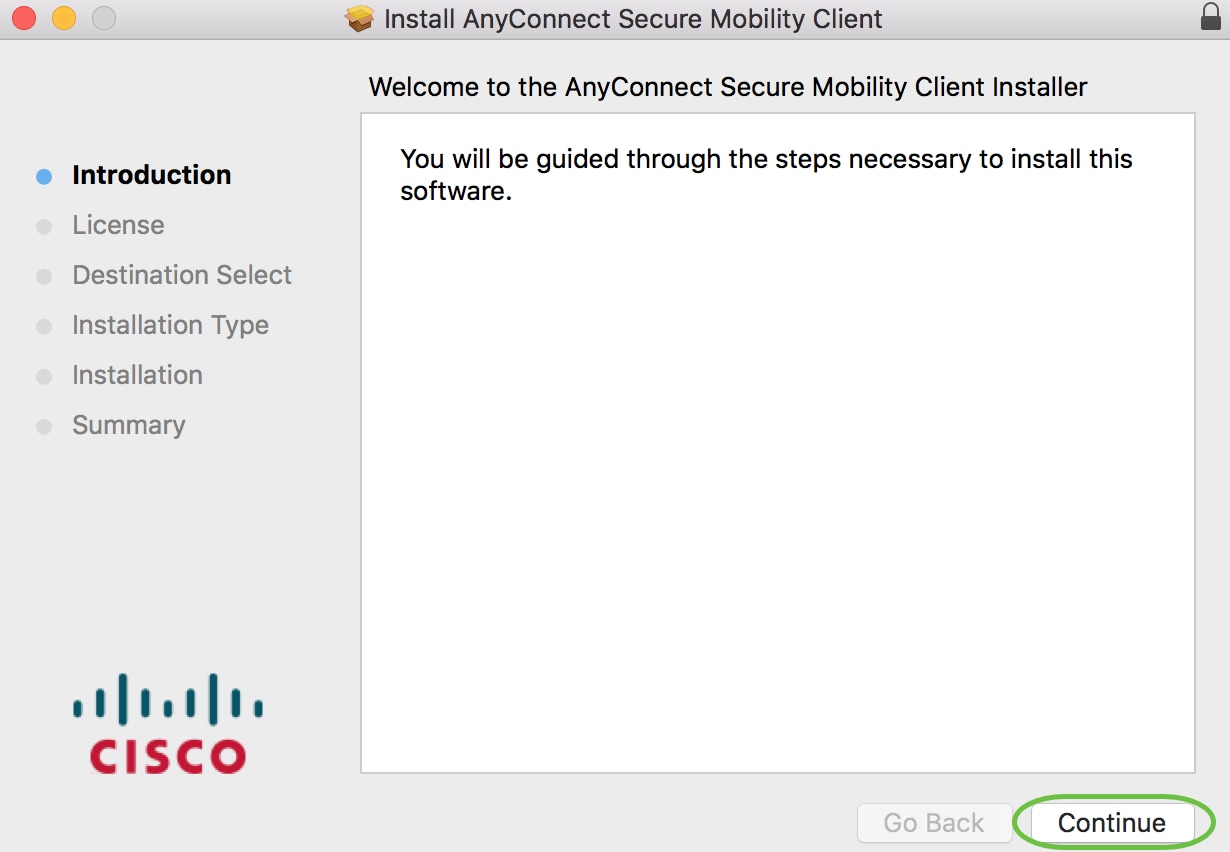
Step 6
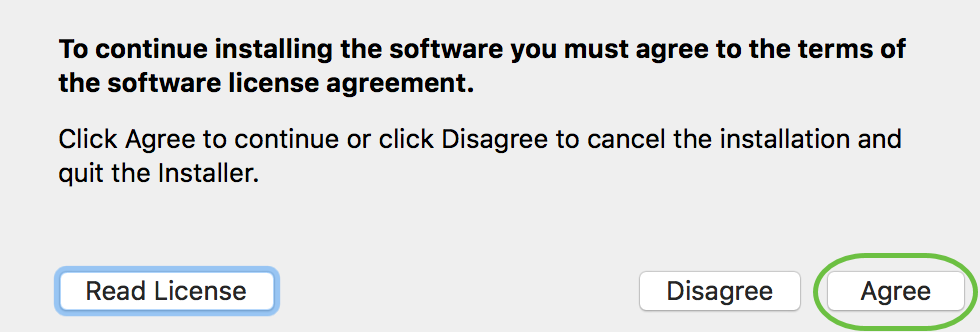
Go over the Supplemental End User License Agreement and then click Continue.
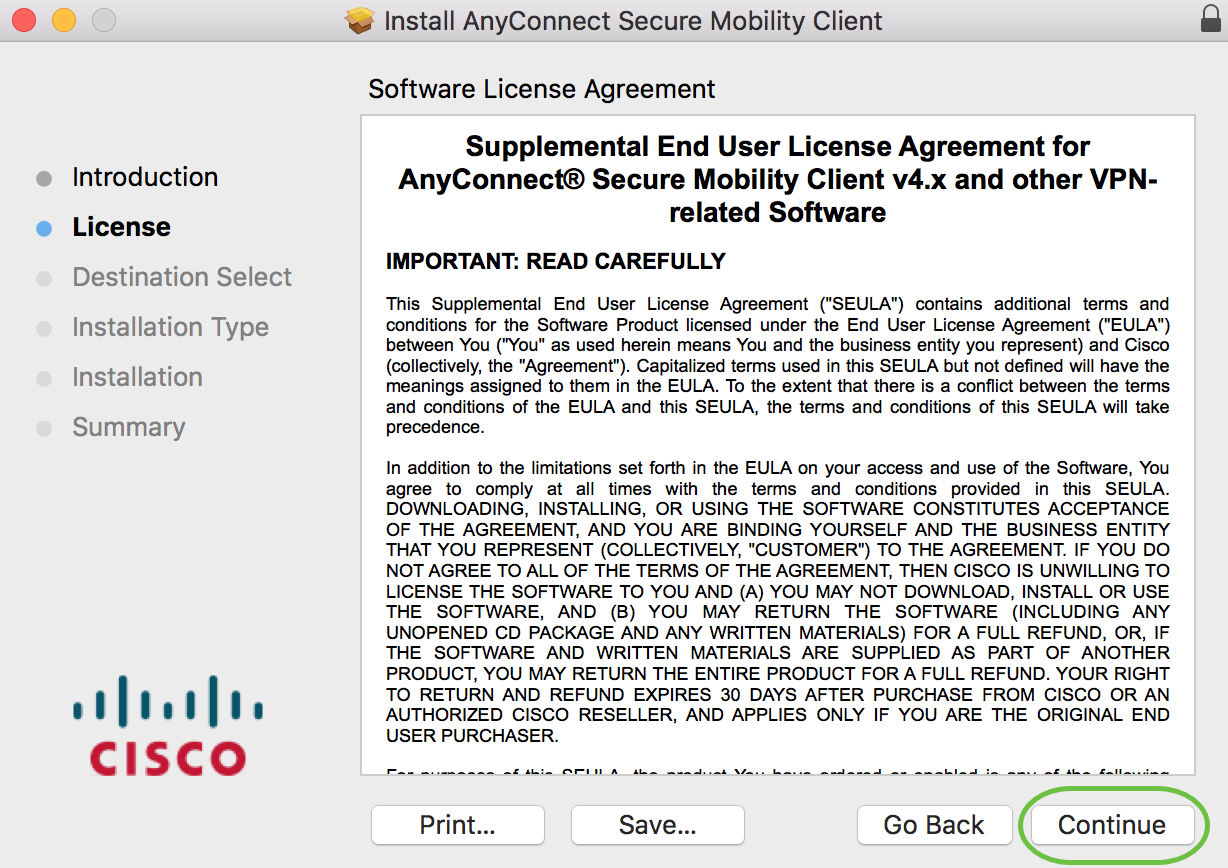
Step 7
Step 8
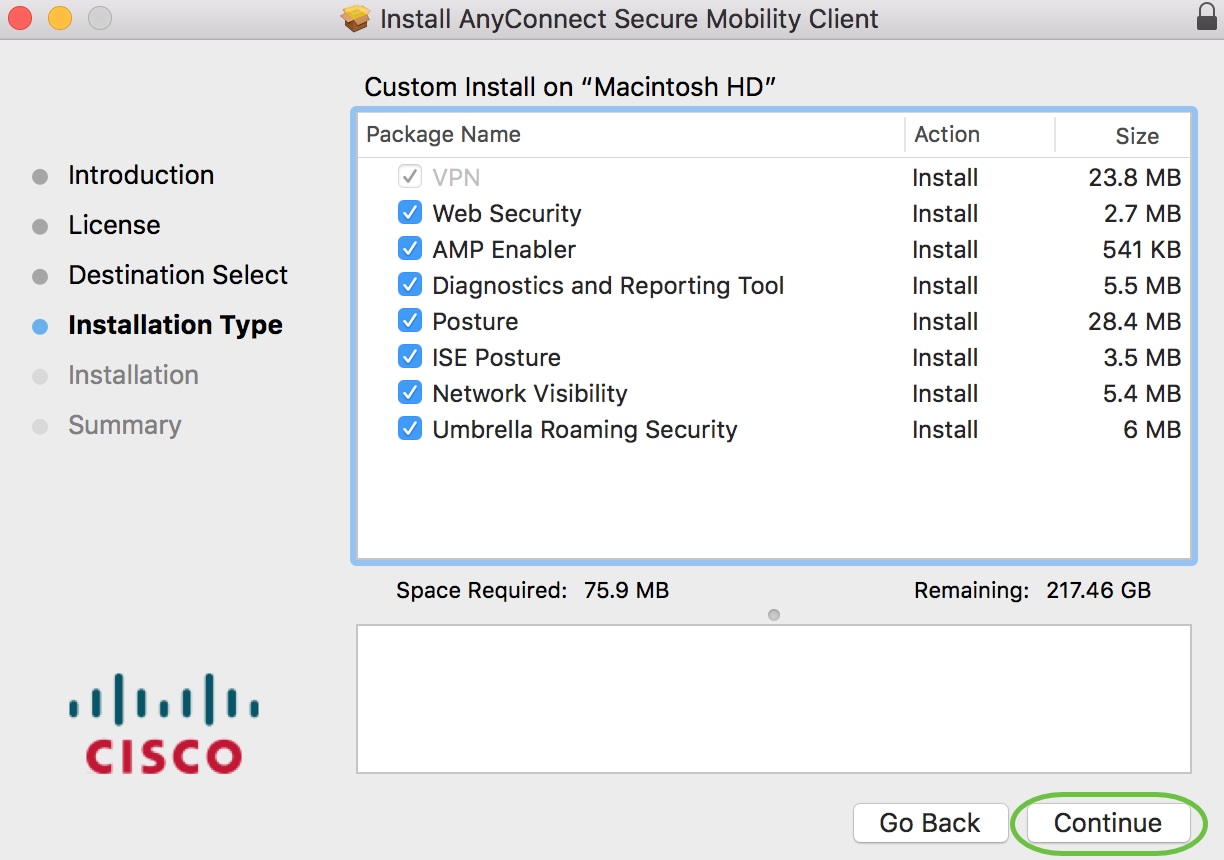
Choose the components to be installed by checking or unchecking the corresponding check boxes. All components are installed by default.
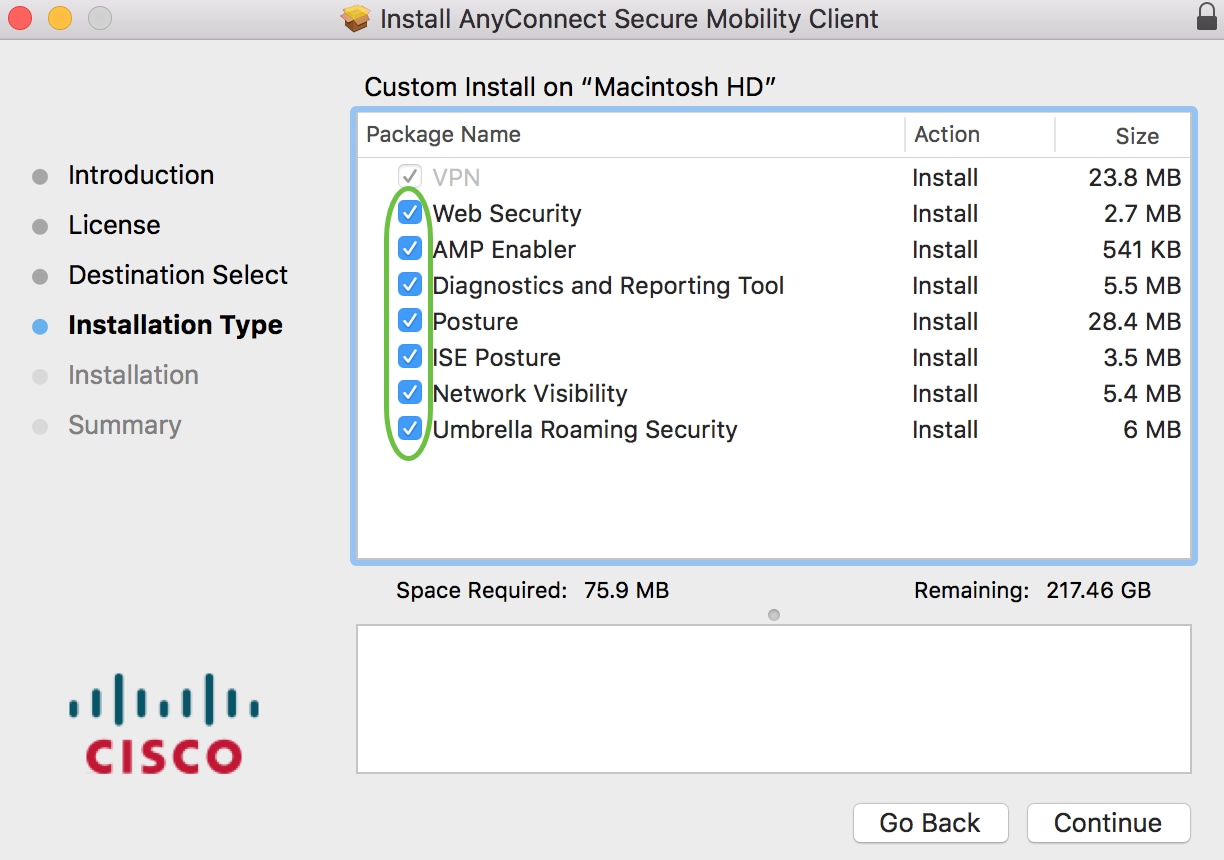
The items you select in this screen will appear as options in AnyConnect. If deploying AnyConnect for end-users, you may want to consider deselecting options.
Step 9
Step 10
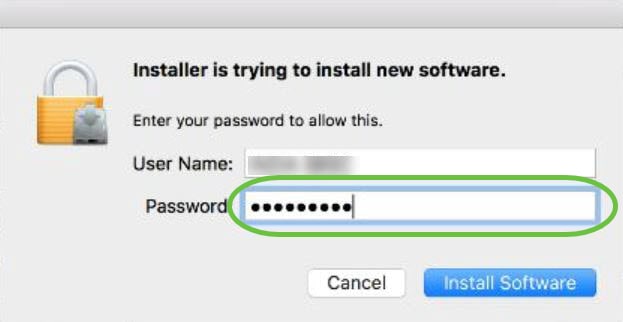
Step 11
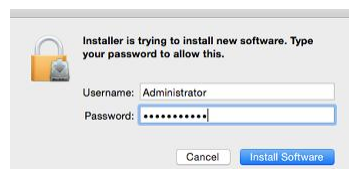
(Optional) Enter your password in the Password field.
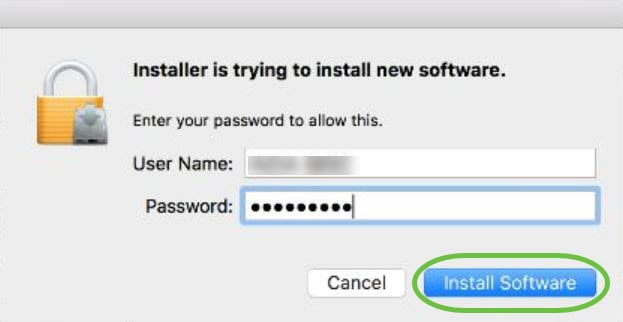
Step 12
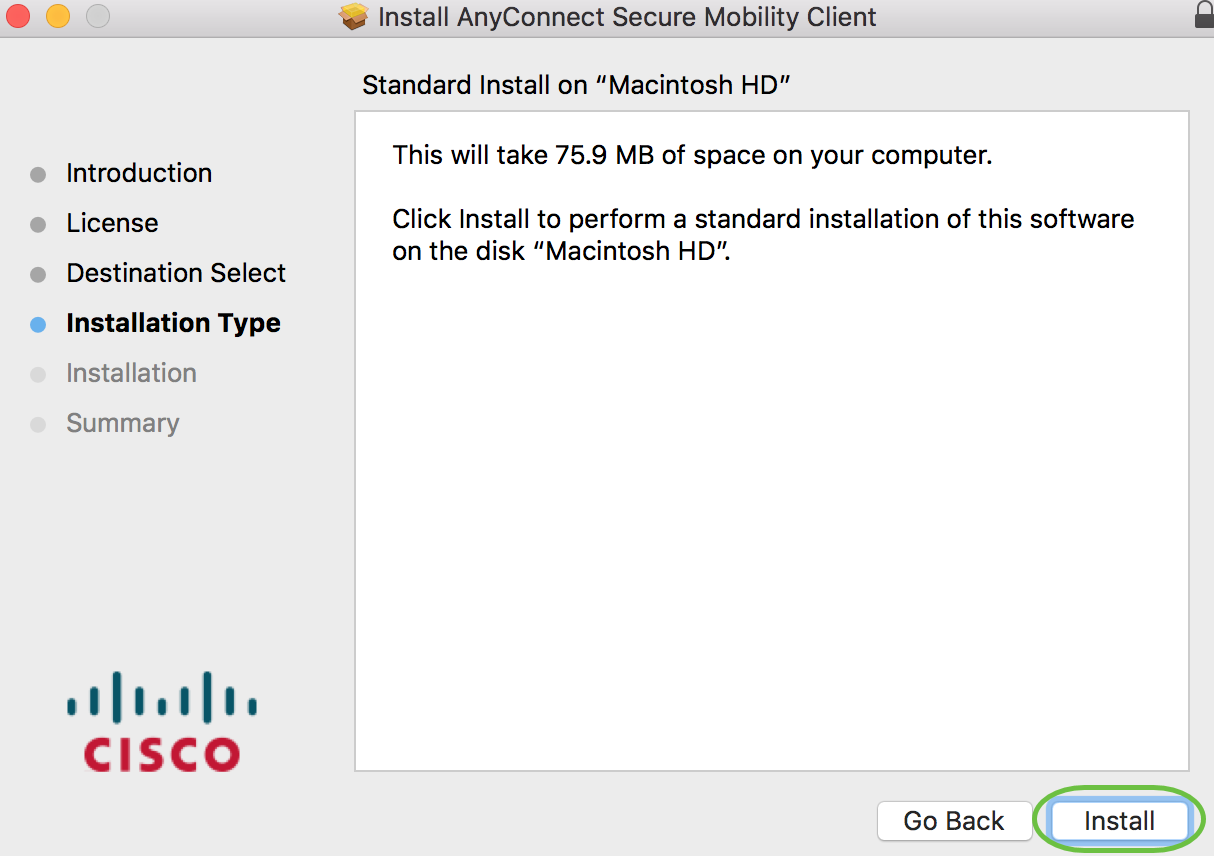
Click Install Software.
Step 13
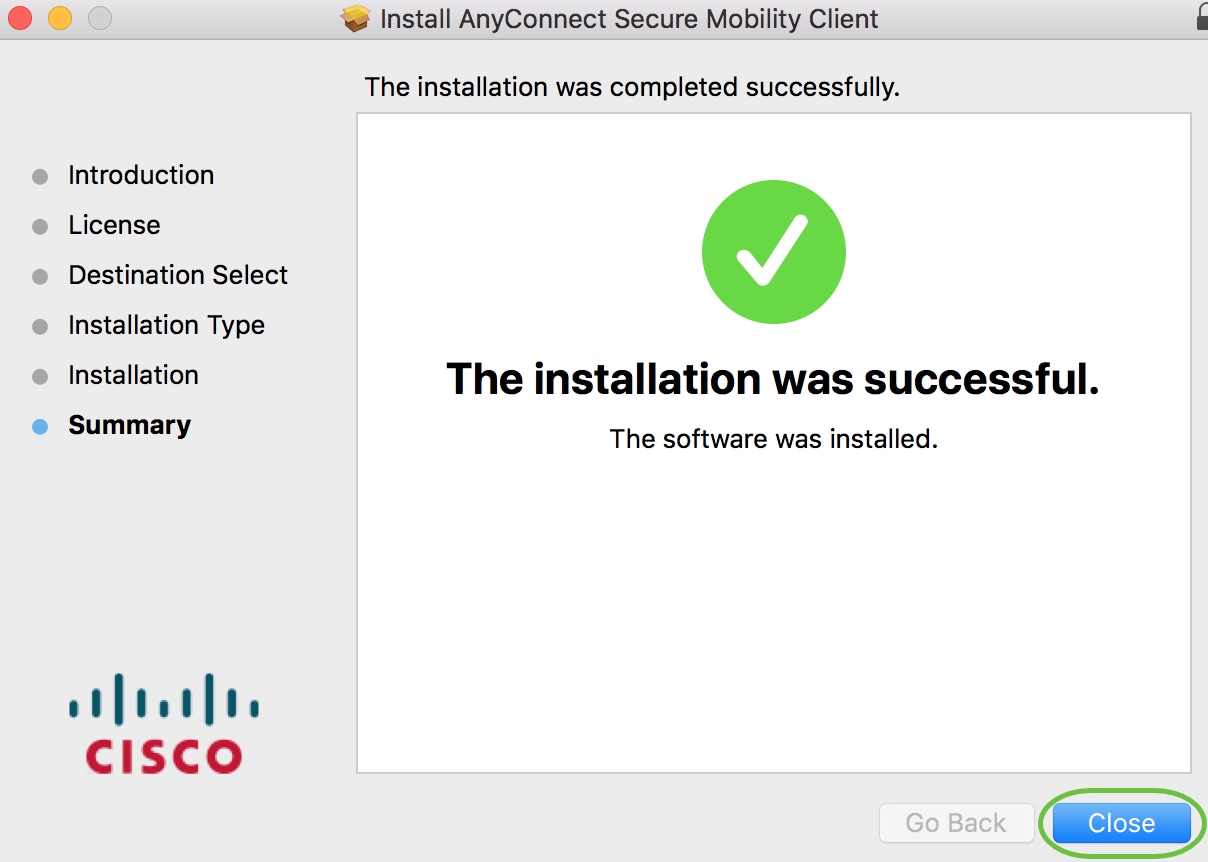
You have now successfully installed the AnyConnect Secure Mobility Client Software on your Mac computer.
Additional Resources
AnyConnect App
To try out AnyConnect on mobile devices, the App can be downloaded from Google Play store or Apple store.
View a video related to this article.
Источник
AnyConnect macOS 11 Big Sur Advisory
Available Languages
Download Options
AnyConnect Changes Related to macOS 11 (Big Sur)
Table of Contents
Table of Figures
1. Introduction
AnyConnect 4.9.04xxx leverages the System Extension framework available in macOS 11 (Big Sur). This differs from past AnyConnect versions, which rely on the now-deprecated Kernel Extension framework. This is the minimum version required to run AnyConnect on macOS 11.
This advisory describes changes introduced in the new AnyConnect version and the steps administrators can take to confirm AnyConnect is operating correctly on macOS 11. There are important changes in approving the AnyConnect system extension, as detailed in the next section.
The advisory also details the steps for failing over to the AnyConnect kernel extension, as last-resort workaround in case a critical system extension (or related OS framework) issue is encountered. The AnyConnect kernel extension is installed on macOS 11 solely for this purpose, it is no longer used by default.
2. About the AnyConnect System Extension
AnyConnect uses a network system extension on macOS 11, bundled into an application named Cisco AnyConnect Socket Filter. (This app controls the extension activation and deactivation and is installed under /Applications/Cisco.)
The AnyConnect extension has the following three components:
These components are visible in the macOS System Preferences – Network UI window:

Figure 1 — DNS proxy component
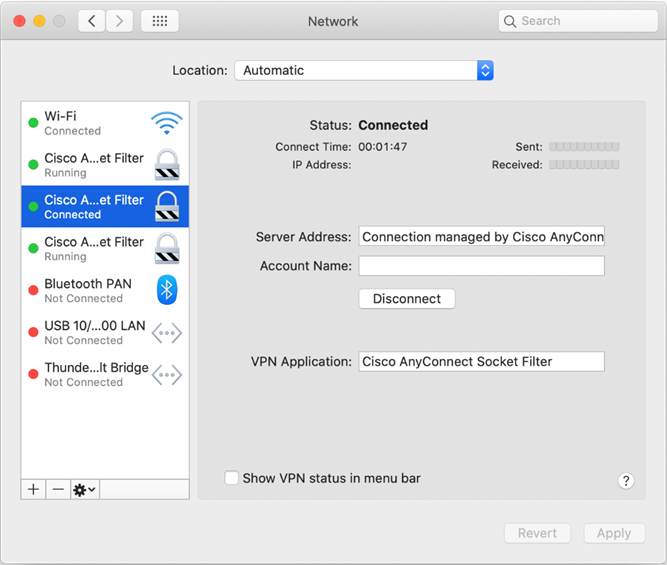
Figure 2 — App/Transparent proxy component
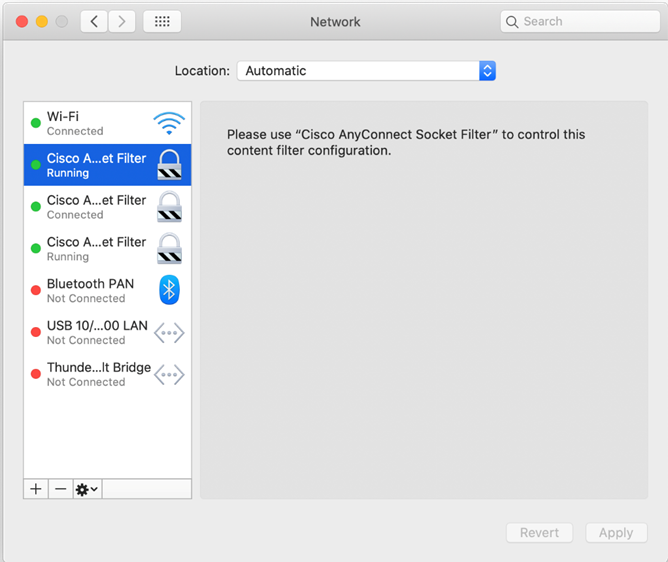
Figure 3 — Content filter component
AnyConnect requires its system extension and all its components to be active in order to operate properly, which implies that the mentioned components are all present and show up as green/running in the left pane of the macOS Network UI, as per above screenshots.
3. Approving the AnyConnect System Extension
macOS 11 requires end user or MDM approval before system extensions are allowed to run.
Two approvals are required for the AnyConnect system extension:
— Approve the system extension loading/activation.
— Approve the extension’s content filter component activation.
3.1 Extension Approval by End User
The AnyConnect system extension and its content filter component can be approved by end user, by following either the OS prompting, or the more explicit AnyConnect Notification app’s instructions.

Figure 4 — Extension blocked — OS prompt
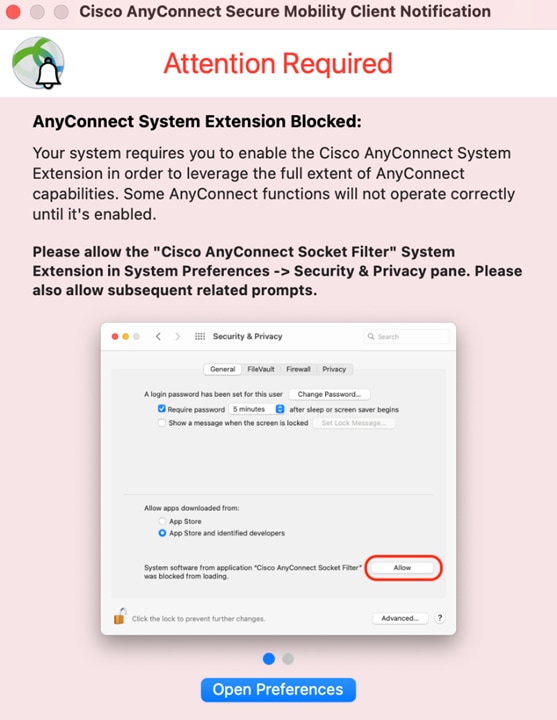
Figure 5 — Extension blocked — AnyConnect prompt
After opening the Security & Privacy Preferences window, click the bottom-left lock and provide the requested credentials, as prompted, to unlock it and allow changes.
The window’s appearance depends on whether the AnyConnect extension is the only one requiring approval. If that’s the case, simply click the Allow button.

Figure 6 — AnyConnect extension approval
Otherwise click the Details… button, then select the ”Cisco AnyConnect Socket Filter” check box and click OK.

Figure 7 — AnyConnect extension approval (multiple unapproved extensions)
Shortly after approving the AnyConnect extension, the user is shown another popup, this time for approving the extension’s content filter component.

Figure 8 — AnyConnect extension’s content filter approval
After the extension’s content filter approval is complete, the extension and its components should be active, as confirmed by the AnyConnect Notification app:

Figure 9 — AnyConnect extension approval confirmation
3.2 Extension Approval using MDM
The AnyConnect system extension can also be approved without end user interaction, using a management profile’s SystemExtensions payload with the following settings:
Источник
How to Install Cisco AnyConnect on a Mac
The Cisco AnyConnect VPN allows you to connect to Mason networks allowing access to restricted services as if you were on campus. To connect to the VPN from your Mac computer, you need to install the Cisco AnyConnect VPN client.
The following instructions are for computers NOT on Jamf Pro (Mason Self Service). If your computer is on Mason Self Service, the Cisco AnyConnect VPN should already be installed. However, if it is not present in your Applications menu, follow the instructions below.
Step 1
Download the Mac Cisco AnyConnect VPN client via the Related Downloads box to the right on this page.
Step 2
Run the downloaded program. 
Note: the version number may be different from the screenshot above.
Step 3
When the installation starts, double click AnyConnect to continue.
Step 4
Click Continue twice.
Step 5
Click Agree.

Step 6
Uncheck everything except the VPN package. Click Continue. 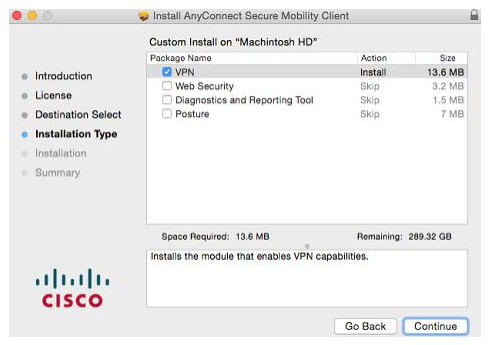
Step 7
Click Install to start the installation.
Step 8
If prompted, enter your username and password and click Install Software.
Step 9
Click Close when the installation is complete.
Источник
Download Cisco AnyConnect Secure Mobility Client Latest Version
Cisco AnyConnect Secure Mobility Client is Cisco’s flagship VPN connection software which can securely connect enterprise networks using a single VPN agent software.
Apart from VPN connectivity, major benefits of AnyConnect include endpoint security for enterprises, telemetry, web security, network access management etc.
The limitation of AnyConnect client is that it can only connect with Cisco equipment. So the Cisco router or firewall needs to be at the hub of connectivity to use AnyConnect VPN client.
If you have an active subscription of Apex, Plus or VPN Only, you can easily download the latest AnyConnect client.
What’s new in Cisco AnyConnect 4.8
This is a major release of the software as it includes a lot of bug fixes and new features. I’m listing down some of the features.
- Management VPN Tunnel enables the client to automatically connect to the VPN when the computer starts. This is useful for always-connected remote computers.
- TLS v1.2 is fully supported including handshaking and certificate authentication.
- NVM flow filter now monitors the filtered traffic making it easier for the admins to work on the logs.
- A lot of new cipher suites are supported for SSL/TLS connections.
If you want to go through all the features of this release, you may visit this page.
System Requirements for Cisco VPN Client
Java Runtime Environment is required before installing the Anyconnect. You can install Java 8 latest update. I have also tried running Cisco AnyConnect 4.6 with Java 11 installed and it is running perfectly fine. I haven’t tried the web version. You may need to install Java 8 for running the web version of the Cisco VPN client but I’m not sure.
VPN URL in trusted sites
If you have previously enabled the option that only trusted websites can access, then the URL of the server should be added. Go to Windows Settings and search for Internet Options. Then go to the Security tab and select Trusted Sites and add the server URL in trusted sites.
Adding a Cisco VPN URL to trusted sites in Internet Options
Using AnyConnect is easy. Just add the VPN server URL and click Connect. This will create a secure VPN connection to the Cisco systems VPN router. You can now browse the resources in the remote network securely. All the traffic is passed through the VPN tunnel meaning that no one can read the information except the server and the client.
Check which AnyConnect version is currently installed on your computer
To check which version of AnyConnect client is installed on your computer, follow the steps below:
- Open AnyConnect VPN client
- Click on the i (information) icon near the gear icon on the bottom left of the client window.
- This will show the complete version no. of the VPN client running on your computer.
Checking the version of Cisco AnyConnect Secure Mobility Client
Download AnyConnect
Please note that you need to have an active AnyConnect Apex, Plus or VPN Only subscription with Cisco to download the latest AnyConnect VPN client software. Just login with your Cisco ID and password and you’ll be able to download the software without any issues.
Download AnyConnect for Windows
If you are a Windows 10 user, you can easily download the Cisco AnyConnect VPN client from Windows Store. There is no restriction over the download and it’s free.
[appbox windowsstore 9wzdncrdj8lh]
Download AnyConnect for Apple iOS
[appbox appstore id1135064690]
Download AnyConnect for Android
[appbox googleplay com.cisco.anyconnect.vpn.android.avf]
Installing the Cisco AnyConnect 4.8
Installing AnyConnect 4.8 is a little different from the previous versions. The Windows version of the AnyConnect client comes as a Zip file. You will need to unzip all the contents of the zip file to run the setup. There are two setup files, setup.hta, and setup.exe. Running any of the setup files will open the installer selection window: Cisco AnyConnect Secure Mobility Client Install Selector
You can select the components you want to install with this version of the Cisco VPN client. If unsure, please ask your network admin to guide you through the process.
Using Cisco AnyConnect 4.8
Using AnyConnect from the client perspective is quite simple. You just have to start the client, give the server URL, username and password and it just connects. We will give you our step by step overview of how to start the client and the disconnect from the VPN when required.
Starting and connecting to the VPN using AnyConnect
Make sure that you have installed AnyConnect successfully. Follow the steps below to start the VPN client:
- Open Cisco AnyConnect Secure Mobility Client from the Start Menu
- Select the connection from the drop-down menu. If this field is blank, you should manually type in the server URL. Most of the time, network administrators will configure a VPN profile for the users. So the default connection will automatically be listed in the drop-down menu.
- Click Connect
- You will be asked to enter your Username and Password.
- After entering your credentials, press Ok.
Once the connection is successful, AnyConnect will automatically minimize itself in the system tray. To disconnect from the VPN, double-click the AnyConnect icon from the system tray and press the Disconnect button.
Источник


