User Guide for Cisco Jabber and Cisco Virtualization Experience Media Engine for SUSE Linux Release 9.0
Book Title
User Guide for Cisco Jabber and Cisco Virtualization Experience Media Engine for SUSE Linux Release 9.0
Chapter Title
Cisco Jabber and Virtualization
View with Adobe Reader on a variety of devices
View in various apps on iPhone, iPad, Android, Sony Reader, or Windows Phone
Results
Chapter: Cisco Jabber and Virtualization
Cisco Jabber and Virtualization
In this document, Cisco Virtualization Experience Client means Cisco Virtualization Experience Client 6215.
Cisco Jabber
Cisco Jabber is a multimedia communication application for presence, audio and video calls, and enterprise instant messaging.
With Cisco Jabber you can
See the availability status for your contacts.
Set your own custom availability status messages.
Place or receive audio and video calls.
Send instant messages to your contacts.
Access your visual voicemail.
Access your corporate directory.
Start or join web conferences.
Some of the Cisco Jabber features described in this FAQ might not be available in your environment. Your organization determines the feature set that is available to you, for example, video, visual voicemail, and web conferencing. Your system administrator must enable and set up some features before you can access them. If the administrator does not set up these features, they do not appear in Cisco Jabber .
Note
Cisco Jabber always starts with the default size and position for the application windows.
Jabber Main Window
After you sign in, the main window appears. The main window includes the following icons:
Icon
Description
Click to show your contacts.
Click to show a record of your calls. If you missed calls, a number appears beside this icon to indicate the number of missed calls.
Click to show your voicemail messages. If you have voicemail messages, a number appears beside this icon to indicate the number of new messages.
Click to see a list of your scheduled WebEx meetings for the day. If you set up your WebEx host account, you can start a WebEx meeting by clicking Instant WebEx Meeting .
This icon appears only if WebEx integration is set up. For more information, see your system administrator.
Click to view error messages.
This icon appears only if there are new error messages.
Click to choose a telephone to control, or to specify a number to which you want to redirect your calls.
The list contains all available telephones set up for you.
Jabber Chat Window
Chat sessions open in the Integrated Session window. Use the following icons to enhance your chat.
Icon
Description
Click to start a call. If you are chatting with multiple people, click to start a conference call.
Click to open a browser for a WebEx conference. You receive an invitation email that you can forward to other participants. You can also copy the link from the email and paste it into the chat window.
Click to add the contact to the contact list. This icon appears only during a person-to-person chat, if the contact is not already in your contact list.
Click to send a screen capture.
Click to send an attachment.
Click to select from a palette of smileys.
Click to select a font, type size, and color.
Click to search your corporate directory and add people not already on your contact list to your chat.
You can also drag a name from your contact list onto your active chat window to add them to your chat.
Jabber Call Window
Calls open in the Integrated Session window. Use the following icons to control the call in progress.
Start My Video
Click to start sending your video.
This button appears only if you are not currently sending your video. If your administrator disables video, this button is not available.
Stop My Video
Click to stop sending your video.
This button appears only if you are currently sending your video. If your administrator disables video, this button is not available.
Click to expand video to full screen. To exit full screen, press Escape .
Click to toggle self view video. Self view is available for all calls where the other party can receive video, even if they do not send video.
If your administrator disables video, this button is not available.
Click to open a keypad that you can use to enter numbers or characters. Use this keypad to perform tasks such as entering a PIN or a numeric password, or to interact with applications that have telephony user interfaces.
Click to mute your microphone.
Click to open a menu, from which you can place the call on hold, transfer the call, merge the call with another, or start a conference call.
Click to end the call.
Click to separate the call window from your chats in the Integrated Session window.
Tool Tips
Cisco Jabber includes tool tips. Hover your mouse over an icon to display a short description.
Integration with Microsoft Office Applications
The following table describes the integration features that are available, depending on how Cisco Jabber is set up. If you cannot place a call or start a chat session from a particular application, check with your administrator.
Cisco Jabber starts all calls according to the preference that you set in File > Options > Calls . However, you can start or stop your video during an active call.
Click to chat/IM Support
Click to Call Support
(Voice and Video)
Group chat function is also available.
Conferencing function is also available.
Word 2007, Excel 2007, and PowerPoint 2007
Support to contact the author of the document.
Support to contact the author of the document.
Internet Explorer required.
Internet Explorer required.
Internet Explorer required.
(32 bit and 64 bit)
Group chat function is also available.
Conferencing function is also available.
Word 2010, Excel 2010, PowerPoint 2010
(32 bit and 64 bit)
Support to contact the author of the document.
Support to contact the author of the document.
Internet Explorer required.
Internet Explorer required.
Internet Explorer required.
Microsoft Internet Explorer and Mozilla Firefox
Cisco Jabber was tested with Microsoft Office 2007 32bit, Office 2010 32bit, Office 2010 64bit and SharePoint 2010 in a Microsoft Office 365 environment, with an on-premises Active Directory server. Cisco cannot support an environment where active directory cannot be locally accessed and updated.
Virtual Private Network Support
To connect to your hosted virtual desktop (HVD), you must first connect to your corporate network. If you do not connect to the network directly, you must use Cisco AnyConnect.
Your system administrator can provide advice as to whether you must use Cisco AnyConnect before you can log on to your HVD or access other network resources. If you must use Cisco AnyConnect, your administrator can set it to start automatically when you boot and can place the Cisco AnyConnect shortcut on your Cisco Virtualization Experience Client desktop.
After you connect to the corporate network, you log on to your HVD by using one of the following methods:
Citrix XenDesktop (opens in Mozilla Firefox)
Citrix XenClient
VMware Horizon View Client
Note
You must use the connection method set up for your network.
Virtual Environment
The hosted virtual desktop (HVD) is a new form of desktop computing. Your HVD looks and behaves like a regular desktop. However, your Windows desktop, other software (including Cisco Jabber ), and your data reside in a central location called a data center. The HVD removes the need for typically more costly physical desktop PCs. Central hosting in the data center reduces the cost of providing the applications and computing services that you need.
This type of setup is commonly referred to as a virtual environment.
Cisco Virtualization Experience Client 6215 is a thin client—a multimedia-enabled desktop PC and phone replacement for enterprises. You access your HVD over a secure connection with your Cisco Virtualization Experience Client. With Cisco Virtualization Experience Client 6215 and Cisco Virtualization Experience Media Engine , you can use Cisco Jabber to place calls in virtual environments.
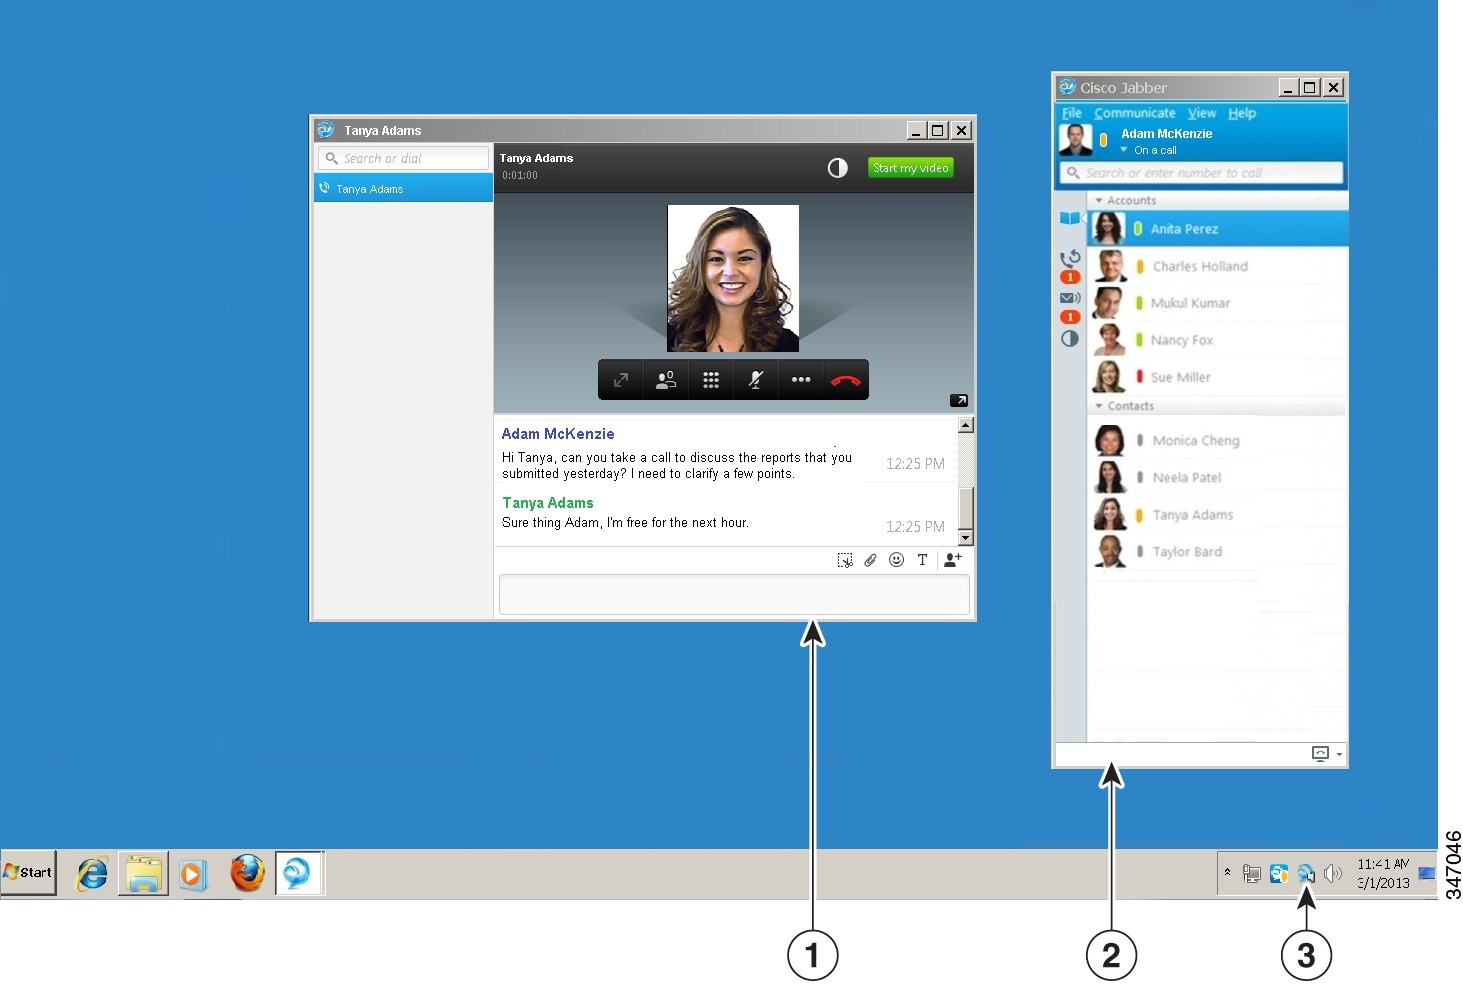
Figure 1. Cisco Jabber with Cisco Virtualization Experience Media Engine .
The following image shows Cisco Jabber with Cisco Virtualization Experience Media Engine components for a video call, as they appear on a Cisco Virtualization Experience Client 6215 (VXC 6215) display.
Legend
1
Integrated session window (call and chat)
Cisco Jabber main window
Device Selector
The Device Selector is part of Cisco Virtualization Experience Media Engine (VXME). Device Selector is a menu that you use to manage your cameras and audio devices. You can view your currently active cameras and audio devices or change them. A list of audio devices appears first in the menu, followed by a list of cameras. The list of audio devices includes the thin client built-in audio device. Your active camera and audio device selections apply to all applications.
The icon for the Device Selector () appears in the notification area in the bottom right corner of the screen. Some icons, including the Device Selector, can be hidden. Click the up arrow in the notification area to show hidden icons.
You can also open Device Selector from Cisco Jabber by clicking Show on one of the following tabs:
View Your Active Camera or Audio Device
You can check to see which of your cameras or audio devices is currently selected. Procedure
In the Windows notification area, click .
Check marks indicate the selected devices.
Change Your Active Camera or Audio Device
Use the Device Selector menu to select a different active camera or audio device. You must have multiple devices connected.


 ) appears in the notification area in the bottom right corner of the screen. Some icons, including the Device Selector, can be hidden. Click the up arrow in the notification area to show hidden icons.


