Appendix — Starting a Router Terminal or Console Session
View with Adobe Reader on a variety of devices
Results
Chapter: Appendix — Starting a Router Terminal or Console Session
Starting a Router Terminal Session
This section describes how to start a terminal session with the Cisco 1240 Connected Grid Router (CGR 1240 or router) using the console port. Start a terminal session with the router when you are at the router installation location and want to administer the router with a direct connection using the command-line interface (CLI) software.
These topics are discussed:
■About the Console Port
■Connecting to the Console Port with Microsoft Windows
■Connecting to the Console Port with Mac OS X
■Connecting to the Console Port with Linux
Before You Begin
Before you start a terminal session with the router, you must connect a PC or PC terminal to the router console port by following the instructions in Connecting the Console Port.
About the Console Port
Caution: The console port does not support cable glands. When a cable is connected to this port, the router interior is exposed to environmental elements, which can damage the port and the router interior. This port should be exposed only during terminal sessions, when a cable is connected to the port. This port should never be left unattended when in use.
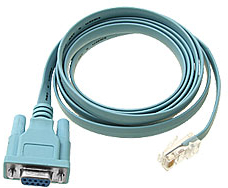
The console port is an asynchronous serial port that allows you to connect to the device for initial configuration through a standard RS-232 port with an RJ-45 connector. Any device connected to this port must be capable of asynchronous transmission.
Console Port Settings
Configure the following parameters for the console port:
Parameter
Console Port Setting
Description
Specifies the transmission speed for the connection.
Specifies the number of bits in an 8-bit byte that is used for data.
Specifies the odd or even parity for error detection.
Specifies the stop bits for an asynchronous line.
Using the Ctrl-C Command
The router console port is located on the router exterior and is accessible by removing the seal over the console port (see Console Port).
On many Cisco routers, you can enter Ctrl-C to interrupt the router startup process and then delete or change the admin password, or view or delete the router configuration.
To prevent unauthorized access to the router configurations and passwords, the Ctrl-C command is disabled on the Cisco CGR 1240 Router while it is booting up and loading the system software.
Connecting to the Console Port with Microsoft Windows
To connect to the router console port using Microsoft Windows:
1.Start a terminal emulator application, such as Windows HyperTerminal (included with some versions of Windows OS) or PuTTY .
2.Configure the terminal emulation software with the parameters described in About the Console Port.
3.Connect to the router.
Connecting to the Console Port with Mac OS X
To connect a Mac OS X system USB port to the console using the built-in OS X Terminal utility:
1.Use the Finder to go to Applications > Utilities > Terminal.
2.Connect the OS X USB port to the router.
3.Enter the following commands to find the OS X USB port number:
macbook:user$ cd /dev macbook:user$ ls -ltr /dev/*usb* crw-rw-rw- 1 root wheel 9, 66 Apr 1 16:46 tty.usbmodem1a21 DT-macbook:dev user$
4.Connect to the USB port with the following command followed by the router USB port speed:
macbook:user$ screen /dev/tty.usbmodem1a21 9600
To Disconnect the OS X USB Console from the Terminal Window
Enter Ctrl+A followed by Ctrl+\
Connecting to the Console Port with Linux
To connect a Linux system USB port to the console using the built-in Linux Terminal utility:
1.Open the Linux Terminal window.
2.Connect the Linux USB port to the router.
3.Enter the following commands to find the Linux USB port number:
root@usb-suse# cd /dev root@usb-suse /dev# ls -ltr *ACM* crw-r—r— 1 root root 188, 0 Jan 14 18:02 ttyACM0 root@usb-suse /dev#
4.Connect to the USB port with the following command followed by the router USB port speed:
root@usb-suse /dev# screen /dev/ttyACM0 9600
To Disconnect the Linux USB Console from the Terminal Window
Enter Ctrl+A followed by :, and then type quit.
Источник
Jaime Frutos Morales’s blog
30/12/2010
How to connect to Cisco devices via serial port using GNU/Linux
Description: to connect your computer to a Cisco device via its console port, you usually need a RJ45 rolled cable. You can use a RJ-45 to DB-9 Female if your computer has a serial port.
To communicate through the serial port with the Cisco device, you need Minicom, a terminal emulator software.
Installation:
Debian/Ubuntu based distros: sudo apt-get install minicom
Red Hat/Fedora based distros: sudo yum install minicom
Steps:
Check whether your serial port is detected by the kernel: dmesg | grep ttyS
[ 0.485378] serial8250: ttyS0 at I/O 0x3f8 (irq = 4) is a 16550A [ 0.485739] 00:07: ttyS0 at I/O 0x3f8 (irq = 4) is a 16550A
Run Minicom: sudo minicom
Press Ctrl+A Z to enter Minicom’s menu.
Press O to enter configuration submenu.
Enter the serial port setup.
Set the serial device (/dev/ttyS0 in this example).
Press E to set the “Bps/Par/Bits”.
Press C (9600 bps) and Q (8-N-1).
Set software flow control to NO.
Save the configuration as “cisco” (for example)
Press Q to quit Minicom
Run Minicom with the new configuration: sudo minicom cisco
Tip: if you need to send a “Break” through Minicom (on a password recovery operation, for example), use Ctrl+A F .
Источник
Ubuntu Documentation
People who work with Cisco network equipment need to be able to connect to the console port on their devices. In Windows, you can simply fire up HyperTerminal to get basic access to your devices. If you are using Linux, then you need to know how this can be done with an application called Minicom.
First, you are going to need a Cisco console cable, a Cisco device, and a computer. If your computer has a serial port, then you can use the standard console cable that comes with every Cisco device.
If you do not have a serial port (like most new laptops), then you need to purchase a USB to Serial adapter that supports Linux. Many of them do not require a driver in Linux. Make sure the item is plugged in at boot time & the system should find it. This device will allow you to use the standard Cisco cable which has a DB9 serial connector on one end & an RJ45 connector on the other.
Install Minicom
You can easily install Minicom by using «System > Administration > Synaptic Package Manager». Search for «minicom» and choose to install the package. Click «Apply» and Minicom should be installed within a few seconds.
Find the name of your serial port
Next, you need to find out is which device your serial (including the USB adapter) ports are mapped to. The easiest way to do this is to connect the console cable to a running Cisco device. Now open up a Terminal using «Applications > Accessories > Terminal» and type this command:
The output will look something like one of these:
Look in this output for words that contain «tty». In this case, it is «ttyS0». That means the name of the device that corresponds to your serial port is «ttyS0». The name of your device that corresponds to your USB port has a definition of name=»/dev/ttyUSB0″ (make sure it’s plugged in). Now we are ready to configure Minicom to use this information.
Configure Minicom
Open a terminal using «Applications > Accessories > Terminal». Now type this command to enter the configuration menu of Minicom:
Use the keyboard arrow keys to select the menu item labeled «Serial Port Setup» and then hit «Enter». This will open a window that looks similar to the one below:
Change your settings to match the ones in the picture above. Here is what I had to change:
Change the line speed (press E) & change to «9600»
Change the hardware flow control (press F) & change to «No»
Change the serial device (press A) & change to «/dev/ttyS0»
Or to use your USB port, change the serial device to «/dev/ttyUSB0»
Be sure to use the device name that you learned with the grep output.
Once your screen looks like mine, you can hit «Escape» to go back to the main menu. Next, you need to select «Save setup as dfl» and hit «Enter» to save these settings to the default profile. Then select «Exit Minicom» to exit Minicom.
To find out if you have configured Minicom correctly, type this command in the terminal:
After entering your Ubuntu user password, you should be connected to your Cisco device.
Once inside, press Ctrl+A, to access minicom commands. Press ‘Ctrl+A’, then ‘Z’ to access help. Ctrl-A, then another letter, like ‘X’ & you will eXit. Help will show a list of available commands.
Note: You may want to delete the Minicom init string if you see a bunch of gibberish every time you connect to a device. To do this, enter Minicom configuration with:
Then select «Modem and dialing». Press «A» to edit the Init string, and delete all characters so that it becomes empty. Make sure you save this to the default profile with «Save setup as dfl». You should no longer see gibberish when you connect to devices.
Create a desktop launcher
If you want to have quicker access to Minicom, you can create a desktop launcher.
Right-click on the desktop and choose «Create launcher»
Click on «Icon» and choose the picture you want to use
Use the «Type» pull-down menu and select «Application in terminal»
Create a name like «Cisco Console» in the field labeled «Name»
Enter this command into the field labeled «Command»
sudo minicom
Hit «OK» and your desktop launcher is ready for you to use.
The material on this wiki is available under a free license, see Copyright / License for details You can contribute to this wiki, see Wiki Guide for details
Источник
Zone PC
Подключение к Cisco из Linux и FreeBSD
Настройка различных коммутаторов, маршрутизаторов и другого оборудования обычно производится через последовательный COM порт (RS232). Вначале нужно найти и соединить подходящим консольным кабелем компьютер и коммутатор (через COM-порт или USB переходник) компьютер. В этой статье посмотрим как производить настройку в ОС Linux.
Настройка через minicom
В первую очередь нужно найти в документации к оборудованию настройки консольного com порта. Для подключения под linux необходимо поставить программу minicom. Поставим из пакета под Debian (ubuntu):
Чтобы minicom увидел Сisco его необходимо правильно настроить запускаем с ключом:
Заходим в настройку последовательного порта (Serial port setup) и меняем значения Скорость/Четность/Биты (Bps/Par/Bits) на 9600 8N1.
Меняем последовательный порт (Serial Device) на порт, к которому подключено оборудование и настраиваем параметры управления потоком(Flow Control). В данном примере это /dev/ttyS0 — адрес порта COM1. При подключении через разъем mini-usb порт может быть таким /dev/ttyACM0.
Справку по командам можно получить нажав Ctrl+A затем Z.
В итоге получаем стандартные настройки для Cisco и HP procurve:
Сохраняем конфигурацию, как настройки по-умолчанию в главном меню minicom (Save setup as dfl), либо как конфигурацию с конкретным названием ( Save setup as..).
Для выхода из minicom необходимо нажать Ctrl+A затем Q.
Далее запускаем minicom с настройками по-умолчанию.
Либо с сохранными настройками.
А это пример настроек для свитчей 3com(hp) 4210 и 4500
Устройство /dev/ttyUSB0 обычно используется при подключении через переходник usb->com. Скорость 19200 иногда 115200 используется на свитчах 3COM (теперь уже HP) причем любую другую скорость они не понимают. Так что перед подключением нужно внимательно читать в документации какие скорости и контроль потока нужно выставлять. Однако иногда параметры подключения пишут прямо на устройстве рядом с консольным портом.
Настройки через утилиту cu
Можно подключиться к консоли командой
Если не задать права chown на файл устройства то можно получить сообщение:
Главное достоинство утилитки cu что она одинаково хорошо работает под linux и под freebsd только названия устройств отличаются.
На freebsd получится так:
Единственное нужно правильно выбрать файл устройства куда подключено устройство.