То, что здесь написано — НЕ IPSec VPN. И никогда им не станет. Для IPSec VPN никаких дополнительных интерфейсов, кроме уже присутствующих в системе, создавать не надо — а тут конфигурируется Dialer1.
Курим документацию до тех пор, пока не станут ясны различия между:
1. IPSec AH Transport Mode; 2. IPSec ESP Transport Mode; 3. IPSec AH Tunnel Mode; 4. IPSec ESP Tunnel Mode; 5. GRE Tunnel protected by IPSec AH Transport Mode; 6. GRE Tunnel protected by IPSec ESP Transport Mode; 7. GRE Tunnel protected by IPSec AH Tunnel Mode; 8. GRE Tunnel protected by IPSec ESP Tunnel Mode; 9. PPP over TCP protected by IPSec AH Transport Mode; 10. PPP over TCP protected by IPSec ESP Transport Mode; 11. PPP over TCP protected by IPSec AH Tunnel Mode; 12. PPP over TCP protected by IPSec ESP Tunnel Mode; 13. L2TP over UDP protected by IPSec AH Tunnel Mode (AH VPDN); 14. L2TP over UDP protected by IPSec ESP Tunnel Mode (ESP VPDN);
Все это можно сделать на связке «Линукс Циска». Из них VPN’ами будут варианты №№ 3-14, а IPSec VPN’ами будут варианты №№ 3 и 4.
4.4 , ilia kuliev ( ok ), 09:51, 03/06/2008 [^] [^^] [^^^] [ответить]
+ / –
>Все это можно сделать на связке «Линукс Циска». Из них VPN’ами будут варианты №№ 3-14, а IPSec VPN’ами будут варианты №№ 3 и 4.
До этого места все было верно, а вот начиная с процитированного — это из вашего личного определния VPN ? Или из общепринятого? Если из общепринятого, приведите пожалуйста ссылку на собственно определение. Спасибо.
> До этого места все было верно, а вот начиная с процитированного — это из вашего личного > определния VPN ? Или из общепринятого?
Я, честно говоря, не вполне понимаю, что такое «общепринятое определение VPN». Если http://en.wikipedia.org/wiki/VPN — это определение можно считать общепринятым, то, согласно тому, что: «. The link-layer protocols of the virtual network are said to be tunneled through the larger network when this is the case,» — случаи 1 и 2 под определение VPN не попадают, так как это transport mode. Остальное все (т.е, случаи 3-14) — туннели.
А вот что касается того, что считать IPSec VPN’ом, а что не считать — так это уже according to Cisco. Она называет, правда, IPSec Native такие туннели. А остальные — IPSec/GRE или IPSec/PPP.
>[оверквотинг удален] >9. PPP over TCP protected by IPSec AH Transport Mode; >10. PPP over TCP protected by IPSec ESP Transport Mode; >11. PPP over TCP protected by IPSec AH Tunnel Mode; >12. PPP over TCP protected by IPSec ESP Tunnel Mode; >13. L2TP over UDP protected by IPSec AH Tunnel Mode (AH VPDN); > >14. L2TP over UDP protected by IPSec ESP Tunnel Mode (ESP VPDN); > > >Все это можно сделать на связке «Линукс Циска». Из них VPN’ами будут варианты №№ 3-14, а IPSec VPN’ами будут варианты №№ 3 и 4.
для особо деревянных на схеме указано что подключение к сети по pppoe его без dialer не сделать. а крипто мап можно применить хоть к loopback’у/
Источник
Installing and Using AnyConnect on Ubuntu Desktop
Available Languages
Download Options
Objective
The objective of this article is to guide you through installing, using, and the option of uninstalling AnyConnect VPN Client v4.9.x on Ubuntu Desktop.
This article is only applicable to the RV34x series routers, not Enterprise products.
Introduction
AnyConnect Secure Mobility Client is a modular endpoint software product. It not only provides Virtual Private Network (VPN) access through Secure Sockets Layer (SSL) and Internet Protocol Security (IPsec) Internet Key Exchange version2 (IKEv2) but also offers enhanced security through various built-in modules.
Follow the steps in this article to install the Cisco AnyConnect VPN Mobility Client on a Ubuntu Desktop. In this article, Ubuntu version 20.04 is used.
This toggled section provides details and tips for beginners.
Prerequisites
You need to purchase client license(s) from a partner like CDW or through your company’s device procurement. There are options for 1 user (L-AC-PLS-3Y-S5) or packets of licenses including one year for 25 users (AC-PLS-P-25-S). Other license options available as well, including perpetual licenses. For more details on licensing, check out the links in the Licensing Information section below.
Download the latest version of firmware available for your router.
Ubuntu 20.04 (LTS), 18.04 (LTS), and 16.04 (LTS) .
Check these other articles out!
Applicable Devices | Software Version
RV340 | 1.0.03.21 (Download latest)
RV340W | 1.0.03.21 (Download latest)
RV345 | 1.0.03.21 (Download latest)
RV345P | 1.0.03.21 (Download latest)
Licensing Information
AnyConnect client licenses allow the use of the AnyConnect desktop clients as well as any of the AnyConnect mobile clients that are available. You will need a client license to download and use the Cisco AnyConnect Secure Mobility Client. A client license enables the VPN functionality and are sold in packs of 25 from partners like CDW or through your company’s device procurement.
Want to know more about AnyConnect licensing? Here are some resources:
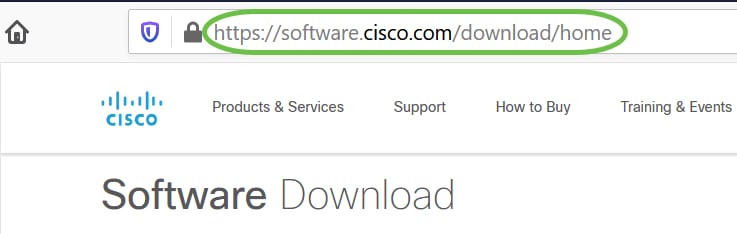
Step 1
Open a web browser and navigate to the Cisco Software Downloads webpage.
Step 2
In the search bar, start typing ‘Anyconnect’ and the options will appear. Select AnyConnect Secure Mobility Client v4.x.
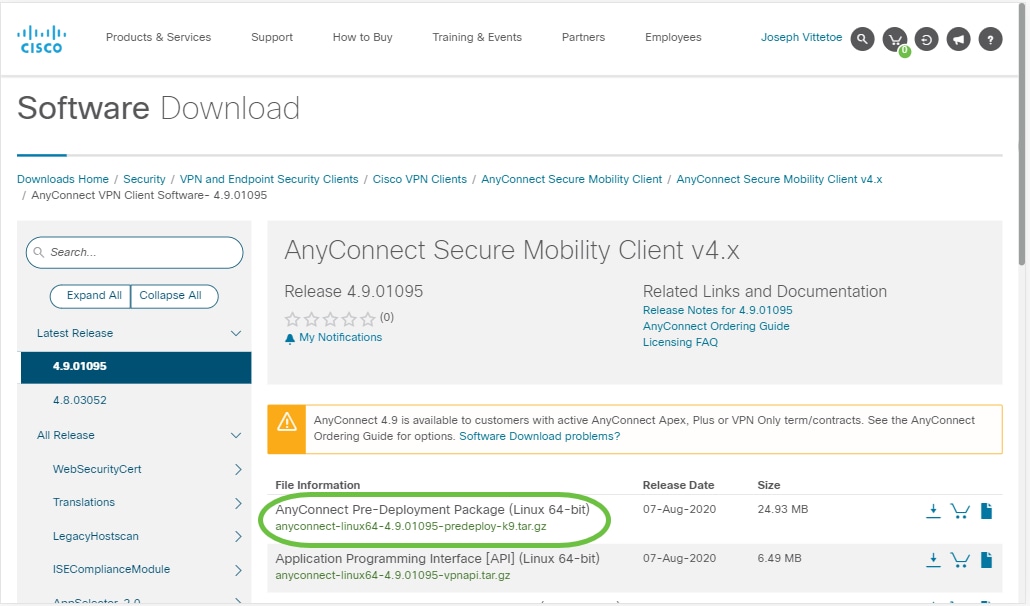
Step 3
Download the Cisco AnyConnect VPN Client. Most users will select the AnyConnect Pre-Deployment Package (Linux 64-bit) option.
The images in this article are for AnyConnect v4.9.x, which was latest version at the time of writing this document.
If you purchased a license and you are unable to download AnyConnect, call +1 919-993-2724. Select option 2. You will need to know your Cisco ID (the one you use to log into Cisco.com) and the sales order number when you call. They will get that situation all straightened out.
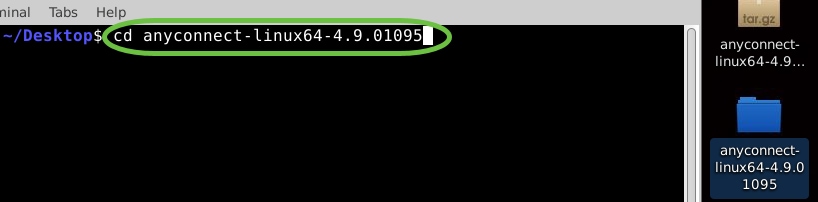
Step 4
Open the Terminal by pressing Ctrl+Alt+T on your keyboard. To navigate to the folder where you have downloaded the AnyConnect Client Package, use the command, ‘cddirectory name’. For more information on the ‘cd’ command, click here.
cd [Directory Name]
In this example, the file is placed on the Desktop.
The directory may be different based on the location of the AnyConnect file download. For long filenames or paths, start typing some characters and press the tab key on your keyboard. The filename will auto-populate. If it doesn’t even after you press tab twice, it indicates that you need to type more number of unique characters. Alternately, you can use the ‘ls’ command to list the files in your current directory.
Step 5
The initial download is a tarball archive (several files packed into one), which must be extracted. The command ‘tar xvffilename’ will extract the contents to the same directory in which the initial file is located.
tar xvf [Filename]
For more information on the ‘tar’ command, click here.
Step 6
Once the folder is extracted, use the ‘cddirectory name’ command again to navigate into the folder.
cd [Directory Name]
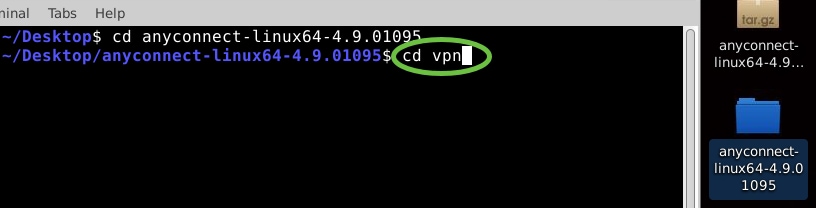
Step 7
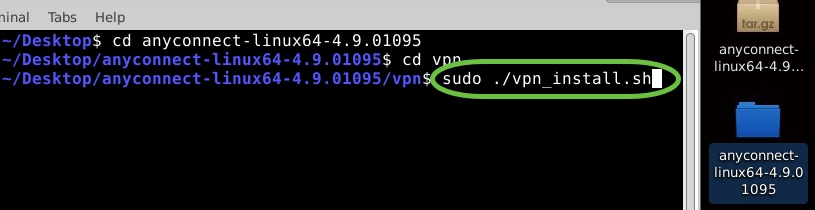
After navigating into the main folder, ‘cd’ into the vpn sub-folder.
Step 8
To run the AnyConnect install script, type ‘sudo ./vpn_install.sh’. This will begin the installation process using superuser permissions.
For more details on the ‘sudo’ command, click here.
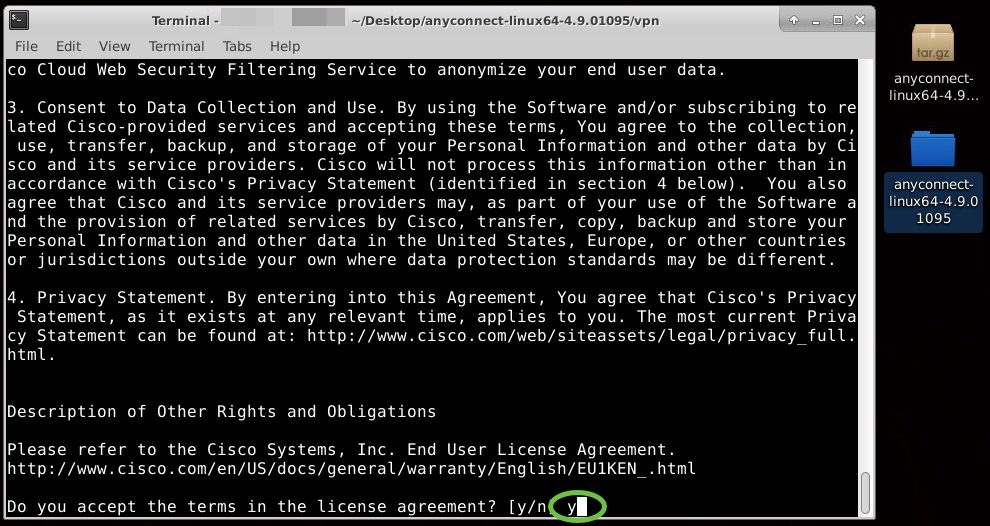
Step 9
Accept the terms in the license agreement to complete the installation by typing ‘y’.
The AnyConnect installation should complete, and the Terminal window can be closed.
Using AnyConnect Secure Mobility Client v4.9.x
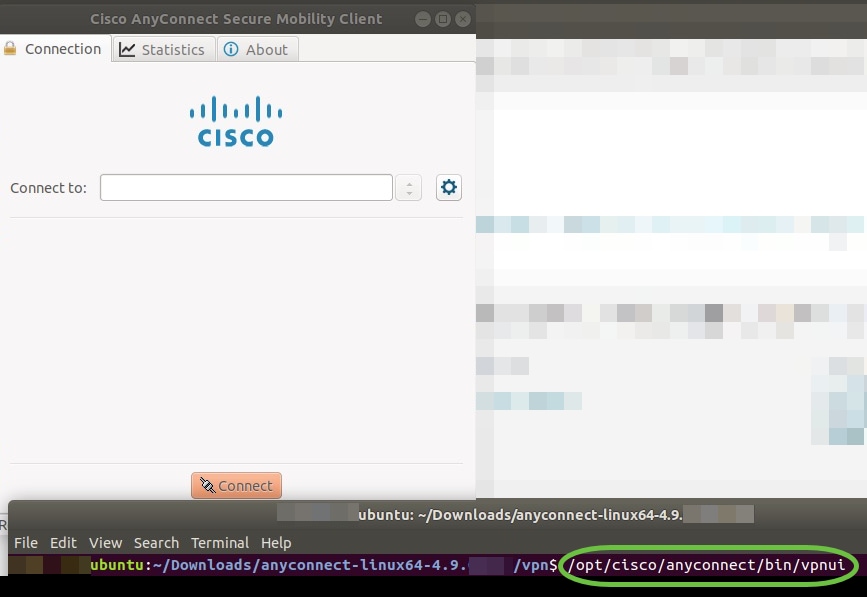
Step 1
To access the Anyconnect app, open the Terminal by pressing Ctrl+Alt+T on your keyboard. Use the command, ‘/opt/cisco/anyconnect/bin/vpnui’.
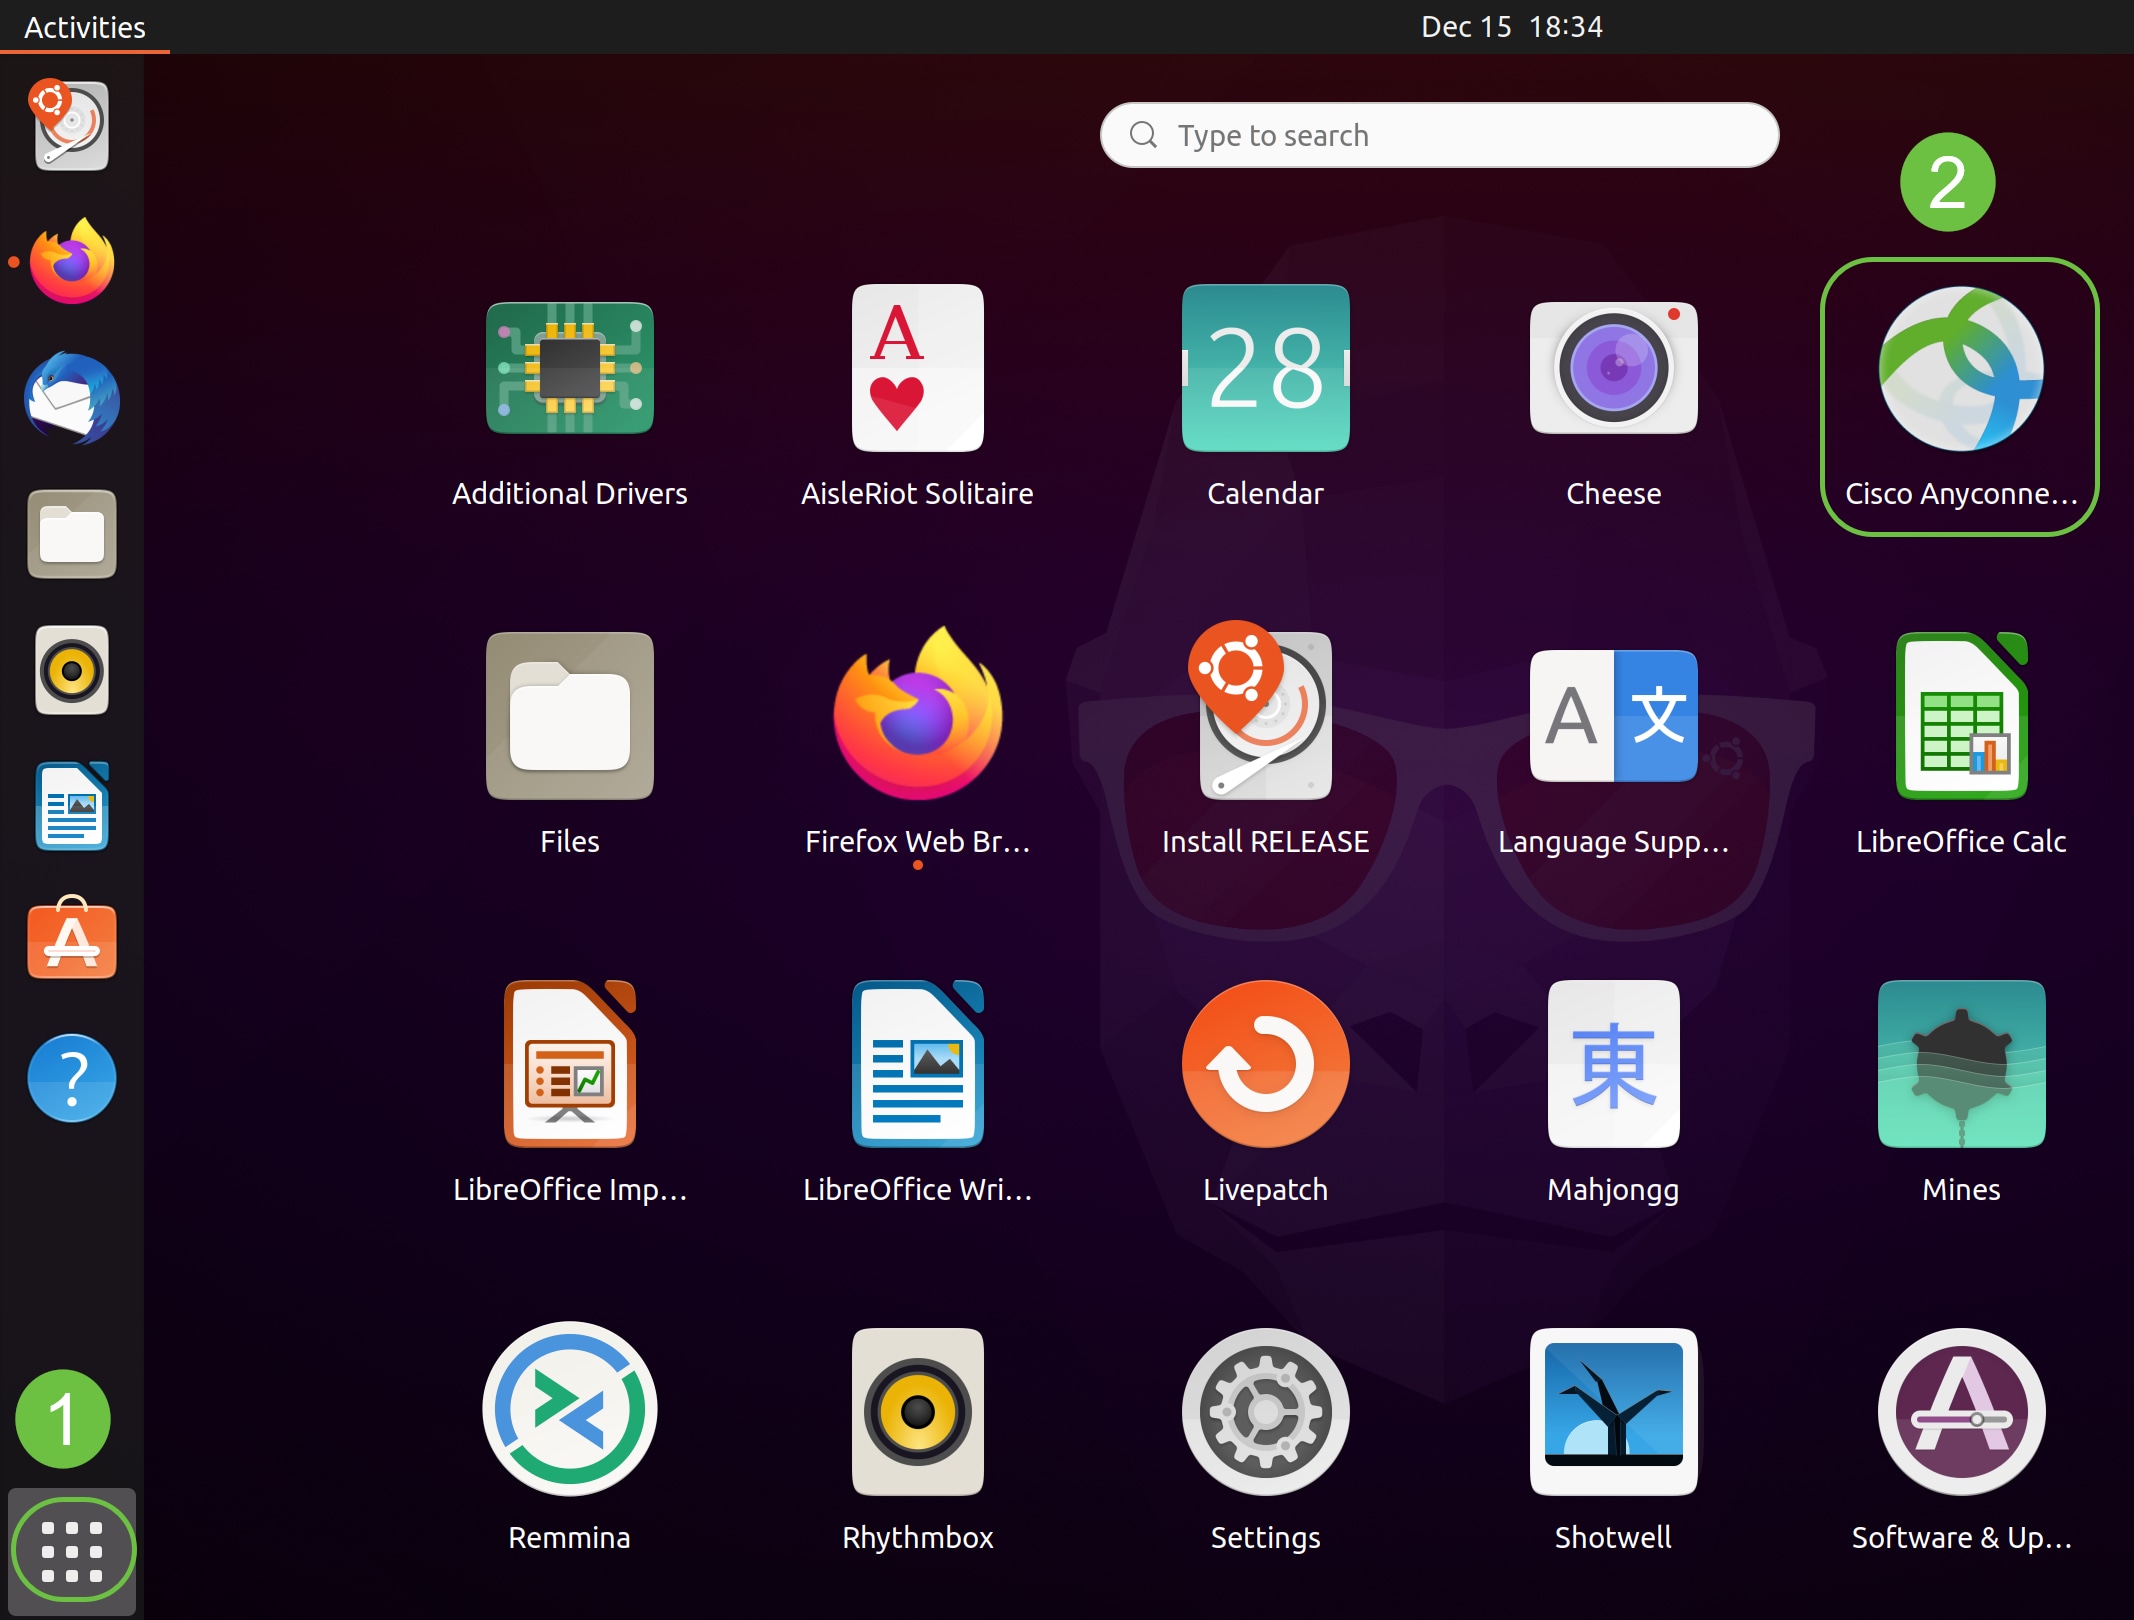
If you encounter any errors through the Terminal, you can access the app from the applications menu as shown below.
To access the applications menu using the User Interface (UI), click on the start icon (appears as nine dots on the lower left corner). Choose the Anyconnect app.
Alternatively, press Super+A (Super key is the windows icon key) on your keyboard to bring up the search bar. Start typing ‘Anyconnect’ and the app will appear.
Step 2
Click on the Anyconnect app.
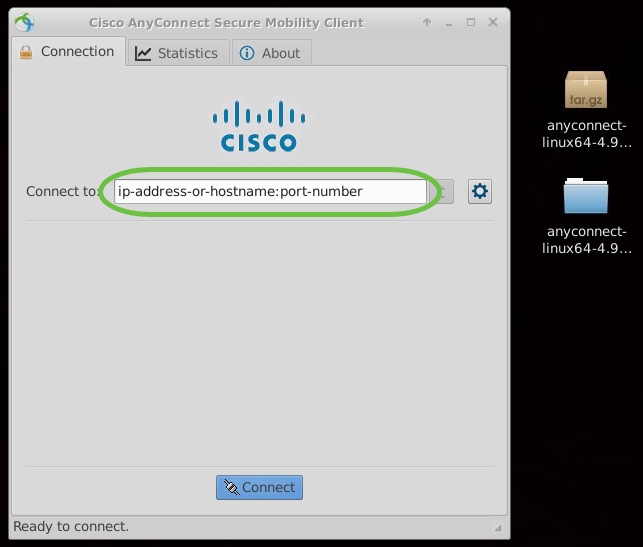
Step 3
Enter the IP Address or Hostname of your desired server followed by the port number.
For RV340 family, the default port number is 8443.
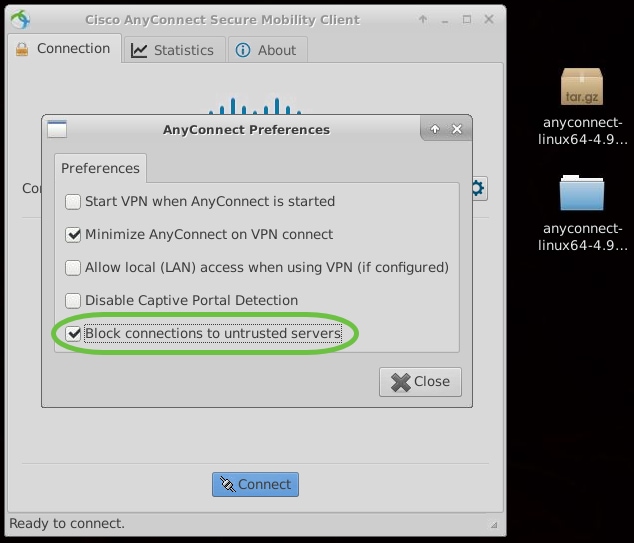
Step 4
Some connections may not be secure using a trusted SSL certificate. By default, AnyConnect Client will block connection attempts to these servers.
Uncheck Block connections to untrusted servers to connect to these servers.
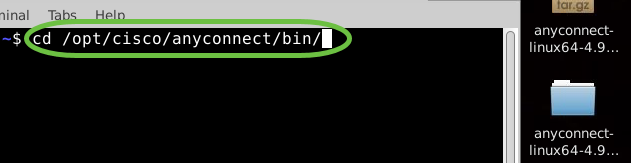
Using Terminal, navigate to the folder that contains the uninstall shell script using the ‘cd’ command.
In a default installation, these files will be located in /opt/cisco/anyconnect/bin/.
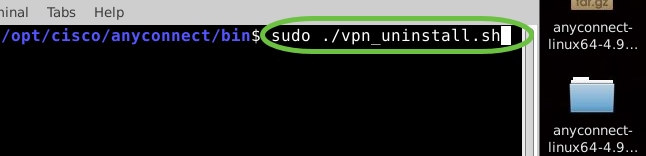
Step 2
To run the Anyconnect uninstall script, enter ‘sudo ./vpn_uninstall.sh’
This will begin the uninstall process using superuser permissions. For more information on the ‘sudo’ command, click here.
Step 3
At the prompt, enter the sudo password and the client software will complete uninstallation.
Conclusion
There you have it! You have now successfully learned the steps to install, use, and uninstall the Cisco AnyConnect Secure Mobility Client v4.9.x on Ubuntu Desktop.
For community discussions on Site-to-Site VPN, go to the Cisco Small Business Support Community page and do a search for Site-to-Site VPN.
We want the best for our customers, so if you have any comments or suggestions regarding this topic, please send us an email to the Cisco Content Team.
AnyConnect App
The Anyconnect App can be downloaded from the Google Play store or the Apple store.
Источник
heatzync / HOWTO.md
HOWTO connect to a company’s VPN using the Cisco VPN client on linux
This HOWTO explains connecting to a VPN gateway over IPSec in «cert auth mode» utilizing the Cisco VPN client. The «cert auth mode» refers to the terms used in the vpnc man page, i.e. server + client certificates. The «cert auth mode» has not been implemented for vpnc, otherwise we would just use vpnc and avoid the headache that follows. openconnect is another alternative, but it does not support IPSec, only HTTPS/SSL. This HOWTO is written with the aim to provide a single document to describe all the steps required, instead of having to search many different things on the Internet.
This HOWTO was written from the perspective of an openSUSE 12.1 user, running a 3.1.10-1.9-desktop x86_64 kernel. The author does not claim to be an expert on any terms used, so if you find a mistake then please submit a patch.
Get the certificate provided by CompanyA
The company we are trying to connect to should provide us with some sort of a certificate, e.g. certificate.pfx. This type of certificate is a PKCS12 certificate which bundles the CA certificate for server authentication, the client/user certificate as well as the primary key. Save it somewhere on disk, e.g.:
Install and prepare kernel-source for our linux distro
In order to «compile» (Cisco calls it «install») the Cisco IPSec kernel module (see later section) we need the kernel sources for our distro. In openSUSE 12.1 do the following:
Make sure the version that will be installed is the same as the version we are currently running:
When the kernel-source has been installed, execute the following as root:
Download, patch and install Cisco VPN client
Now that the kernel-source has been installed we can download, patch and install the Cisco VPN client with the following steps (as root):
Remember to specify the kernel-source directory as /usr/src/linux- .
The module will be installed to /lib/modules/ /CiscoVPN/cisco_ipsec.ko.
Start the Cisco VPN daemon
The Cisco VPN client installation suggests starting the vpncclient_init service, so do it:
If we get errors such as:
then (1) we compiled/linked the module with the wrong kernel-source or (2) we forgot to symlink the Module.symvers file. We will have to repeat some of the steps above.
Import provided certificate for use with Cisco VPN client
The provided PKCS12 certificate should now be imported. The following commands can be used (as root):
Supply the certificate filename, e.g. /tmp/certificate.pfx as well as the password with which the certificate is locked/encrypted. Next, enter a password that we will easily remember.
View the imported certificate:
and provide the number of the corresponding certificate when asked. The certificate information will be displayed. Take note of the «Subject» and «Serial #» fields as they will be required in the next step.
Configure Cisco VPN client
Configure a profile for connecting to CompanyA. Let’s call the profile «CompanyA». As root:
and change the following properties as follows:
The moment of truth has arrived. To connect to the VPN of CompanyA, simply execute:
assuming /usr/local/bin is in our PATH.
When prompted, provide the certificate password we chose in a previous step as well as our unique username and password that should also have been provided by CompanyA. We should now be connected.
 >[оверквотинг удален]