- Configuring an IPSec Tunnel Between a Cisco VPN Client for Linux and a VPN 3000 Concentrator
- Available Languages
- Download Options
- Contents
- Introduction
- Before You Begin
- Conventions
- Prerequisites
- Components Used
- Network Diagram
- Configurations
- Configuring the VPN 3000 Concentrator
- Configuring the Linux Client
- Verify
- Troubleshoot
- Turning on Logging on the VPN Client
- Turning on Logging on the VPN 3000 Concentrator
- Configure AnyConnect Secure Mobility Client for Linux using Client Certificate Authentication on an ASA
- Available Languages
- Download Options
- Contents
- Introduction
- Prerequisites
- Requirements
- Components Used
- Backgound Information
- Configure
- Network Diagram
- Configurations
- Verify
- Troubleshoot
Configuring an IPSec Tunnel Between a Cisco VPN Client for Linux and a VPN 3000 Concentrator
Available Languages
Download Options
Contents
Introduction
This document describes how to form an IPSec tunnel from a Linux-based PC running the Cisco VPN Client to a Cisco VPN 3000 Series Concentrator so that you can access the network inside the concentrator securely.
Before You Begin
Conventions
For more information on document conventions, see the Cisco Technical Tips Conventions.
Prerequisites
This document uses these configurations:
Components Used
The information in this document is based on these software and hardware versions:
Cisco VPN 3000 Concentrator version 3.x
Cisco VPN Client version 3.0.8
Red Hat Linux® version 7.2 with 2.4.7-10 Kernel
Note: Support for RedHat8 is available in VPN Client versions 3.6.2a and above. Registered customers can obtain specific information by researching bug ID CSCdy49082 (registered customers only) .
The information presented in this document was created from devices in a specific lab environment. All of the devices used in this document started with a cleared (default) configuration. If you are working in a live network, ensure that you understand the potential impact of any command before using it.
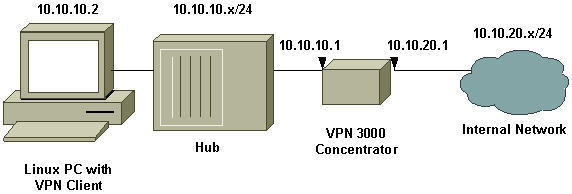
Network Diagram
This document uses the network setup shown in the diagram below.
Configurations
In this section, you are presented with the information to configure the features described in this document.
Configuring the VPN 3000 Concentrator
Use the following steps to configure the VPN 3000 Concentrator.
Connect to the VPN Concentrator console port and verify that there are IP addresses assigned to the private (inside) and public (outside) interfaces. Also verify that there is a default gateway assigned so that the concentrator can forward the packets for the destinations that it does not know about to the default gateway.
Note: The default is normally the Internet Gateway Router.
This table shows current IP addresses.
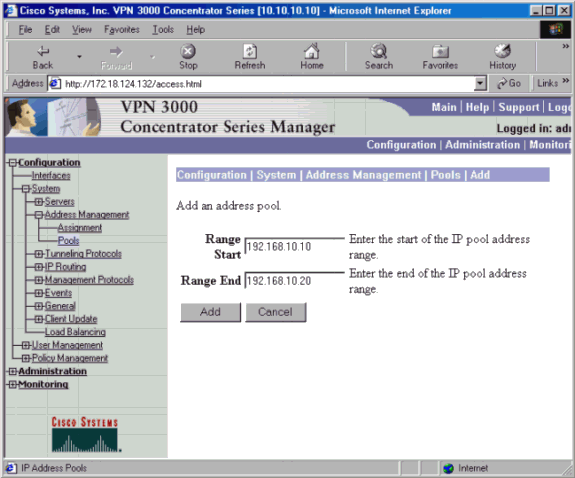
To assign an available range of IP addresses, point a browser to the inside interface of the VPN 3000 Concentrator and go to Configuration > System > Address Management > Pools > Add. Specify a range of IP addresses that do not conflict with any other devices on the inside network.
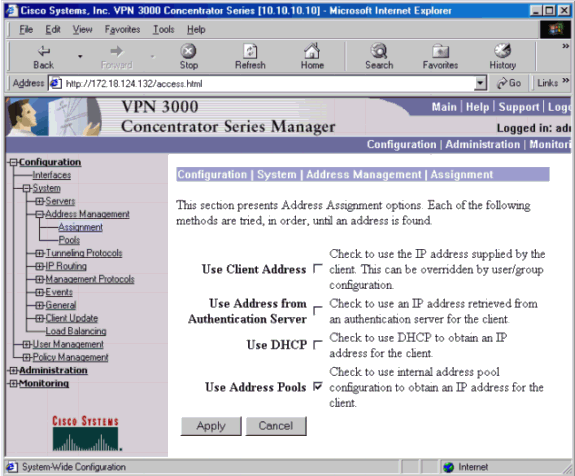
To tell the VPN Concentrator to use the pool, go to Configuration > System > Address Management > Assignment, and check the Use Address Pools box.
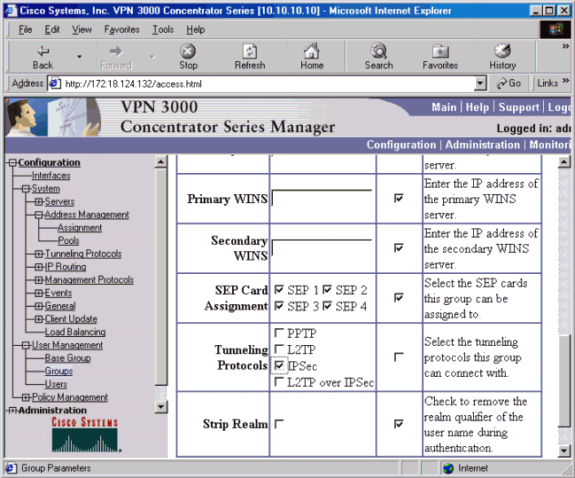
Configure an IPSec group for the users by going to Configuration > User Management > Groups > Add and defining a group name and password. The example below uses group name «ipsecgroup» with the password/verify as «cisco123.»

On the Groups General tab, select IPSec.
On the Groups IPSec tab, set the authentication to Internal.

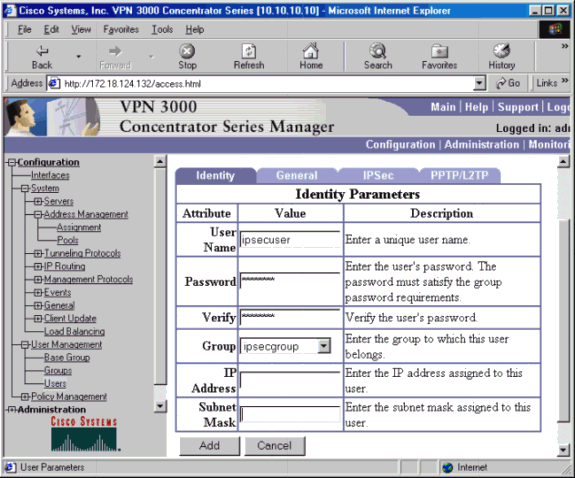
Go to Configuration > User Management > Users > Add, and add a user to the previously defined group. In the example below, the user is «ipsecuser» with the password «xyz12345» in the group «ipsecgroup.»
Configuring the Linux Client
Follow these steps:
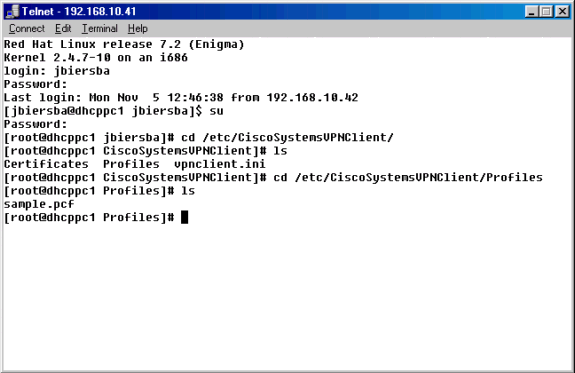
Navigate to the /etc/CiscoSystemsVPNClient/Profiles directory where VPN connection profiles are stored.
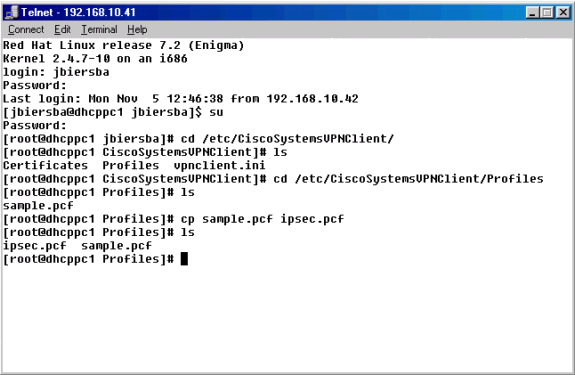
Open a new profile file by either copying the sample profile to a new name or by creating one from scratch. In the example below, the sample .pcf file was copied, renamed, and edited.
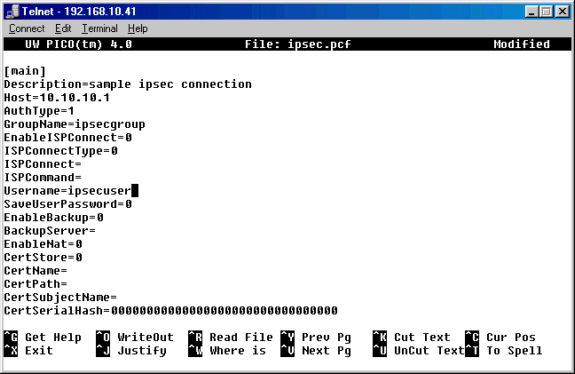
Edit the newly named .pcf file to include the following information.
A new description that will identify the connection
A new host IP address that will be the IP address of the public interface of the VPN 3000 Concentrator
A new group name that will need to match the group configured in the VPN 3000 group setup
A new user name which is the same user name that is configured on the VPN 3000 Concentrator that coincides with the VPN Group on the concentrator
Save the file and exit.
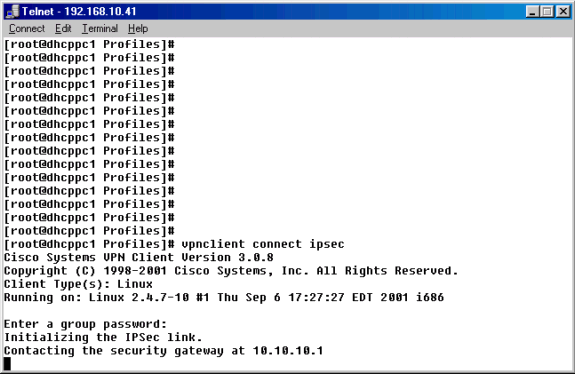
From the command prompt, use the vpnclient connect ipsec command to connect to the VPN Concentrator using the IPSec .pcf file. You will be prompted to enter the group password. This is the same password that was configured on the VPN 3000 Concentrator (password «xyz12345», in this example).
If the connection is not successful, please see the Troubleshooting section below.
Verify
There is currently no verification procedure available for this configuration.
Troubleshoot
This section provides information you can use to troubleshoot your configuration.
Turning on Logging on the VPN Client
Below is troubleshooting information relevant to this configuration. Follow the instructions below to troubleshoot your configuration.
Create a global profile, if one does not already exist in the /etc/CiscoSystemsVPNClient/ directory. The global profile should look like the example below.

Note: Verify that each one of the log levels is set to «3»; this will ensure that the highest level of logging can be achieved.
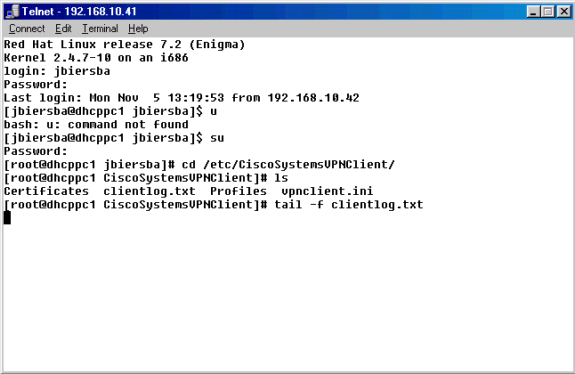
From the command prompt, use the /usr/local/bin/ipseclog command to start the IPSec log utility and to move the information in that log to a directory and file of your choice. In this example the file is named clientlog.txt, and it is in the /etc/CiscoSystemsVPNClient directory:

In a separate window, use the tail -f (for filename) command to get a constantly updated snapshot of the clientlog.txt file while you are connecting to gather debug information.
Turning on Logging on the VPN 3000 Concentrator
Follow the instructions below to troubleshoot your configuration.
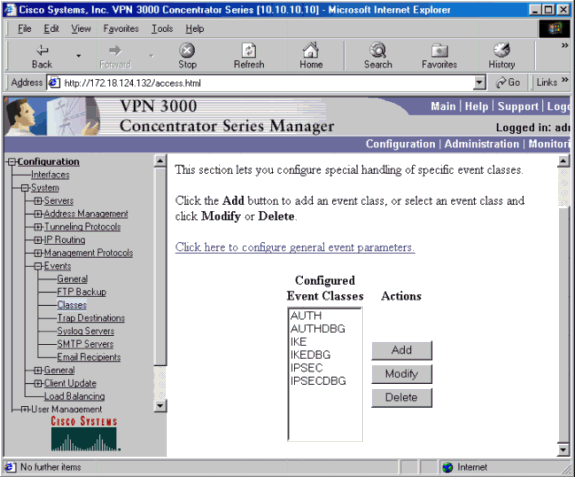
Go to Configuration > System > Events > Classes to turn on the following debug if there are event connection failures.
AUTH — Severity to log 1-13
AUTHDBG — Severity to log 1-13
IKE — Severity to log 1-13
IKEDBG — Severity to log 1-13
IPSEC — Severity to log 1-13
IPSECDBG — Severity to log 1-13
Note: If necessary, AUTHDECODE, IKEDECODE, and IPSECDECODE can be added later.
You can view the log by going to Monitoring > Filterable Event Log.
Источник
Configure AnyConnect Secure Mobility Client for Linux using Client Certificate Authentication on an ASA
Available Languages
Download Options
Contents
Introduction
This document describes a configuration example for Adaptive Security Appliance (ASA) Cisco AnyConnect Secure Mobility Client access that uses client certificate for authentication for a Linux Operative System (OS) for an AnyConnect user to connect successfully to an ASA Headend.
Contributed by Dinesh Moudgil, Cisco HTTS Engineer.
Prerequisites
Requirements
This document assumes that the ASA is fully operational and configured to allow the Cisco Adaptive Security Device Manager (ASDM) or Command Line Interface (CLI) to make configuration changes.
Cisco recommends that you have knowledge of these topics:
Basic knowledge of ASA’s CLI and ASDM
SSLVPN configuration on the Cisco ASA Head End
Fundamental knowledge of PKI
Familiarity with Linux OS
Components Used
The information in this document is based on these software and hardware versions:
Cisco Adaptive Security Appliance ASA5585-SSP-20
Cisco Adaptive Security Appliance Software Version 9.9(2)36
Adaptive Security Device Manager Version 7.9(1)
AnyConnect Version 4.6.03049
Ubuntu OS 16.04.1 LTS
Note: Download the AnyConnect VPN Client package (anyconnect-linux*.pkg) from the Cisco Software Download (registered customers only) site. Copy the AnyConnect VPN client to the ASA’s flash memory, which is then downloaded to the remote user computers in order to establish the SSL VPN connection with the ASA.
The information in this document was created from the devices in a specific lab environment. All of the devices used in this document started with a cleared (default) configuration. If your network is live, make sure that you understand the potential impact of any command.
Backgound Information
For a successful client certificate authentication on Linux devices, AnyConnect secure mobility client supports the following certificate stores:
1. Linux OS (PEM) certificate store
2. Firefox (NSS) certificate store
This document is based on client certificate authentication using a Linux OS (PEM) certificate store.
1. To use Linux OS certificate store, PEM file-based certificates are placed in these directories.
| Entity | Path | Example |
| Certificate authority (CA) certificate | /opt/.cisco/certificates/ca | tactest: $ ls /opt/.cisco/certificates/ca |
| User certificate | /home/tactest/.cisco/certificates/client | tactest: $ ls /home/tactest/.cisco/certificates/client |
| User private key [Initially used to create CSR] : | /home/tactest/.cisco/certificates/client/private | tactest: $ ls /home/tactest/.cisco/certificates/client/private |
Note: By default, the path for installing client certificate and the private key is not present so it needs to be manually created using this command.
mkdir -p .cisco/certificates/client/private/
If you are using a Windows Certificate Authority,
1. Download the CA Certificate (Base64 encoded) with extension .cer
2. Download the User Identity Certificate (Base64 encoded) with extension .cer
3. Change the extension of certificates from .cer to .pem extension
2. To use Firefox (NSS) certificate store, user can import their certificate via Firefox.
The CA certificate for the ASA can be imported into NSS certificate store by AnyConnect client automatically if the user clicks “Always Connect” button on the certificate security warning dialog when browsing to ASA via HTTPS.
AnyConnect Linux uses Firefox certificate store (NSS) as default, if it fails then it would turn to use Linux OS certificate store.
Note: Currently, AnyConnect on a Linux OS doesn’t support GNOME Keyring so AnyConnect won’t able to use the certificate imported to the GNOME Keyring.
Please make sure there are no related certificates in Linux OS certificate store and Firefox (NSS) certificate store before importing a new user certificate.
Ensure that your files meet the following requirements:
- All certificate files must end with the extension .pem.
- All private key files must end with the extension .key.
- A client certificate and its corresponding private key must have the same filename. For example: client.pem and client.key.
For a clean start, please consider the following approach:
- Linux OS (PEM) certificate store:
A. Remove unnecessary PEM files under “/opt/.cisco/certificates”, but keep the “/opt/.cisco/certificates/ca/VeriSignClass3PublicPrimaryCertificationAuthority-G5.pem” certificate intact. This is the CA certificate AnyConnect relies on to perform the code signing verification.
B. Remove the user certificates that are not required from the path
Use firefox settings to inspect and delete related certificates imported by user or AnyConnect itself.
Configure
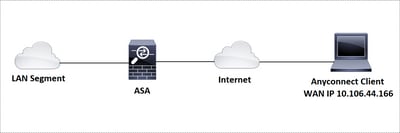
Network Diagram
Configurations
Linux Client Setup
Step 1. Download the Anyconnect package, extract the contents and install the Anyconnect application on the Linux client.
Step 2. Create a certificate signing request for the identity certificate on Linux client using OpenSSL.
Step 3. The CSR generated above can be used to request CA to issue a user identity certificate.
Step 4. Once the certificate is issued by CA, copy the certificate to the Linux client.
ASA CLI Configuration
This section provides the CLI configuration for the Cisco AnyConnect Secure Mobility Client for reference purposes.
Verify
Use this section in order to confirm that your configuration works properly.
Note: The Output Interpreter Tool (registered customers only) supports certain show commands. Use the Output Interpreter Tool in order to view an analysis of show command output.
- On an Ubuntu OS 16.04.1 LTS, connect Anyconnect via GUI
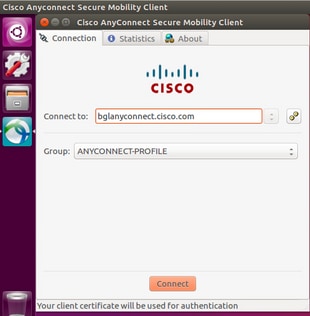
If you wish to connect Anyconnect via command line on a Linux client, navigate to the following path:
Verify the Anyconnect client is able to establish connection:
Note: If Anyconnect GUI client is already opened and you try to connect Anyconnect via CLI, you get this error.
In this case, close the Anyconnect GUI client and then connect via Anyconnect CLI.
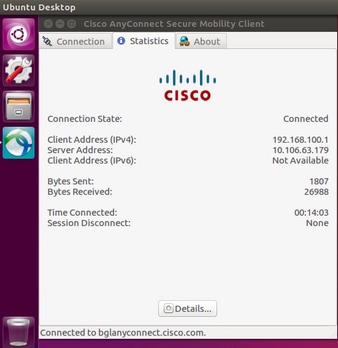
Once successfully connected, Anyconnect client details can be verified by navigating to Statistics tab in the Anyconnect GUI client
This command is used to confirm the CA and Identity certificates present on the Adaptive Security Appliance (ASA).
These show commands can be executed to confirm the status of AnyConnect client and its statistics.
In order to confirm if the Linux client has the certificate in the correct format (Base64 encoding with .pem extension), browse to the given path and use the following command:
If you get the following error it means that you are trying to view a DER-encoded certificate and it is not a PEM encoded certificate
Troubleshoot
This section provides the information you can use in order to troubleshoot your configuration.
Note: Refer to Important Information on Debug Commands before you use debug commands.
Caution: On the ASA, you can set various debug levels; by default, level 1 is used. If you change the debug level, the verbosity of the debugs might increase. Do this with caution, especially in production environments.
To troubleshoot an incoming AnyConnect client connection from Linux OS client, you can use the following:
- For AnyConnect process on an ASA
debug webvpn anyconnect 255
Here is a sample debug taken on an ASA from a working scenario:
- For client certificate authentication on an ASA
debug crypto ca 255
debug crypto ca messages 255
debug crypto ca transactions 255
Here is a sample debug taken for a successful client certificate authentication on an ASA:
- For the AnyConnect process on a Linux client
On a Linux device, Anyconnect logs can be found in the file named «syslog» at path:/var/log/
Here is a sample of working logs taken from a Linux client. The below command can be run to gather live logs for an Anyconnect client connection.
- DART(Diagnostic and Reporting Tool) on Linux Client
Similar to Windows and MAC, Linux client also has DART functionality. This can be used either using GUI and CLI.
Please note that DART needs to be run as an admin user in order to collect complete logs on a Linux client.
Step 1. DART can be executed from the command line by navigating to the following path:
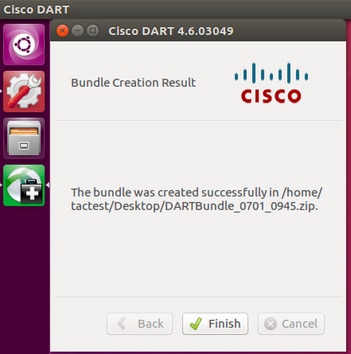
Step 2. To execute DART from GUI, search for «anyconnect» on Linux GUI and click on Cisco DART and follow the instructions. The collected DART bundle is stored on the desktop.
Step 3. To copy dart bundle from the Linux client to your workstation, use the command
scp username@10.106.44.166:/home/ /Desktop/DARTBundle_0701_0945.zip /Users/dmoudgil/Desktop/Ubuntu/
Here is a document for reference to DART on different OS: https://community.cisco.com/t5/security-documents/how-to-collect-the-dart-bundle-for-anyconnect/ta-p/3156025
Источник


