- Citrix
- Contents
- Installation
- Chromium/Google Chrome
- wfica.desktop
- TLS/SSL Certificates
- Audio Support
- Endpoint Analysis (EPA)
- Ubuntu Documentation
- Citrix Receiver 13.1 on Ubuntu 14.04
- 1. (64-bit only) Alternative install procedure that can be added to a deployment bash script
- 2. (64-bit only) Enable i386 Multiarch
- 3. Download the Citrix Receiver for Linux .deb package
- 4. Install the downloaded package(s) and dependencies
- 5. Add more SSL certificates
- 6. Configure Citrix Receiver
- 7. (64-bit only) Fix Firefox plugin installation
- 8. Configure Firefox
- 9. Configure Chrome/Chromium
- Known Issues / Workarounds
- Как установить Citrix клиент на Ubuntu 14.04.1 Desktop
Citrix
![]() This article or section needs language, wiki syntax or style improvements. See Help:Style for reference.
This article or section needs language, wiki syntax or style improvements. See Help:Style for reference.![]()
Citrix Workspace App (previously known as Citrix Receiver and ICA Client) is the client component of XenDesktop (desktop virtualization software) and XenApp (application virtualization software), developed by Citrix Systems.
Contents
Installation
Install the icaclient AUR package. It includes the wfica.desktop file, so Arch knows how to open ica files.
Chromium/Google Chrome
If you have problems launching Citrix applications with Chromium, just go to chrome://extensions and disable «Citrix Receiver for Linux».
wfica.desktop
Create /usr/share/applications/wfica.desktop (Exec path may vary based on package installed):
Now xdg-open will handle .ica extensions using /opt/Citrix/ICAClient/wfica .
Note: if you are running Xfce and Chromium is opening the .ica files in the wrong application (e.g. a text editor), make sure you have xorg-xprop installed.
TLS/SSL Certificates
Because ICAClient uses SSL you may need a security certificate to connect to the server, check with the server administrator. If there is a certificate download and place it in /usr/lib/ICAClient/keystore/cacerts/ .
You may then receive the error You have not chosen to trust the issuer of the server’s security certificate. (SSL Error 61) .
There may be several reasons for this:
You do not have the root Certificate Authority (CA) certificates. These are already installed on most systems, they are part of the core package ca-certificates , but they are not where ICAClient looks for them. Copy the certificates from /etc/ssl/certs/ to /usr/lib/ICAClient/keystore/cacerts/ . For Citrix versions before 13.1, run the following command as root: Since versions 13.1, Citrix needs the certificates in separate files. You need to run the following commands as root: You may also need to download your CA’s intermediate certificates and store them in the same directory. Changes to your certificate directory will likely require rehashing links for openssl to find them properly. Skipping this step might result in Citrix still giving certificate errors. To do this, use this command (borrowed from [1])
 This article or section is out of date.
Instead of using c_rehash which no longer works the openssl rehash command can be used instead.
Audio Support
Citrix Receiver uses ALSA. If you use Pulse Audio, install pulseaudio-alsa .
To get audio input into Citrix Receiver, in
/.ICAClient/wfclient.ini , add AllowAudioInput=True anywhere in the [WFClient] section.
As of client 2012 — December 2020 Citrix has introduced additional audio redirection: https://docs.citrix.com/en-us/citrix-workspace-app-for-linux/configure-xenapp.html#audio . If your audio device is no longer detected within the Citrix Workspace App, you may need to disable this new functionality following the instructions provided.
Endpoint Analysis (EPA)
If your company has activated the optional endpoint analysis to check if your computer meets certain requirements, you will have to install another component, the EPA-Plugin. It seems like it was a browser plugin using the legacy NPAPI, but now it’s just an application the browser calls with a protocol handler for «nsgcepa://». Here is what you have to do to get it running:
- Step 1. Download the EPA plugin from your company’s Citrix gateway. Opening the URL of your company’s Citrix gateway will try to start the endoint check immediately, which (of course) fails, because you have not installed the EPA plugin, yet. Under the error message you will see a button for downloading nsepa.deb . Download it.
- Step 2. Transform the Debian package into an Arch package with debtap. You might need to install debtapAUR first. Call the package «nsepa» and use the suggested version. Install it like so:
Recent versions of the EPA are linked to libcurl-gnutls and you are done now. Unfortunately your company might use and old version that has the following problem:
As you can see, the nsgcepa executable (which is the main executable of nsepa) has been linked to a libcurl.so.4 that contains the «CURL_OPENSSL_3» symbol. I think this is a patched version from Ubuntu and I could not find an Arch package providing it, not even libcurl-compat . Unfortunately you have to find an appropriate lib for yourself. I found one in the Steam runtime under
- Troubleshooting-Step 1. Create a directory for patched library files and copy libcurl.so.4 into it. Also copy dependencies.
- Troubleshooting-Step 2. In order to use these libs instead of your system’s libs, we have to fiddle with the way nsgcepa is being called. There is a .desktop file provided in the nsepa package for that: /opt/Citrix/Browser-EPA/nsgcepa.desktop . Change the Exec line to:
- Troubleshooting-Step 3. The .desktop file had already been copied to where the system expects it to be: /usr/share/applications/ . Overwrite it with your new one.
Now go to you company’s Citrix URL again. The EPA should run. If it does not, you should check if the protocol handler for «nsgcepa://» works:
If it answers «gio: nsgcepa://something.com: The specified location is not supported» or «klauncher said: Unknown protocol ‘nsgcepa'» you need to add the protocol handler manually:
If the EPA still fails you should ask your company’s Citrix Netscaler admins if they have disabled Linux logins completely. It seems like there is no corresponding error message for that case, instead the error message is the same as if you do not have installed the EPA plugin at all.
Источник
Ubuntu Documentation
The Citrix ICA Client (Citrix Receiver) allows access to remote Windows sessions that run on a Citrix server.
These instructions are for current/recent Ubuntu/ICA versions. For historical reference, instructions for older Ubuntu/ICA versions are at CitrixICAClientHowToOlderVersions.
If you are considering deployment of the Receiver in your workplace (as opposed to installation on just your machine), have a look at the Citrix Receiver deployment how-to in the Ubuntu for the Enterprise wiki.
Citrix Receiver 13.1 on Ubuntu 14.04
1. (64-bit only) Alternative install procedure that can be added to a deployment bash script
2. (64-bit only) Enable i386 Multiarch
Even the Citrix Receiver for 64-bit systems has a lot of dependencies on packages from the i386 architecture. If you are using 64-bit Ubuntu and have not already configured i386 multiarch, you must configure it by running:
N.B. The download link currently directs you to receiver 13.2 rather than 13.1 and the 64-bit deb no longer has i386 architecture dependencies.
3. Download the Citrix Receiver for Linux .deb package
Go to https://www.citrix.com/downloads/citrix-receiver/legacy-receiver-for-linux/receiver-for-linux-13-2.html
4. Install the downloaded package(s) and dependencies
In case your Ubuntu Software Center didn’t install the Citrix receiver, so you had to download it, now install it as follows:
5. Add more SSL certificates
By default, Citrix Receiver only trusts a few root CA certificates, which causes connections to many Citrix servers to fail with an SSL error. The ‘ca-certificates’ package (already installed on most Ubuntu systems) provides additional CA certificates in /usr/share/ca-certificates/mozilla/ that can be conveniently added to Citrix Receiver to avoid these errors:
6. Configure Citrix Receiver
To map drives (to allow access to files on your local Ubuntu machine via a share drive in the remote Windows session), see the «File Access» tab.
7. (64-bit only) Fix Firefox plugin installation
Starting with Citrix Receiver 13.1, the 64-bit version of Citrix Receiver switched from a 32-bit plugin (using nspluginwrapper to allow it to run within a 64-bit browser) to a native 64-bit plugin. However, the install script still configures the plugin to run within nspluginwrapper, which doesn’t work with a 64-bit plugin. The above will reconfigure the plugin to run without nspluginwrapper.
8. Configure Firefox
In Firefox, go to Tools -> Add-ons -> Plugins, and make sure the «Citrix Receiver for Linux» plugin is set to «Always Activate».
Starting in Firefox 32, plugins are set to «Ask to Activate» by default, but for some reason the activation prompt is never displayed for the Citrix Receiver plugin, so the plugin will not work unless it is set to «Always Activate».
9. Configure Chrome/Chromium
To use Citrix Receiver in Chrome and/or Chromium, run:
Known Issues / Workarounds
If you are running KDE 4.10 or later: In System Settings, make sure GTK is set to a theme other than Oxygen. The Oxygen theme seems to cause the Citrix Receiver to constantly crash when trying to launch fullscreen applications (such as Terminal Servers or VDI).
Some people have experienced problems with Citrix Receiver 13.0 showing only random fragments of windows. It is not clear if this is a bug in the graphics library that Citrix has adopted with this version and/or its interaction with certain Citrix server configurations. If you experience this, you are likely to have better success with version 12.1, see CitrixICAClientHowToOlderVersions. The behavior of Citrix Receiver 13.1 for the affected people has not yet been determined.
Sometimes the Citrix client will not go full-screen with Unity. The Unity launcher and status bar will still be visible, and the Citrix mouse will be in a slightly different position than the client mouse. This can be fixed enabling legacy fullscreen in compizconfig-settings-manager. It is in ‘advanced search’ then ‘Plugin: workarounds’, then second on the list.
/.ICAClient/All_Regions.ini and setting DesiredHRES=1366 and DesiredVRES=768 for example.
You can solve keyboard layout problems looking for your keyboard layout in http://support.citrix.com/proddocs/topic/receivers-java-101/java-parameters-keyboard-layouts.html and updating KeyboardLayout value in
There is a bug in Citrix Receiver 13.1.0.285639, that the receiver can not be started from unity. The problem is a missing hash in a parameter, as a workaround it can be fixed by executing the follwing command. The problem and and solution are also described here: http://discussions.citrix.com/topic/358076-deb-package-uses-icaroot-instead-of-icaroot-spelling-error/#entry1844542
CitrixICAClientHowTo (последним исправлял пользователь jajodo3 2015-11-22 02:31:25)
The material on this wiki is available under a free license, see Copyright / License for details
You can contribute to this wiki, see Wiki Guide for details
Источник
Как установить Citrix клиент на Ubuntu 14.04.1 Desktop

Понадобилось мне уметь использовать в своей работе опубликованные приложения на системе нового образца, а именно релиза Ubuntu 14.04.1 Desktop amd64 , поэтому данная заметка будет своего рода напоминалка шагов, которые нужно сделать, чтобы использовать опубликованные приложения от Citrix. В работу данных шагов включена практическая часть , как установить клиент Citrix Receiver 13 для последующего использования приложений Windows. В роли таких приложений у меня на работе выступает возможность подключения клиентом 1С , как версии 7 так и 8 к определенным базам. Также в ходе практической демонстрации как происходит подключение, я покажу пути решения проблем, с которыми я столкнулся.
Итак, сперва запрещу системе обновлять на более новые релизы :
$ sudo nano /etc/update-manager/release-upgrades
Обновляю систему до актуального состояния:
$ sudo apt-get update && sudo apt-get upgrade -y
Создам каталог, где буду располагаться скачанные deb файлы клиента Citrix:
Далее посредством браузера по ссылке (http://www.citrix.ru/downloads/citrix-receiver/linux/receiver-for-linux-131.html) скачиваю deb пакеты применительно к своей архитектуре amd64 в созданный каталог ica.
Далее перехожу к установке клиента:
$ sudo dpkg -i ica/icaclient_13.1.0.285639_amd64.deb
В процессе установки обнаружатся недостающие компоненты, для их установки следует запустить нижеследующую команду:
$ sudo apt-get –f install –y
Повторяю установку клиентской части Citrix и она завершается успешно, ошибок не было выявлено в процессе:
$ sudo dpkg -i ica/icaclient_13.1.0.285639_amd64.deb
Устанавливаю поддержку USB:
$ sudo dpkg -i ica/ctxusb_2.4.285639_amd64.deb
Selecting previously unselected package ctxusb.
(Reading database … 167659 files and directories currently installed.)
Preparing to unpack …/ctxusb_2.4.285639_amd64.deb …
Unpacking ctxusb (2.4.285639) …
Setting up ctxusb (2.4.285639) …
* Starting Citrix USB daemon [fail] – А почему статус ошибочный
Processing triggers for ureadahead (0.100.0-16) …
Начинаю смотреть логи, почему так происходит натыкаюсь на то что в системе не найден некоторый модул ь :
$ sudo tail -f /var/log/syslog | grep ctxusbd
Dec 11 15:16:41 srv-serv ctxusbd[8380]: libcap: libcap.so.1: cannot open shared object file: No such file or directory
Dec 11 15:20:39 srv-serv ctxusbd[8501]: libcap: libcap.so.1: cannot open shared object file: No such file or directory
Пока поправить, эту ошибку не знаю. Двигаюсь дальше, запускаю собственно сам клиент, действия как его вызвать смотрите ниже:
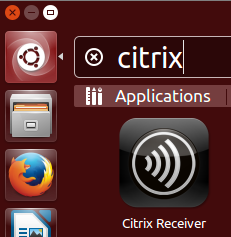
Т.к. дефолтный графический интерфейс Ubuntu 14.04.1 Desktop – это Unity, то чтобы вызвать приложение , нужно посредством системного меню, где имеют место установленные приложения вызвать Dash, которое находится в самом верхнем значке панели Unity и после в строке поиска набрать – «Citrix». По мере ввода будут отображаться приложения, имеющие полное соответствие с набранным.
Приложение у меня не запустилось и в логах, нет ни каких сообщений об этом. Даже по окончании этой заметки данное приложение у меня с использованием GUI интерфейса не запустилось, только консольное подключение работало и проблем не знало. Видимо это из-за стола с графическим интерфейсом Unity.
Заходим на Web— интерфейс сервера, где развернут Citrix:
Если не получиться вдруг зайти, то можно как вариант прописать соответствие имени хоста и IP адреса в файл /etc/hosts:
$ sudo nano /etc/hosts
Сохраняем внесенные изменения.
Далее открываем браузер и вводим в строку адреса следующий URL:
http://ekt-ts10.dsplit.local/Citrix/AccessPlatform — авторизуюсь
User name: alektest
И нажимаю Log In

Меня перекинет на страницу, где будут отображены все опубликованные и доступные данному пользователю приложения и скачиваем уже существующее приложение “S2013”
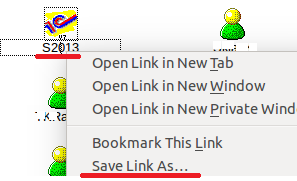
, выделив его и сохранив (Save Target As) куда-либо удобнее, по умолчанию скачиваемое приложение именуется , как launch.ica
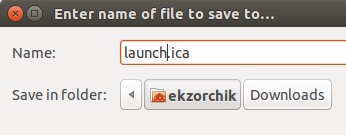
, а после сохранившийся файл переименовываем, как 1c.ica, хотя можно было здесь это и сразу в процессе скачивания.
$ mv launch.ica 1c.ica
Запускаю клиент Citrix из консоли с указанием на скачанное приложение :
в консоли вижу ошибки:
(wfica:2575): Gtk-WARNING **: Unable to locate theme engine in module_path: «murrine»,
$ sudo apt-get install gtk2-engines-murrine:i386 –y)
Пробую запустить скачанное приложение еще раз.
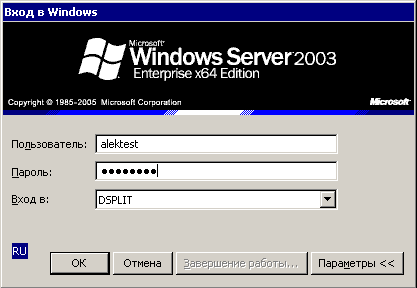
И окно аутентификации на сервере
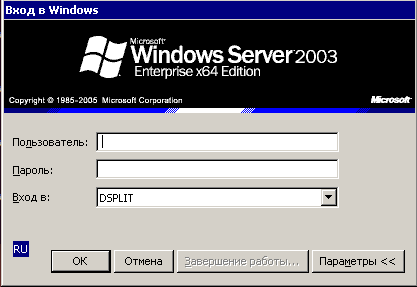
, но обнаружил – не работает клавиатура, а через некоторое время вообще приложение зависло, мышкой не могу нажать на ОК, ОТМЕНА, Параметры.
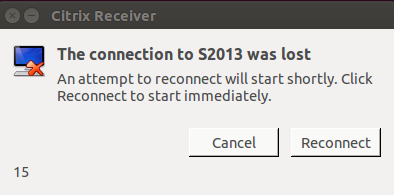
И после соединение было сброшено
Заметил еще одно но, после запуска, файл 1c.ica удаляется, поэтому запрещю его удаление:
$ sudo chown ekzorchik:ekzorchik 1c.ica
$ sudo chattr +i 1c.ica
$ sudo apt-get install gtk2-engines
и клавиатура работает
Запускаю снова и опубликованное приложение запускается:
ввожу аутентификационные данные на подключение
Нажимаю ОК и попадаю в следующее окно уже авторизации в программе 1С базы опубликованного приложения:
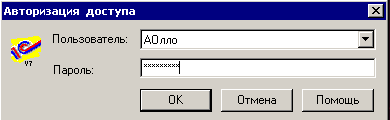
И нажимаю «ОК» и передо мной разворачивается приложение 1С подключенное к определенной базе
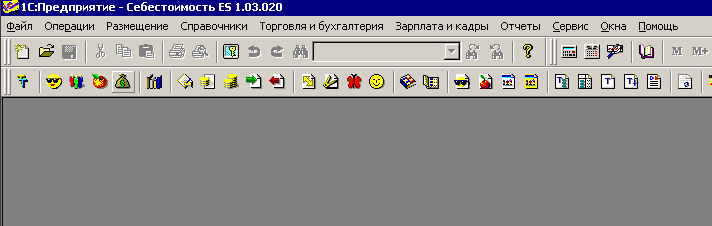
Завершаю работу с программой
Файл – Выход — Да
и возвращаюсь в консоль, проверяю не удалился ли файл 1c.ica, нет не удалился.
Подправляю конфиг 1c.ica чтобы миновать окно аутентификации на сервере:
chattr: Operation not permitted while setting flags on 1c.ica
$ sudo chattr -i 1c.ica
Ниже пример моего конфигурционного файла на прозрачное подключение к опубликованному приложению . Пояснять в этой заметке значение каждого параметра не имеет смысла, есть документация.
Источник


